ON THIS PAGE:
Overview
Cases are raised (manually in Explorer, or automatically when Sentinel events occur) in the monitoring of entities (or assets, as they are called in Sentinel).
This article shows how to locate and view these cases, and also how to open the case editors (Case Details in the Case Tab, and the Explore panel for a case).
About Case Management
Case Management is all about activities and changing statuses surrounding events for cases that have been manually raised in Explorer, and those raised in source applications such as P2 Sentinel. Sentinel has configuration options for raising cases for certain events, under specific conditions.
The Sentinel-raised cases in Explorer can be viewed from Sentinel: Case Id, Title, Category, Entity (shown as Asset), Raised Date, State, Raised By and Assigned To can all be viewed from Sentinel, in the Asset reports.
Updates to Sentinel-raised cases update the event status for originating events in Sentinel. When a Sentinel-raised case is confirmed or rejected in Explorer, the related event in Sentinel has an automatic status update to Valid (for confirmed cases) or Invalid (for rejected cases). Read more about Sentinel-raised cases in the P2 Sentinel User's Guide.
Cases can be given a Due Date. The ideal is to try and resolve a case by its due date, and then either confirm or reject it, before closing it.
Case Categories
Case categories are used to group and filter cases. The categories are stored in the Server database, and can be updated or added to by a System Administrator. Instructions can be found in the P2 Explorer Installation Guide.
Case Status
The status for a new case is always New.
Case statuses can be changed in any order. The following statuses can be applied: New, Investigating, Confirmed, Rejected, Closed, Deprecated.
In Sentinel, there is an optional setting to automatically close cases after relating deferred actions in Sentinel complete. Read more about deferred actions in the P2 Sentinel User's Guide.
Deprecated Cases
Sentinel-raised cases are automatically deprecated when the responsible Sentinel monitor is re-run for the period that the case was raised.
In Explorer, cases can also be manually updated to the Deprecated status.
Managing Prioritisation of Cases
Every case in Explorer has a priority (1 to 10). The default for all new cases is priority 10 (the lowest priority). Cases can be re-prioritised manually, and they can also be automatically re-prioritised daily, according to a set of configurable rules.
Auto-prioritised cases can also be configured to have the priority coloured: for example, red, green, grey, black, etc. Note that each priority doesn't always have the same colour. For example, there may be a priority 3 in red, and another one in orange, while there might also be a priority 4 in red. Priorities and colours are defined for Category, Urgency, and Impact, in the customised ‘AutoCaseCalculations’ spreadsheet.
The ‘AutoCaseCalculations’ spreadsheet is maintained on P2 Explorer’s server. P2 Explorer’s Server service uses this spreadsheet in its daily configured run, to update priorities and colours of all cases in Explorer that have a category matched by a tab sheet. The P2 Explorer Installation Guide has instructions for creating and maintaining the spreadsheet, so that it will auto-prioritise cases based on a matrix of rules defined for each category.
Case URLs
The URL command for opening a case in P2 Explorer is:
https://[server name]/P2.Explorer/cases/[CaseId] where [server name] is the name of the Explorer Server and [CaseId] is the case’s ID.
This opens the case in a Case tab in a new Explorer browser. For example:

The Case Management Tab in Explorer
To view and manage a list of existing cases, open the Case Management tab in Explorer.
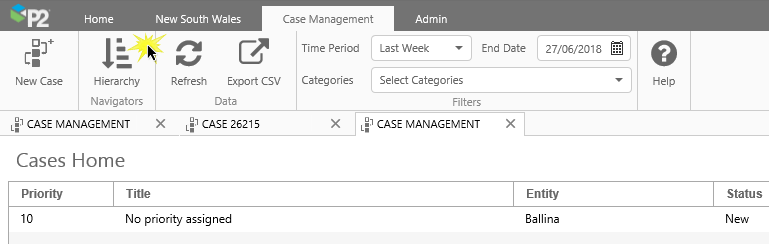
Opening the Case Management Tab
Click the Case Management button on the Home ribbon tab, to open the Case Management tab in a new Explorer page. You can open several of these tabs if required.

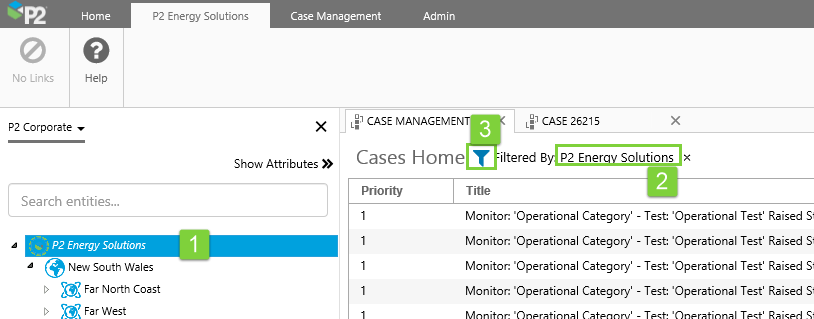
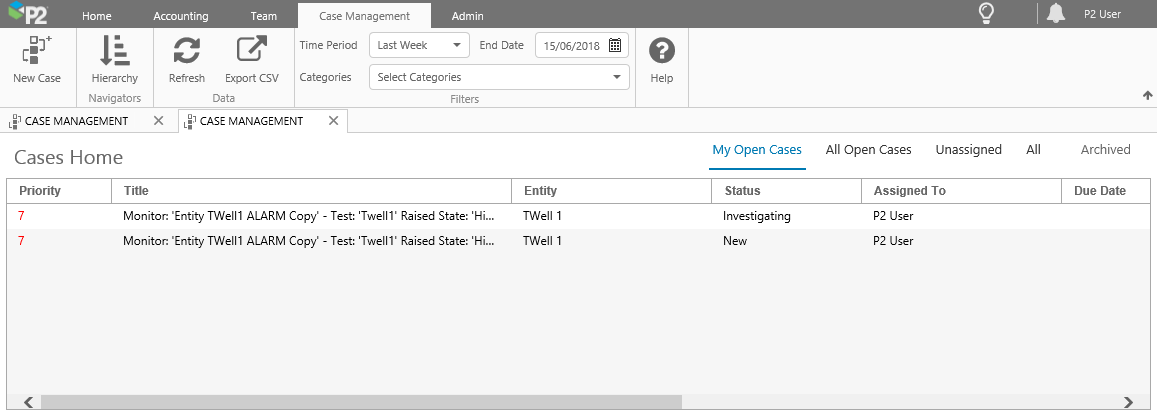 |
| A Case Management tab |
The Case Management tab provides a list of existing cases, which you can filter through, using the Filters on the ribbon or by selecting an entity from the Hierarchy navigator.
From this tab, you can open a new case by clicking the New Case button on the ribbon. This opens a New Case tab.
Features of the Case Management Tab
The Case Management tab opens in a new Explorer display.
Using the filters on the ribbon, or selecting an entity from the Hierarchy Navigator, you can limit the cases shown on the case table in the display.
You can view different groups of cases, using the tabs on the top right of the display.
Case Management Ribbon
The Case Management tab opens when Case Management is the currently selected tab in the display area.
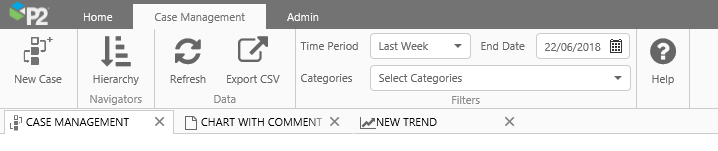
Click on the buttons on this tab to:
 |
New Case | Open a tab for a New Case. |
 |
Hierarchy | Open the Hierarchy Navigator, to filter on an entity and its descendants in the hierarchy. |
 |
Refresh | Refresh the list of cases for the current filter selection. |
 |
Export CSV | Export the filtered list of cases, for the selected case tab, to a CSV file. |
 |
Filters | Set filters to limit the set of cases displayed in this tab. |
 |
Help | Open the Case Management landing page on the P2 Explorer Help Center. |
Case Table
The case table shows all the cases for the filtered selection, and for the tab selection. These are ordered by highest to lowest priority (1 to 10), and within that, they are ordered with the most recently raised cases shown first.
You can open a case in the Explore panel, by clicking on a table row.
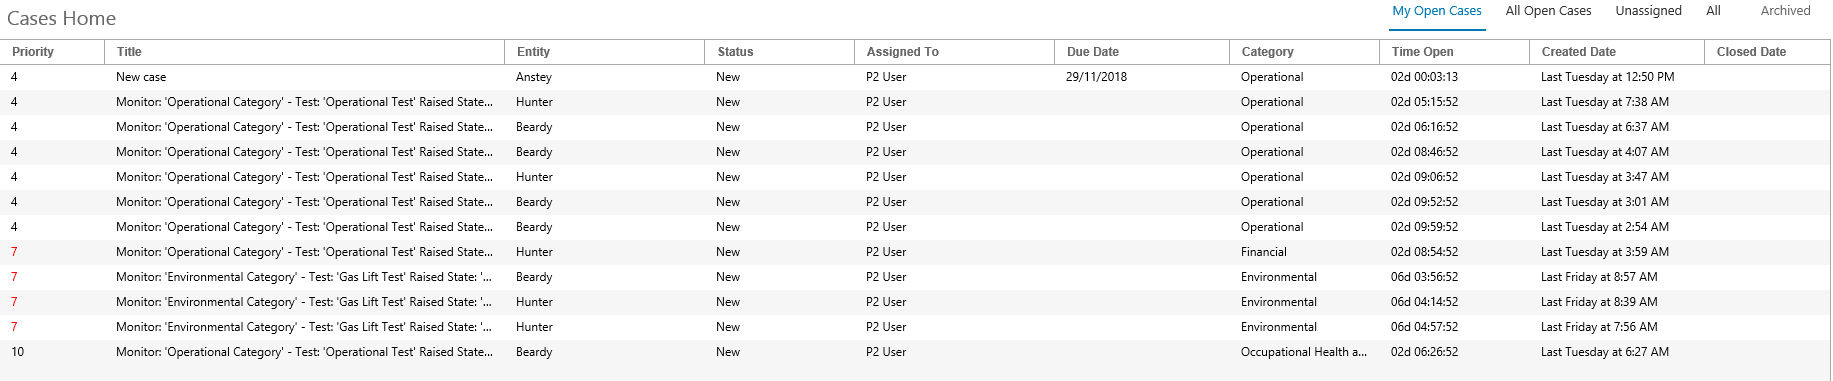
Case Table Tabs
The filtered selection of cases in the case table is separated into different groups, based on Status and the Assigned To user.

| My Open Cases | All open cases (where Status is New, Investigating, or Confirmed) that are assigned to the current logged-on user, for the filtered selection of cases |
| All Open Cases | All open cases (New, Investigating, or Confirmed) for the filtered selection of cases |
| Unassigned | All unassigned cases for the filtered selection of cases (where there is no selection in the Assigned To field) |
| All | All cases for the selections |
| Archived | All deprecated cases (where the Status is Deprecated) for the filtered selection of cases |
Case Table Columns
All cases, for the filters and the selected tab group, are listed in the table.
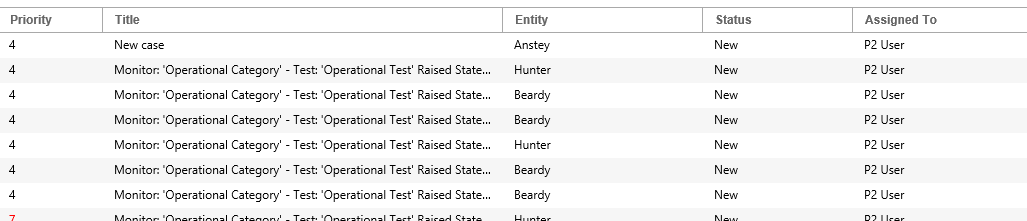
| Priority | The default priority for a new case is 10. |
| Title | The case title should describe what the case is about. Sentinel-raised cases have titles configured in Sentinel, that can contain Sentinel tokens, such as the event time, the monitor name, and so on. |
| Entity | The entity is the subject of a case. Every case is linked to an Explorer entity. |
| Status | The status should be updated as the case progresses. For example: 'New' -> 'Investigating' -> 'Closed'. |
| Assigned To | You can update the Assigned To user, from a list of users who have read privileges for that case's entity, to bring this case to their attention. While any user with privileges for a case can update it, it is ideally the Assigned To person who manages their own cases. Open Cases that are assigned to the currently logged-on user are the only cases that appear in the My Open Cases tab. |
| Due Date | Ideally, the case will be resolved by this date. |
| Category | The category is used for logically grouping cases, and can also be used to filter the table contents (for example, you can choose to just view 'Environmental' cases.) |
| Time Open | The elapsed time from when the case was created until it was Closed, Rejected or Deprecated. For open cases, it is the elapsed time from when it was raised until current time. |
| Created Date | The date and time the case was manually created, or raised by Sentinel. |
| Closed Date | The date and time the case was closed. |
| Case Id | A unique, system-generated number identifying the case. |
Filtering Cases by Time and Category
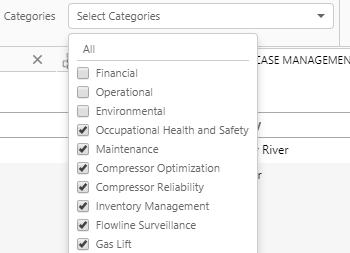
Filter by Category
Use the categories to filter the case list, for those belonging to the selected categories.
Every case belongs to a category, therefore you need to select at least one category to show cases in the table.
1. Click Select Categories to open the list of available categories. For example:
- Environmental
- Financial
- Operational
2. Select the check box for one or more categories.
The data refreshes automatically, to only show cases belonging to the selected categories.
To select all categories, click All at the top of the drop-down list. Click All again to de-select all categories.
Note: The selected categories are saved for the next time you log in from the same machine and browser.
Filter by Period
Cases displayed in the Case Table are filtered by their Created Date. To change the period, you can select a different Time Period and you can select a different End Date.
To select a time period:
Click the Time Period box, then select a time period from the drop-down list.
- All
- Last Day
- Last Week
- Last Month
- Last 3 Months
- Last 6 Months
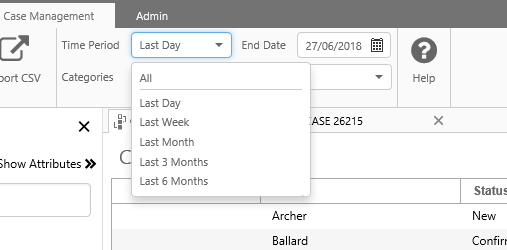
To change the End Date, select a date and time from the Date/Time Picker.
Note that the end date is ignored if Time Period All is selected.
Filtering Cases by Entity
Click on the Hierarchy button in the ribbon, then use the Hierarchy Navigator to filter the case list, to only show cases that feature the selected entity or one of its descendants.
Select an entity to filter on, by choosing a hierarchy and an entity starting point. All entities from the starting point form part of the filter selection. If you select an entity at the lowest level node, cases are filtered for this entity only.
 |
||||||||||||
|
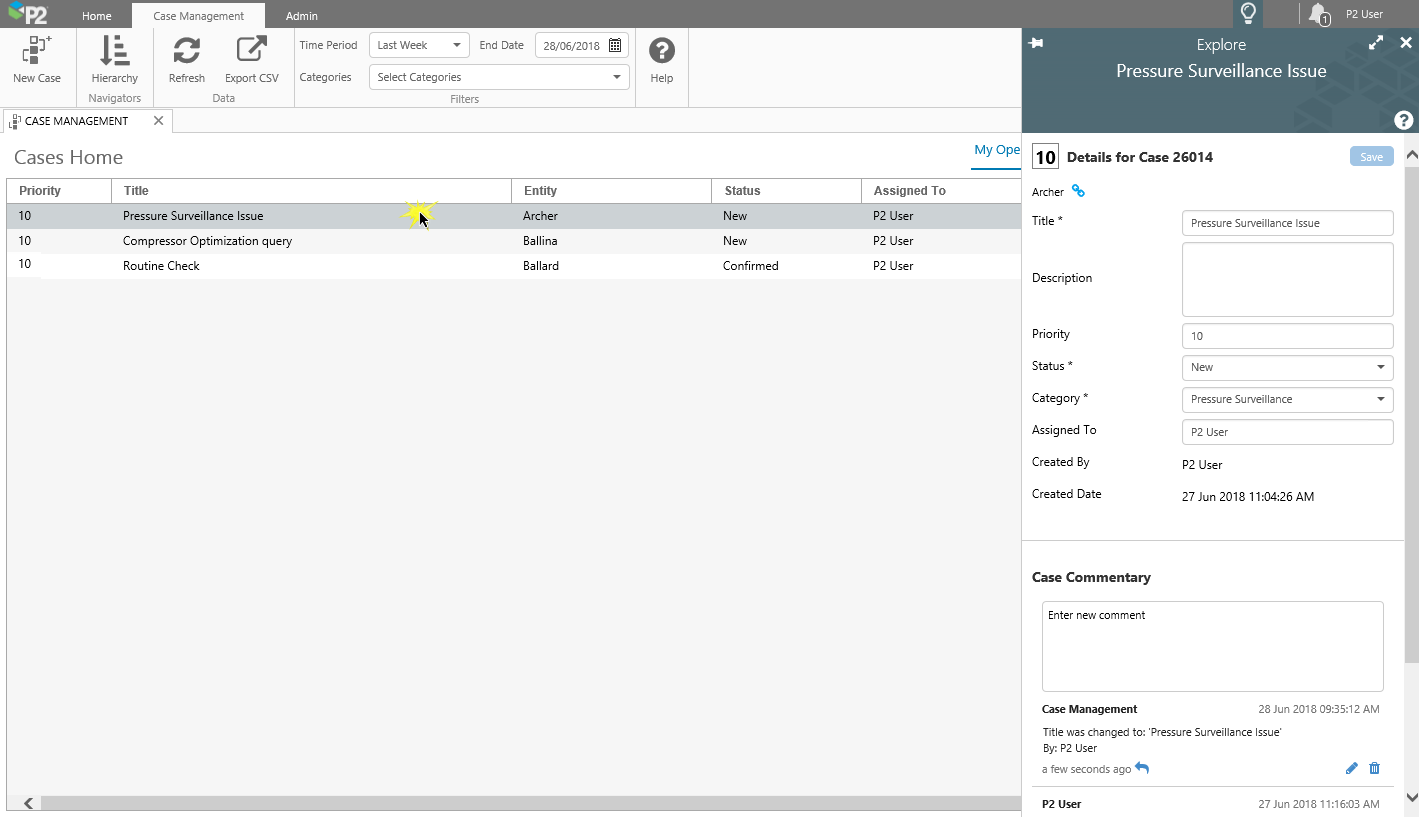
Case Details in Explore Panel
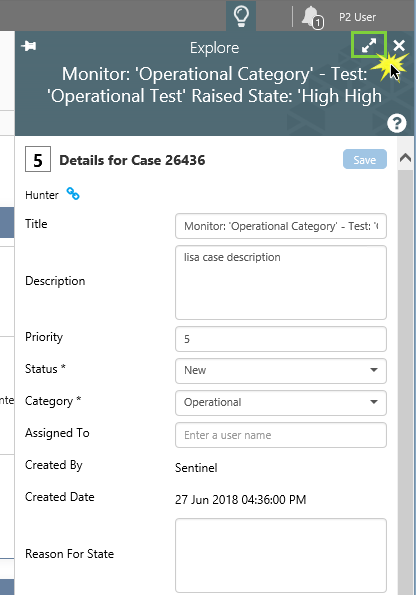
When you click on a row in the table, the Explore panel appears, displaying that case's details. As you scroll through the list of cases in the table, using the up and down arrow keys, the case details in the Explore panel refresh to show the currently selected case in the table.
Note: When you open a Case Notification, this also opens the case details in the Explore panel.
In the Explore panel, you can view and update details for individual cases, and you can also open a case's details in a new Explorer tab.
Opening Case Details from the Case Management Tab
You can open a case in the Explore panel by clicking a row in the case table, or by opening a case notification.
From the Explore panel, click the Expand icon ![]() to open the case in a new Explorer case details tab.
to open the case in a new Explorer case details tab.