ON THIS PAGE:
Overview
Tags and attributes values can be added to trends or viewed on pages, with or without calculations, to help you diagnose problems and visualise value changes over time.
Data (entities, and their attributes) that has been organised into a hierarchy in P2 Server can be located using the Hierarchy Navigator. A flat list of tags can be located using the Tag Navigator.
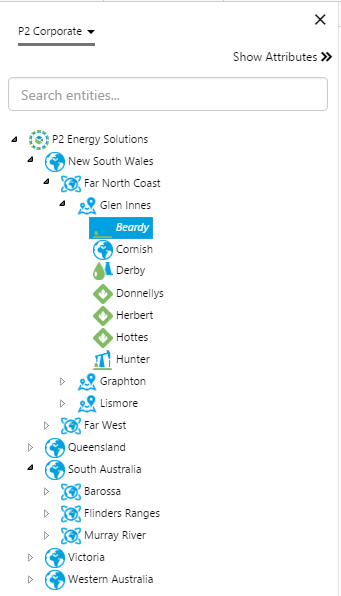
A hierarchy in P2 Explorer
This article describes how to search for tags using the Tags Navigator, and how to search for entities (and their attributes) from a selected hierarchy using the Hierarchy Navigator. The article also describes how you can use tags and attribute values on your pages and trends.
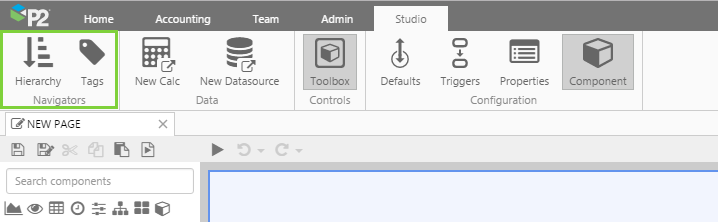
You can open the Hierarchy Navigator or the Tags Navigator from the Navigators group which is available on the Home, Page, Studio, Trend and Details Explorer Ribbon tabs.

The Page ribbon tab opens when you open an Explorer Page in Display Mode
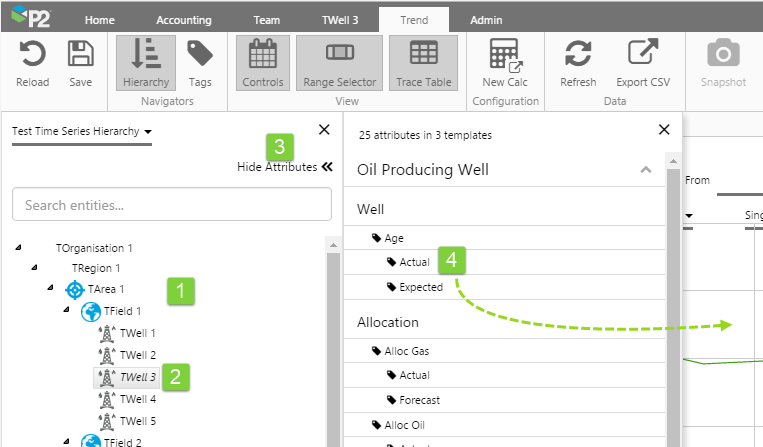
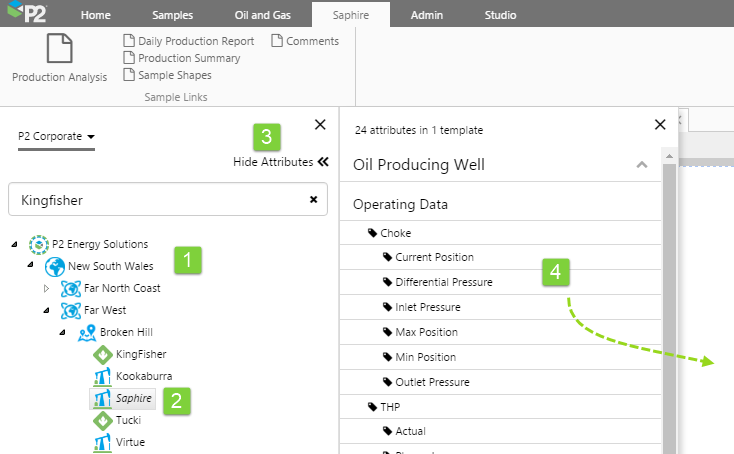
Click Hierarchy on one of the Explorer Ribbon tabs to open the Hierarchy Navigator.
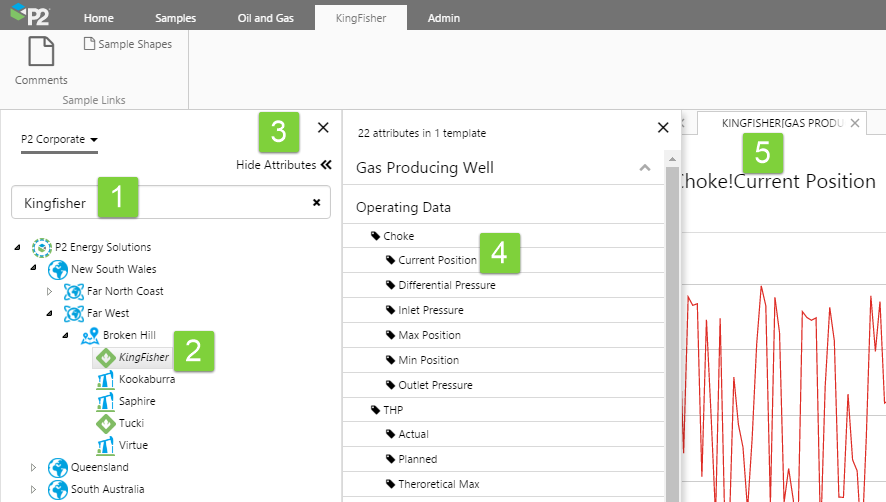
 |
1. Hierarchy button: 2. Hierarchy selector: 3. Hierarchy Search box: 4. Entities: 5. Attributes Panel: 6. Close: |
Attribute Panel and Table of Contents
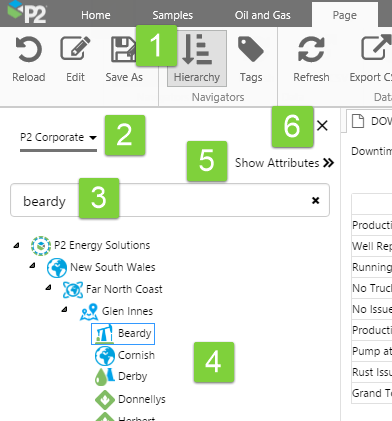
In the Hierarchy Navigator, click an entity to select it, then click Show Attributes to open the Attributes Panel and Table of Contents ribbon tab for the selected entity. (The button text changes to Hide Attributes.)
|
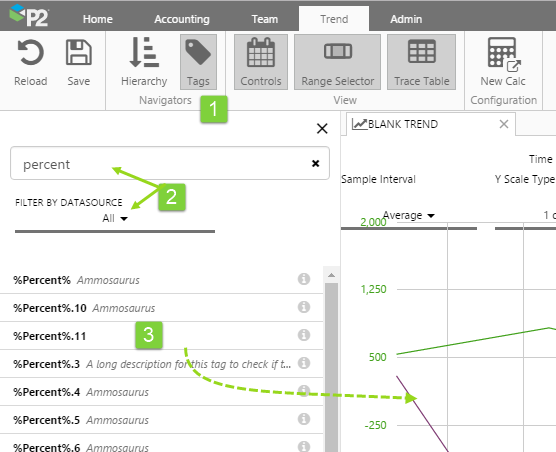
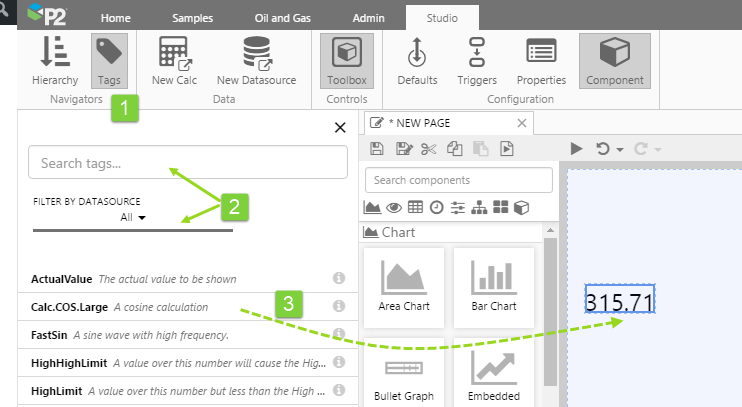
Click Tags on one of the Explorer ribbon tabs to open the Tags Navigator.
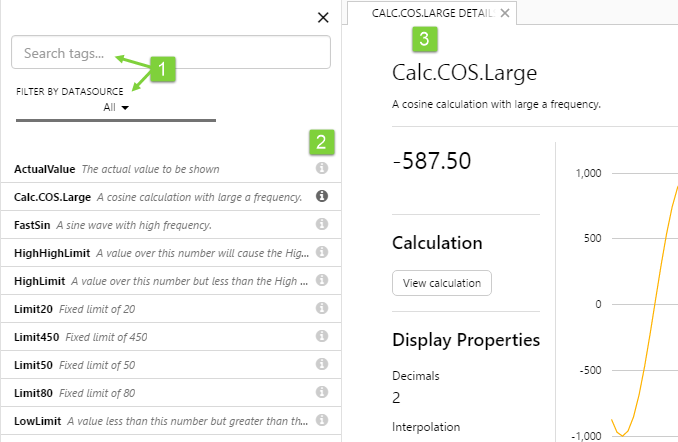
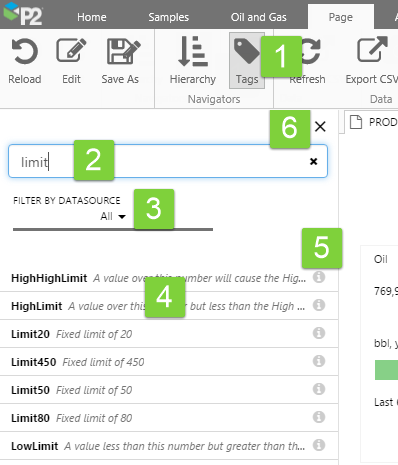 |
1. Tag button: 2. Search Tags box: 3. Filter by Datasource: 4. Tag list: 5. Details icon: 6. Close: |
Functionality
There are several functions you can perform from the Tag and Hierarchy Navigators, and also the Attribute Panel.
- Open point details for a tag or attribute value
- Open an entity's Table of Contents tab
- Open an entity's primary link
- Drag and drop a tag or attribute value onto a trend
- Select an entity for a templated calculation on a trend
- Drag and drop a tag or attribute value onto an embedded trend
The following functionality applies to Design Mode only:
- Drag and drop a tag or attribute value onto a Studio page
- Drag and drop a tag or attribute value onto a Studio component
Open Point Detail
You can open the Point Details page for an Attribute Value (the Attribute Value Details page), or for a Tag (the Tag Details page).
Attribute Details
To open an attribute's Point Detail page:
1. Locate an Entity: Search or navigate through a hierarchy to find your entity.
2. Select Entity: Click the entity.
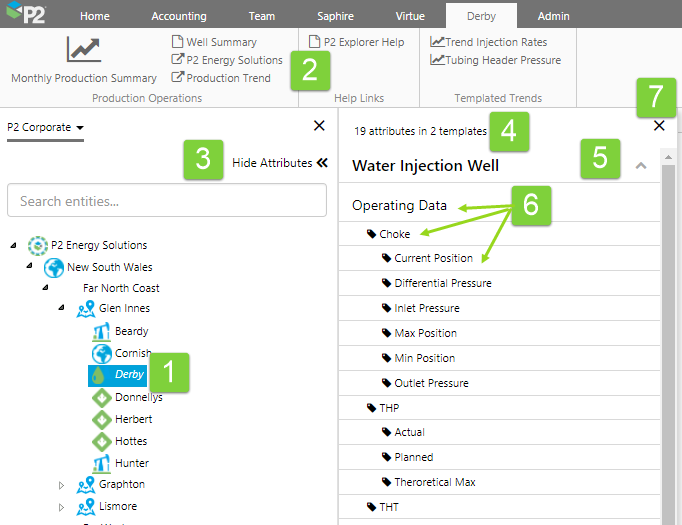
3. Open Attributes Panel: Click Show Attributes to open the Attributes Panel (the button text changes to Hide Attributes).
4. Ctrl and Click: On the Attributes Panel, locate an attribute or an attribute value, then press the Ctrl key and click.
5. Attribute Value Details Page Opens: The attribute value details page opens for the selected attribute value (or for the default attribute value if you just select the attribute).
Tag Details
To open a tag's details:
1. Search for a Tag: Search or scroll to find a tag.
2. Details icon: Locate a tag, then click the details ![]() icon.
icon.
3. Tag Details Page Opens: The tag details page opens for the selected tag.
Open Table of Contents
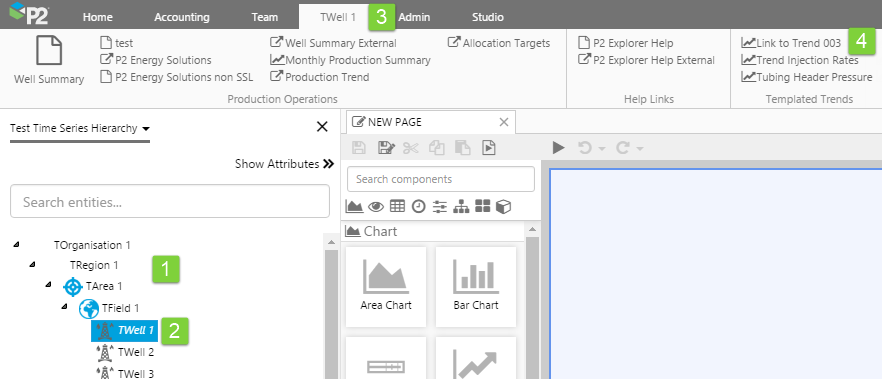
If an entity's templates have links assigned, these appear in its Table of Contents on the Explorer Ribbon.
To open the Table of Contents:
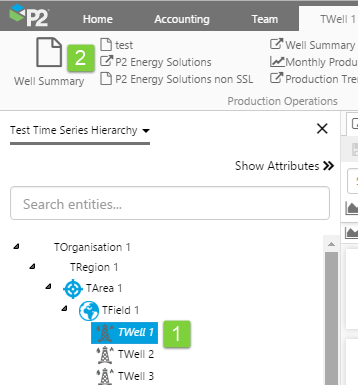
1. Navigate to an entity in the Hierarchy Panel.
2. Click the entity.
3. A new tab containing the Table of Contents opens on the Explorer ribbon. The tab name displays the name of the entity.
4. Click on any of the links on the Table of Contents. For example, you can click on a templated trend, which uses attribute values for the entity.
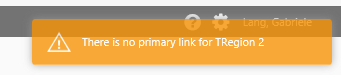
Open an Entity's Primary Link
If an entity has a primary link, there is a short-cut method for opening this.
1. Navigate to an entity in the Hierarchy Panel.
2. Press the Ctrl key and click.
3. The primary link opens.
Alternatively, you can open the primary link (or any other of the available links) from the Table of Contents.
1. Click the entity to open its Table of Contents ribbon tab.
2. Click the primary link on the Table of Contents; this is the large button on the left of the ribbon.
Drag and drop a Value on a Trend
You can drop a tag or an attribute value onto a trend.
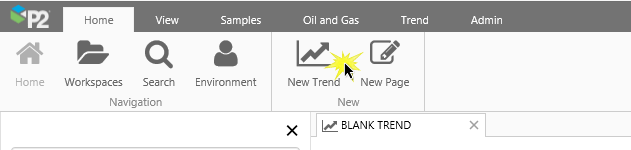
First open a trend, or create a new trend.
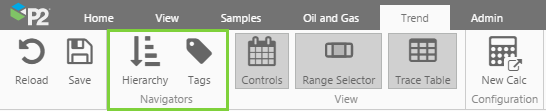
The Hierarchy and Tags Navigators are also located on the Trend ribbon tab.
Attribute Values
To drop an attribute value onto a trend, first click Hierarchy on the Trend ribbon tab.
1. Search or navigate through a hierarchy to find your entity.
2. Click the entity to select it. Note that the Table of Contents will also open in the ribbon.
3. Click Show Attributes to open the Attributes Panel (the button text changes to Hide Attributes).
4. On the Attributes Panel, locate an attribute or an attribute value, then drag and drop the attribute or attribute value onto the trend (or first select an open trend to drag to, as described here in Drag, Hover, and Drop).
The selected attribute value or the default attribute value of the selected attribute is added to the trend.
Tags
To drop a tag value onto a trend:
1. Click Tags on the Trend ribbon tab.
2. Search or scroll to find a tag.
3. Drag and drop the tag onto the trend.
The tag is added to the trend.
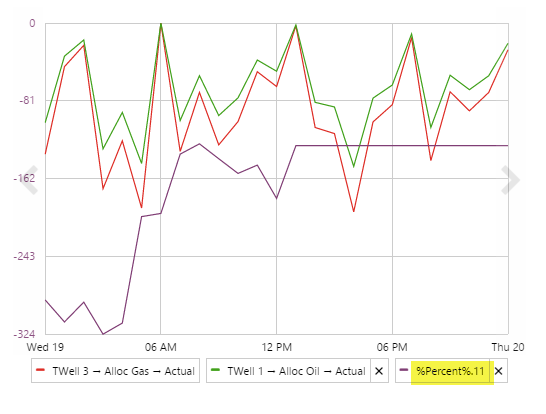
Tags and attributes are listed in the trace table, as shown below.

| 1. | Attribute: | This attribute was dragged onto the trend from the hierarchy entity's attribute list. It contains the Entity name (TWell 3), the Attribute (Age), and the Attribute Value (Actual). |
| 2. | Tag: | The actual tag name, taken from the Tag Search. You can type this name in if you prefer, surrounded by curly brackets {}. |
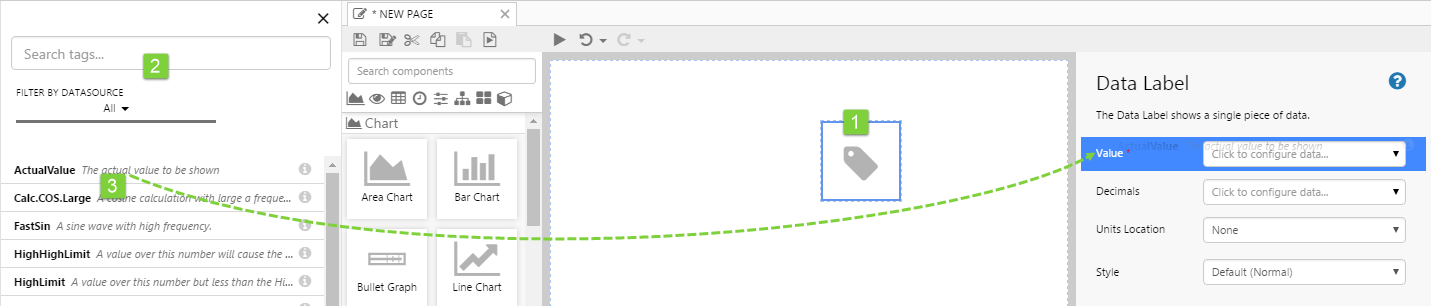
Drag and drop a Value onto a Page
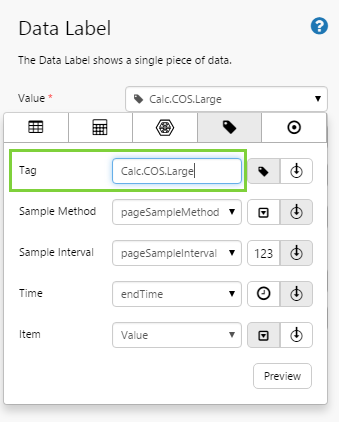
You can drop a tag or an attribute value onto a page in Design Mode. When you drag and drop a tag or attribute onto a page, it is added to the page as a Data Label.
For attributes, this can either be an attribute value of the selected entity or of the default entity, depending on how you add it.
- Press Ctrl when you click and drag an attribute value onto a page, to use the page default variable, selectedEntity.
- Click and drag an attribute value onto a page, to use the entity selected in the hierarchy panel.
First open a page in Design Mode, or create a new page.
The Hierarchy and Tags Navigators are also located on the Studio ribbon tab.
Attributes
To drop an attribute value onto a page: open the Hierarchy Navigator, navigate to an entity, and open the Attributes Panel. From the Attributes Panel, drag and drop an attribute or attribute value onto the page (or first select an open Studio page to drag to, as described here in Drag, Hover, and Drop).
1. Search or navigate through a hierarchy to find your entity.
2. Click the entity to select it. Note that the Table of Contents will also open in the ribbon.
3. Click Show Attributes to open the Attributes Panel (the button text changes to Hide Attributes).
4. On the Attributes Panel, click on an attribute or an attribute value, then drag and drop the attribute or attribute value onto the page.
The selected attribute value of the selected entity is added to the page as a Data Label.
OR: Press Ctrl during Drag and Drop, so that the selected attribute value of the Page Default selectedEntity is added to the page as a Data Label.
If you drag and drop an attribute value onto a page, that attribute value is used. If you drag and drop an attribute onto a page, the default attribute value is used.
More about Entities
Note: The first time you drag and drop an attribute onto a page, the page default value for SelectedEntity is assigned the value of that attribute's entity.
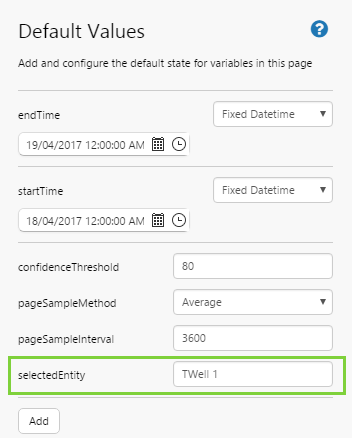
If you want to use the selectedEntity default when you drag another attribute or attribute value onto the page, press Ctrl while you drag and drop.
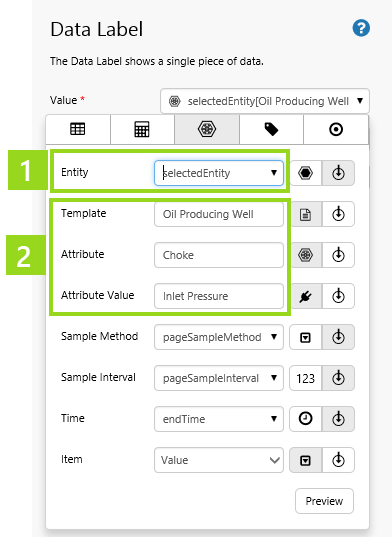
When you open the resulting Data Label, the data label properties depend on how the value was added.
|
Ctrl during drag and drop for an attribute value onto a page:
1. The entity is the page default variable, selectedEntity. 2. The template, attribute and attribute value that was dropped onto the page. |
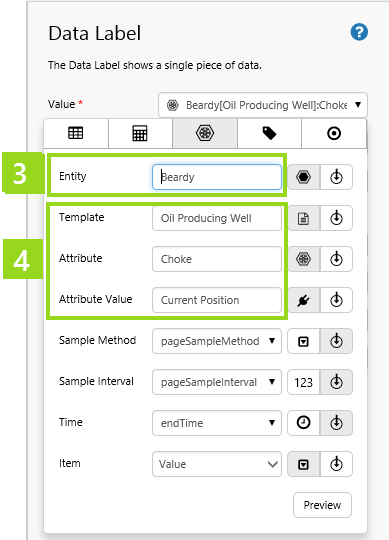
Drag and drop an attribute value onto a page:
3. The entity selected in the Hierarchy Panel is used here. 4. The template, attribute and attribute value that was dropped onto the page. |
Tags
1. Search or scroll to find a tag.
2. Drag and drop the tag onto the page (or first select an open Studio page to drag to, as described here in Drag, Hover, and Drop).
The tag is added to the page as a Data Label.
When you open the resulting Data Label, the tag selected in the Tag Panel is used as the Value.
Drag and drop a Value onto a Component
Some of the Studio components can have data dropped into their Data Selectors straight from the Hierarchy or Tag Navigators.
As with dropping a value onto a page, you can use Ctrl with drag and drop, so that the selected attribute value of the Page Default selectedEntity is added to the component's property.
This functionality is available for some of the Studio components only. For example:
- Level Meter
- Temperature Meter
- Data Table
For some of the components, you can drag multiple tags or attribute values into a property. For example, the Chart component's Chart Data property.
Drag an Attribute Value onto a Component's Property
First open a page in Studio, and click on a component to edit it.
1. On the page, click the component to open the component editor.
2. Locate an entity on the Hierarchy Navigator.
3. Drag and drop an attribute value into the applicable property (Data Selector) of the component. As you move over the fields in the component editor, the ones that you can drag and drop into are highlighted in blue.
Drag a Tag onto a Component's Property
1. On the page, click the component to open the component editor.
2. Locate a tag in the Tags Navigator.
3. Drag and drop the tag into the applicable property (Data Selector) of the component. As you move over the fields in the component editor, the ones that you can drag and drop into are highlighted in blue.
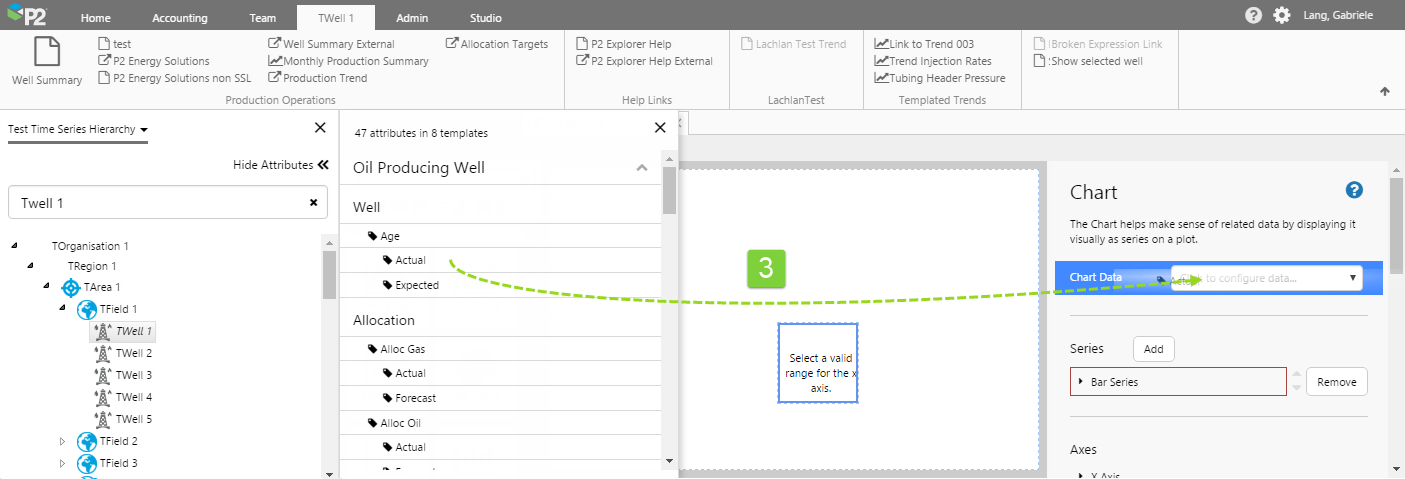
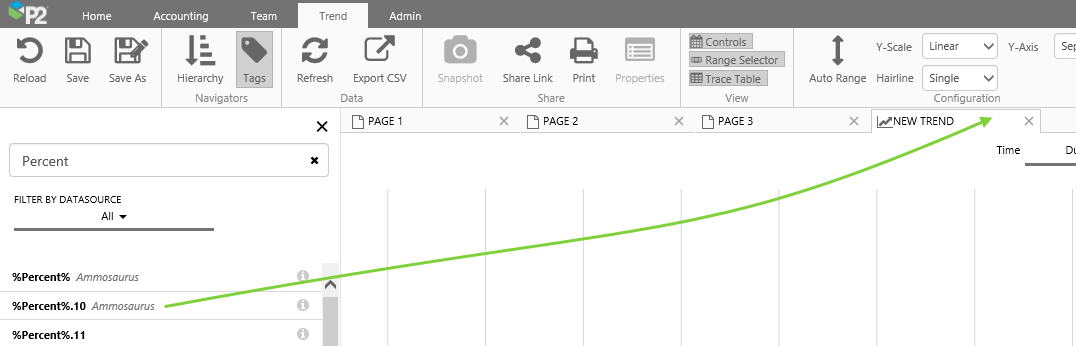
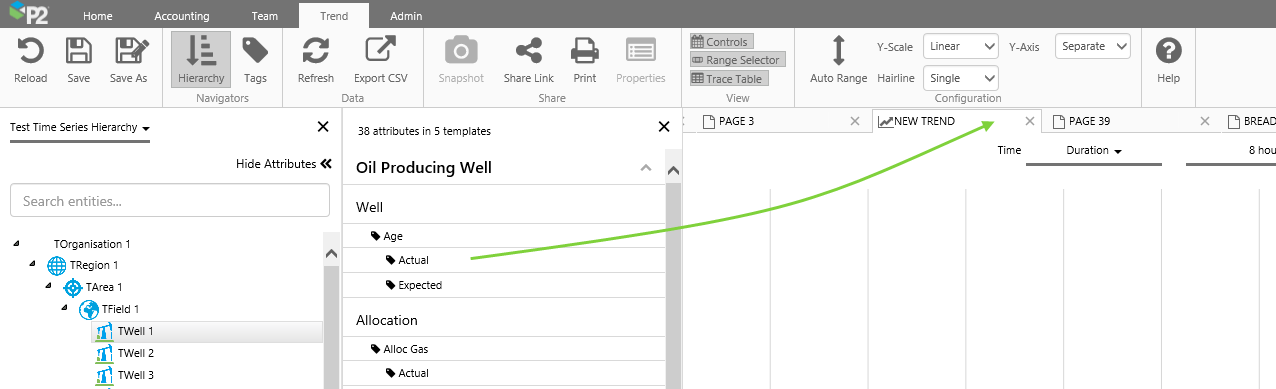
Select an Entity for a Templated Trend
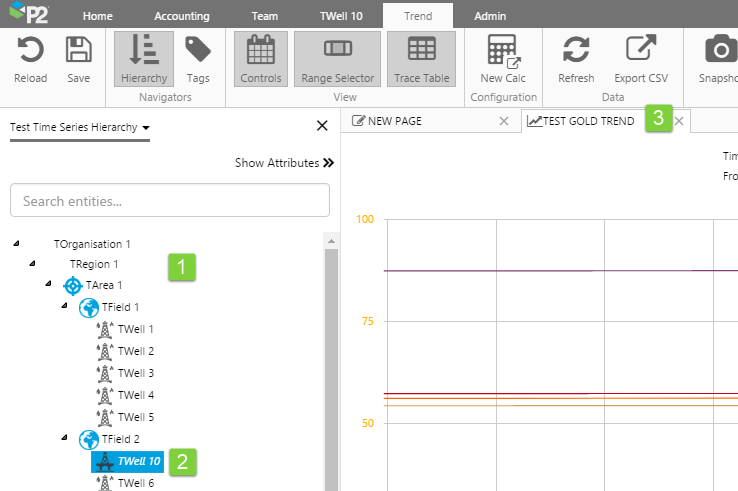
If a trend's trace uses a templated calculation, the entity portion of the calculation is controlled from the Hierarchy Navigator.
1. Search for an entity in the Hierarchy Navigator.
2. Click the entity. If the entity has the same template as that used by the templated calculation, then the trace templated calculation uses the entity.
3. Open a trend that uses the entity in a templated calculation. (In this example we've used a link on the Table of Contents for the entity.)
4. The trace appears for the templated calculation, using the selected entity.
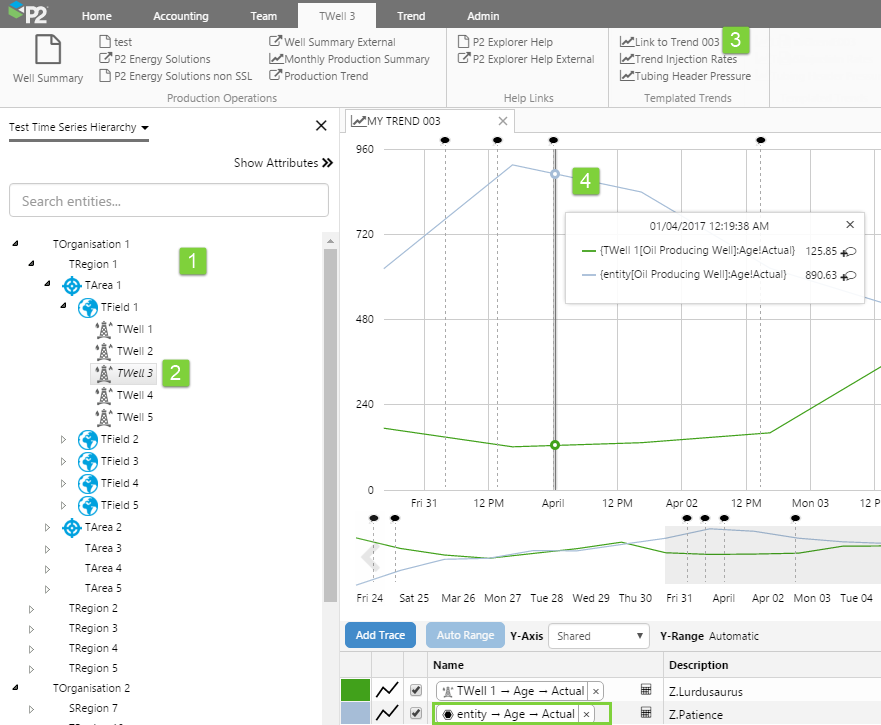
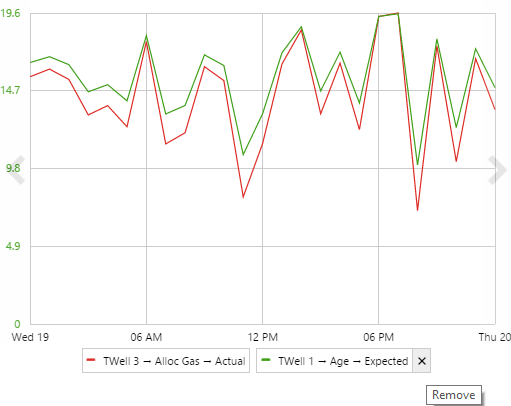
Example: A trend may include the following templated calculation in its trace table: {entity[Oil Producing Well]:Tubing Head Pressure!Actual} * 4. If the selected entity (for example, TWell 1) uses the Oil Producing Well template, then Server fetches values for TWell 1 attribute values: Tubing Head Pressure!Actual}. Each value is multiplied by 4, and then displayed in the trend.
Drag and drop a Value onto an Embedded Trend
If a page contains an Embedded Trend component, then you can drag and drop tags and attributes onto this in Display Mode.
1. Open a page in Display Mode.
2. Open the hierarchy navigator, and select an entity.
3. Open the Attributes Panel.
4. Drag and drop an attribute value onto the embedded trend (or first select an open page to drag to, as described here in Drag, Hover, and Drop).
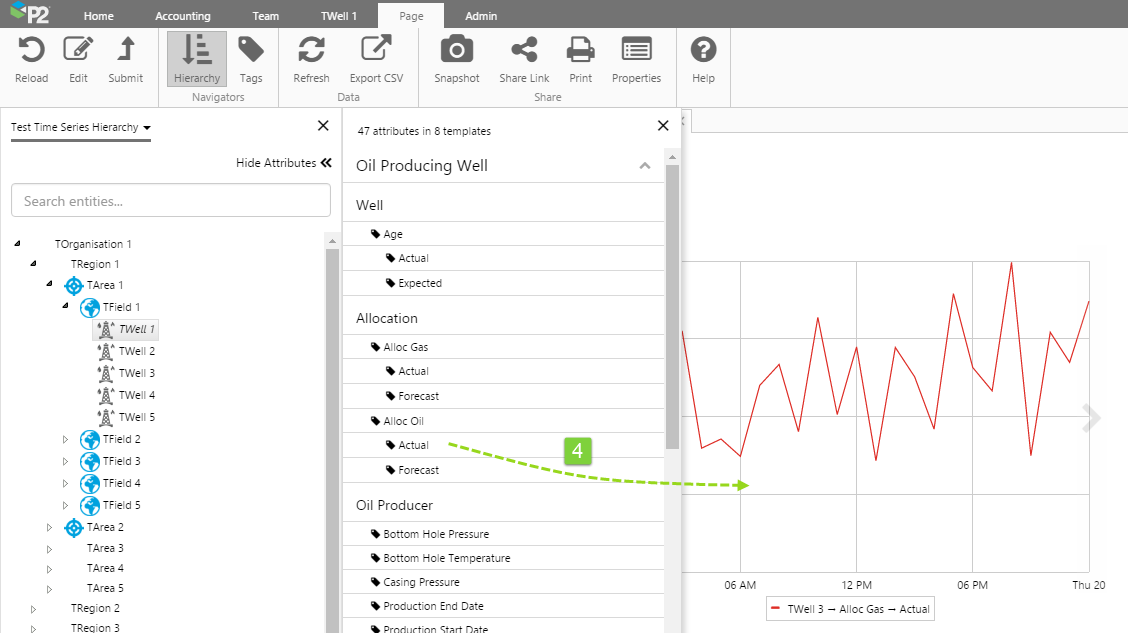
The new attribute value is displayed on the embedded trend.
5. Now open the Tags Navigator.
6. Click a tag to select it, then drag and drop it onto the embedded trend.
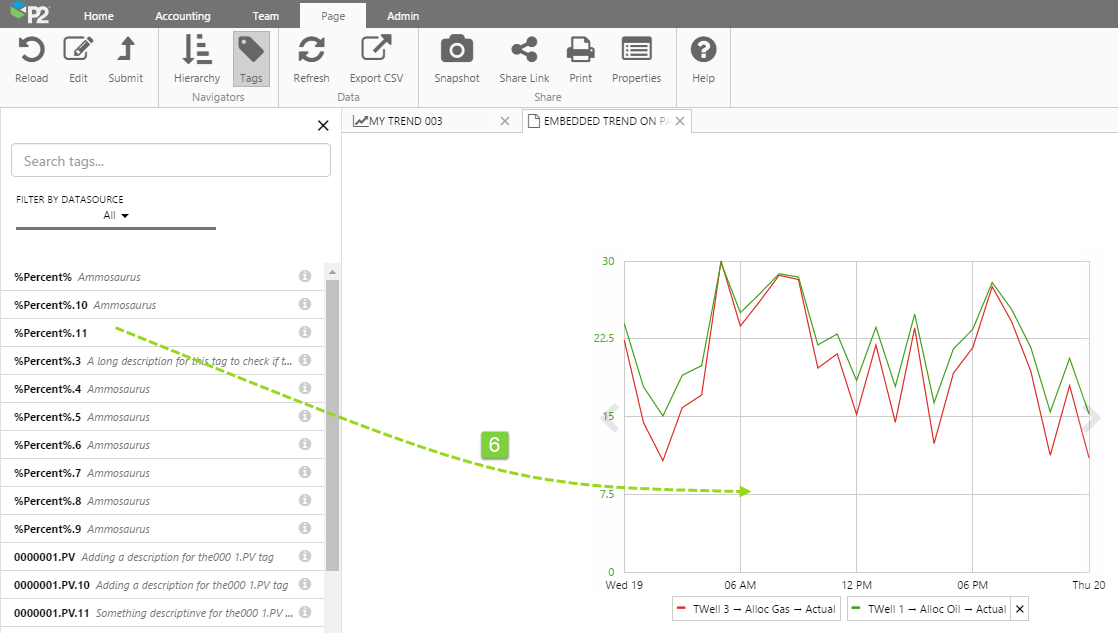
The new tag value is displayed on the trend.
Note that you can remove a trace from the embedded trend by clicking the little X from the item in the list below the embedded trend, as shown:
Drag, Hover, and Drop
From version 4.5.4 of Explorer, you can drag a tag or attribute to any open display (page or trend), by first hovering over the tab to give it focus.
For example, here we drag a tag to a trend's tab, to give the trend focus.
Dragging a tag over a Trend tab, to give the trend focus
And here we drag an attribute value to a trend's tab, to give the trend focus.
Dragging an attribute value over a Trend tab, to give the trend focus
Once the page or trend has focus, we can drop the value onto it (for example, onto an embedded trend on a page, or onto a trend, or onto a page in Studio).
Videos
Watch the following videos to see how tags and attribute values can be used.
Drag and drop a Value onto a Trend
This video shows how to drop attributes and tags onto a trend.
Drag and drop a Value onto a Page
This video shows how to drop attributes and tags onto a page.
Open Point Details
This video shows how open point details for a tag or attribute value. Press Ctrl and click on a tag or attribute value.
Open Pages and Trends from Table of Contents
This video shows how to open trend's and pages from the entity's Table of Contents ribbon tab.
Drag and drop a Value onto an Embedded Trend
This video shows how to drag and drop attributes and tags onto an embedded trend.
Release History
- Tag Search and Hierarchy Navigation 4.5.4 (this release)
- When dragging a data item onto a page or trend, you can choose from any of the open pages or trends, by first hovering over the tab to get focus
- You can now use wildcard filtering when searching for entities or tags
- The Attributes Panel opens with the Primary Template bold, and at the top
- Tag Search and Hierarchy Navigation 4.5
- Changes to how the Attributes Panel opens from the Hierarchy Navigator
- Tag Search and Hierarchy Navigation 4.4.6
- Updated the layout of the Tags Navigator
- Tag Search and Hierarchy Navigation 4.4.5
- Added ability to select entities on the Hierarchy Navigator, to provide context to templated trends
- Tag Search and Hierarchy Navigation 4.4
- Tag Search and Hierarchy Navigation 4.3.1