![]()
ON THIS PAGE:
P2 Shift Log version 4.0 is a major release that re-invents Shift Log into a true collaboration tool. Shift Log 4.0 heralds a new era of interconnectivity between P2 Explorer modules, with advanced knowledge sharing capabilities.
The latest version of Shift Log is now directly accessible from within P2 Explorer. Shift Log has received a face lift while still retaining a familiar interface, and configuration will now be much simpler.
New to this version of Shift Log is the ability to create multiple shift patterns, simplified configuration, and the ability to share entries with other P2 modules.
In this release, the version number has been changed to align with the version number of P2 Explorer. Additional field types have been added, along with the ability to add instructions to fields, further sharing of entries, and other usability enhancements.
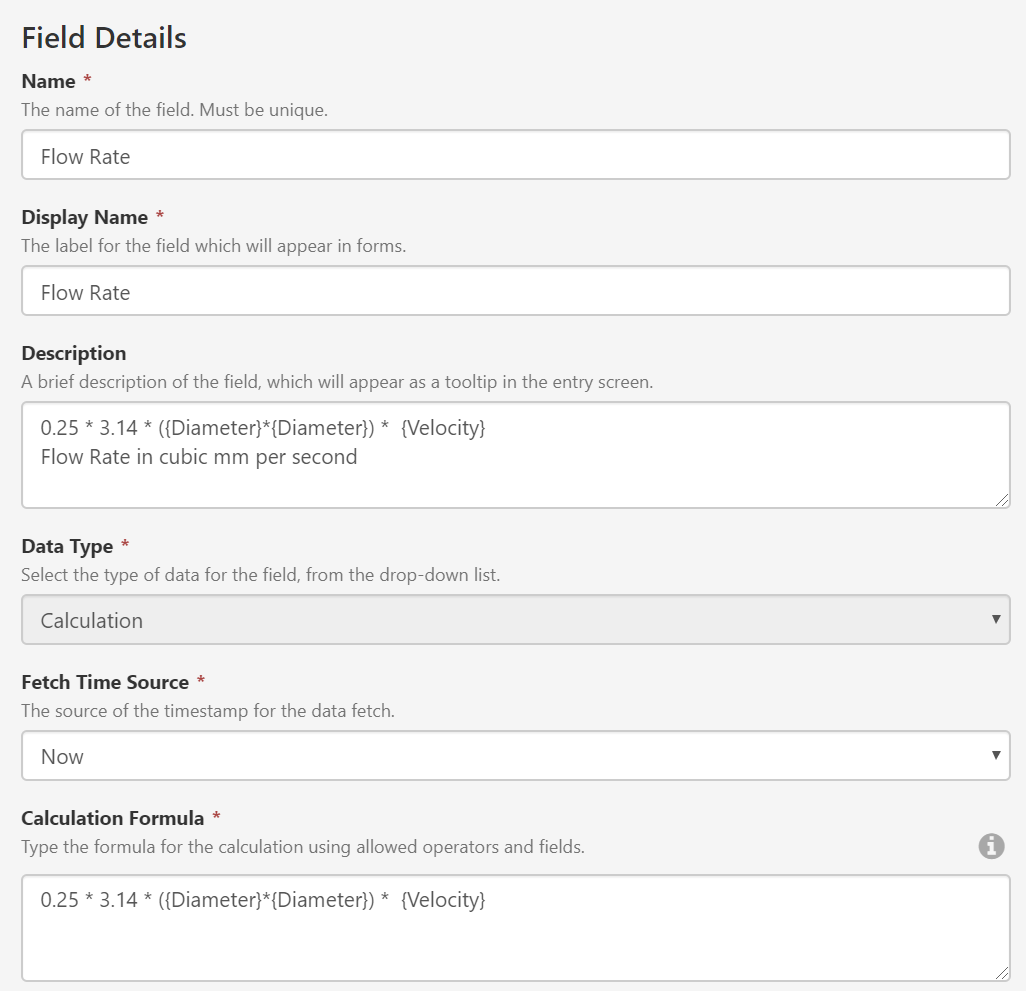
Calculation Fields
P2 Shift Log now allows you to add a Field that automatically calculates a value using a specified mathematical formula.
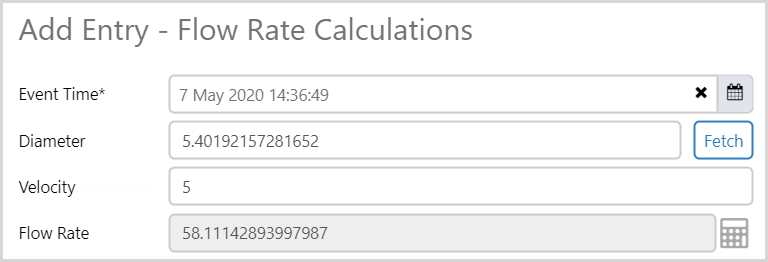
On your entry form, the calculation field cannot be edited and will display with a grey background. Clicking on the calculation icon next to the field opens a tooltip that shows the formula used by the calculation. This allows you to see the fields from the form that are being used to derive the calculation.
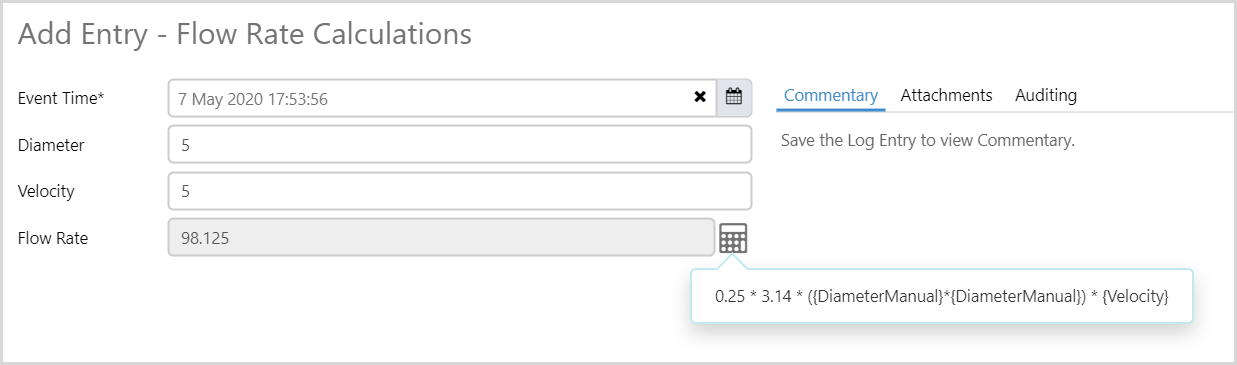
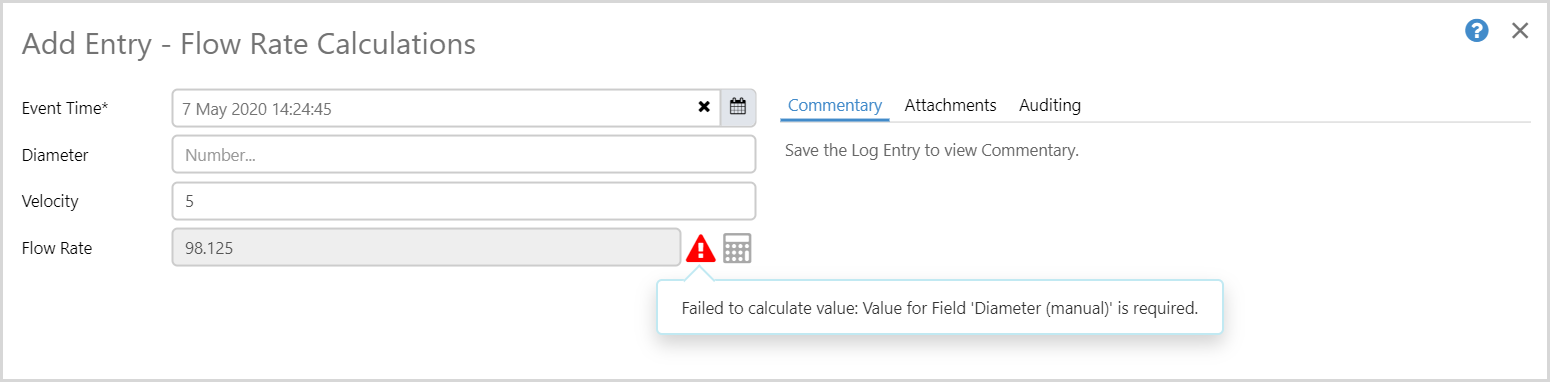
If the calculation field encounters an error, an error icon is displayed next to the field, which you can click to see the error message.
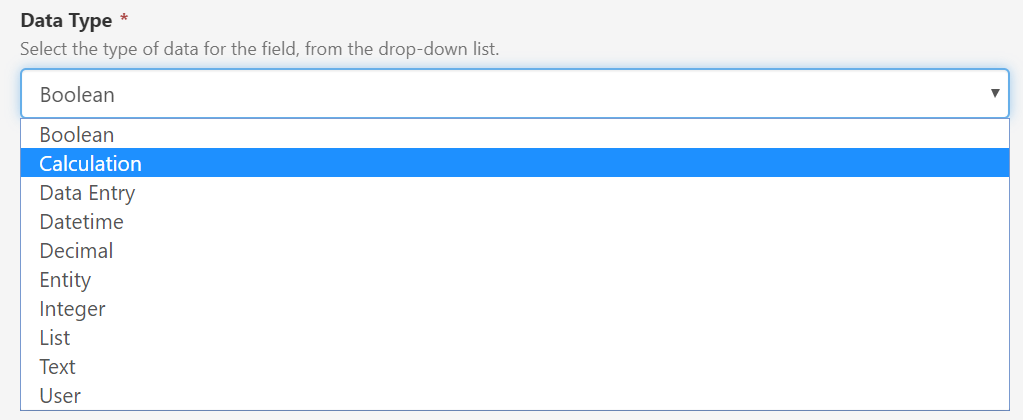
Creating the calculation field is done in P2 Server Management. In the Shift Log section, add a Field, using the new Calculation data type.
You will need to specify how to get the timestamp for the calculation (Fetch Time Source), which can be:
- Now: Current time
- Field: The name of a datetime Field which will be used as the timestamp
- Offset: The time, in hours and minutes (hh:mm) by which to offset the fetch.
Then, you simply type in the calculation formula, which has the following rules:
- Field names must be wrapped in curly braces.
- The following field types are allowed: Integer, Decimal, Calculation, Data Entry.
- Allowed operators: ( ) + - * /
Here is an example of a formula: ({Temperature}*{Pressure})/100
Data Entry Fields
You can now also add a Field that fetches data and writes it back to a tag.
On your entry form, the field has a Fetch button next to it. Clicking the Fetch button retrieves data from P2 Explorer. When the entry form is saved, the value is written back to the specified destination tag.
Creating the data entry field is done in P2 Server Management. In the Shift Log section, add a Field, using the new Data Entry data type.

The Data Entry field has been made deliberately versatile, allowing users to enter data manually or to fetch the data from a specified tag.
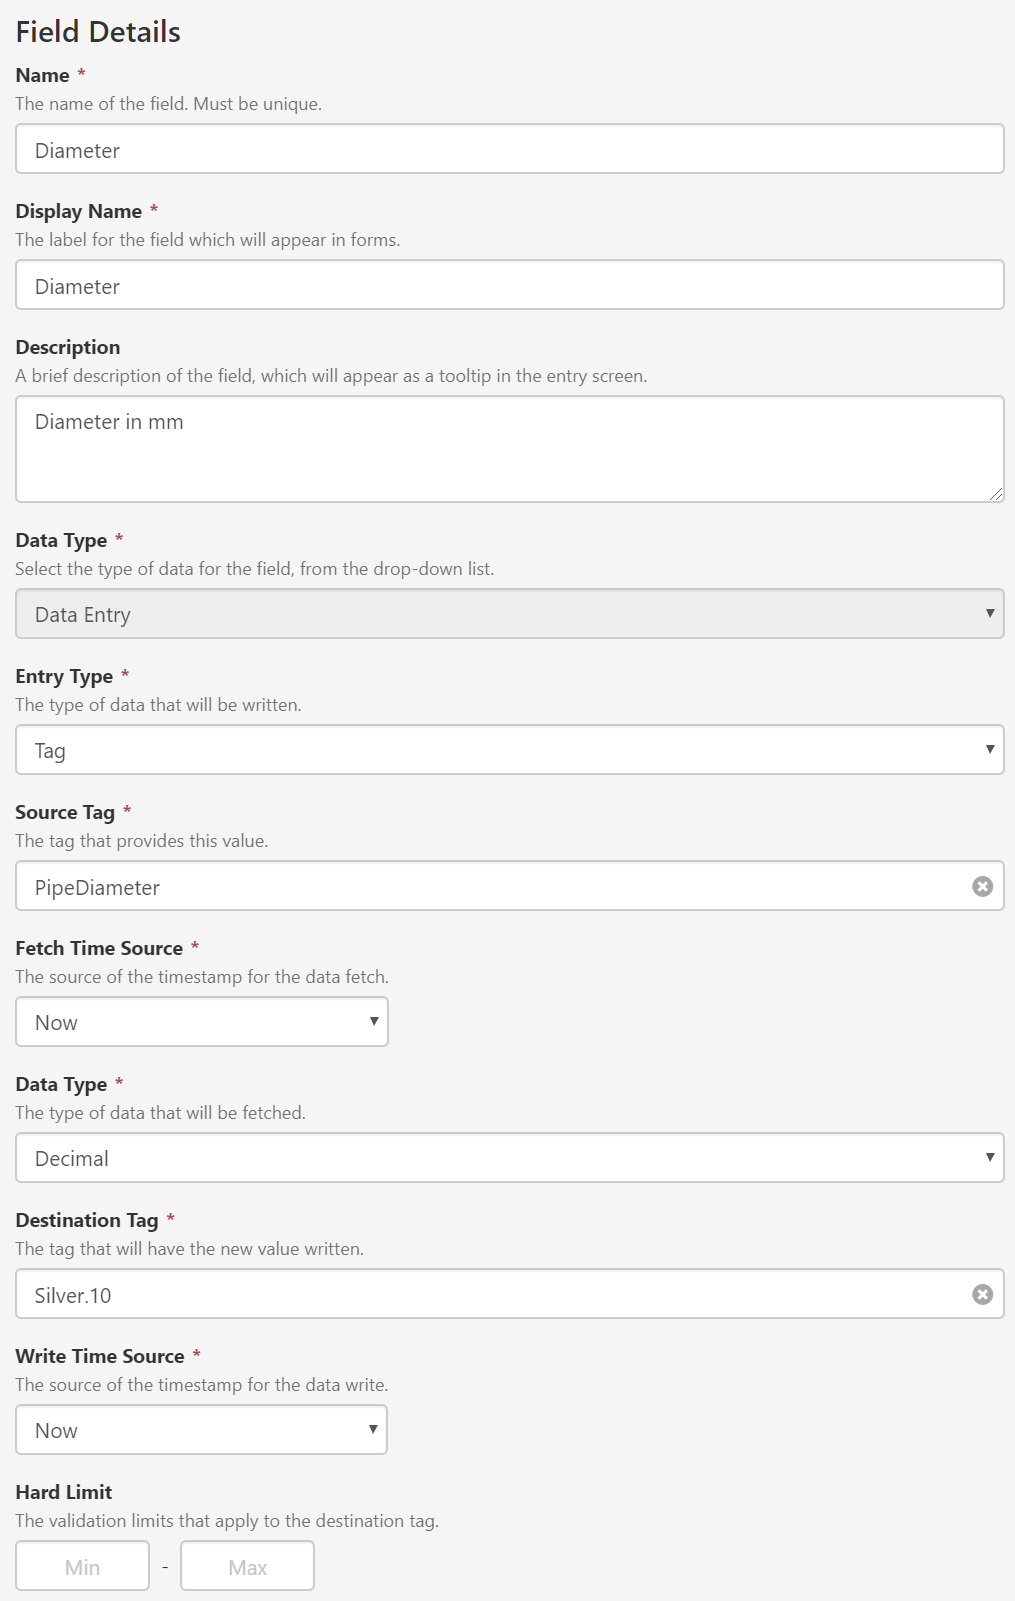
Data Entry Fields Common Properties
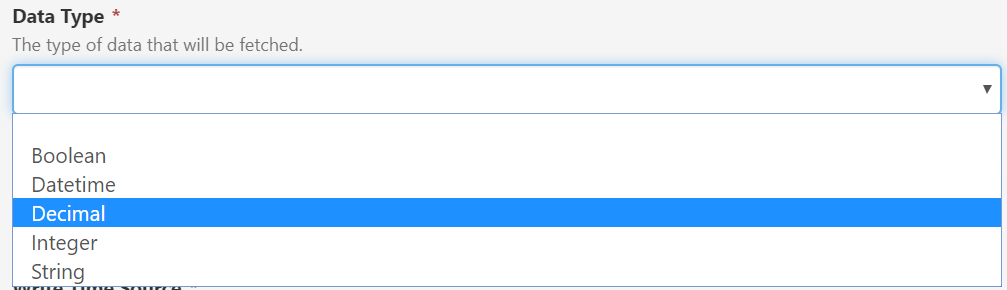
Regardless of whether it is a manual or tag entry type, the type of data that will be fetched an written can be either: Boolean, Datetime, Decimal, Integer, or String.

All data entry fields must also have a Destination Tag to which the data can be written. This must be a pre-existing tag that is writeable.
Along with the Destination Tag, all data entry fields must supply a timestamp (Write Data Source) that is stored alongside the written data value. This is similar to the Fetch Time Source for calculation fields.
Optionally, you can also supply validation limits (Hard Limit) for the destination tag.
Additional Properties for Tag Type
The Tag entry type allows you to specify a Source Tag from which the data can be collected. This must be a pre-existing tag or calculation tag.
Along with the Source Tag, you must supply a timestamp (Fetch Time Source) for when the data will be collected. This is similar to the Write Time Source for the destination tag.
Instructions Tab
In Shift Log forms, you now have the option of providing a set of instructions for how a user should complete a field. On the entry form, if an instruction has been provided, the user will see an ![]() icon next to a field. Clicking the icon, or clicking inside the entry field, will display the instructions for the field, in the panel on the right.
icon next to a field. Clicking the icon, or clicking inside the entry field, will display the instructions for the field, in the panel on the right.
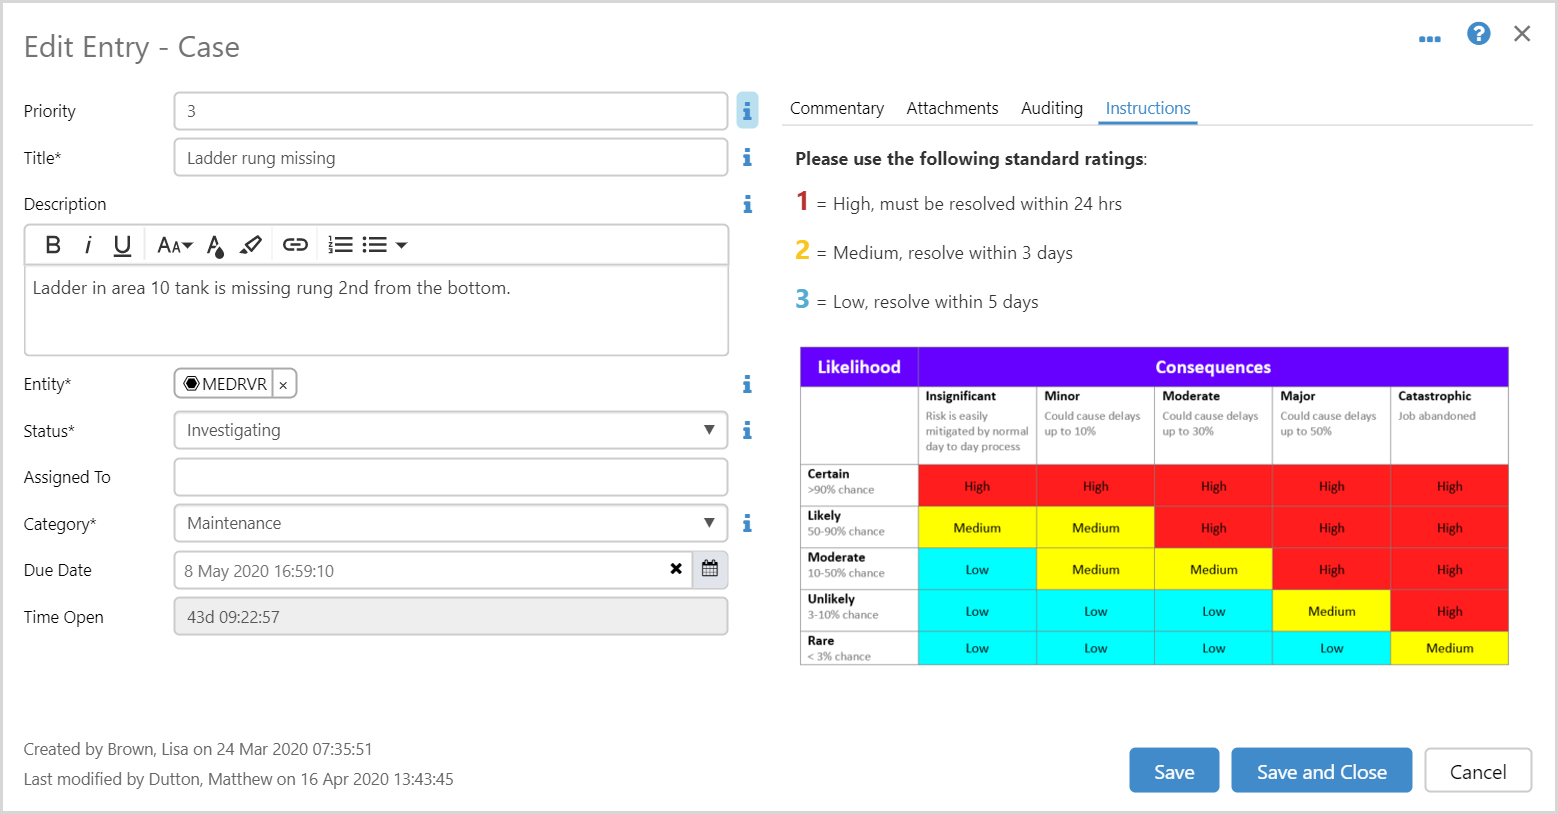
Instructions can be set up in two ways:
- Default instructions can be created for a Field on a Form, in Server Management.
- Instructions can be overridden for a particular field when configuring a workbook.
Instructions in Server Management
In Shift Log Forms, there is a new tab called ‘Instructions’ in the Defaults section. For each field, a text box with a formatting toolbar is available, where you can create instructions for each field.
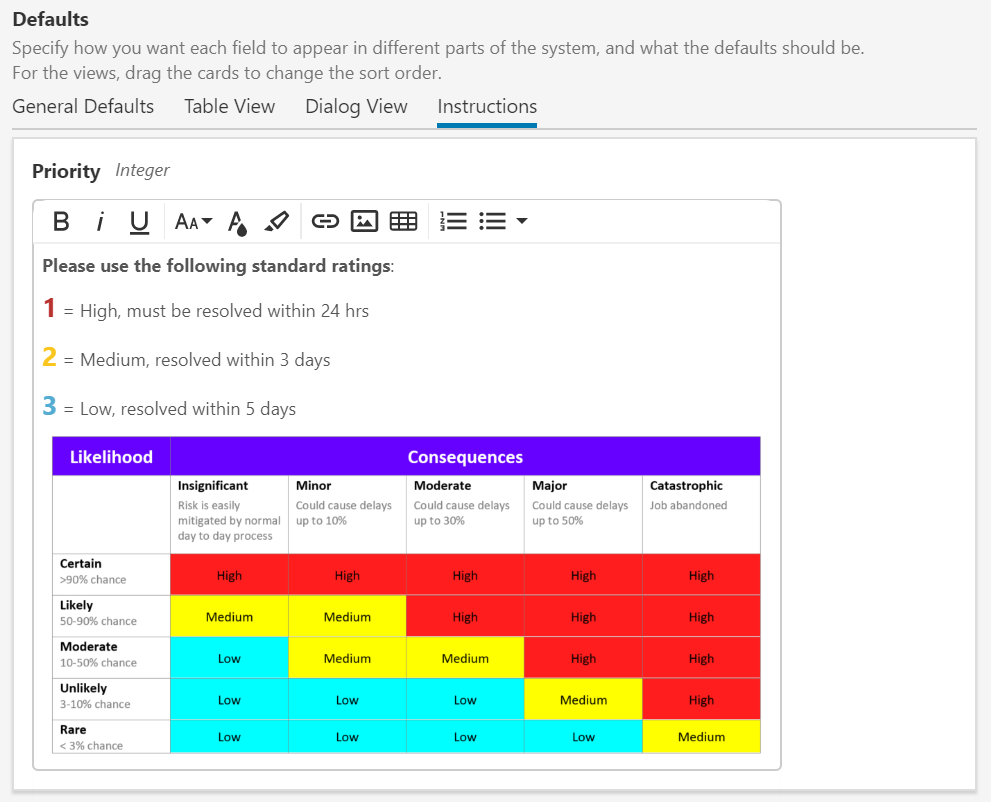
These will automatically appear in the entry dialogs wherever the form is used. Creating instructions here allows you to have a consistent set of instructions for every time this field appears in the dialog, when this form is used.
The formatting toolbar now also allows you to add images to your instructions.
Override Instructions in Workbooks
Sometimes a default set of instructions just needs a little tweaking, or needs to be completely changed. When using a form inside a workbook, you have the opportunity to override the instructions that have been set for the form’s field inside P2 Server Management.

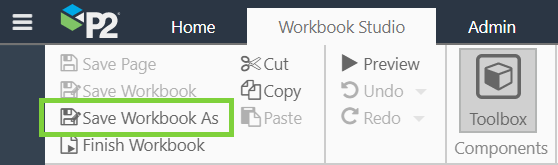
Save As for Workbooks
To assist with rapid creation of similar workbooks, a ‘Save Workbook As’ button has been added to the Workbook Studio ribbon.
This allows you to create a copy of the workbook and save it in a different workspace, if desired.
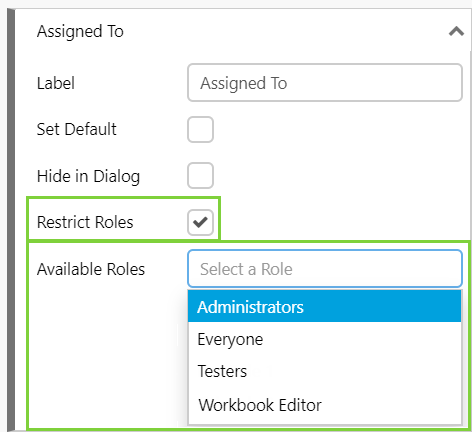
Filter User List by Role
When configuring a workbook, user fields, such as ‘Assigned To’, can now be configured to only show users that belong to a specified role. These roles are defined in the Security section of Server Management.
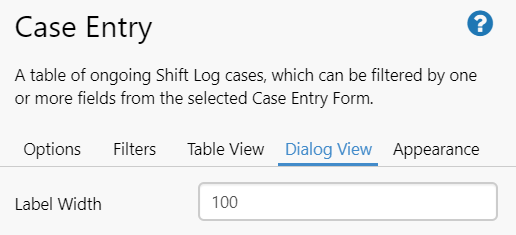
Label Width Configuration
In the entry dialogs, the default width of a label is 100px, which is suitable for most applications. In this release, it is now possible to specify the width of labels. This allows you to provide more room for long labels on entry forms, which is a nicer experience for the user.
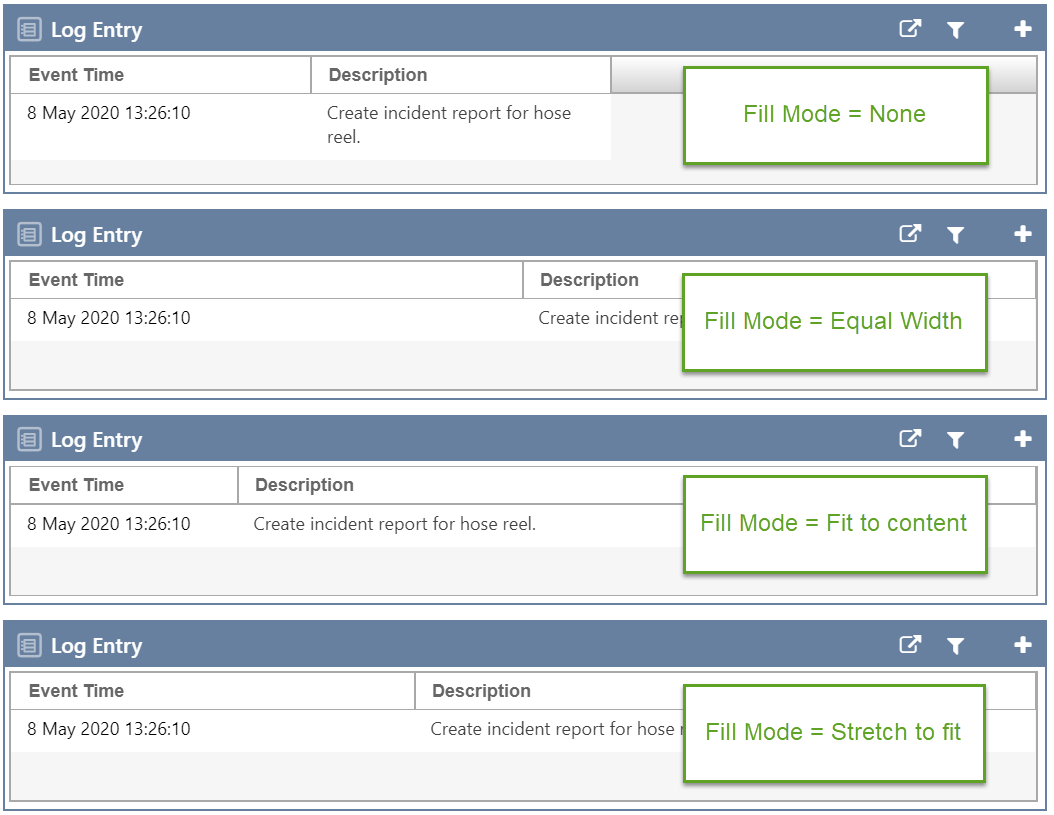
Column Distribution Inside a Table
Columns inside the tables in a workbook can often have differently sized content. In P2 Server Management it’s possible to specify the width of a column on a form, but sometimes you just want an easier way to distribute columns when you’re configuring a workbook. In this release, during workbook configuration it is now possible to specify exactly that, in the Table View of an entry component.
Fill Mode allows you to specify how the columns will be distributed across the width of the table, if a width has not otherwise been specified for a field. All fill modes except None will re-calculate the width of the columns whenever the window is resized or the column order is changed.
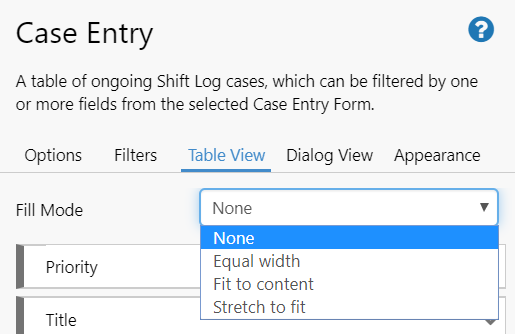
- None: Uses the width for each column as specified in the Form in P2 Server Management, with a minimum width of 50px.
- Equal Width: Distributes the columns across the table so that they are all the same width. This may mean that some columns will shrink if their content width is greater than the table width.
- Fit to content: The columns expand to the minimum width necessary to display all their content and fill the table. Any extra space is added to the last column.
- Stretch to fit: The columns will expand to the minimum width necessary to fill the table. Any extra space is distributed to columns proportional to the size of their content.
Show Log Entries from Another Workbook
In the previous release, Log entries were unable to be shared with other workbooks. However they may be instances where it would be desirable to include in a workbook, log entries from another workbook.
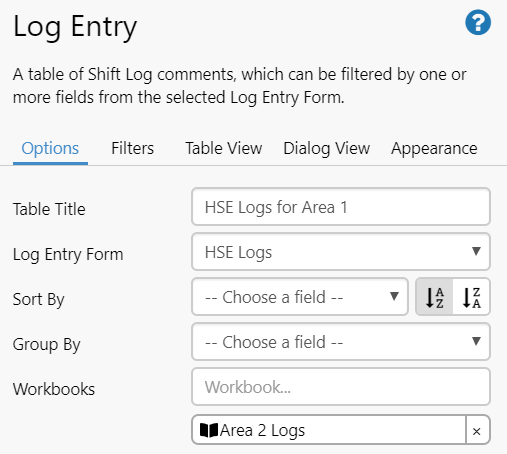
During workbook configuration, Log Entry components now have an additional ‘Workbooks’ field on the Options tab. This allows you to specify one or more workbooks from which the log entries will also appear in this workbook.
The workbook will only display log entries that use the same form. Any changes made to the entries from within either workbook will also be reflected in both.
It is now also possible to share specific entries to another workbook. The receiving workbook must contain entries of the same type (i.e. log entry to log entry, case entry to case entry).
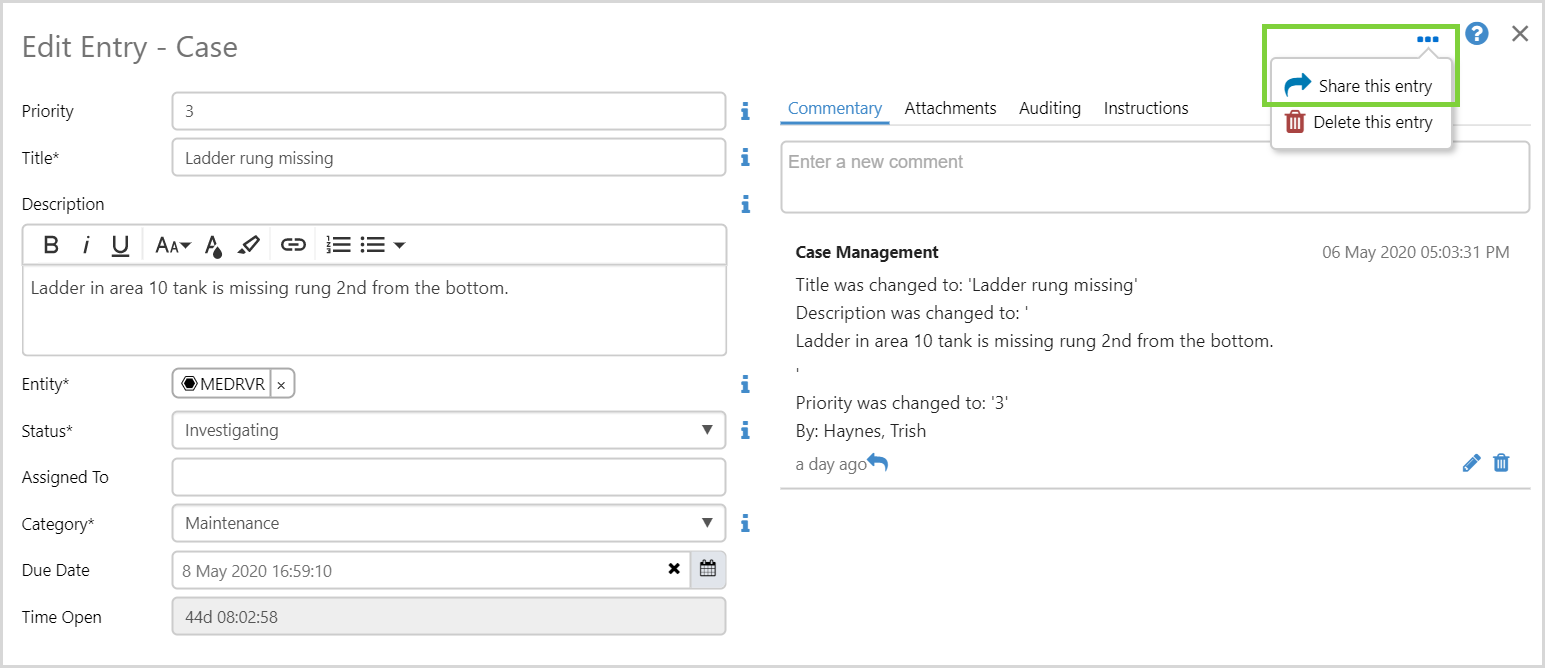
From within the entry dialog, click the ellipsis at the top right and select ‘Share this entry’.
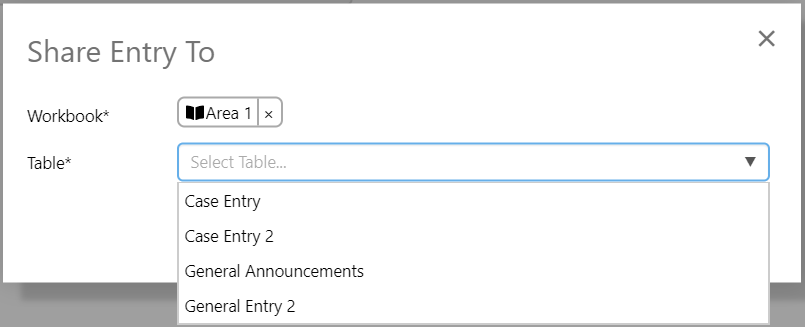
You will then be promoted to select the workbook you want to share to, and you will also need to specify the table in which to share the entry. Note that tables that use the same form as the originating entry will not be listed, as entries are automatically shared between forms.
Once you have selected the table, all of the fields in the destination form will be shown, allowing you to add further information to the entry for display in the other workbook.
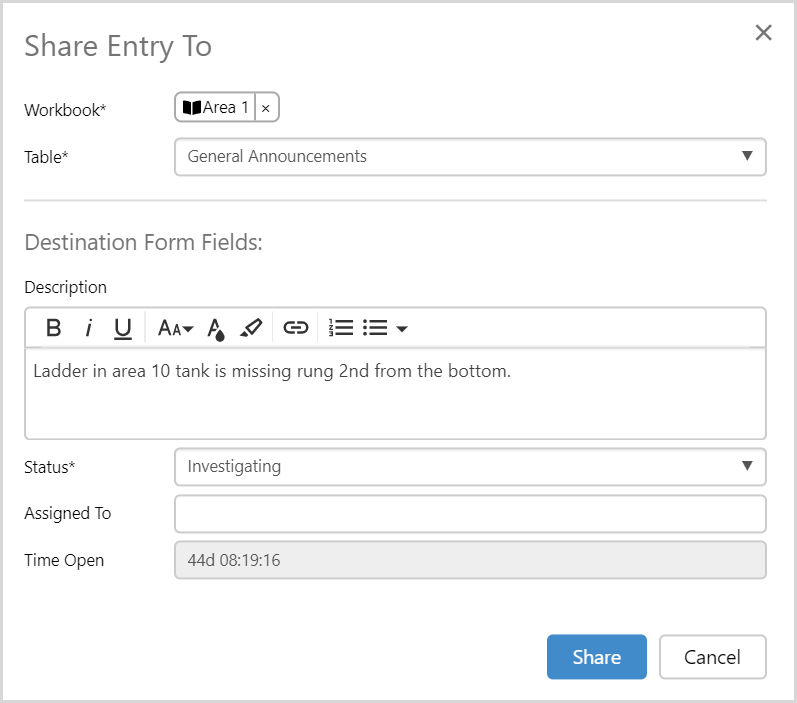
After clicking Share, the destination workbook now shows the entry that you have shared with it. Any changes made to the common fields of the entry are reflected in both workbooks.

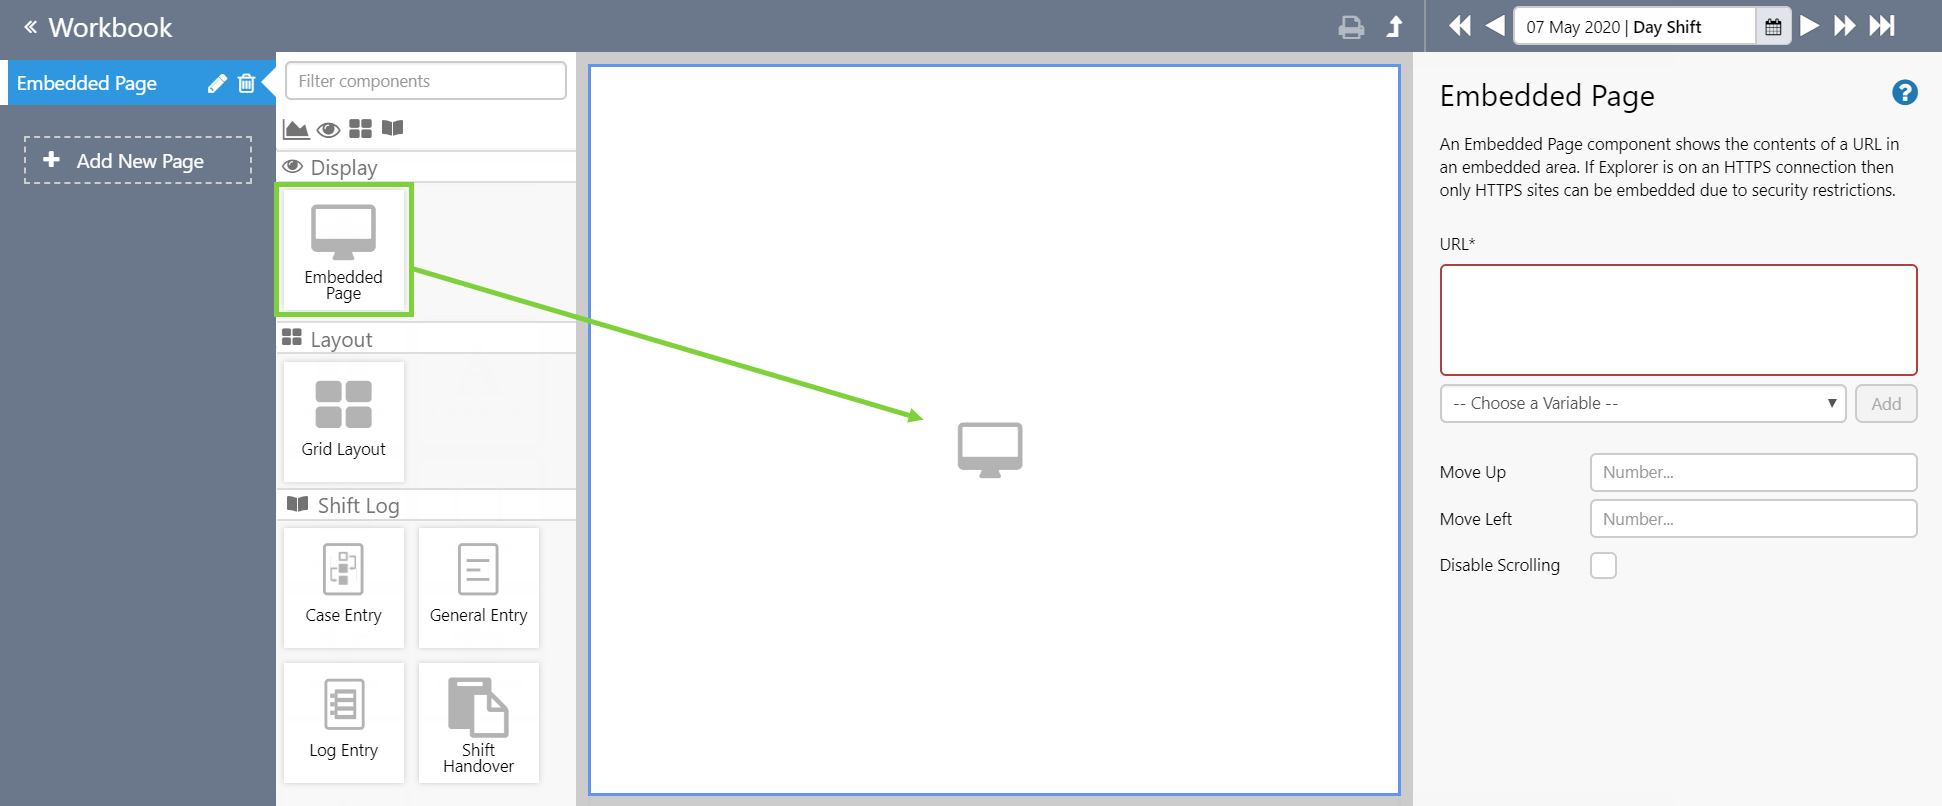
Embed a Page in a Workbook
In Workbook Studio you are now able to embed another page inside a workbook. This is useful for comparing KPIs and other measures that users would find helpful to refer to.