ON THIS PAGE:
The Server Browser allows you to browse the Data Dictionary for entities, tags and hierarchies, helping you to find them by data source, template, or hierarchy. You can also filter the entities to show only those that match specified criteria.
Note: If Sentinel is configured to cache hierarchies, the latest hierarchy is downloaded and cached at configured intervals (the default is every 30 minutes).
You can access the Browser by clicking the ellipsis ![]() button next to the field you are editing. You will need to do this when selecting an Entity Name for a Test Source, for example.
button next to the field you are editing. You will need to do this when selecting an Entity Name for a Test Source, for example.
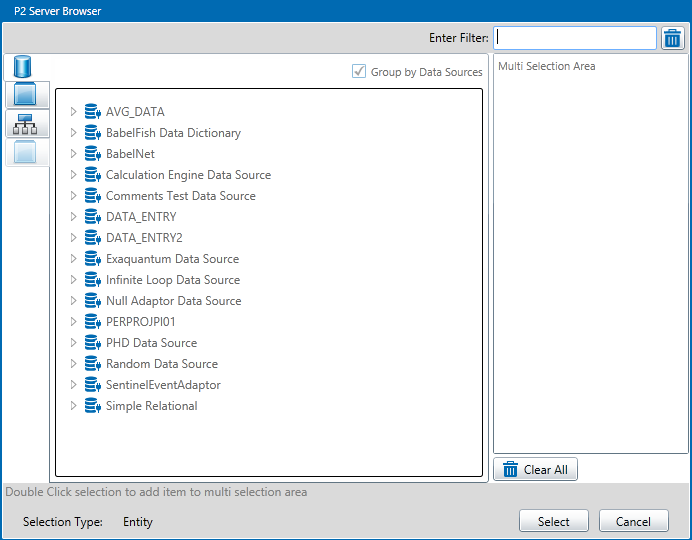
Enter Filter: To restrict the display to only those entities that match the filter criteria, enter part of the name of an entity. This applies across all data sources, templates, and hierarchies. To clear the filter, click the trash can ![]() icon.
icon.
![]() Data Sources: When you select the Data Sources tab, the drop-down list displays all the data sources configured in the Data Dictionary. You can select a data source from the list and browse its entities or use the filter to limit the displayed entities.
Data Sources: When you select the Data Sources tab, the drop-down list displays all the data sources configured in the Data Dictionary. You can select a data source from the list and browse its entities or use the filter to limit the displayed entities.
![]() Entities by Template: When you select the Template tab, the drop-down list displays all the templates configured in the Data Dictionary. You can select one from the list and browse its entities or use the filter to limit the displayed entities.
Entities by Template: When you select the Template tab, the drop-down list displays all the templates configured in the Data Dictionary. You can select one from the list and browse its entities or use the filter to limit the displayed entities.
![]() Hierarchies: When you select the Hierarchies tab, the drop-down list displays all the entity hierarchies configured in the Data Dictionary. You can select a hierarchy from the list and browse its entities or use the filter to limit the displayed entities.
Hierarchies: When you select the Hierarchies tab, the drop-down list displays all the entity hierarchies configured in the Data Dictionary. You can select a hierarchy from the list and browse its entities or use the filter to limit the displayed entities.
Note: If you have specified a Hierarchy type data source, the Multi Selection Area will not be available.
![]() Clear All: Click the Clear All button to clear the current selection.
Clear All: Click the Clear All button to clear the current selection.
Selecting a Hierarchy
The Server Browser can be used to select a Hierarchy to monitor, or to use for a custom event view, in a Hierarchy Report or an Event Timeline Report.
For example, when you are using the Hierarchy type for a Test Source, click the ellipsis button next to Hierarchy edit box.
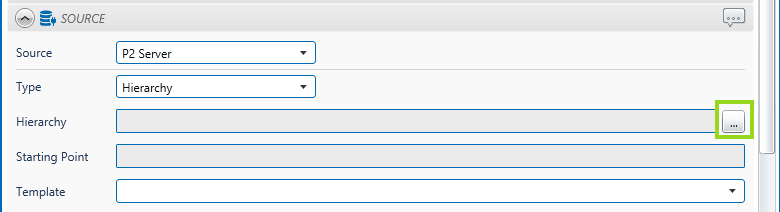
This opens the Browser, with the Selection Type of Hierarchy.

- The Hierarchy button on the left is already selected.
- Select a Hierarchy from the drop-down list.
- Optionally locate a starting point:
- Either use the filter (as shown). Type into the Enter Search box and select an entity from the search result list. The entity is located on the hierarchy.
OR - Navigate through the hierarchy by clicking on the arrow
 to the left of an entity.
- Either use the filter (as shown). Type into the Enter Search box and select an entity from the search result list. The entity is located on the hierarchy.
- Optionally select a starting point. Click on an entity. This is the starting point for your selected hierarchy.
- Click Select to close the window, with the hierarchy and (optional) starting point selected.
Selecting Entities
The Server Browser can be used for selecting one or more entities. For example, when you are selecting an Entity source for a Test, click the ellipsis button next to Entity Name.
For example, when you are using the Entity type for a Test Source, click the ellipsis button next to Entity Name edit box.
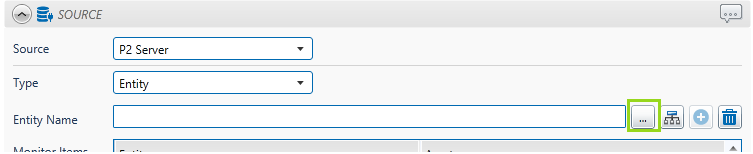
This opens the Server Browser, with the Selection Type of Entity.
Entities by Template

- Click the Template button on the left.
- Select a Template Group from the drop-down list.
- Expand the Template, by clicking the little arrow
 to its left.
 - Locate an entity:
- Either use the filter (as shown). Type some matching letters into the Enter Search box. A list of matching entities appears below the expanded template. Scroll through this list to locate an entity.
OR - Scroll through entities listed below the expanded template.
- Either use the filter (as shown). Type some matching letters into the Enter Search box. A list of matching entities appears below the expanded template. Scroll through this list to locate an entity.
- Select an entity:
- Double-click on an entity. This is added to the multi selection area, on the right.
Or - Click on an entity, then click Select to close the window, with this single entity selected.
- Double-click on an entity. This is added to the multi selection area, on the right.
- Continue to add entities, until you have all that you want to select.
- Optionally click Clear All to clear the selection of entities from the multi selection area. Or remove a single entity from the list: click on an entity in the list and press the Delete key on your keyboard.
- Click Select.
The window closes and you are returned to the previous window, where the selected entities are added to the list.
Entities by Hierarchy
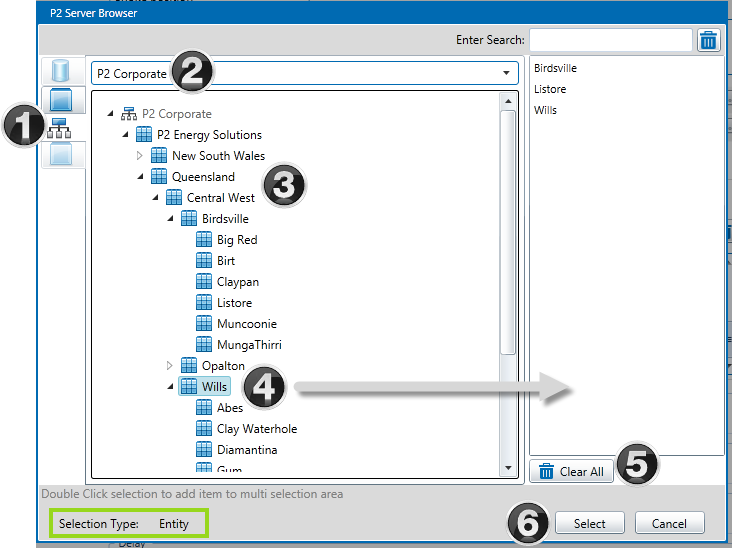
- Click the Hierarchy button on the left.
- Select a Hierarchy from the drop-down list.
- Locate an entity:
- Either use the filter (as shown). Type into the Enter Search box and select an entity from the search result list. The entity is located on the hierarchy.
Or - Navigate through the hierarchy by clicking on the arrows next to the entities.
- Either use the filter (as shown). Type into the Enter Search box and select an entity from the search result list. The entity is located on the hierarchy.
- Select an entity:
- Double-click on an entity. This is added to the multi selection area, on the right.
Or - Click on an entity, then click Select to close the window, with this single entity selected.
- Double-click on an entity. This is added to the multi selection area, on the right.
- Continue to add entities, until you have all that you want to select.
- Optionally click Clear All to clear the selection of entities from the multi selection area. Or remove a single entity from the list: click on an entity in the list and press the Delete key on your keyboard.
- Click Select.
The window closes and you are returned to the previous window, where the selected entities are added to the list.
Selecting an Attribute
The Attribute Picker is used for selecting an attribute. Attributes belong to entities.
For example, to select an attribute as the Input for a process in a test:

1. Select Attribute from the drop-down list next to Input.
2. Click the ellipsis button.
The Attribute Picker opens, with a list of templates.
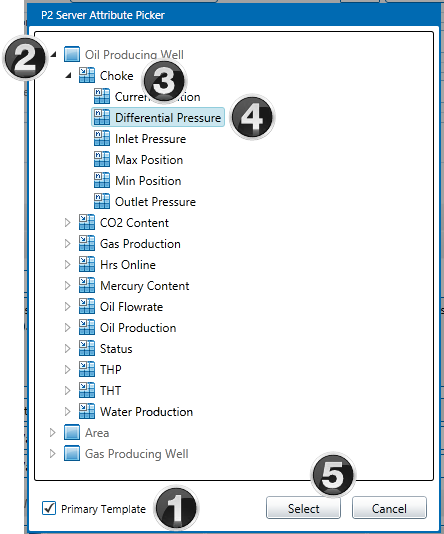
3. Select the Primary Template check box to list attributes that belong to the primary template, or clear it to show all of the attributes that belong to the listed templates. Note: By default, this option is not selected.
4. Expand a Template, by clicking the little arrow ![]() to its left.
to its left.
5. Select an attribute or attribute value.
a. Expand an Attribute by clicking the little arrow ![]() to its left.
to its left.
Or
b. Click on the attribute and click Select to close the window, with this attribute selected.
6. In the list, click an Attribute Value.
7. Click Select to close the window, with this Attribute Value selected.
Attributes and Attribute Values
When you select an attribute, you can select either the attribute or from the attribute values. For example, the screenshot below shows attributes, such as Choke, as well as attribute values of Choke, namely Current Position, Differential Pressure, Inlet Pressure, etc.
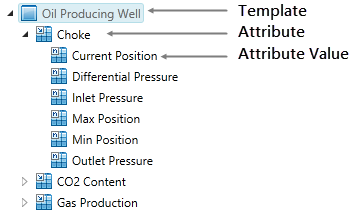
If you select just the Choke attribute, then Sentinel uses the current primary attribute value of Choke (this may change over time). If you select an attribute value, such as Inlet Pressure then Sentinel uses this.
| A Sentinel Test Process using :Choke!Inlet Pressure attribute value | A Sentinel Test Process using the: Choke attribute |
Selecting Tags
The Server Browser can be used for selecting one or more tags.
For example, when you are using the Tag type for a Test Source, click the ellipsis button next to Tag Name edit box.
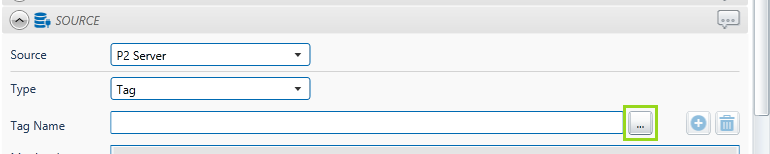
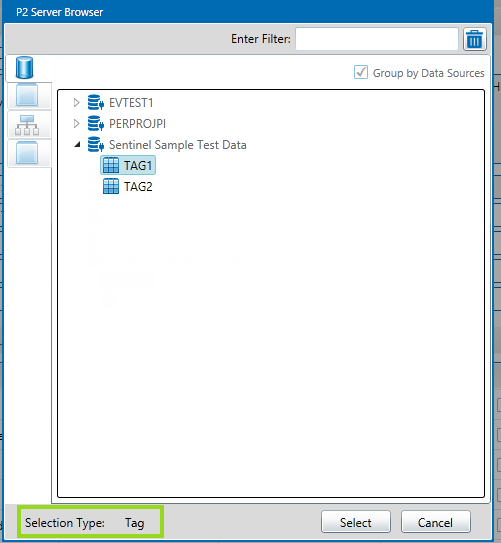
This opens the Server Browser, with the Selection Type of Tag.
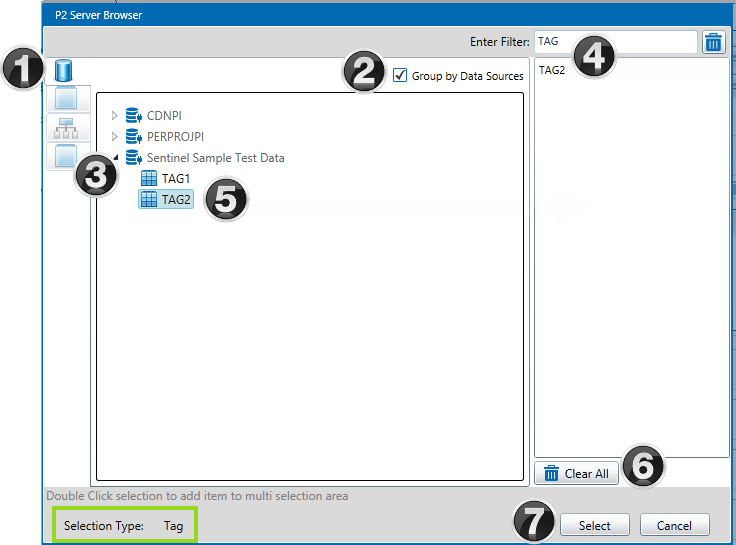
- The Data Sources button on the left is already selected.
- Select the Group by Data Sources check box (as shown), or clear it if you want a flat list of tags that are not each grouped under their applicable data source. Note: You need to have a filter before you can clear this check box.
- Expand the Data Source, by clicking the little arrow
 to its left. The tags belonging to this data source are listed alphabetically below the data source.
 - Optionally type a filter into the Enter Search box, as shown.
- Select a tag:
- Scroll down the list of tags (filtered or unfiltered) listed below the expanded data source to locate a tag, then double-click on the tag to add it the multi selection area, on the right.
Or - Click on a tag, then click Select to close the window, with this single tag selected.
- Scroll down the list of tags (filtered or unfiltered) listed below the expanded data source to locate a tag, then double-click on the tag to add it the multi selection area, on the right.
- Continue to add tags, until you have all that you want to select.
- Optionally click Clear All to clear the selection of tags. Or remove a single tag from the list: click on a tag in the list and press the Delete key on your keyboard.
- Click Select.
The window closes and you are returned to the previous window, where the selected tags are added to the list.
Selecting Tags or Entities
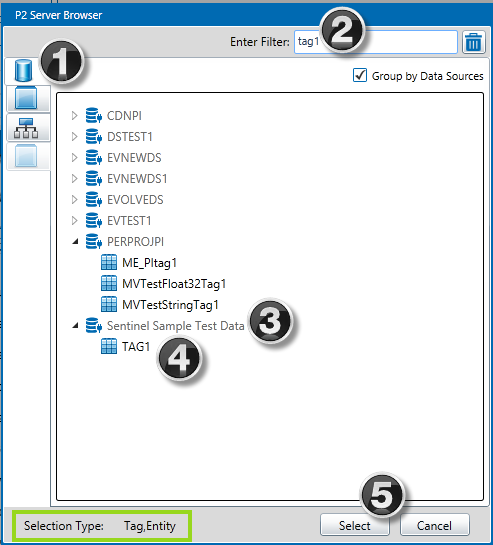
The Server Browser can also be used for selecting either an entity or a tag. For example, if you are adding data to a Timeline report, the Server Browser opens for Selection Type Tag, Entity.
To select a tag:
- Click the Data Sources button on the left.
- Optionally type filter text into the Enter Search box, as shown.
- Expand a data source (if Group by Data Sources is selected) and scroll down the list of tags (filtered or unfiltered) listed to locate your tag.
Or
- Scroll down the ungrouped list of tags (filtered or unfiltered) to locate your tag.
- Click a tag.
- Click Select.
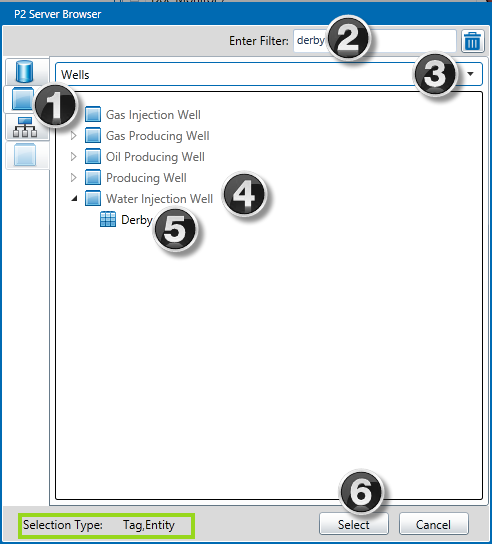
To select an entity (by template):
- Click the Templates button on the left.
- Optionally type filter text into the Enter Search box, as shown.
- Select a template group from the drop-down list
- Expand a template and scroll down the list of tags (filtered or unfiltered) listed to locate your entity.
- Click on the entity.
- Click Select.
To select an entity (by hierarchy):
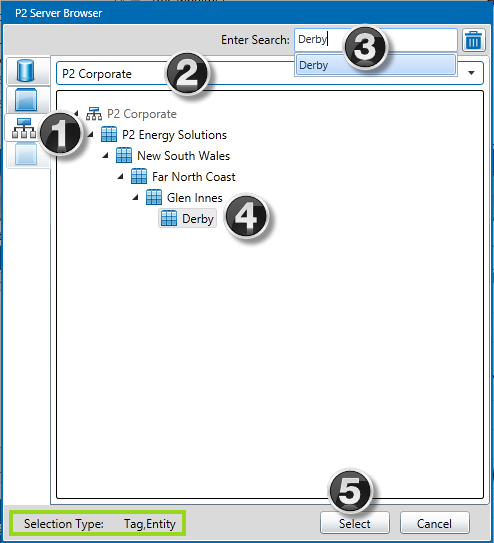
- Click the Hierarchies button on the left.
- Select a hierarchy from the drop-down list.
- Optionally type filter text into the Enter Search box, as shown, and select from the drop-down list.
- The entity is auto-selected if there is a search match.
Or
- Navigate through the hierarchies until you locate your entity, then click it.
- Click Select.