Note: The import procedure cannot be reversed. Please ask your System Administrator to make a backup of your Sentinel database before you proceed with the import, in case you need to revert to your pre-import configuration.
You will need a Sentinel Migration Package to import. This can either be a zipped (.zip) file, or a plain .xml file, created by an export from another Sentinel environment.
To import to Sentinel:
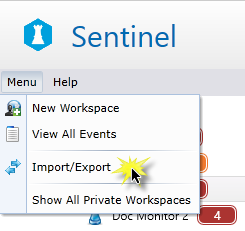
1. Click the Menu button below the Sentinel header.
2. Click ![]() Import/Export.
Import/Export.
The Import/Export window appears.
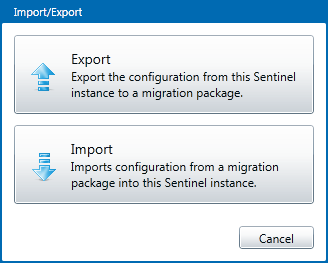
3. Click the Import panel.
An Open dialog box appears.
4. Navigate to the folder containing the package you want to import.
5. Click on the file, and click Open.
Note: If the migration package is corrupt, the import cannot continue. An error message window appears. Click OK to close the window. The Import tab closes.
If this is a valid Sentinel migration package, the Import tab opens.

The following information appears on the different panels of the Import tab.
| Migration Package | Contains the following information relating to the package:
|
| Import Options | The default import options:
|
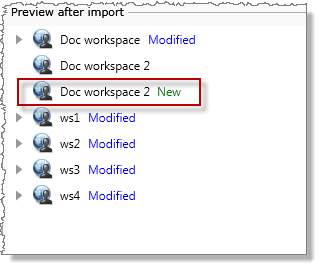
| Preview after import | The Preview after import panel on the right side of the Import tab shows a preview of what the Workspace panel will contain after the import. This includes what is currently in the Workspace panel, as well as the newly imported items.
You can navigate through the Preview after import panel in the same way that you navigate through the Workspace panel. The following labels are appended to the import item (workspace/folder/monitor) names as applicable.
|

New items with the same name:
If a workspace in the migration package has the same name as an existing workspace, but is not actually the same workspace, then the workspace to be imported will have suffix of “(1)”, after the import. For example, “Doc workspace 2” is imported as “Doc workspace 2 (1)”. In the preview panel, this suffix does not exist.
| Preview of workspace Doc workspace 2 | Doc workspace 2 after import, now named Doc workspace 2 (1) |
 |
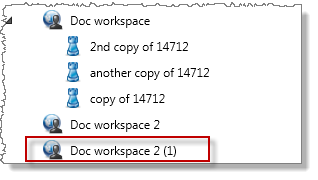 |
The same behaviour can be observed with different monitors that have the same name, and different folders that have the same name.
6. If needed, change one or both of the import options by selecting or deselecting the relevant check boxes in the Import Options panel. Options: Submit imported monitors and new monitor versions and Always add new monitor versions.
7. Review the Preview after import panel.
8. Click Import.
9. Click Yes in the Perform Import confirmation dialog.
The import completes, with a message:

Each imported monitor has a version comment, indicating that this version of the monitor was imported, and taking the form: “[comment from exported version] - migrated from [migrating Sentinel server name]”.
Incompatible Packages or Versions
If either the Sentinel version or the Package version is incompatible, an error message appears.
- Click OK to close the message box.

Approve Imported Monitors
If Change Management has been implemented, you will need to approve the newly imported monitors.
- Submit new monitors for approval (unless you selected to have automatic submissions as part of the import).
- Approve or reject the newly imported monitors.