ON THIS PAGE:
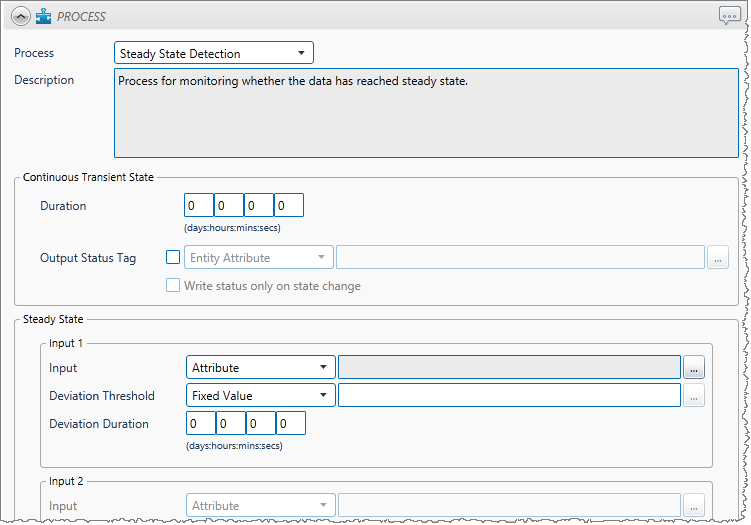
The Steady State Detection evaluates up to four separate data inputs to determine whether the asset under surveillance has reached a steady state. This process can also evaluate whether data is continuously transient, that is: if it does not reach the steady state for longer a specified duration.
The standard deviation of each input is evaluated at every sample interval. Each input’s standard deviation is calculated over the duration specified for that input, and measured against the deviation threshold specified for that input.
For example: for Input 1, the process is configured to calculate the standard deviation for all samples collected within the last two hours; it then determines whether this figure exceeds the current deviation threshold value. Simultaneously, the standard deviation for Input 2 for all samples collected over the last hour (Input 2’s configured deviation duration) is evaluated to determine whether it has exceeded the current deviation threshold for Input 2. The combined outcome for all configured inputs is used to determine the test outcome for that sample interval.
Steady State Detection is used for scenarios where fluctuations of values are expected initially (transient state), but where these variations should subside over time, leading to a steady state.
If the data continues to fluctuate for one of more of the inputs (that is, if it continues to be in the transient state) for longer than a specified duration, this triggers a continuous transient state.
State Transition Rules
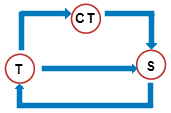
The Steady State Detection process has clearly defined state transition logic paths. Transition from one state to another is dependent on the current evaluation of data, and on the current state.
State transitions cause events to be raised, allowing for the escalation of actions via the Sentinel framework. Different actions can be assigned to different state outcomes.
The following table outlines the allowable state transitions of the Steady State Detection process.
| This state can transition to | This state | |
| Transient | Steady | |
| Continuous Transient | ||
| Continuous Transient | Steady | |
| Steady | Transient |
The following diagram outlines the state transition logic of the Steady State Detection process.
|
|
T Transient State |
Test Outcomes
A number of outcomes are possible when the Steady State Detection process is executed:
| Steady State | For all inputs, the standard deviation for that input is at or below the input’s deviation threshold. |
| Transient State | For one or more inputs, the standard deviation for that input is above the input’s deviation threshold. |
| Continuous Transient State | The transient state persists for up to or longer than the defined continuous transient duration. |
| Suppressed State | The monitor has been suppressed. For example, if the precondition has not been met. |
Using Standard Deviation
Sentinel uses the statistical standard deviation method to calculate dispersion of the different input values over a given duration.
Conditional Logic
The Steady State Detection process provides the following conditional logic.
Note: All of the example graphs in the following sections show tests that have used the Last Known Value sample method.
Output Status Tag
An Output Status Tag can be set for both the Continuous Transient State and the Steady State. In each case, this tag can be an entity attribute, either as it is, or as part of a calculation.
If an output status tag is set for the continuous transient state, the tag will show a status of one within Explorer when a continuous transient event is raised, and zero for any other state.
Similar behaviour applies to the output status tag for steady state (showing a status of one for steady state, and zero for any other state). Within the Server Browser, the status tag can be observed, for example altering a shape's appearance to indicate whether the monitor's data item is in a particular state or not.
Transient State
The Transient State can be considered the default state of the Steady State Detection Process.
Every input is evaluated. If any one of the inputs’ standard deviation is above that input’s deviation threshold, a transient event is raised and the process goes into a transient state.
The following example demonstrates how a steady state moves to a transient state. Three inputs are used. In this example, the following settings are used:
- All three inputs have fixed deviation thresholds.
- All three inputs have a deviation duration of five hours.
- The sample interval is 1 hour.
| Collective Evaluation of Inputs | ||
Input 2 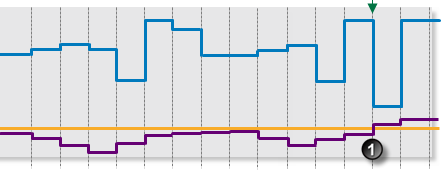 |
At 11:00am one of the three inputs has breached the primary deviation limit. |
|
Input 1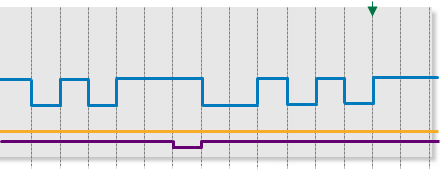 |
At 11:00am one of the three inputs (Input 2) is above the primary deviation limit. | |
Input 3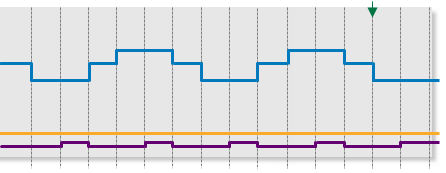 |
At 11:00am one of the three inputs (Input 2) is above the primary deviation limit. |
Continuous Transient State
A continuous transient event occurs when the transient state persists for up to or longer than the defined continuous transient duration.
The following example demonstrates the continued duration of the transient state, which causes a continuous transient event to occur. In this example, the following settings are used:
- Both inputs have a deviation duration of five hours.
- The continuous transient state duration is 2 hours.
- Both inputs use a fixed deviation threshold.
- The sample interval is 1 hour.
| Collective Evaluation of Inputs | ||
Input 2 |
At 11:00am one of the three inputs has breached the primary deviation limit. |
|
Input 2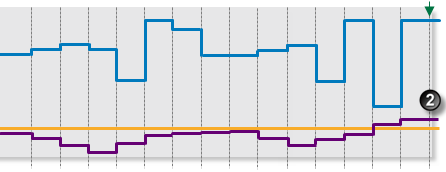 |
At 1:00pm the transient state has a duration of 2 hours. |
|
Input 1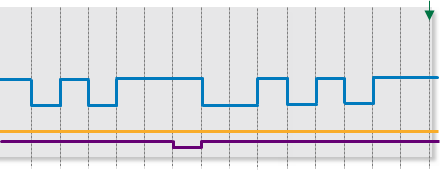 |
At 1:00pm the transient state has a duration of 2 hours, due to the continued high standard deviation for Input 2. |
Steady State
For all inputs, the standard deviation is at or below that input’s deviation threshold.
The following example demonstrates how a transient state changes to a steady state. Three inputs are used. In this example, the following settings are used:
- The sample interval is 1 hour.
- Input 2 uses a fixed deviation threshold.
- Input 1 and input 3 use variable deviation thresholds.
- All three inputs have a deviation duration of five hours.
In the example, all three inputs have a deviation duration of five hours. For each input, at each sample interval: all samples collected over the previous five hours are used to calculate the standard deviation for that input.
| Collective Evaluation of Inputs | ||
Input 1 |
At 9:00am one out of three inputs has its standard deviation below its deviation threshold. | |
Input 2 |
At 10:00am two out of three inputs have their standard deviation below their respective deviation thresholds. | |
Input 3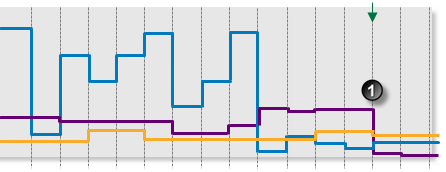 |
At 11:00am all three inputs have their standard deviation below their respective deviation thresholds. |
Adding a Steady State Detection Process
The Steady State Detection Process evaluates the standard deviation of one or more defined inputs. Based on the combined outcome of these evaluations, a state persists or a new state is raised.
Setting Process Values and Limits
Setting up the Steady State Detection process involves selecting inputs and deviation thresholds. Deviation thresholds can either be fixed values, or they can be variable data taken from entities. Inputs can only be defined as variable data taken from entities.
The following deviation thresholds are available. Select a deviation threshold type from the drop-down list, then type in or select a limit.
- Fixed Value: Type in a numerical value.
- Source Tag: This option is only available if the Source Type is Tag.
- Attribute: This option is only available if the test’s Source Type is Entity or Hierarchy. Click the ellipsis
 button to select an attribute of the source entities.
 - Calculation: Click the ellipsis
 button to open the Edit Calculation window.
- If the Source Type is Entity or Hierarchy: Type a calculation, prefixed by ‘this’ as the Source Entity token, for example: {this:THP} + 34.
- If the Source Type is Tag: Type a calculation, prefixed by ‘this’ as the Source Tag token, for example: {this} * 2.
- Tag: Click the ellipsis
 button to select a tag.
 - Entity Attribute: Click the ellipsis
 button to select an entity. From here, select an attribute, or attribute value, for the selected entity.
Adding the Process
As with all Sentinel processes, the Steady State Detection Process is defined within a Sentinel Test page.
In the Sentinel Test page:
- Expand the Process
 panel.
 - Select Steady State Detection from the Process drop-down list.
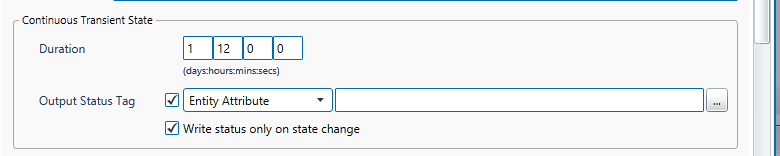
Continuous Transient State
The duration specified here is used to determine the transition from transient state to continuous transient state. An output status tag can reflect this state transition on a Server Browser page.
1. Type integer values in the days, hours, mins (minutes), and secs (seconds) Duration boxes to define a duration period. The default value is zero.

2. Optionally set the Output State Tag.
- Select the Output Status Tag check box.
- Select one of the options from the drop-down list, then click the ellipsis button to select.
- Attribute: This option is only available if the test’s Source Type is Entity or Hierarchy. Click the ellipsis
 button to select an attribute of the source entities.
 - Tag: Click the ellipsis
 button to select a tag.
 - Entity Attribute: Click the ellipsis
 button to select an entity. From here, select an attribute, or attribute value, for the selected entity.
- Attribute: This option is only available if the test’s Source Type is Entity or Hierarchy. Click the ellipsis
- To ensure that the status is set only on a state change, select the Write status only on state change check box.
Steady State
At least one input will be evaluated to determine whether the process has reached a steady state.
If every enabled input’s standard deviation is at or below that input’s deviation threshold, a steady state is reached.
The various different inputs are:
- Input 1
- Input 2 (optional)
- Input 3 (optional)
- Input 4 (optional)
Input 1
At every sample interval, all values for Input 1’s preceding duration period are used to calculate a standard deviation for Input 1. If the standard deviation exceeds the deviation threshold for Input 1, a transient event is raised, and a transient state is reached.
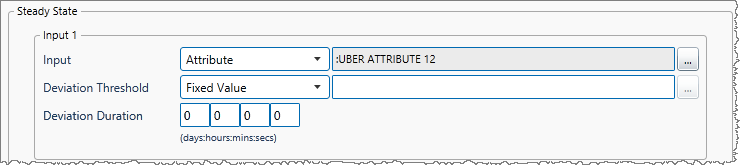
1. From the Input drop-down list, select one of the following and then type in or select a corresponding value:
- Attribute: This is available where the Source Type is either Entity or Hierarchy. Click the ellipsis
 button to see templates of the source entities. To view primary templates of the source entities, select the Primary Template check box. Select an attribute.
 - Source Tag: This is available where the Source Type is a Tag.
- Calculation: Click the ellipsis
 button to open the Edit Calculation window.
- Where the source type is Entity or Hierarchy, enter ‘this’ for the source entity token, followed by an attribute or attribute value definition. For example: {this:THP} + 34. Another example: {this:Choke!Current Position}*1.2
- Where the source type is Tag, enter ‘this’ for the tag token. For example: {this} * 1.2. .
- Entity Attribute: Click the ellipsis
 button to select an entity. From here, select an attribute, or attribute value, for the selected entity.
2. From the Deviation Threshold drop-down list, select one of the following and then type in or select a corresponding value:
- Fixed Value: Type in a numerical value.
- Attribute: This option is only available if the test’s Source Type is Entity or Hierarchy. Click the ellipsis
 button to select an attribute of the source entities.
 - Source Tag: This is available where the Source Type is a Tag.
- Calculation: Click the ellipsis
 button to open the Edit Calculation window.
- If the Source Type is Entity or Hierarchy:
Type a calculation, prefixed by ‘this’ as the Source Entity token, for example: {this:THP} + 34. - If the Source Type is Tag:
Type a calculation, prefixed by ‘this’ as the Source Tag token, for example: {this} * 2.
- If the Source Type is Entity or Hierarchy:
- Tag: Click the ellipsis
 button to select a tag.
 - Entity Attribute: Click the ellipsis
 button to select an entity. From here, select an attribute, or attribute value, for the selected entity.
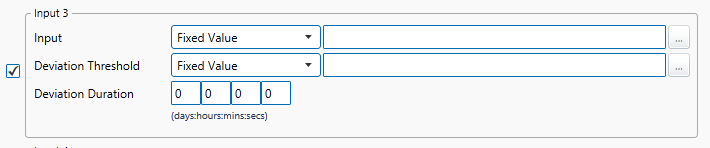
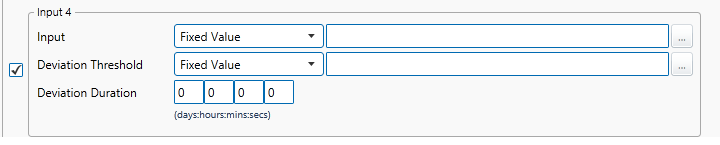
3. Type integer values in the days, hours, mins (minutes), and secs (seconds) Deviation Duration boxes to define a deviation duration period for the steady state for Input 1. The default value is zero.
The various options for the Input drop-down list and the Deviation Threshold drop-down list are outlined above.
Inputs 2, 3 and 4 (Optional)
If you are using other inputs, define these in the same way as you for Input 1. Input options for Inputs 2, 3 and 4 are:
- Fixed Value: Type in a numerical value.
- Attribute: This option is only available if the test’s Source Type is Entity or Hierarchy. Click the ellipsis
 button to select an attribute of the source entities.
 - Source Tag: This is available where the Source Type is a Tag.
- Calculation: Click the ellipsis
 button to open the Edit Calculation window.
- If the Source Type is Entity or Hierarchy: Type a calculation, prefixed by ‘this’ as the Source Entity token, for example: {this:THP} + 34.
- If the Source Type is Tag: Type a calculation, prefixed by ‘this’ as the Source Tag token, for example: {this} * 2.
- Tag: Click the ellipsis
 button to select a tag.
 - Entity Attribute: Click the ellipsis
 button to select an entity. From here, select an attribute, or attribute value, for the selected entity.
To define Input 2, select the check box to the left of the Input 2 section, then define the Input, Deviation Threshold and Deviation Duration for Input 2.

To define Input 3, select the check box to the left of the Input 3 section, then define the Input, Deviation Threshold and Deviation Duration for Input 3.
To define Input 4, select the check box to the left of the Input 4 section, then define the Input, Deviation Threshold and Deviation Duration for Input 4.
Output Status Tag (Optional)
To set the Output Status Tag for the steady state:
1. Select the Output Status Tag check box.
2. Select one of the following types and values:
- Attribute: This option is only available if the test’s Source Type is Entity or Hierarchy. Click the ellipsis
 button to select an attribute of the source entities.
 - Tag: Click the ellipsis
 button to select a tag.
 - Entity Attribute: Click the ellipsis
 button to select an entity. From here, select an attribute, or attribute value, for the selected entity.
3. To ensure that the status is set only on a state change, select the Write status only on state change check box.

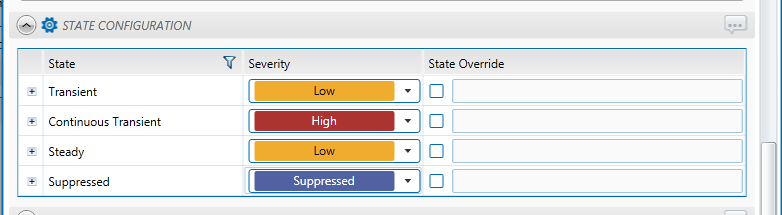
Configuring States
For the Steady State Detection process, you can configure the following states, each with an optional state override and comments:
- Transient
- Continuous Transient
- Steady
- Suppressed