ON THIS PAGE:
You can create custom event views within a workspace or folder. The custom report can be independent of any of the monitors stored under a particular workspace or folder, and you may move a saved report to another workspace or folder, without affecting the report.
Opening an Event View Report
To open an event view report:
- In the Workspace panel, within a workspace or folder, locate the event view (hierarchy report, event report, event history report, or event timeline report) that you want to see.
- Right-click on the event view, and select View
 from the list, or double-click the event view.
The report is displayed on a separate page in the main panel.
Creating a Custom Event View Report
To create a new event view:
1. In the Workspace panel, right-click on the Workspace ![]() or Folder
or Folder ![]() where you want to create the new event view.
where you want to create the new event view.
2. Select New Event View ![]() from the list.
from the list.
The New Event View window appears in the Main panel.
3. Select a report type.
4. Fill in the required fields, described in the following sections.
5. Save or view the new report.
Note: You cannot save changes to a report while viewing it from the New Event View window. If you want to save the report, save it first and view it later.
Event Report
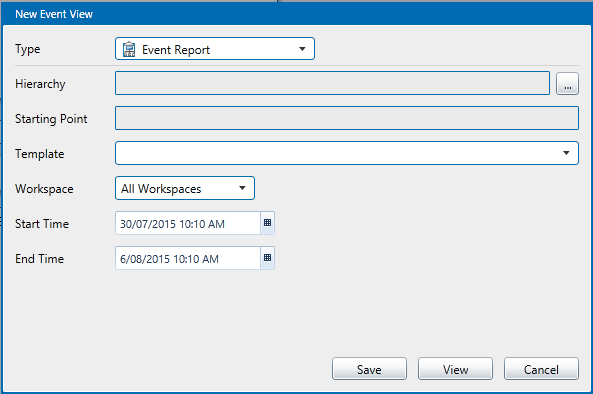
- Hierarchy: Click the
 button next to the edit box, and select the Hierarchy
  (and optionally the Entity
  for the Starting Point). The selected hierarchy and starting point (if selected) appear in the Hierarchy and Starting Point edit boxes, respectively.
 - Template: Select a template, or All Templates, from the Template drop-down list. The templates listed are those that use the selected entity within the selected hierarchy, from the starting point.
- Workspace: Select the workspace on which to base the report. If you select This Workspace, then the report only applies to monitors in the workspace where it resides (created or moved to).
- Start Time: Use the date-time picker to select a start time.
- End Time: Use the date-time picker select an end time. Events that started within this period are shown in the report.
Event History Report
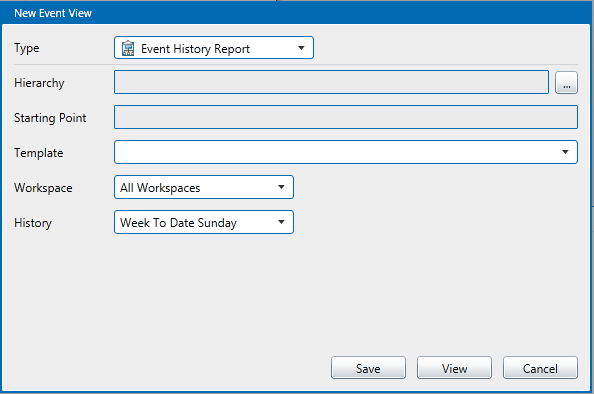
- Hierarchy: Click the
 button next to the edit box, and select the Hierarchy
  (and optionally the Entity
  for the Starting Point). The selected hierarchy and starting point (if selected) appear in the Hierarchy and Starting Point edit boxes, respectively.
 - Template: Select a template, or All Templates, from the Template drop-down list. Templates listed are those that use the selected entity within the selected hierarchy, from the starting point.
- Workspace: Select the workspace on which to base the report (This Workspace or All Workspaces).
- History: Select a period. Events that started within this period are shown in the report. For example, select Week to Date Sunday to show events that started in the current week (including Sunday).
Event Timeline Report
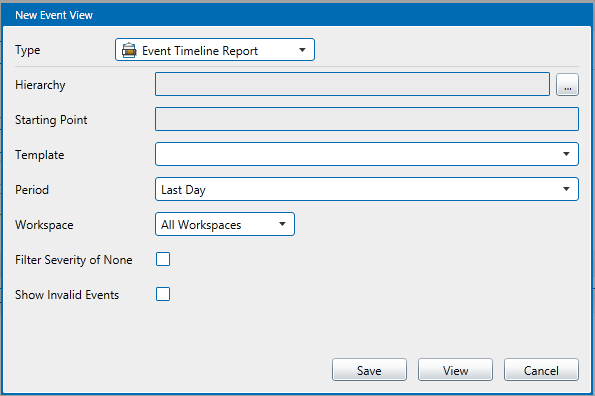
- Hierarchy: Click the
 button next to the edit box, and select the Hierarchy
  (and optionally the Entity
  for the Starting Point). The selected hierarchy and starting point (if selected) appear in the Hierarchy edit box and the Starting Point edit box, respectively.
 - Template: Select a template, or All Templates. Templates listed are those that use the selected entity within the selected hierarchy, from the starting point.
- Period: The period you select dictates the start time for the range of events displayed in the report, with current time being the end time. Periods to choose from are:
- Last Hour
- Last Day
- Last Week
- Last Month
- Workspace: Select which workspace the report is based on (This Workspace or All Workspaces).
- Select the Filter Severity of None check box, if you do not want events of severity None displayed in the event timeline.
- Select the Show Invalid Events check box, if you want invalid events to be included in the report. This option is only available if Case Management is enabled in Sentinel. An event is Invalid if its related case was rejected in Explorer.
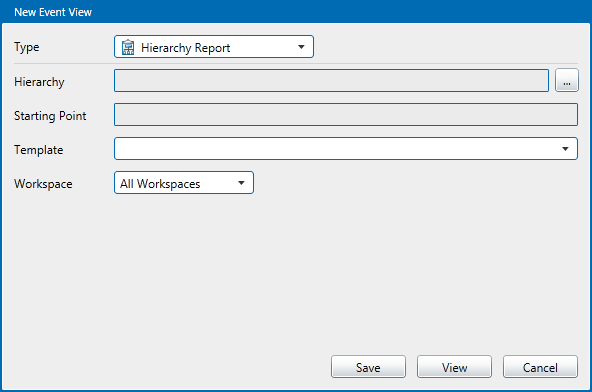
Hierarchy Report

- Hierarchy: Click the
 button next to the edit box, and select the Hierarchy (and optionally the Entity for the Starting Point). The selected hierarchy and starting point appear in the Hierarchy edit box and the Starting Point edit box, respectively.
 - Template: Select a template or All Templates. Templates listed are those that use the selected entity within the selected hierarchy, from the starting point.
- Workspace: Select which workspace (This Workspace or All Workspaces) on which to base the report.
Save or View the Report
- To save the report, click Save.
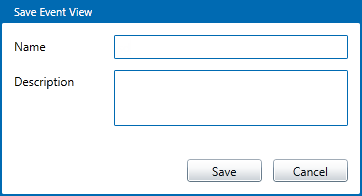
- In the Save Event View window, in the Name edit box, type a name for the report.
- In the Description edit box, type a description. This is an optional description of the report, which appears when you hover the mouse over the report in the Workspace panel.
- Click Save.
The new event view report is saved under the folder or workspace under which you created it.
- To view the report, click View.
The report is displayed in a new tab in the Main panel.
Note: You cannot save changes to a report while viewing it from the New Event View window. If you want to save the report, save it first and view it later.
Editing an Event View Report
To edit an event view report:
1. In the Workspace panel, within a workspace or folder, locate the event view (hierarchy report, event report or event history report ![]() or event timeline
or event timeline ![]() report) that you want to edit.
report) that you want to edit.
2. Right-click on the report.
3. Select Edit ![]() from the list.
from the list.
The Edit Event View window appears in the Main panel. Example:
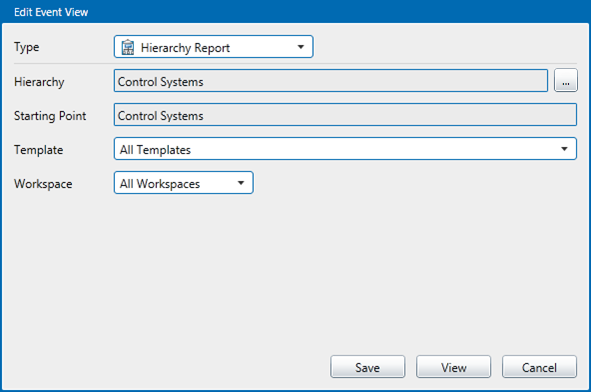
4. Edit the report.
To update the report type:
- Select another report type from the Type drop-down list.
The screen changes according to the new type selected.
To update the Hierarchy and Starting Point:
- Click the
 button next to the Hierarchy edit box.
 - Select the Hierarchy
 for the Hierarchy edit box, and the Entity
  for the Starting Point box.
- To update the template, select a Template from the Template drop-down list.
- To change the period (this applies to event timeline reports only), select another Period from the Period drop-down list.
- To change the workspace, select All Workspaces or This Workspace from the Workspace drop-down list.
- To show or hide events with a severity of None, select or deselect the Filter Severity of None check box (this applies to Event Timeline reports only).
5. Save or View the changes.
Note: You cannot save changes to a report while viewing it from the Edit Event View window. If you want to save the report, save it first then view it later.
Deleting an Event View Report
To delete an event view report:
- In the Workspace panel, within a workspace or folder, locate the event view (hierarchy
 report or event timeline
  report) that you want to delete.
 - Right-click on the report.
- Select Delete
 from the list.
 - Click Yes at the Delete event view prompt.
The event view report is deleted.
Moving an Event View Report
You may move an event view report to a different workspace, or to another folder.
1. In the Workspace panel, locate the event view (hierarchy, event, event history ![]() report or event timeline
report or event timeline ![]() report) that you want to move.
report) that you want to move.
2. Click and drag the custom event view report to the destination workspace or folder.
3. Release the mouse button.
The event view report is moved to the destination workspace or folder.
Note: For event views where the workspace is defined as This Workspace, the report will only include events relating to monitors that belong to the destination workspace.
Linking to the Event View Report
Copy to Clipboard
To can copy the link to a custom report:
- Click the Copy Link to Clipboard button, at the upper right of the report page.
You can paste the link to the message content of an email, or you can open a new page in your web browser, to view the report on a separate tab.
Custom Event View URLs
There is URL command for the each custom event view report type. All of the URLs use the EventView.aspx on the Sentinel Server.
The first section of the URL is always:
https://[server name]/Sentinel/EventView.aspx?EventViewName=Event Report
where [server name] is the name of the Sentinel Server.
To use parameters in the URL, add a question mark ? followed by the list of parameters in the format variablename=variablevalue. Separate multiple variables with an ampersand &.
Use %20 for spaces between words.
The following parameters are available for all event view types:
- Hierarchy: The name of the hierarchy, for example "Well 1".
- StartingPoint: The starting point of the hierarchy. This an entity within the hierarchy (for example, "Well 1").
Where the hierarchy is a root node, you can also use the hierarchy name, preceded by the symbols "^^^", to incorporate the complete hierarchy from the root node. For example: "^^^Well 1". - Template: Assets must exist within the template in order to be part of the report. For example, "WATER
Event Report
The following Event View URL applies to the Event Report:
https://[server name]/Sentinel/EventView.aspx?EventViewName=Event%20Report&Hierarchy=[hierarchy]&StartingPoint=[starting point]&Template=[template name]&WorkspaceFilter=[doc workspace]&Private=[private]&StartTime=[start time]&EndTime=[end time]
The EventViewName parameter is Event%20Report.
The remaining parameters are:
- WorkspaceFilter: Events must be generated by monitors that exist within the workspace. To limit this restriction, you can use "All workspaces".
- StartTime: Report start time measured in seconds since 1970 (UTC). Example: 635983556579240000
- EndTime: Report end time measured in seconds since 1970 (UTC). Example: 635984420579246888
Using example values, the final URL will look like this (using a server named myServer):
https://myServer/Sentinel/EventView.aspx?EventViewName=Event%20Report&Hierarchy=P2%20Corporate&StartingPoint=P2%20Energy%20Solutions&Template=Oil%20Producing%20Well&WorkspaceFilter=All%20Workspaces&Private=False&StartTime=635978382120436961&EndTime=635984430120436961
Event History Report
The following Event View URL applies to the Event History Report.
https://[server name]/Sentinel/EventView.aspx?EventViewName= Event History Report&Hierarchy=[hierarchy]&StartingPoint=[starting point]
&Template=[template name]&Period=[Period]
&FilterSeverityOfNone=[FilterSeverityOfNone]&WorkspaceFilter=
[doc workspace]&Private=[Private]
The EventViewName parameter is Event%20History%20Report.
The remaining parameters are:
- WorkspaceFilter: Events must be generated by monitors that exist within the workspace. To limit this restriction, you can use "All workspaces".
- Private: If set to true, users will only see events from monitors existing in their own private workspace, called My Workspace. Valid values are:
- True
- False
- History: The History dictates the period for which events are shown. Valid values for History are:
- Week To Date Sunday
- Week To Date Monday
- Last Week Sunday
- Last Week Monday
- Month To Date
- Last Month
- Year To Date
- Last Year
Using example values, the final URL will look like this (using a server named myServer):
https://myServer/Sentinel/EventView.aspx?EventViewName=Event%20History%20Report&Hierarchy=P2%20Corporate&StartingPoint=P2%20Energy%20Solutions&Template=Oil%20Producing%20Well&WorkspaceFilter=All%20Workspaces&Private=False&History=Week%20To%20Date%20Sunday
Event Timeline Report
The following Event View URL applies to the Event Timeline report.
https://[server name]/Sentinel/EventView.aspx?EventViewName= Event Timeline Report&Hierarchy=[hierarchy]&StartingPoint=[starting point]
&Template=[template name]&Period=[Period]
&FilterSeverityOfNone=[FilterSeverityOfNone]&WorkspaceFilter=
[doc workspace]&Private=[Private]
The EventViewName parameter is Event%20Timeline%20Report.
The remaining parameters are:
- Period: The period selected dictates the start time for the range of events displayed in the report. Valid periods are:
- Last Hour
- Last Day
- Last Week
- FilterSeverityOfNone: Filter events of no severity in the event timeline. Valid values are:
- True
- False
- WorkspaceFilter: Events must be generated by monitors that exist within the workspace. To limit this restriction, you can use "All workspaces".
- Private: If set to true, users will only see events from monitors existing in their own private workspace, called My Workspace. Valid values are:
- True
- False
Using example values, the final URL will look like this (using a server named myServer):
https://myServer/Sentinel/EventView.aspx?EventViewName=Event Timeline Report&Hierarchy=Well 1&StartingPoint=Tubing Head Pressure
&Template=All Templates&Period=Last Hour&FilterSeverityOfNone=False
&WorkspaceFilter=All Workspaces&Private=False
or like this:
https://myServer/Sentinel/EventView.aspx?EventViewName=Event Timeline Report&Hierarchy=Well 1&StartingPoint=^^^Well 1&Template=All Templates&Period=Last Hour&FilterSeverityOfNone=False&Private=False
Hierarchy Report
The following Event View URL applies to the Hierarchy Report:
https://[server name]/Sentinel/EventView.aspx?EventViewName=Hierarchy Report&Hierarchy=[hierarchy]&StartingPoint=[starting point]&Template=[template name]&WorkspaceFilter=[workspace name]&Private=[Private]
- EventViewName: Hierarchy Report
The EventViewName parameter is Hierarchy%20Report.
The remaining parameters are:
- WorkspaceFilter: Events must be generated by monitors that exist within the workspace. To clear this filter, you can use "All workspaces". Note: The WorkspaceFilter parameter is case sensitive.
- Private: If set to true, users will only see events from monitors existing in their own private workspace, called My Workspace. Valid values are:
- True
- False
Using the example values, the final URL looks like this (using a server name of myServer):
https://myServer/Sentinel/EventView.aspx?EventViewName=Hierarchy Report&Hierarchy=Well 1&StartingPoint=Tubing Head Pressure&Template=WATER INJECTION WELL&WorkspaceFilter=All Workspaces
Note: When constructing the URL, ensure that the first parameter is preceded by the question mark (?) symbol. Subsequent parameters must be preceded by the ampersand (&) symbol.