ON THIS PAGE:

P2 A-Plus version 4.19 adds the following enhancements:
- A configuration option to specify how far back transactions should be generated.
- In the A-Plus component for Workbooks, a column has been added to show the icon for the event type.
- Usability updates for configuring A-Plus Areas.
- Ability to log in to the A-Plus Admin Tool using Azure authentication.
- Addition of time-awareness to the A-Plus hierarchy.
- Ability to publish variables from a selected row in the A-Plus Entry component in workbooks.
Note: Before upgrading, always make sure your Environment has met Explorer minimum hardware requirements, as these are constantly evolving as additional capabilities are added.
Option to Restrict Transaction Creation
An option TransactionGenerationLimitDays has been added to Serverconfig.xml to specify how far back transactions should be generated. The default is 90 days.
This comes into effect when a new event is created in the past, as the system will fill in all of the Transactions from the start time of the event up until today.
If an event's start time is earlier than the transaction generation limit, new transactions will no longer be created.
If an entry is created with a date in the past, the limit days period starts from the current day and shift. For example, if an event is created for 4 months ago and the TransactionGenerationLimitDays is set to 90 days, only 3 months worth of transactions will be created.
This is a performance improvement that is designed to prevent open events from creating excess Transactions, and will also prevent accidental long date ranges in the past from being created.
| Setting | Description |
| TransactionGenerationLimitDays | Transactions will not be generated for open Master Events aged greater than this limit. Default: 90 (days) |
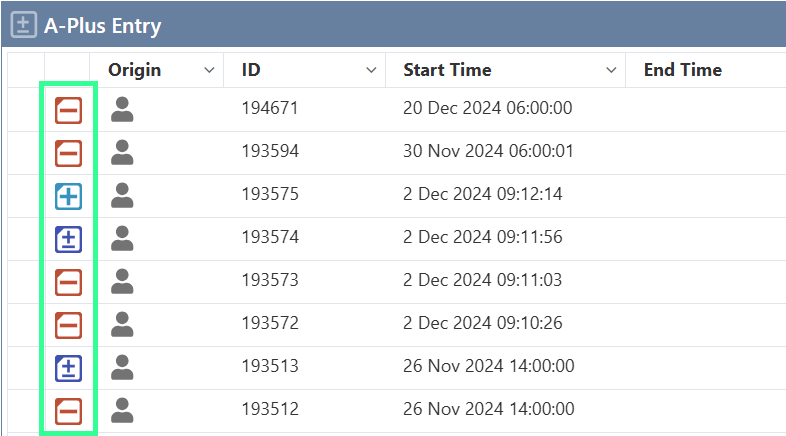
Event Type Icon in A-Plus Entry Component
In the A-Plus Entry component in Workbooks, a column has been added on the left, to show the icon for the event type (Loss, Gain, Availability).
Updates for A-Plus Area Configuration
Several updates have been made to how Areas in an A-Plus Site are configured, to make it easier to configure an A-Plus hierarchy.
Site/Area Hierarchy
On the Areas page, sites that do not have an A-Plus area will now be filtered out from the list. This makes it easier for users to focus on the sites relevant to A-Plus.
An area can be added to a site that is not in the list, by clicking the ‘Add Area’ button without selecting a site node. The user will then be prompted to select a site, and selecting a site that is not currently in the Areas list, will add it to the list along with the new Area.

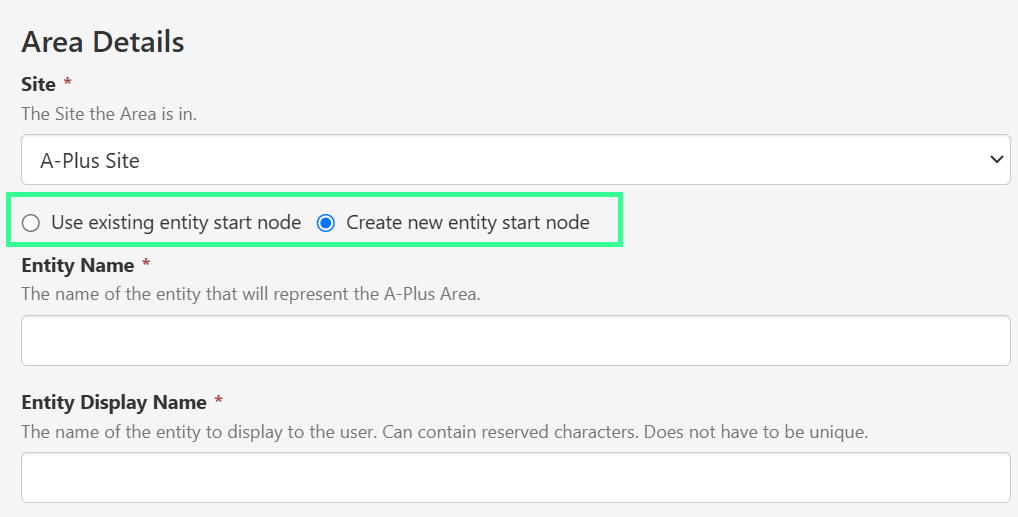
Entity Start Node in Area
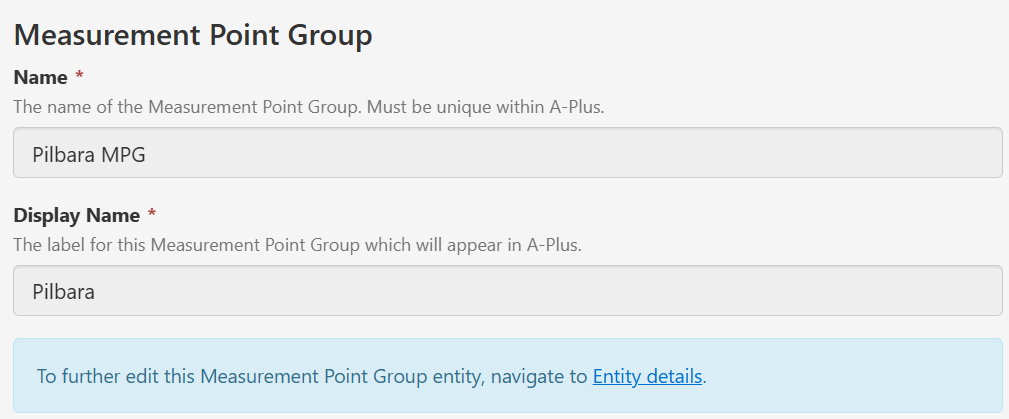
The Entity Start Node when creating an area has been updated to allow administrators to specify whether to use an existing entity, or if they should create a new one. This saves time and eliminates errors when configuring a number of areas in the A-Plus configuration in Server Management.
If ‘Create new entity start node’ is selected, additional fields appear to allow you to specify the name and display name for the new entity.
When the new area is saved, the new entity is also created.
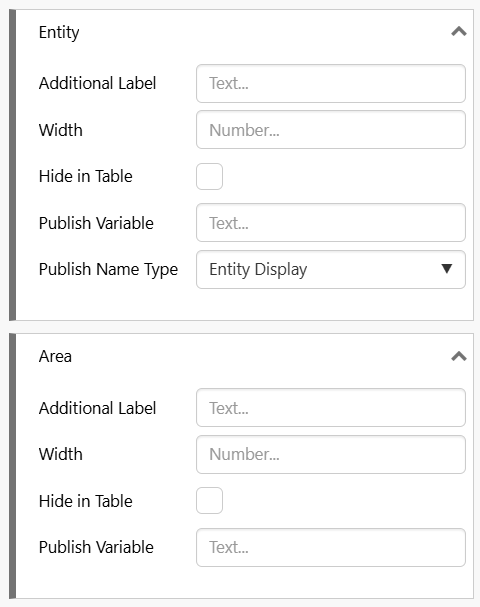
Improved Creation of Measurement Points
Measurement Point Groups, Measurement Points, and Measurement Point Equipment entities can now be created from the A-Plus Areas configuration, with the correct A-Plus template being automatically applied.
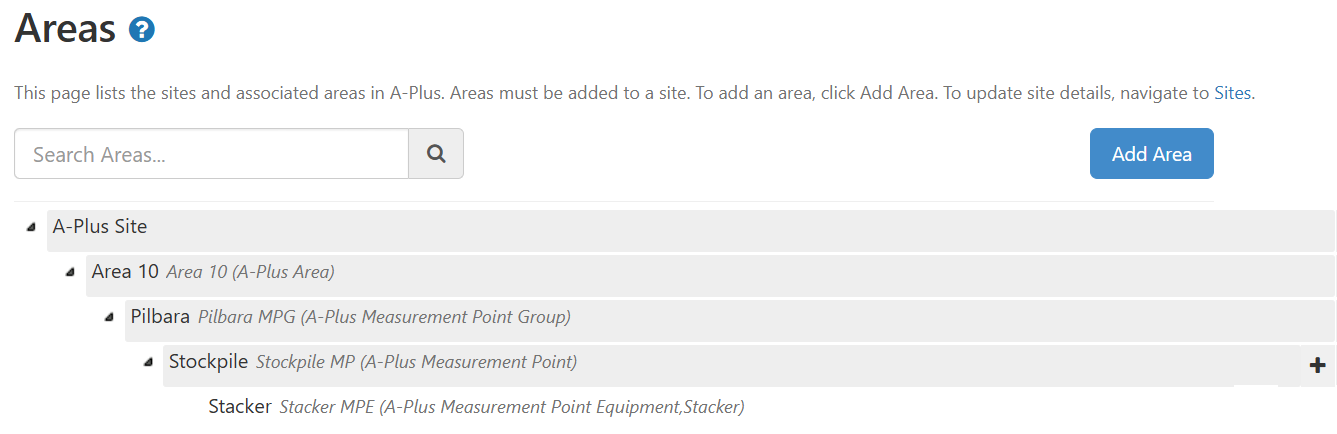
A ➕ icon has been added to the end of each node; when clicked this allows you to easily create the entity in the Explorer Hierarchy and also adds the required A-Plus templates without having to leave the Area configuration. Once created, a link is provided which takes you directly to the entity so you can apply further templates and make any other changes you need.
Admin Tool Login Using Azure
The A-Plus Admin Tool has been enhanced to allow users to log in using Azure authentication.
A-Plus Hierarchy Pickers use Explorer Time-Aware Hierarchies
We have introduced the ability for A-Plus hierarchy pickers to respond to time-awareness in an Explorer hierarchy. This means that when various equipment is brought online or offline, the hierarchy can respond appropriately in the A-Plus application and only show the equipment that was in the hierarchy at the start of the selected time period.
When adding a new event, A-Plus will show the hierarchy as it was at the start time of the event. In previous versions, the hierarchy was always loaded with the most recent version of the hierarchy.

Publish Variables from Selected Row
In a Shift Log Workbook, the A-Plus Entry component tables can be configured to publish a specific value to a variable when a user clicks a row in the table, or the entry table refreshes. This allows greater interactivity between components in a workbook, and provides information with greater context.
This is the same functionality that exists in Data Tables in Explorer Pages, but within Shift Log. For example, when a user clicks a row in the table, the name of the entity can be published, which in turn could allow an embedded trend on the same page to be updated.
For entity type fields, the value that is published can be either the name or the display name.
You can also publish the value of a column that is hidden in the table view.
Note: The following field types cannot be published to a variable: User, Text – Multi Line, and Merrick Form.
Changes to entry table columns for on row click selection
Structural Changes
To accommodate publishing of variables from an entry table, and to further simplify how the entry tables work, the following changes have been made to the structure of all entry tables:
- The ... menu has been moved to the left.
- The Attachments icon has been moved to the left.
- A checkbox has been added on the left for each entry.
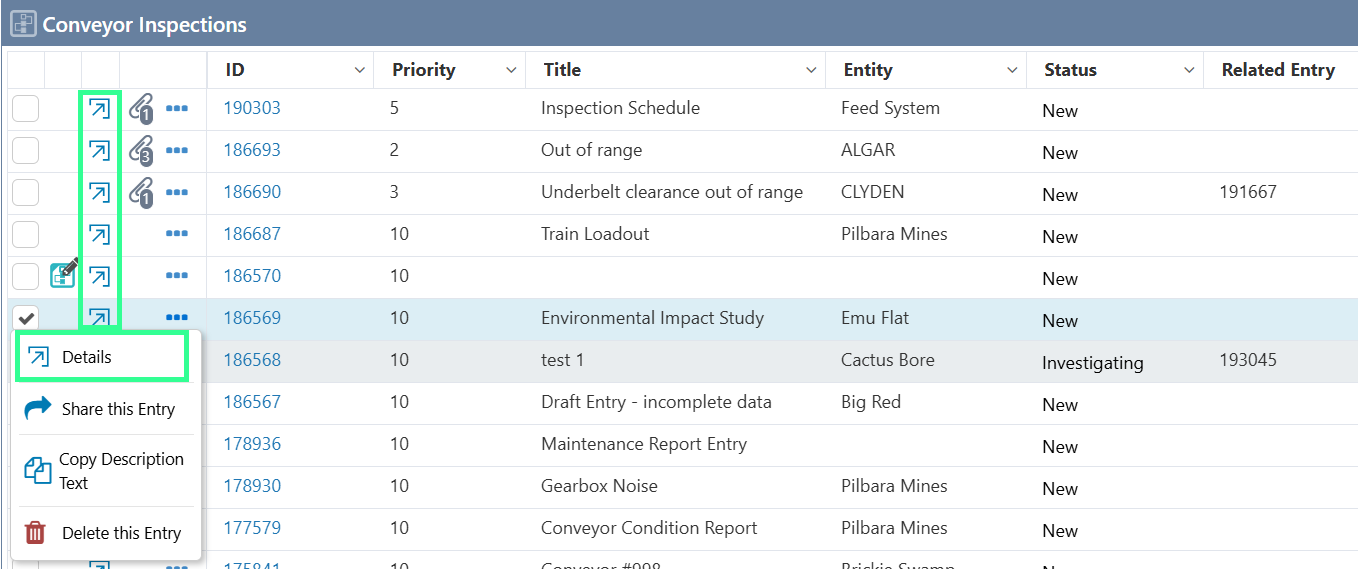
Opening an Entry Dialog
As a single click is now used to publish variables, the following options have been provided to open an entry dialog:
- Click the Details icon on the left.
- Click the Details icon from the ... menu
- Click the ID number in the ID The ID column is now a link that directly opens the entry dialog with a single click, instead of a double-click.
- Double-click elsewhere on a row.
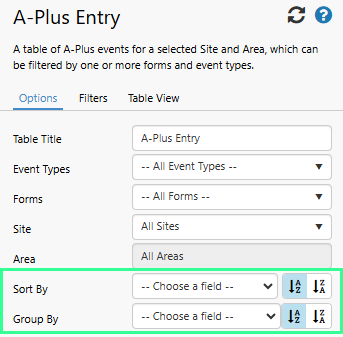
A-Plus Entry Component Editor for Workbooks
The following fields have been removed from the 'Sort By' and 'Group By' fields of the A-Plus Entry component editor, in Workbooks:
- Master Entry Id
- Source Entity Name
- Source System Id
- Production Stream