ON THIS PAGE:
Explorer uses P2 Security to secure the following objects:
- Workspaces
- Pages
- Trends
There are two types of roles in P2 Security: Application Roles and Global Roles.
Users are assigned to Global Roles, and the Global Roles can be mapped to the Application Roles, which transfers those application access privileges to users with that Global Role.
Note: By default, if no users are assigned to an object, then all users have access to that object. As soon as one or more users are assigned, access is restricted to those users.
For example, if there are no users at all assigned to a workspace, then this is interpreted as being set to 'allow all', giving all users access to the workspace. As soon as one user is assigned, then only that user can access that workspace. If you want others to be able to see this workspace, then they need to be added as well.
Tutorial: Assigning User Privileges to a Workspace
Note: This procedure also applies to objects in P2 Server (Attribute, Dataset, Entity, Hierarchy, Link, Tag, Template).
To access P2 Security, go to:
https://SERVER_NAME.MY_DOMAIN.COM/P2.Security.Connect
Note that the server name must be the fully qualified domain name.
Applying security consists of 3 steps:
- Adding Global Roles
- Assigning Application Roles to the Global Roles
- Assigning privileges to the Global Roles
Step 1. Adding Global Roles
The first thing you should do is work out what your Global Roles are, and then add these in the “Global Roles” section in P2 Security.
These are roles that exist across applications, so they would apply to both P2 Server and P2 Explorer. These are the different categories of users that exist in your customers' business.
Another type of Global role that would commonly be added is some type of System Administration role.
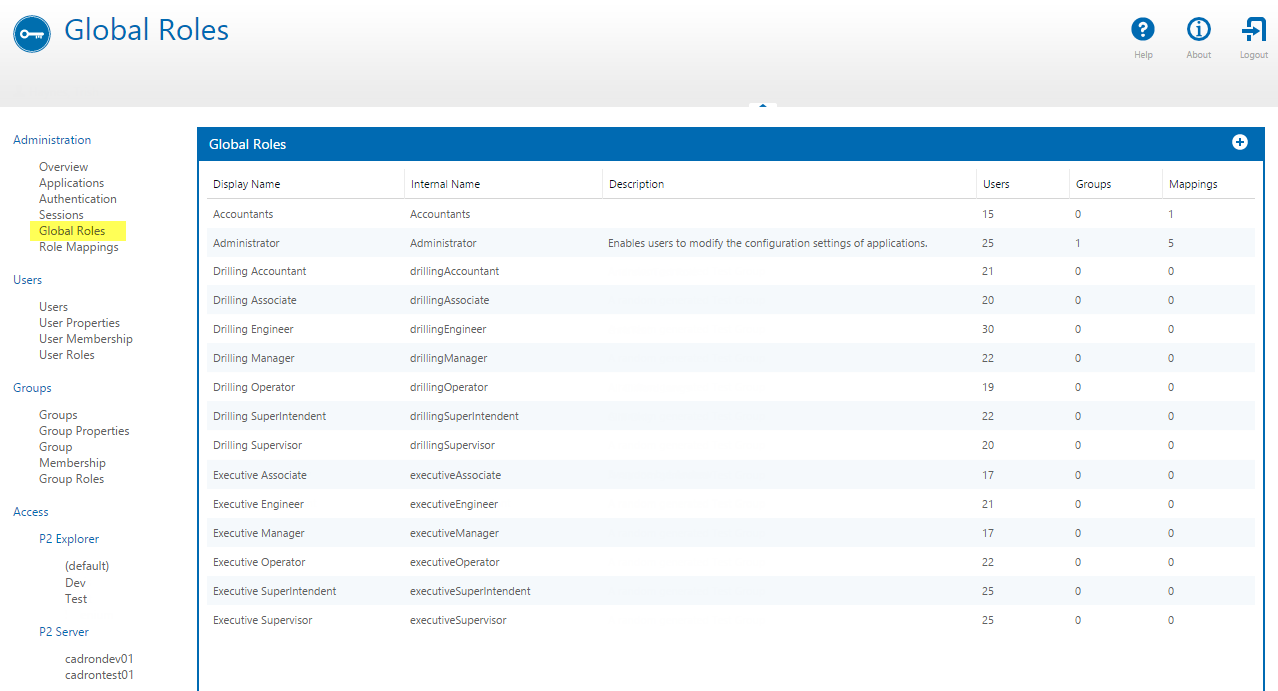
- To add a Global Role, click the Add
 button in the top right of the blue toolbar. This will simply allow you to add a name and description.
 - In here, add the different groups, such as Accountants, Engineers, Developers etc, whatever you need for your organisation.
Step 2. Assigning Application Roles to Global Roles
If you have a use for any of the Application roles that exist, now is the time to assign them. At this point in time, all we have in P2 Explorer is the “Explorer Administrator” role. By assigning this Application Role to a Global Role that you have created (such as System Administrator), then you are automatically adding all of the privileged settings to that Global Role in one easy step. When you're configuring the other applications (such as P2 Server), then you can assign the same types of Application Roles to this same Global Role, creating a super group that can administer all of the applications.
Note that these Application Roles are built into the application and are fixed, as opposed to the Global Roles that are defined by you in P2 Security. At this stage it is just a shortcut to adding administration rights for each of the applications and allowing you assign it to a Global Role that you have created.
To do these assignments:
- Go to the “Role Mapping” section.
- Choose the application (P2.Explorer) in the left box.
- Then choose the role in the right box (Explorer Administrator).
- Then, down the bottom left it will show you the list of Global Roles that you have created earlier.
- To assign a new role, click the role you want to add in the right box, and then click the left arrow to move it into the left box.

Step 3. Assigning Privileges to Global Roles for P2 Explorer
This section is probably where you will be doing most of your work in granting access to a workspace or a page for a particular Global Role.
- For this part, we need to go down to the bottom of the sidebar (on the left), and choose the application you are administering in the “Access” section. E.g. P2.Explorer.
- Choosing this will update the right side on the interface. The section that you are interested in is the Objects' Security section.
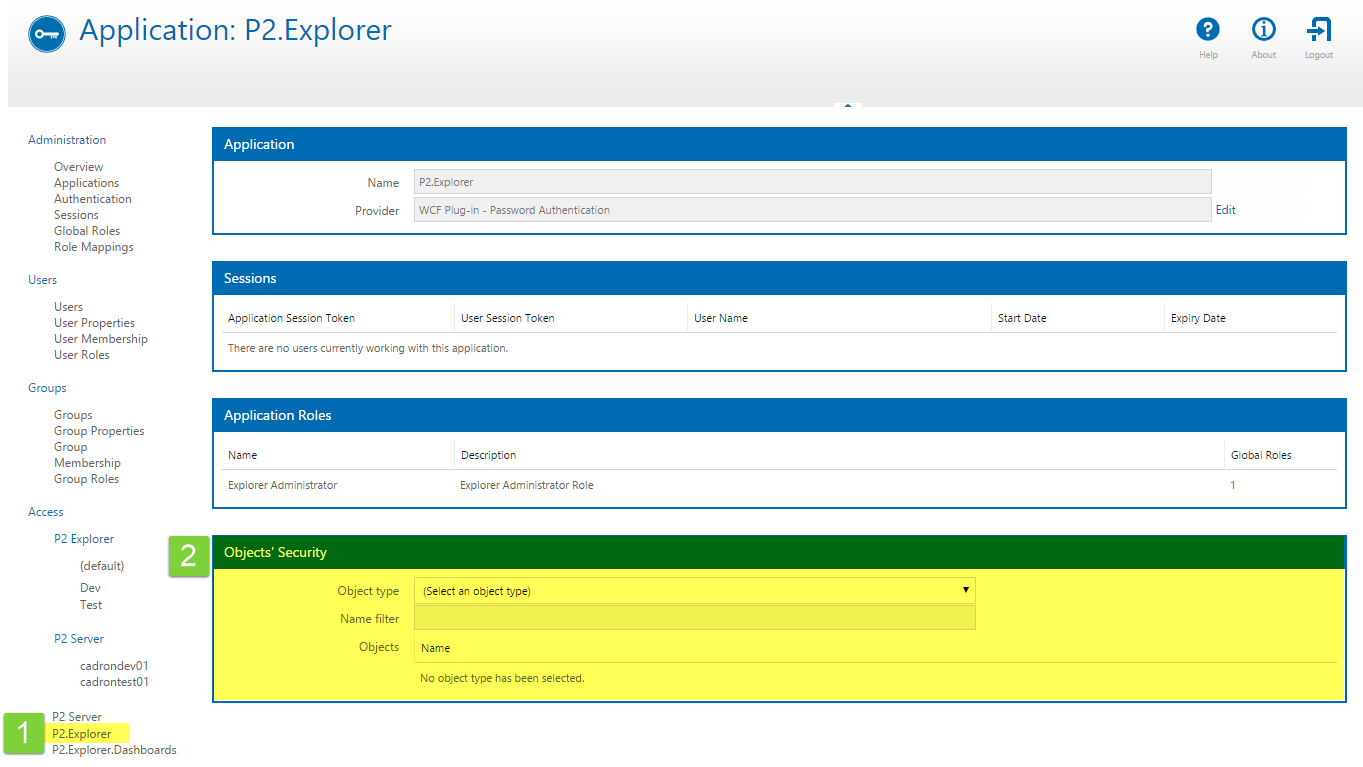
Now, at this point you need to know what you are going to secure: the entire workspace (which will flow down to pages and trends) or a single page or trend.
Let's assume that you are going to secure the whole workspace.
- Choose Workspace in the Object Type drop-down list. This will make a call to P2 Explorer and it will return a list of Workspaces that are available in the system.
- Click the workspace that you want to secure (in the list). An Edit icon will appear in the top right of the Objects' Security toolbar.
- Click the Edit icon to open the access editor.
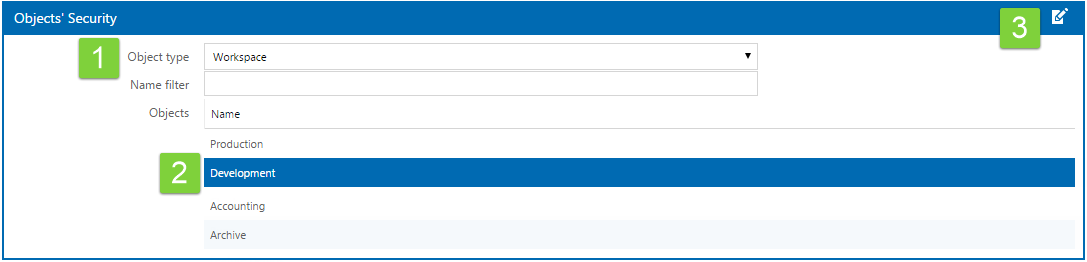
In this example, we're configuring the Development workspace.
There are 2 types of privileges:
- View. Read-only access to the object you are configuring. In this example, this means read-only access to the Development workspace.
- Modify. Access to Explorer Studio for the object you are configuring. In this example, this allows the users with this role to modify the pages and trends in the Development workspace.
There are 2 ways to grant access:
- Allow All. Assigns View and Modify privileges to all of the Global Roles defined in your system.
- Custom. Allows you to set individual View or Modify privileges for each of the roles that you have defined in Step 1.
When you have finished assigning access privileges, click OK and the privileges will be updated, effective immediately.
