ON THIS PAGE:
Security for P2 Explorer is managed by the P2 Security application.
Default Permission Levels
When P2 Explorer is first installed, by default all users are in the "Everyone" global role, and the role allows all users read and modify access to all of Explorer.
The Everyone role is used by administrators to specify a global setting for anyone who accesses P2 Explorer. For example, the Everyone role can be used to allow all users to view specific pages in P2 Explorer, but not edit them.
Note: All users are automatically assigned to the “Everyone” global role, even if that role does not exist. If this role is deleted or otherwise does not exist, you can create the role manually so you can secure items and applications against it.
If you want to start restricting access to certain workspaces, pages, or trends, then you need to explicitly specify permissions for all roles for the workspace, page, or trend you are securing.
Access Levels
In P2 Explorer, you can secure workspaces, pages, and trends for viewing and modifying.
Permissions cascade from higher to lower levels. For example, if you secure a workspace then only the users who are able to view the workspace will be able to view the pages and trends within that workspace.
However, you can also apply further security to pages and trends within a secured workspace. For example, you may have a workspace that is only visible to managers, but you may then have pages within that workspace that are only visible to senior managers.
Launching P2 Security
To open P2 Security, type the URL into the browser's address bar. The URL takes the following form:
https://servername.domainname.com/P2.Security.Connect
Note that the server name must be the fully qualified domain name. For example:
https://cadrondemo01.petroleumplace.com/P2.Security.Connect
Tutorial: Restrict Access to a Workspace
If you want to restrict access to a certain workspace, you will need to create an additional global role for those users who can access the restricted workspace. In this example, we'll restrict access to one workspace by creating a global role, and only allowing that users with that role to view the workspace. Let's assume there's a workspace in P2 Explorer called Managers - this is what we want to restrict.
Step 1. Create the global role
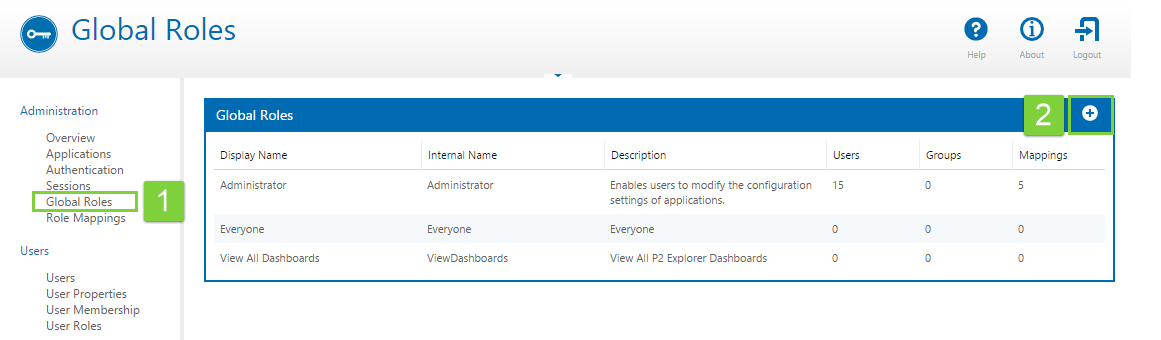
1. On the left, click Global Roles (under Administration).
2. In the top right of the blue toolbar, click the Add ![]() button .
button .
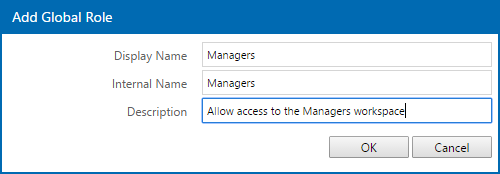
3. In the Add Global Role dialog box, type a name and description for the new global role, and then click OK.
Note that Internal Name is required, and it must be unique and contain no spaces.
Step 2. Restrict access
We'll look at adding users to the global role in the User Management article.
Right now, let's focus on how to use the global role to restrict access. Now that you've created your global role, we can use that to restrict access to certain workspaces in P2 Explorer.
1. On the left, under Access, click your P2 Explorer application. In this case, we're clicking P2.Explorer - cadrondemo01.

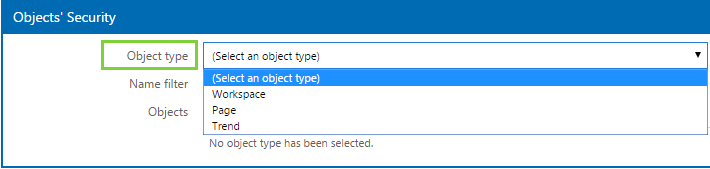
2. The next bit that you have to pay attention to is the Object Security. This is where you secure your workspaces, pages, and trends.
3. First, select your object type. In this case, we want to secure a Workspace, so select that.
You will need to wait a few seconds for the names of the workspaces to load.
4. If you have a lot of workspaces, the one you are looking for may not appear in the list. In this case, type the first few letters into the Name filter.

4. When the Managers workspace appears in the list, click it so that it's highlighted dark blue. The edit icon will then appear in the top right corner.

5. Click the Edit ![]() icon.
icon.
In the Edit Access dialog box, you can see that we're editing access for the Managers workspace on P2 Explorer - cadrondemo01.
By default, the Allow All option is selected, which means that all users are able to read and modify the workspace. As you can see, access depends on the permissions assigned to each global role.
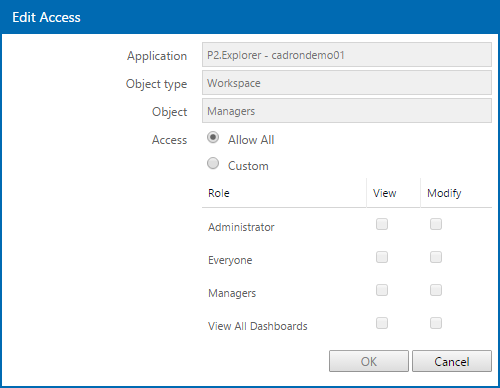
6. We want to customise the permissions, so select the Custom access option.
Now, we only want people in the Managers role to view and modify the workspace, and we want to all Administrators to see it.
7. For Administrator, select View. And for Managers, select View and select Modify.

8. Click OK.
Access permissions for the Managers workspace have now been updated.
You should now add users to the Managers role.