ON THIS PAGE:
Field Operator is a map-based entry, and collaboration tool, designed to optimize field and back office activities.
Field Operator opens in the Map view, with the locations from all preloaded routes displayed in the Information Panel, and as markers on the map.
The Map view highlights what's currently happening at a location.
The Map Explained
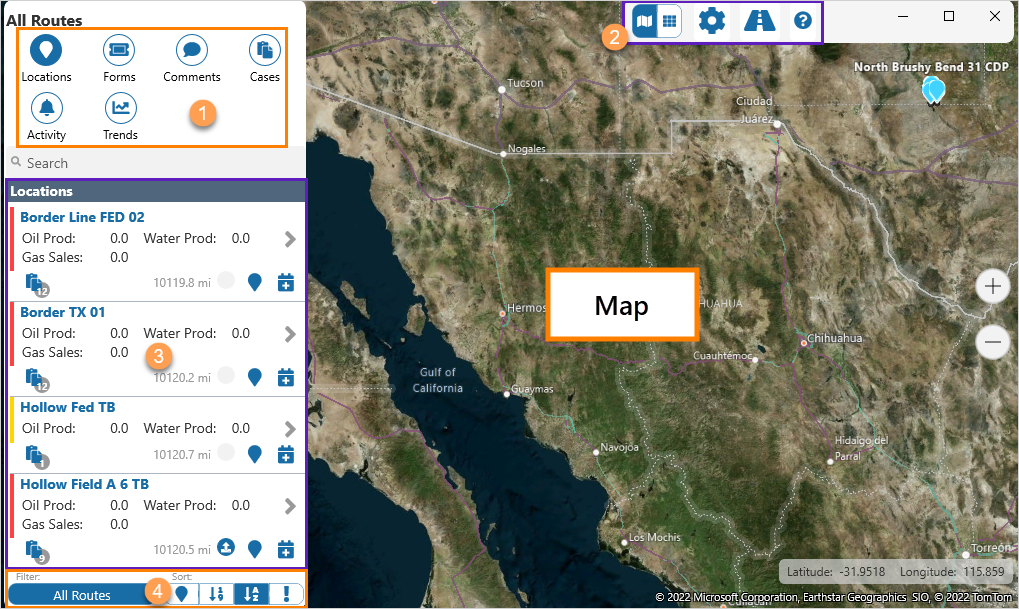
| 1. Navigation Ribbon |
The Ribbon is found at the top left side of each screen. and is the main way to access many of the Field Operator options. In Map view, the ribbon contains the Locations, Forms, Comments, Cases, Activity, and Trends buttons. |
| 2. Toolbar |
The Toolbar is found at the top right side of each screen. Use it to access View Mode, Settings, Journey Planner, and Help options. |
| 3. Information Panel |
In the Information Panel, summary information from the last two days is viewable for all of the Navigation Ribbon items. Only locations on the Selected Route, with data relating to the Active Button, will display in the Information Panel and on the map.
|
| 4. Route Selection | The Filter and Sort functions enable you to select, and organize saved routes. |
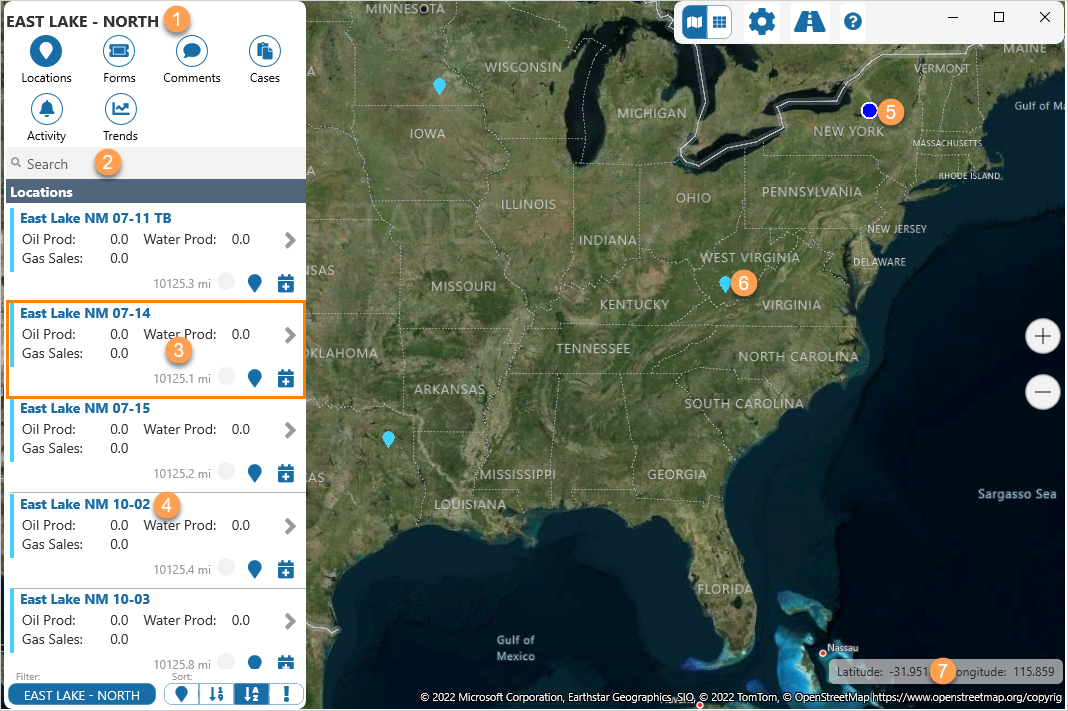
| 1. Current Route | The name of the route currently displayed on the map, and in the Information Panel. |
| 2. Location Search | Search for a location that is on the selected route. |
| 3. Location Summary | Contains summary information about a location. |
| 4. Location Name | The name of a location. |
| 5. Your Location | Your location displayed on the map. |
| 6. Location Map Marker |
Indicates the position of a location on the map. Click on the Location Map Marker |
| 7. Your Location Coordinates | The geographic coordinates of your location. |
Location Summary
A Location Summary contains brief information about a location, and is found in the Map Information Panel.
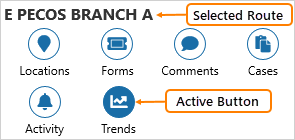
The contents of the Location Summary reflect the current selection in the Ribbon.
With locations ![]() selected in the Ribbon, the Location Summary displays daily production totals.
selected in the Ribbon, the Location Summary displays daily production totals.

Clicking in the Location Summary opens the Location Overview.

All icons in the Location Summary are clickable in some states.
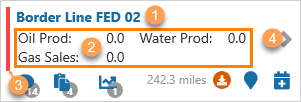
| 1. Location Name | All the information in the summary is for this location. |
| 2. Production Totals | Daily production totals for the location. |
| 3. Severity Indicator |
Indicates level of Case severity. This functionality is available to Route Surveillance users. The list of locations is by default, ordered by Case severity, and this severity is indicated on the map by matching colored icons.
For users without Route Surveillance, all icons will be blue. |
| 4. Detail | Click on the Detail |
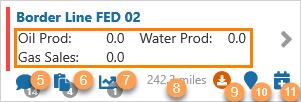
| 5. Comments |
Click on the Comment The number in the circle To close the list, click on the Comment icon again, or the up-chevron The comment icon only displays when there are comments attached to one of the selected location's entities. |
| 6. Cases |
Click on the Case The number in the circle To close the list, click on the Case icon again, or the up-chevron The case icon only displays when there are cases attached to one of the selected location's entities. |
| 7. Trends |
Click on the Trend The number in the circle To close the list, click on the Trend icon again, or the up-chevron The trend icon only displays when there are trends attached to one of the selected location's entities. |
| 8. Distance | Indicates the straight line distance between the location and where you are. |
| 9. Publish |
The Publish icons indicate the current synced, or published state of the data. Click on the Record to Publish |
| 10. Visit | Click on the Location icon to mark the location as:
|
| 11. Planner | Click on the Calendar icon to add, or remove the location from Today's Journey.
|
Release History
- Map (this release, 4.7):
- Name change - Tasks to Cases