ON THIS PAGE:
Authentication is the process of confirming a user’s identity. Authorization is the process of granting a user access to specific data. In Field Operator, Authentication is performed via 3 options:
- On-Prem Domain: Users are authenticated by checking the credentials they’ve entered against your company’s on-premises Active Directory
- IFS OI Central: For customers using software that’s hosted by IFS OI. Users are authenticated by a third-party Identity provider (Auth0). This option is new to version 4.7 and IFS OI will be working with hosted customers in the coming months to convert users to this architecture.
- Private Azure API Management: (in beta) Customers can set up a single tenant instance of the Field Operator conduit and expose it through Azure API Management to authenticate users through Azure Active Directory.
On-Prem Domain Authentication
In most implementations Field Operator uses the corporate Active Directory for authenticating users. Only users with valid domain credentials can access any data. The list of ProCount routes to which a user is authorized to download comes from the eVIN Security settings set in the Field Operator Configuration Utility (same as with the eVIN Laptop app). The list of workbooks to which a user has access is retrieved from the Explorer API. Explorer security settings are set in the IFS OI Server Management web page.
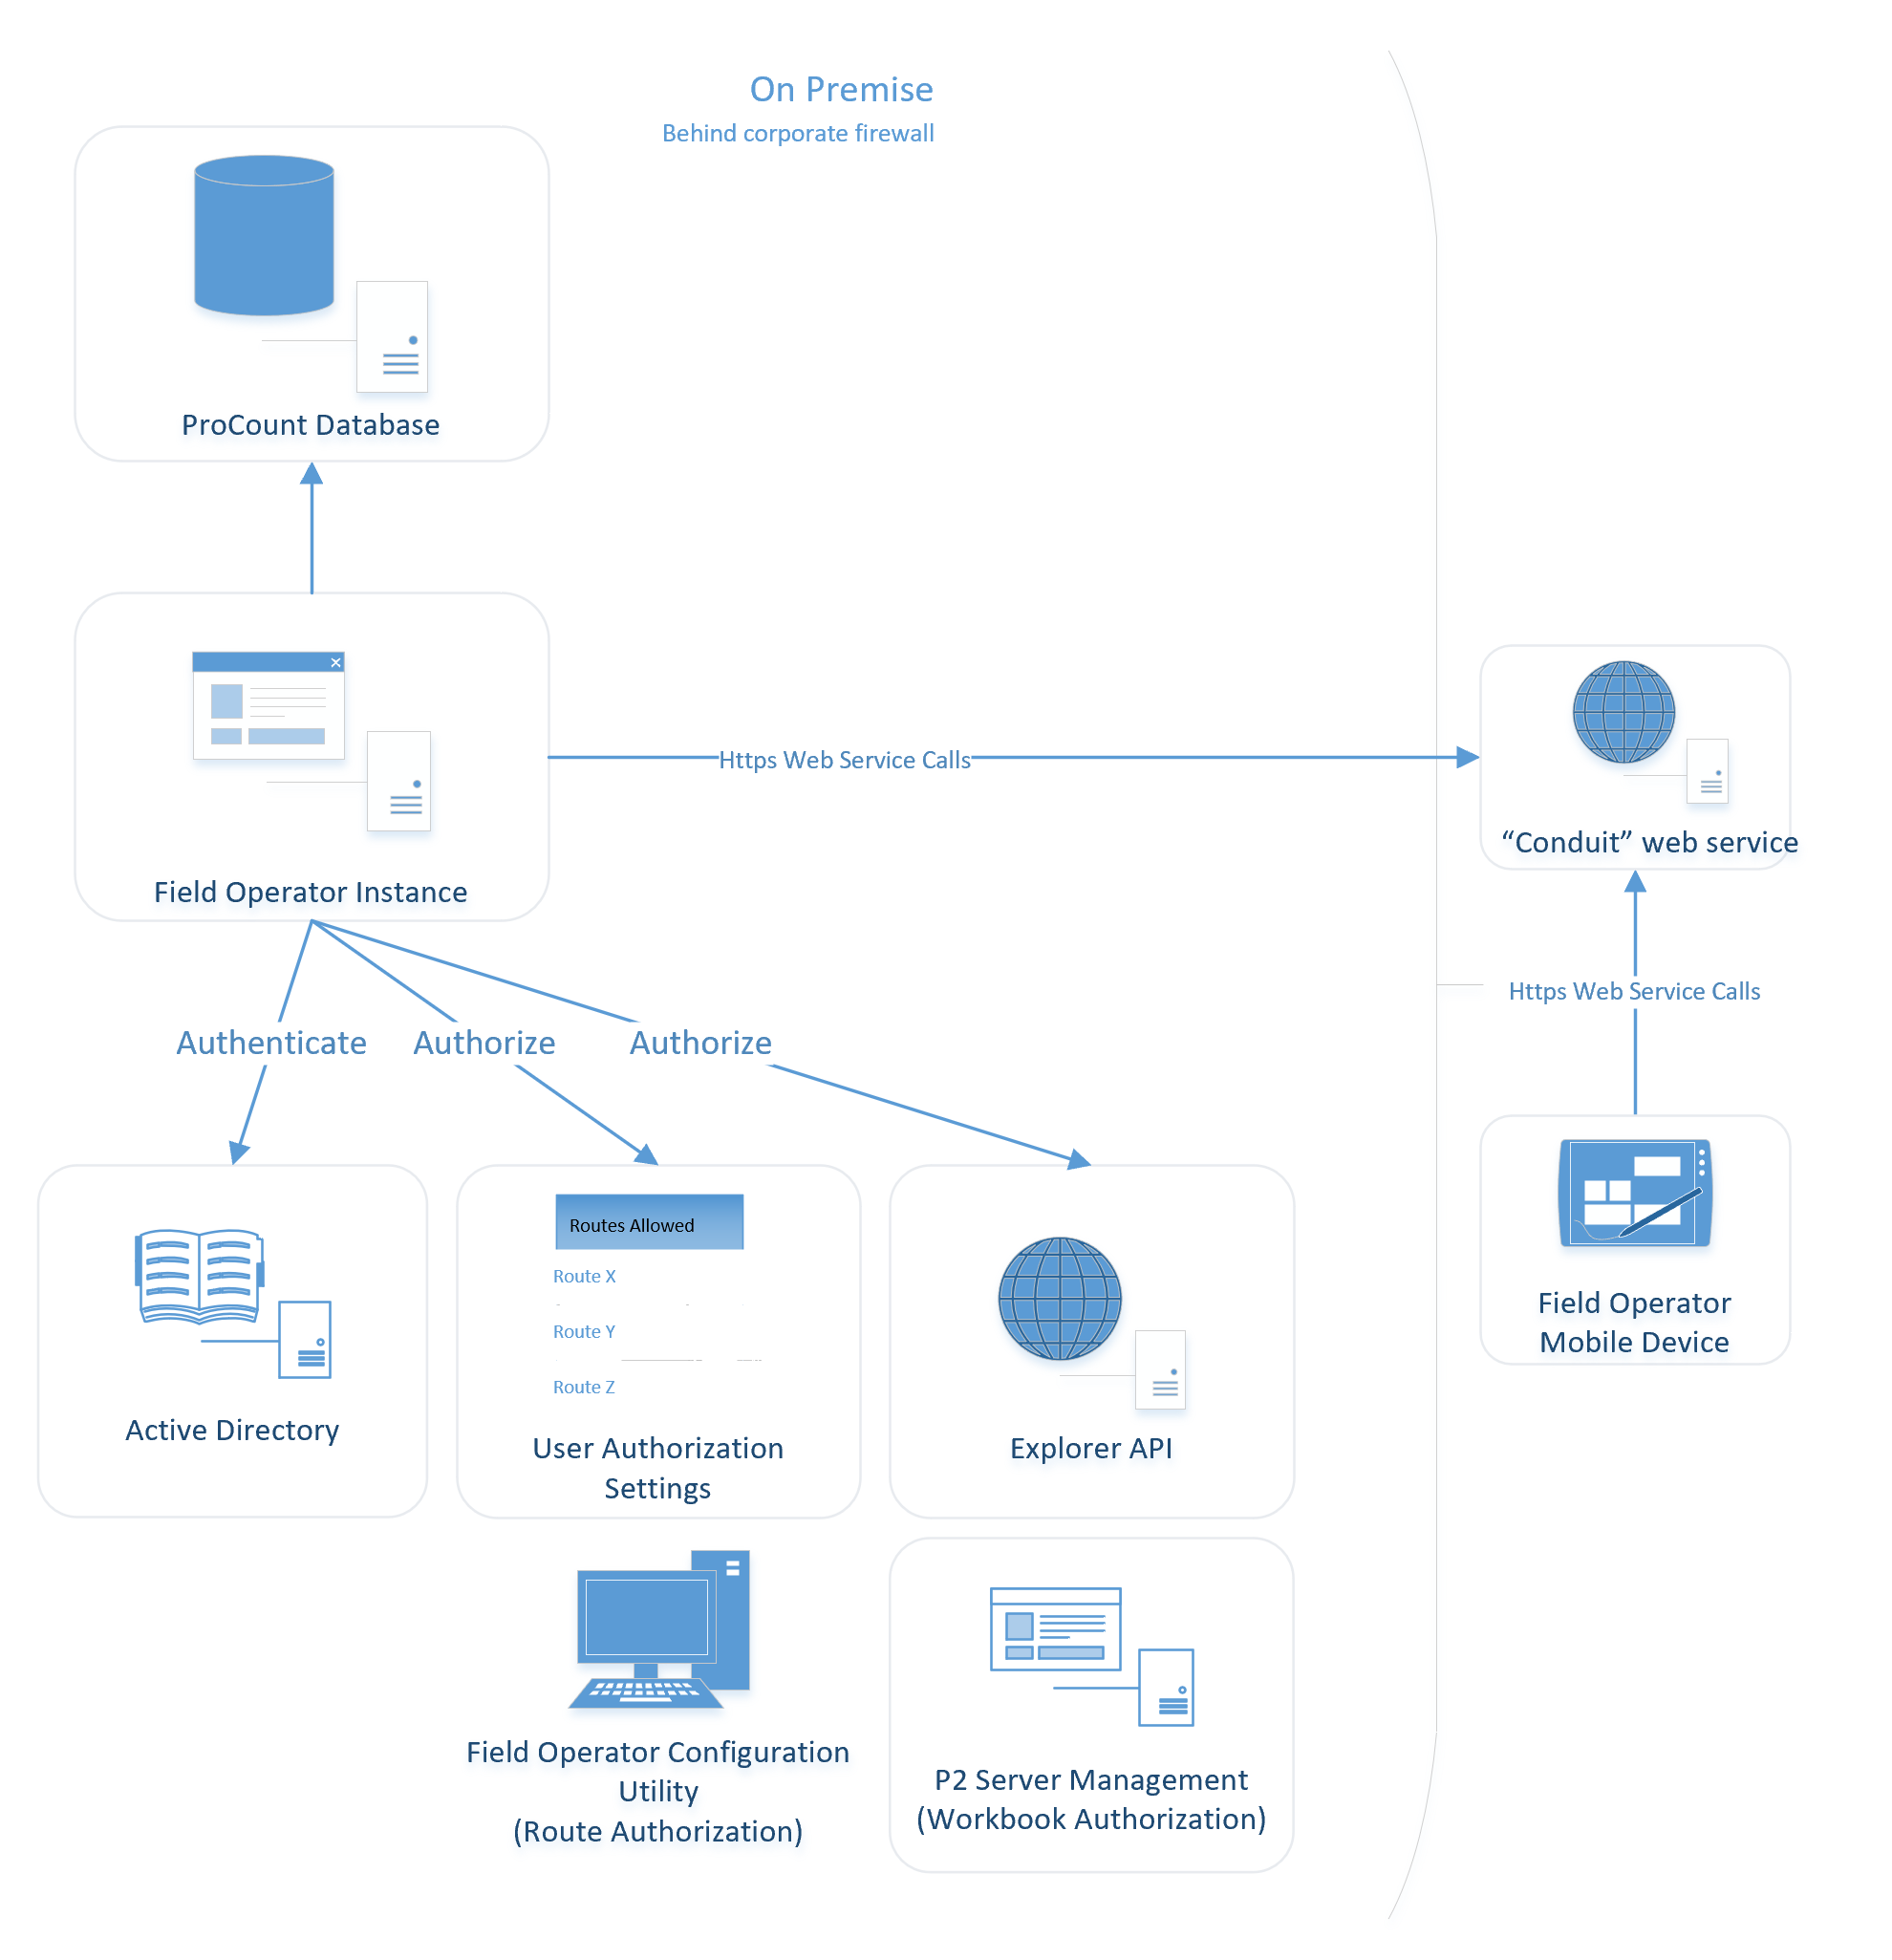
The Field Operator Server checks the user’s credentials are valid against Active Directory and also checks that the user has access to the requested Route and Workbook data.
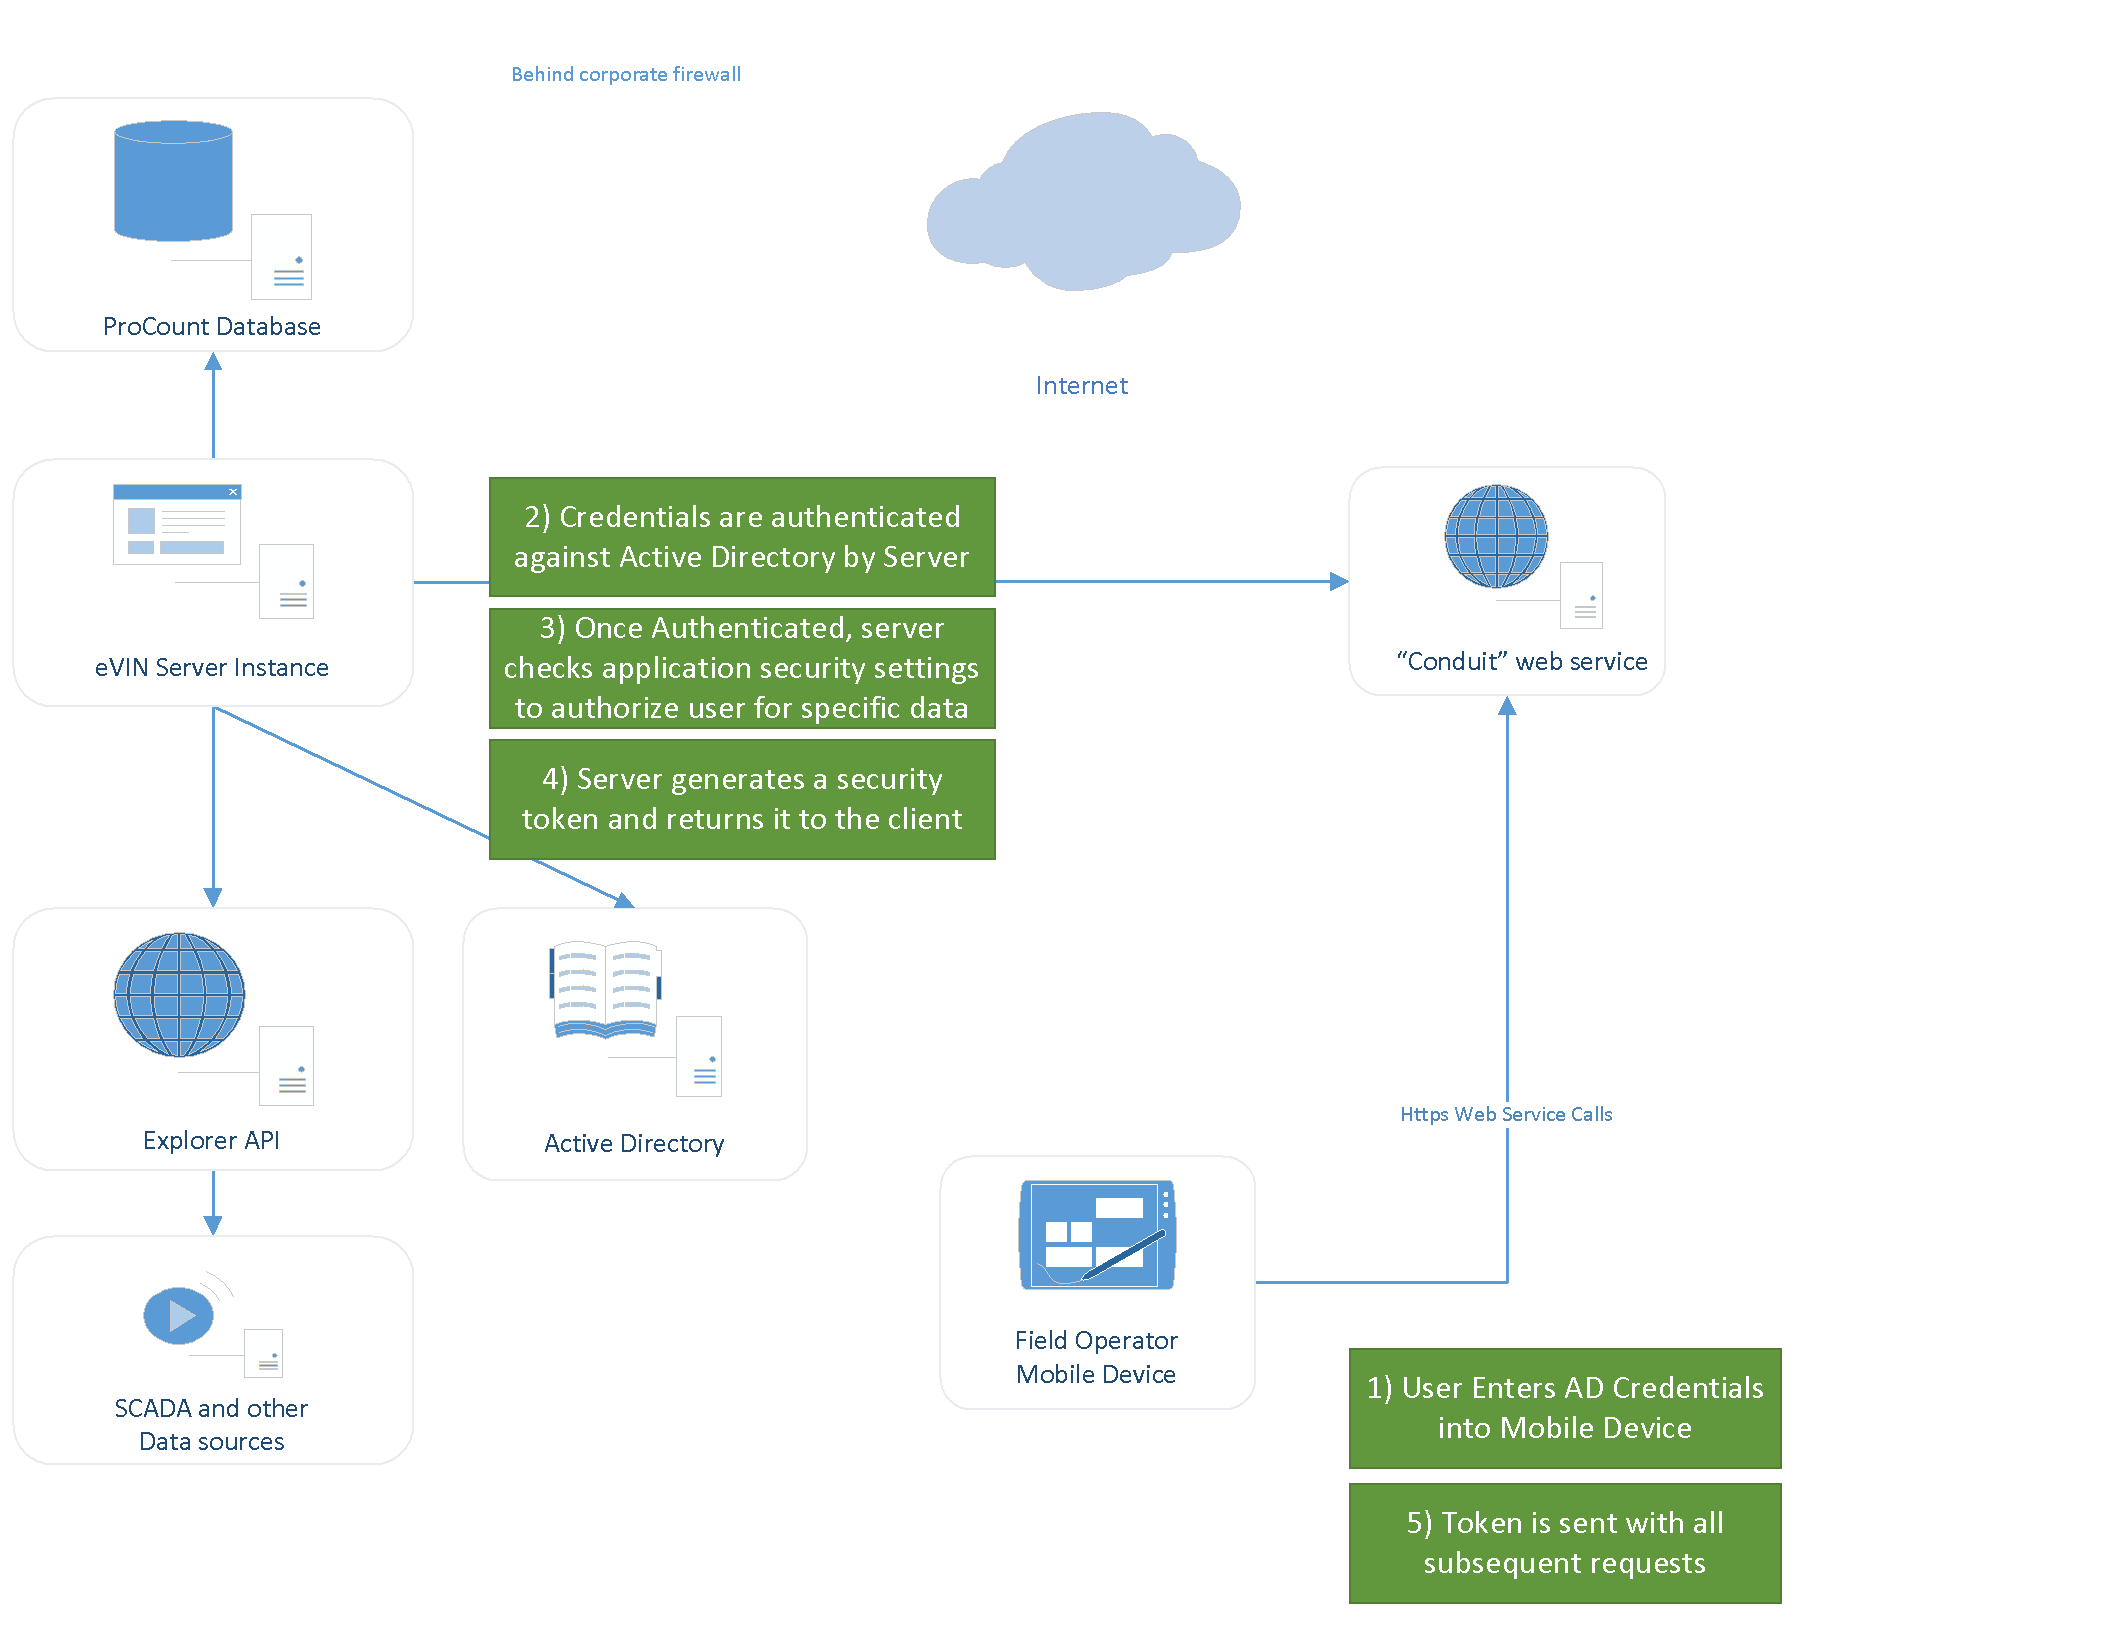
Historically in the eVIN laptops application, the domain user’s password was not required because it was assumed that the laptop was part of the domain and the user had to log into the domain when he logged into his computer. But for Field Operator, it is assumed that the tablet or phone running the app is not part of the domain, so the application requires the user to enter his domain password on the Sign In screen in Field Operator.
These credentials are encrypted in transit and the user’s password is never stored on the remote device. After initial authentication, the client application sends an encrypted security token that was generated by the Field Operator server instance. The token can only be utilized by the device to which it was issued to communicate with the instance that generated it.
Setup
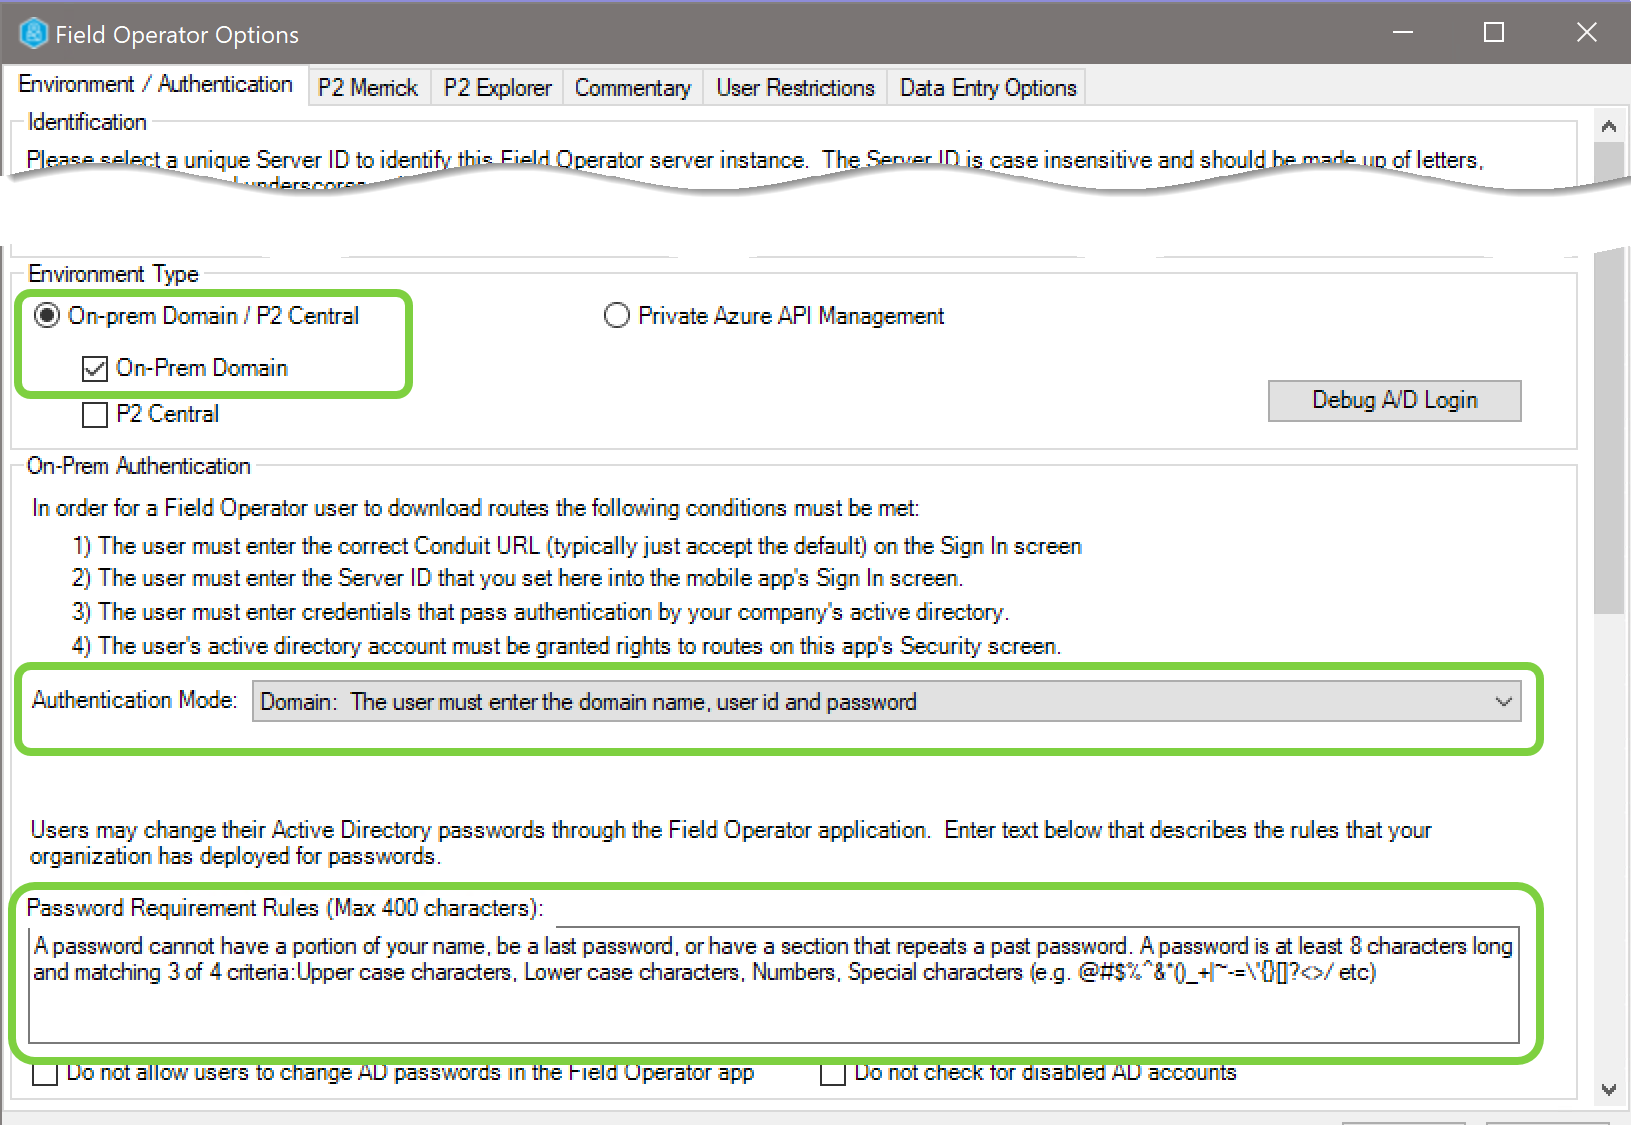
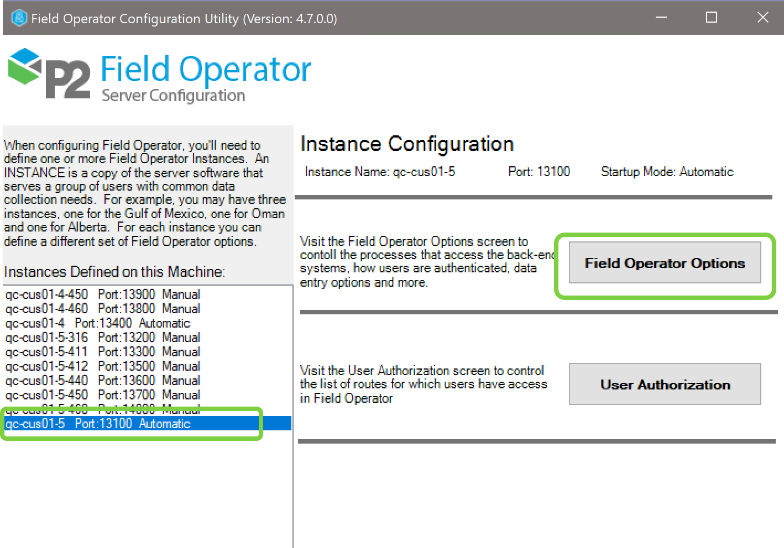
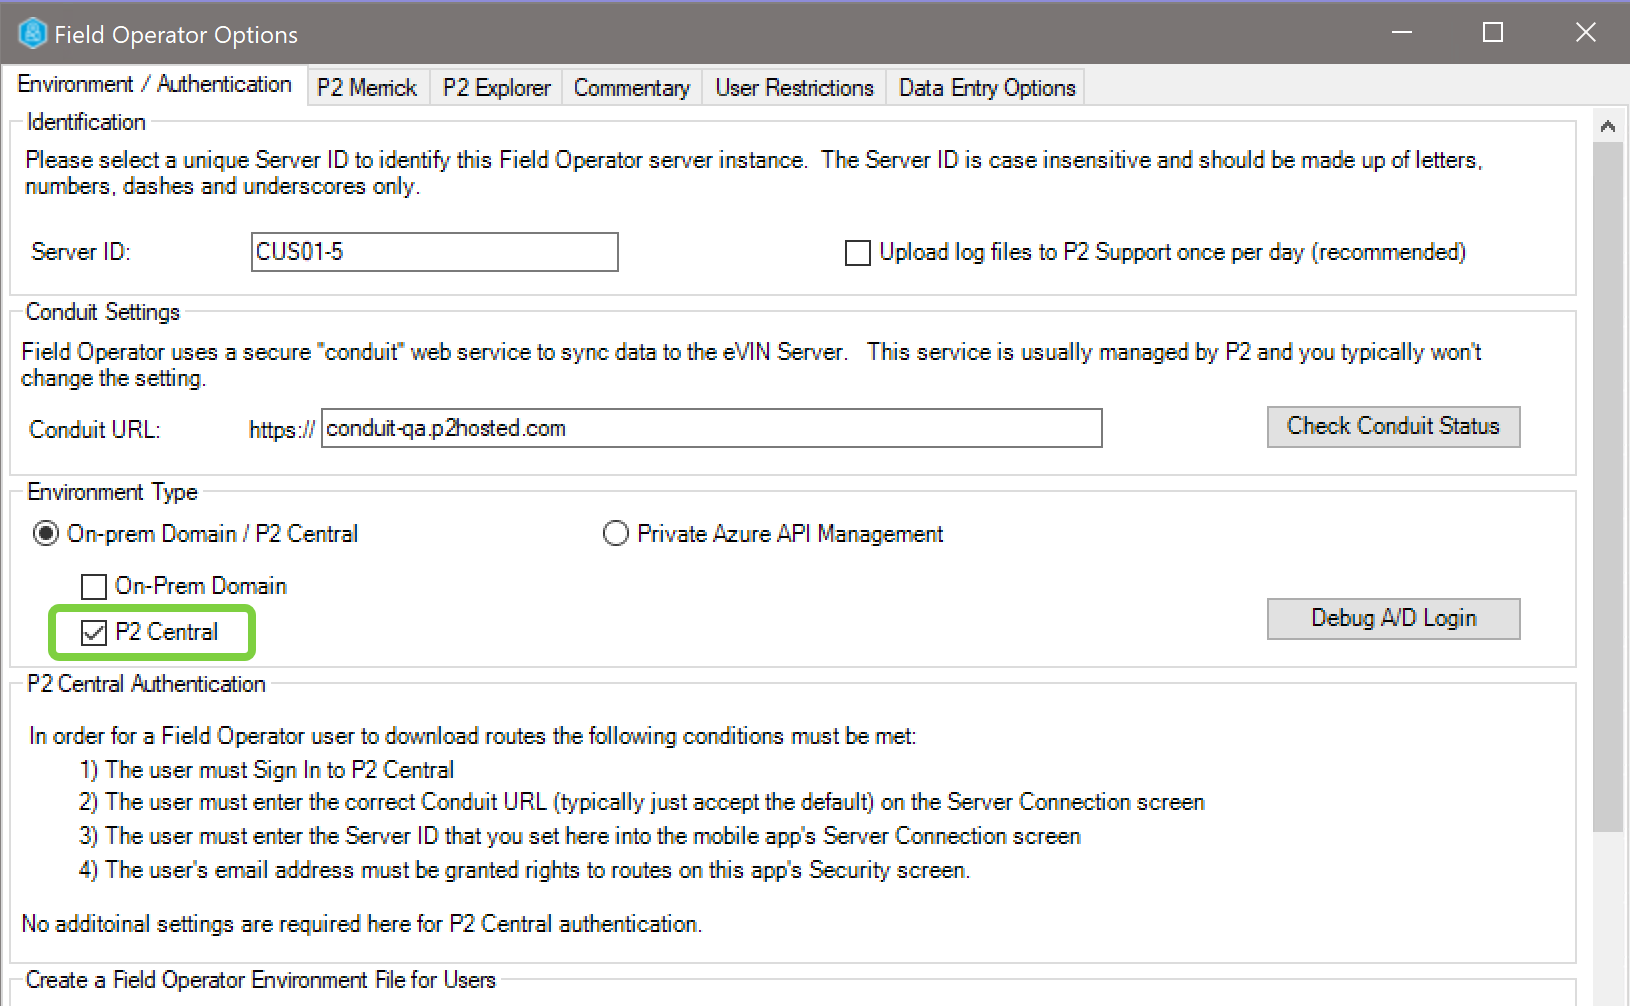
This will be the standard configuration for most implementations. In the Field Operator Configuration Utility, select the instance in the instance list and click Field Operator Options.

On the Environment / Authentication tab, set the Environment Type to On-Prem Domain, the Authentication Mode to Domain and fill in a hint that users will see when they need to change their passwords via Field Operator.
Now visit the User Authorization screen to assign users to routes. See User Authorization in the Field Operator Configuration Utility.
User Experience
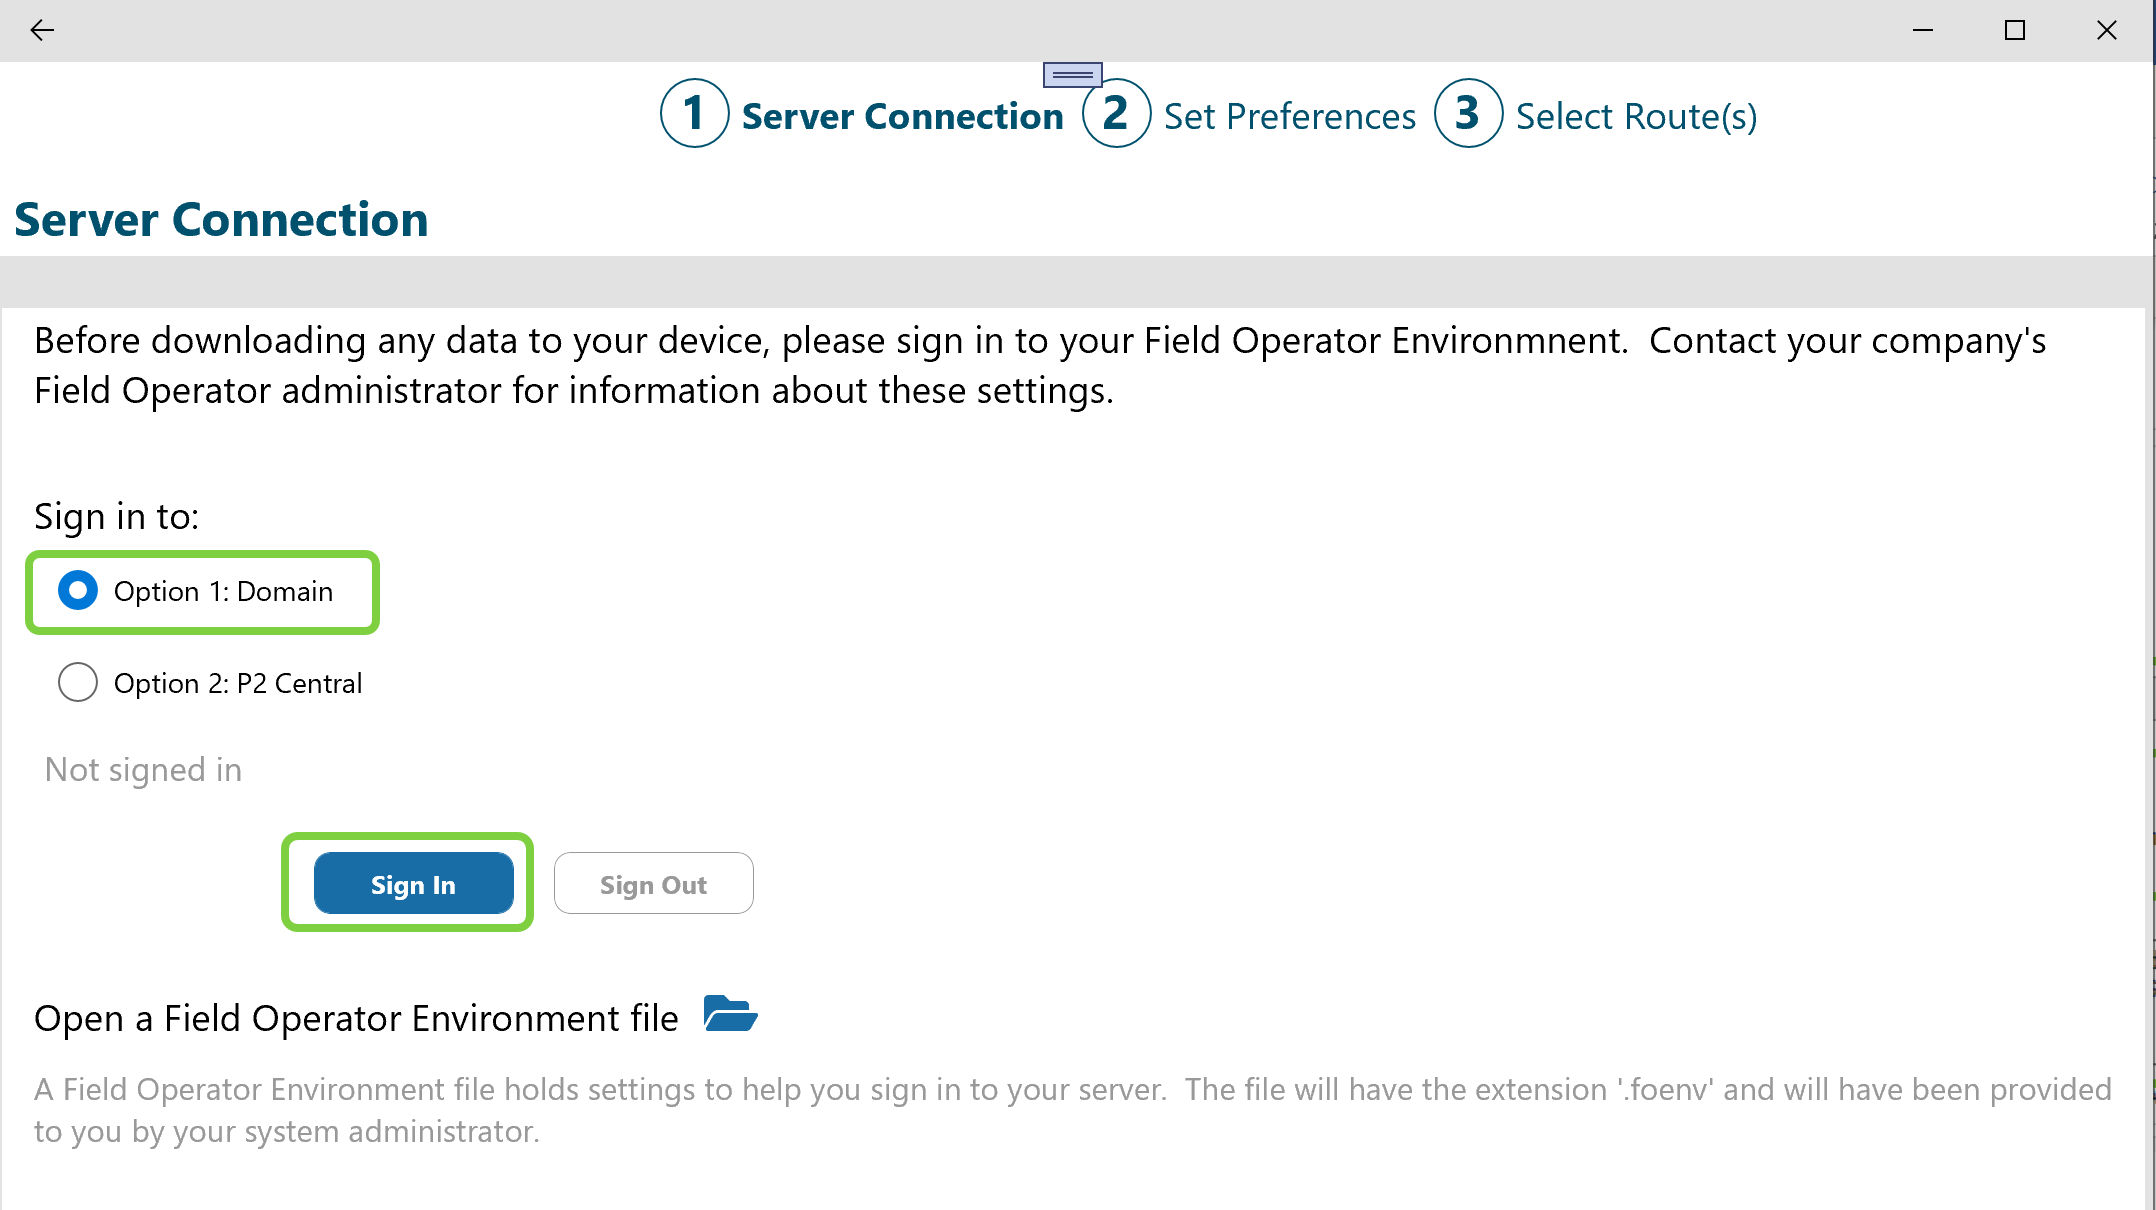
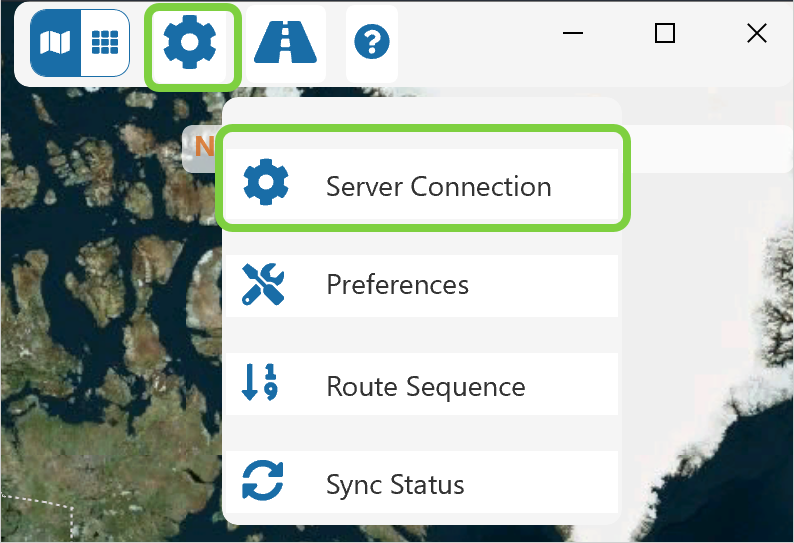
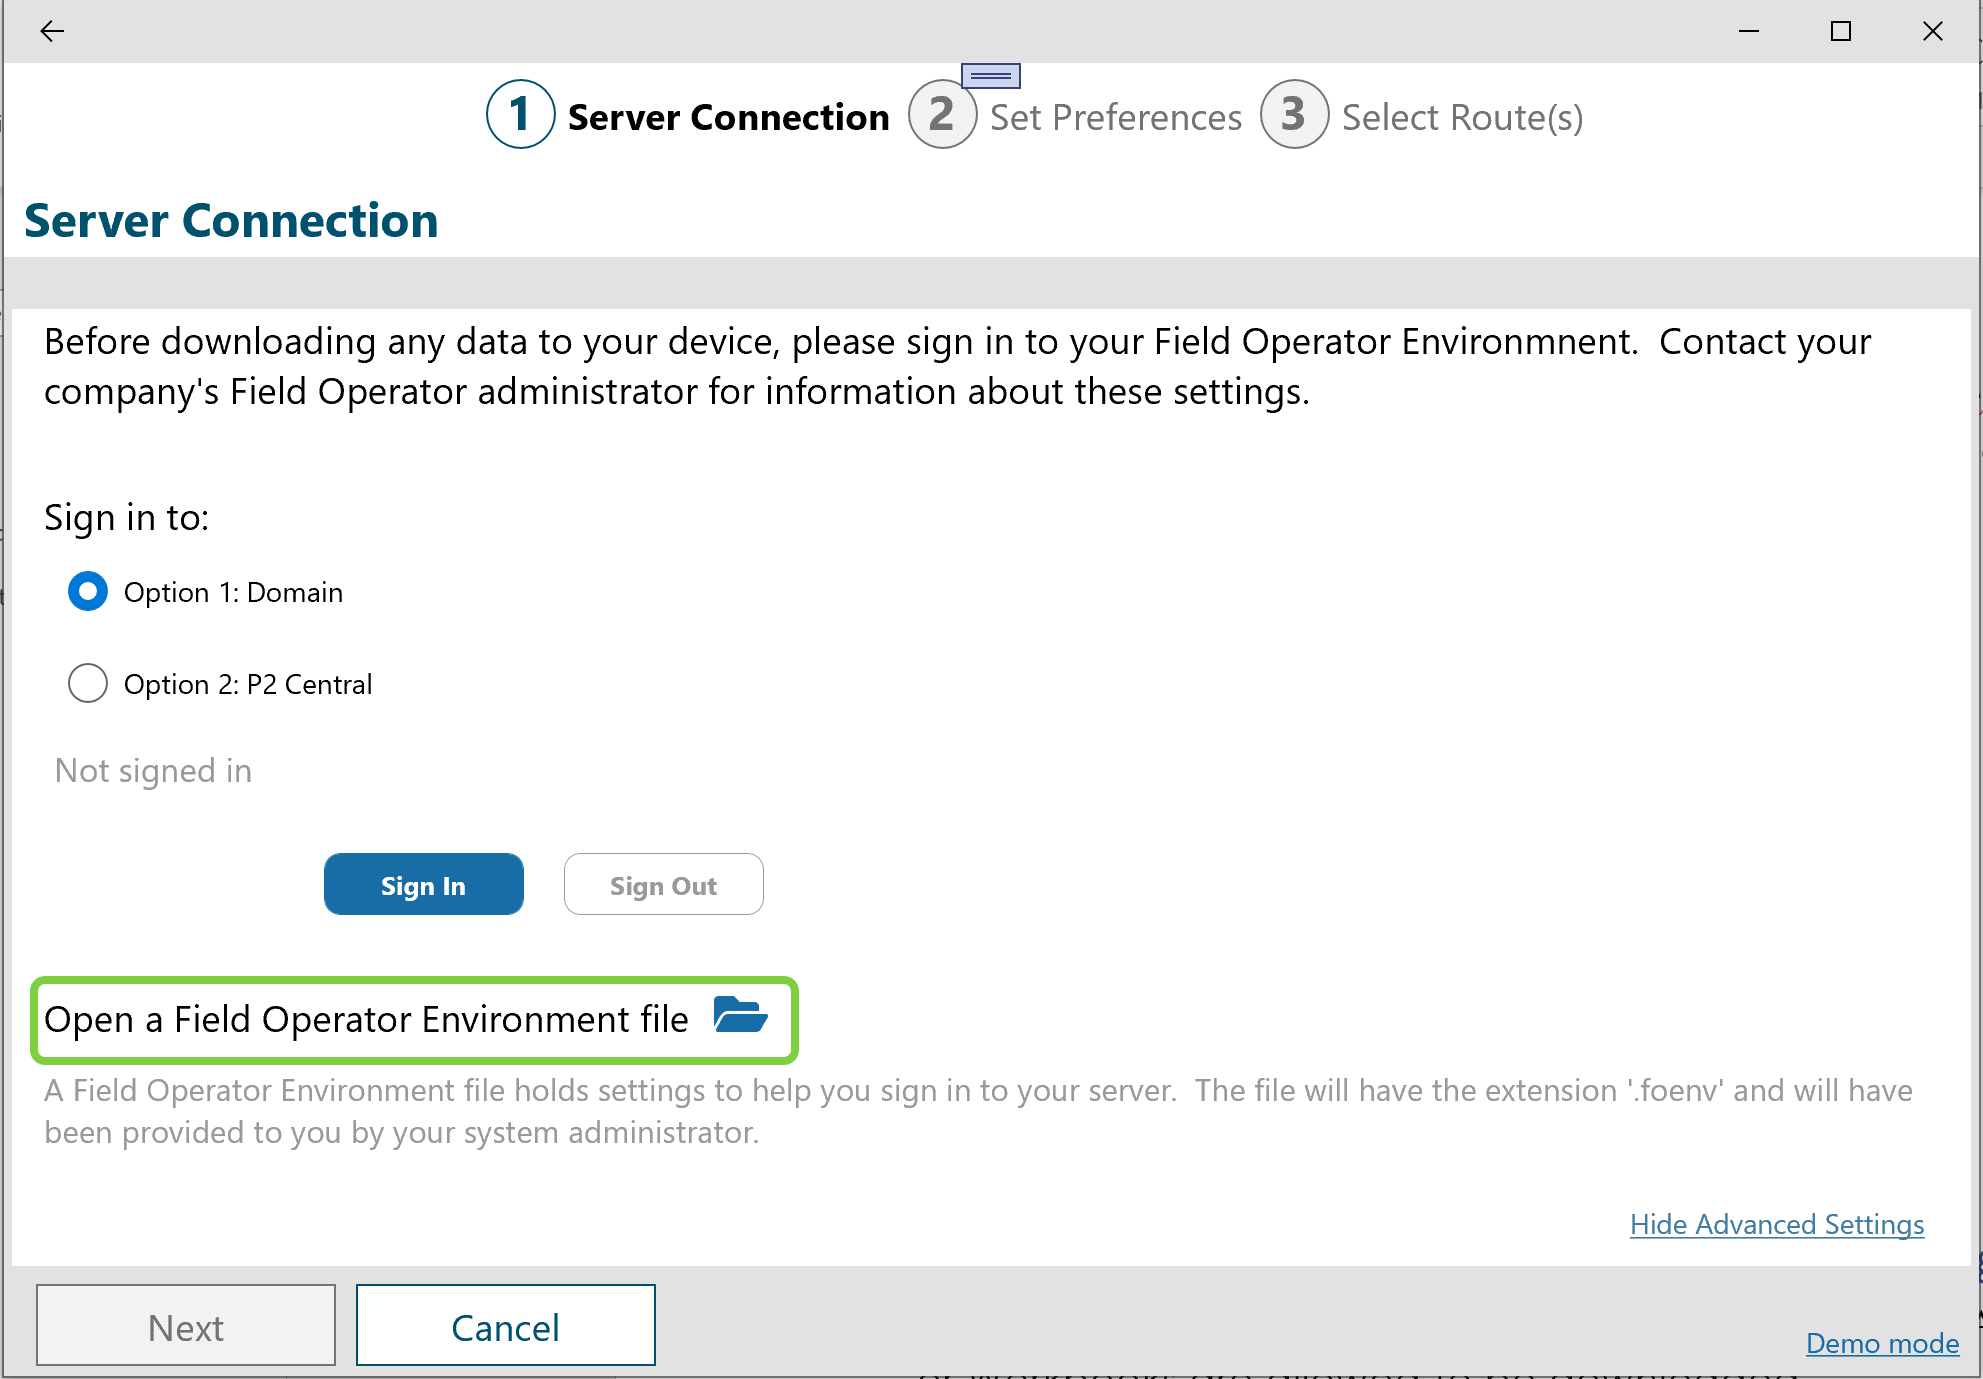
The first step to using Field Operator for a user is to visit the Server Connection page and sign into the application.
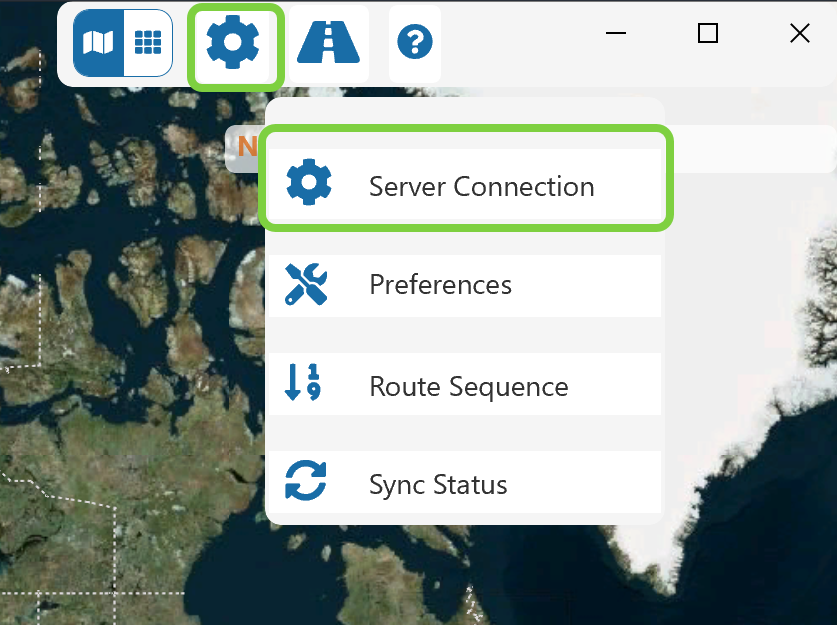
The default type of environment is Option 1: Domain, so the user will click Sign In on this page.
A Field Operator user must enter the Server ID, Domain, User ID and Password to connect to an Field Operator Server:
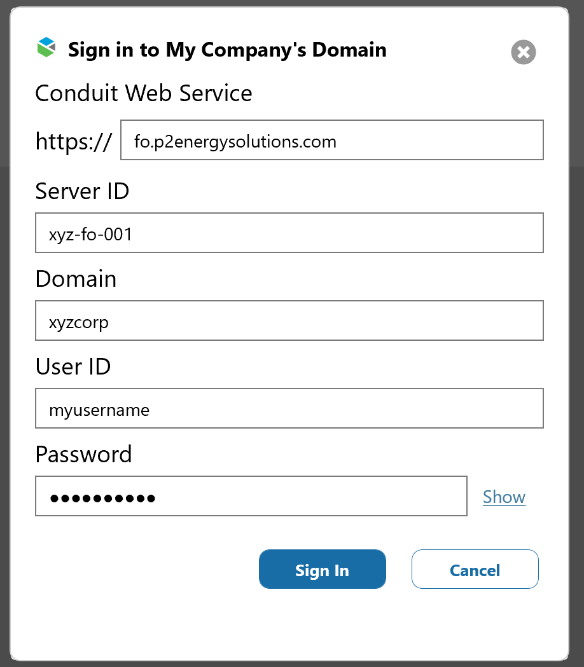
To connect a Field Operator device to an Field Operator Server, the user must know 5 pieces of information.
- The Conduit Web Service URL (defaulted to fo.p2energysolutions.com which is typical)
- The Server ID. This is a unique code is created and entered by the administrator in the Field Operator Configuration Utility.
- The name of the domain
- The domain User ID.
- The password associated with the domain User ID.
You can assist users in filling out these details by providing a Field Operator Environment file (see Field Operator Environment files ).
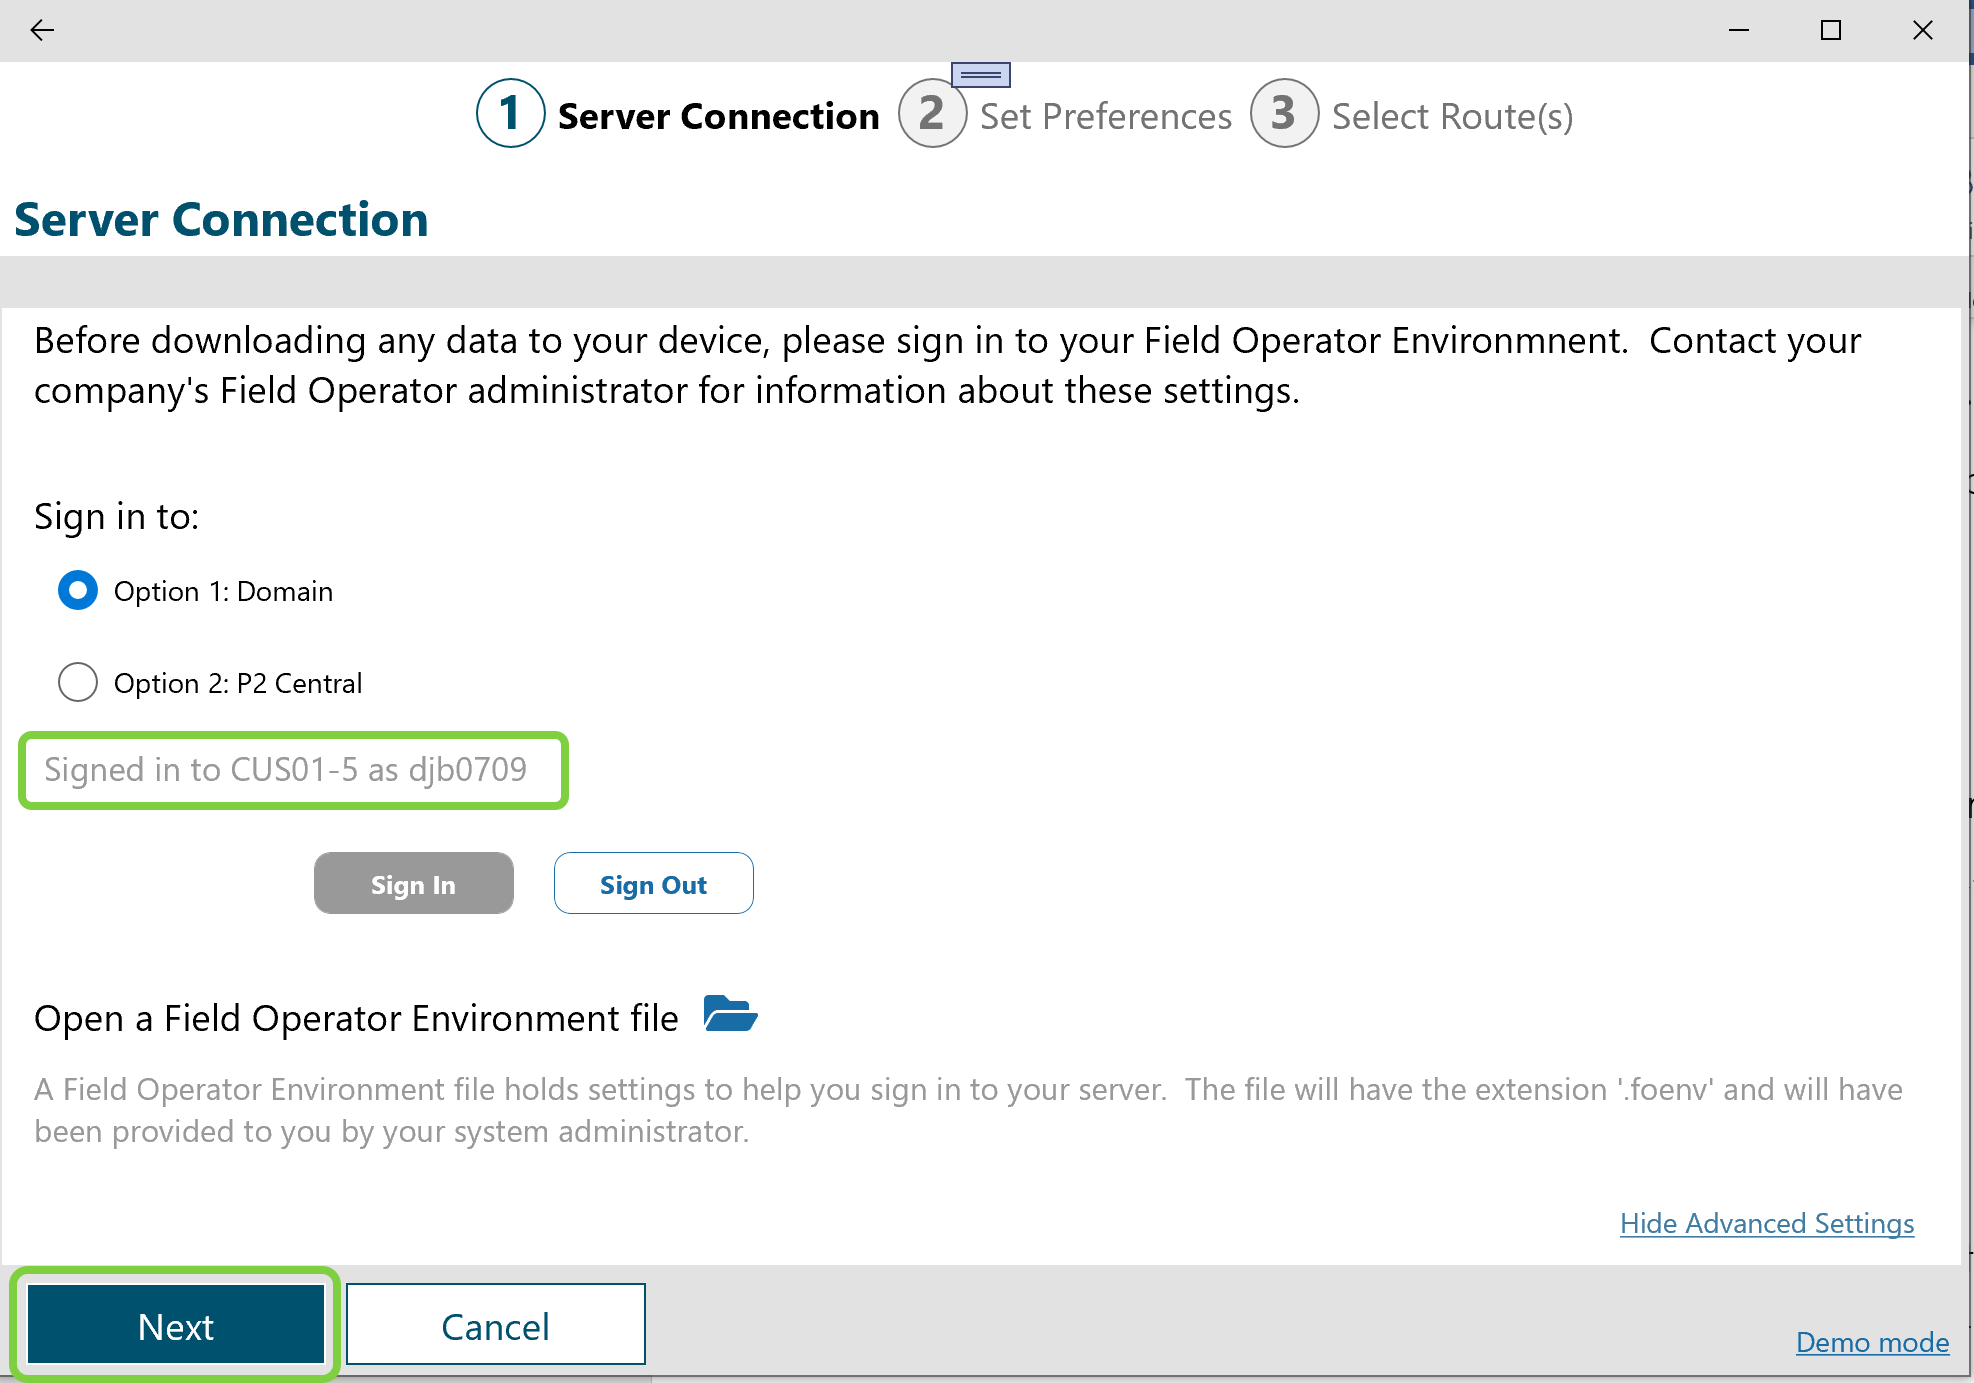
Once signed in, the app will automatically display the list of Routes and / or Workbooks for which the user is Authorized. In normal course of business, this is the last time the user would need to visit this tab of the setup page. If the user were to return to the Server Connection page the signed in status is displayed.
Note: As an administrator if you are switching between environments, between test and production for example, please see the Known Issue Switching Environments.
IFS OI Central Authentication
Users connecting via IFS OI Central will be prompted with the IFS OI Central (Auth0) login. Once signed in, users will need to enter the Conduit Web Service URL and your Server ID to connect.
Setup
Setup will likely be performed by the IFS OI personnel who manage your hosted environment. In the Field Operator Configuration Utility, select the instance in the instance list and click Field Operator Options.
On the Environment / Authentication tab, set the Environment Type to IFS OI Central.
Note: During the transition of users from the IFS OI hosted Domain to IFS OI Central, an instance can be configured to service users using both On-Prem Domain and IFS OI Central authentication.
Now visit the User Authorization screen to assign users to routes. See User Authorization in the Field Operator Configuration Utility
User Experience
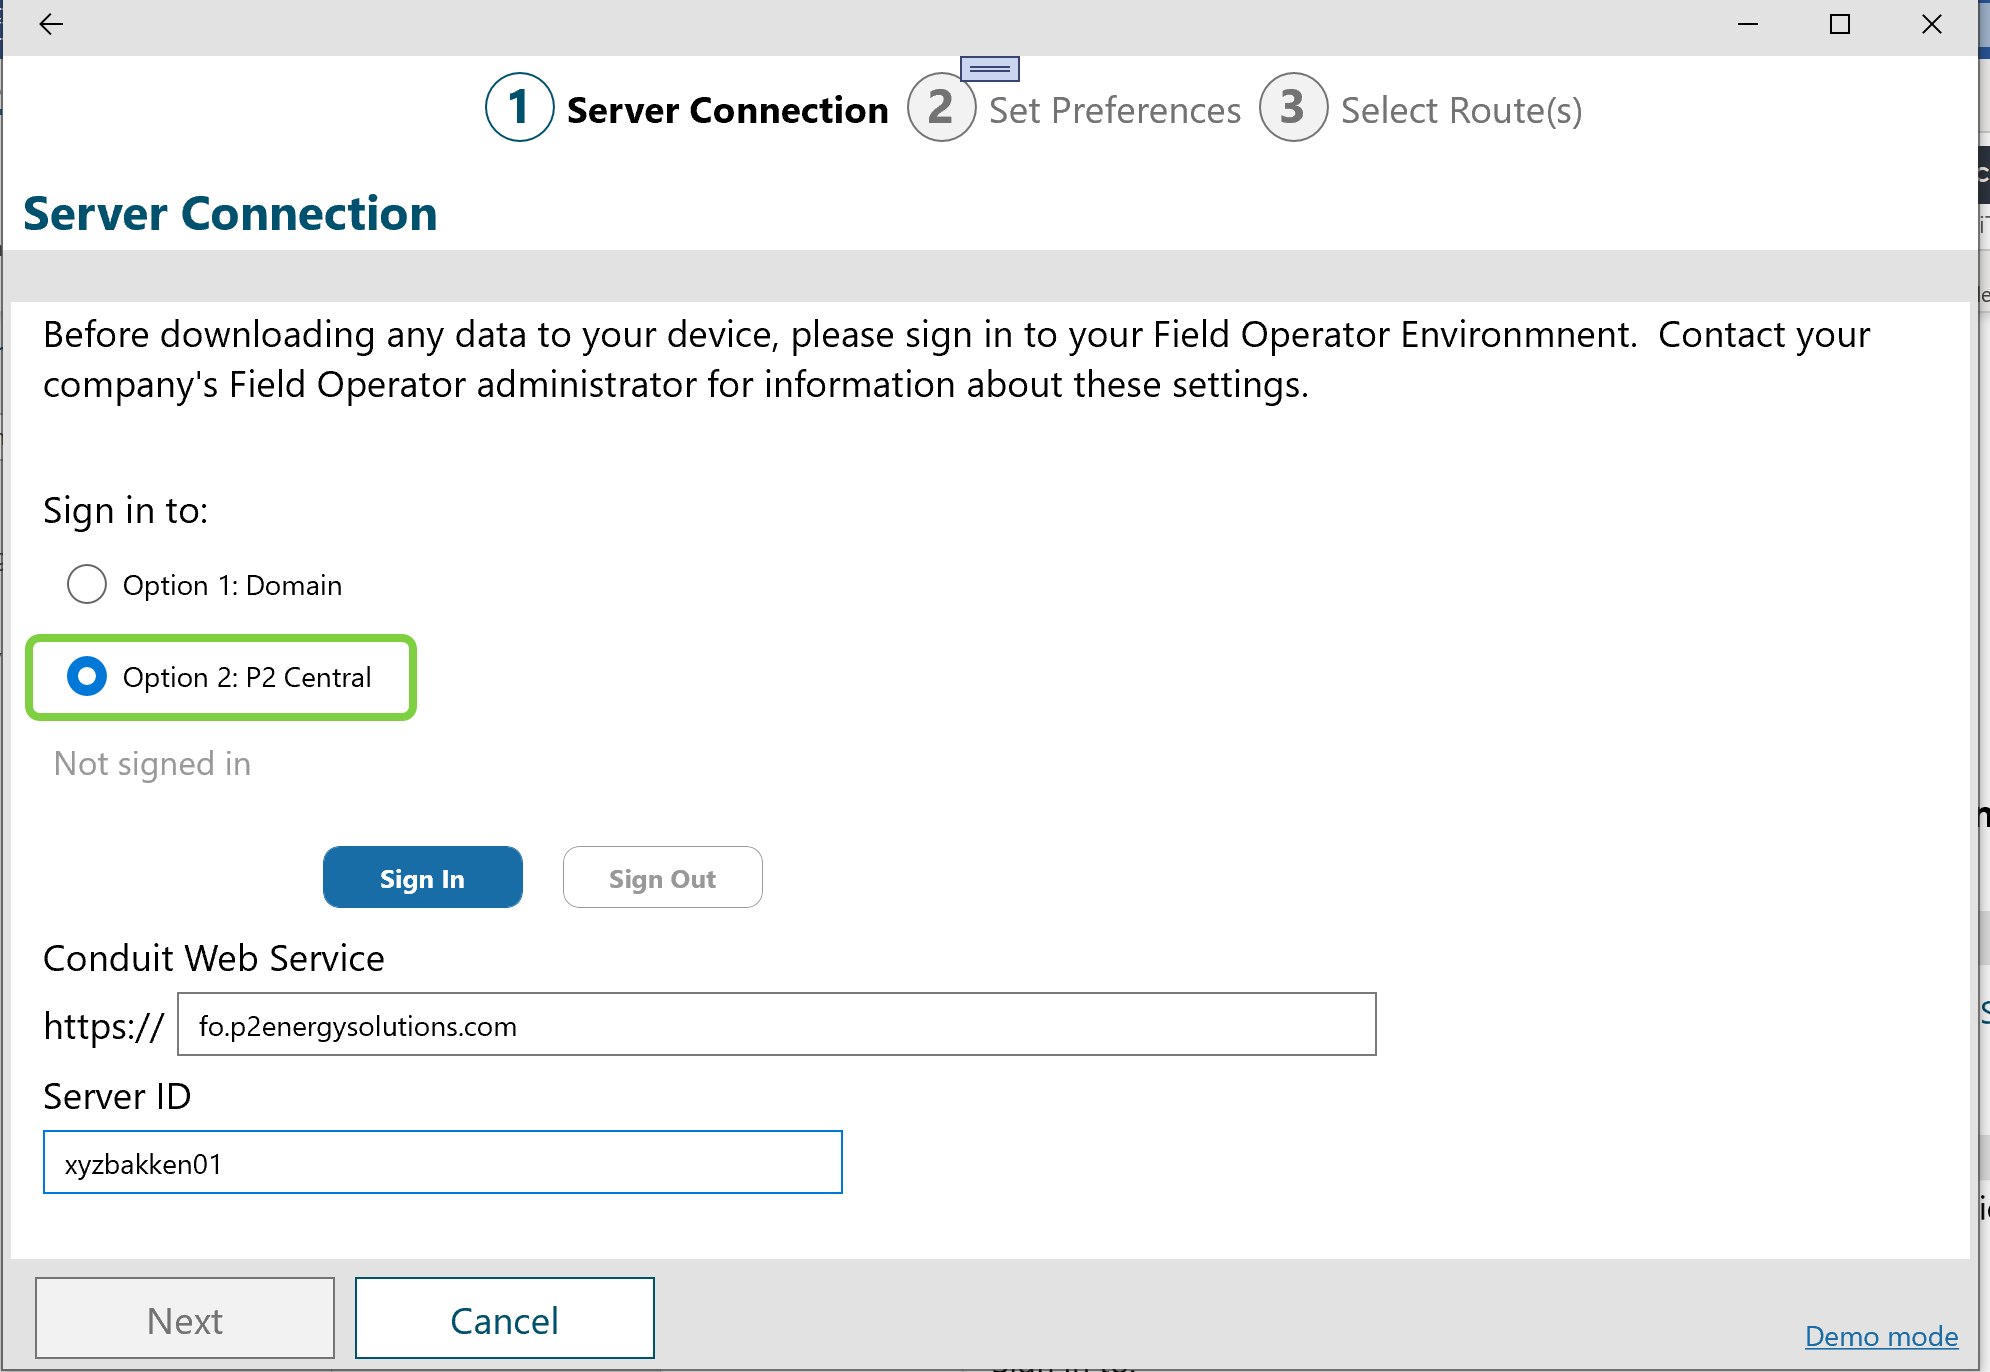
The first step to using Field Operator for a user is to visit the Server Connection page and sign into the application.

The user will select Option 2: IFS OI Central and click Sign In.
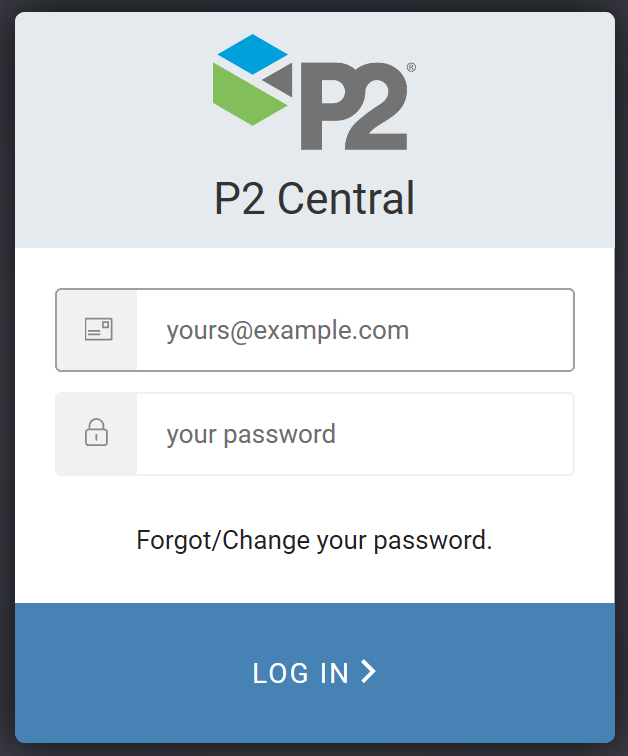
The IFS OI Central login screen will be displayed where the user enters a valid email address and password.
Once signed in, the user must enter two more pieces of information:
- The Conduit Web Service URL (defaulted to fo.p2energysolutions.com which is typical)
- The Server ID. This is a unique code is created and entered by the administrator in the Field Operator Configuration Utility.
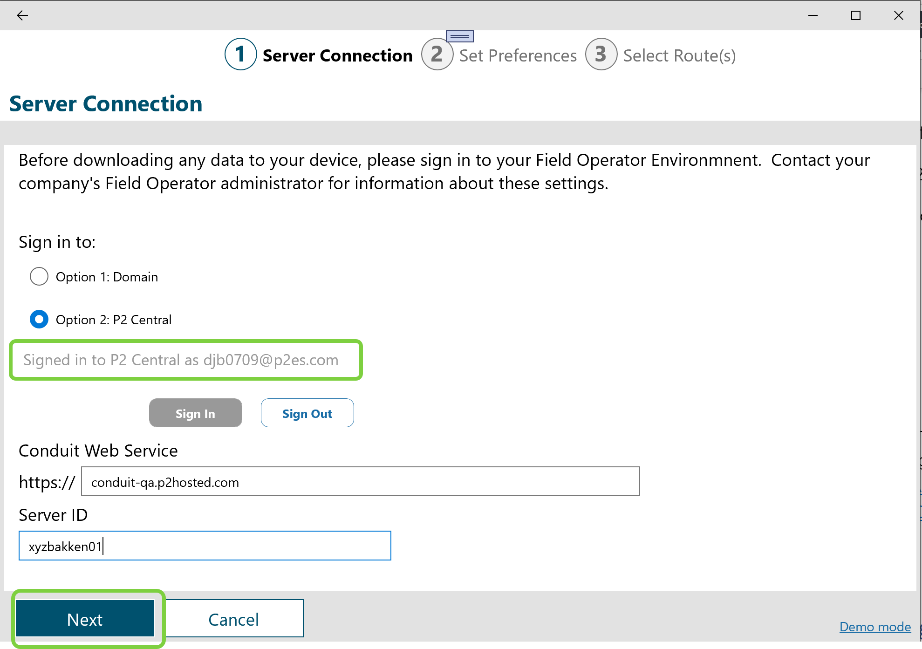
Once the status shows the user to be signed in to IFS OI Central and the server id is correctly entered, the Next button will bring the user to list of routes and/or workbooks for which they are authorized.
You can assist users in filling out the Conduit Web Service URl and Server ID by providing a Field Operator Environment file (see Field Operator Environment files ).
Private Azure APIM Authentication
In the current version, this option is in beta test only. If this option is interesting to your organization, consider contacting IFS OI to discuss a project for its configuration. Underlying documentation from Microsoft can be found here: Protect API backend in API Management using OAuth 2.0 and Azure Active Directory - Azure API Management | Microsoft Docs.
Field Operator Environment files
New to Field Operator 4.7 is a convenience feature to help users type in the various settings necessary to connect to a Field Operator Environment.
Setup
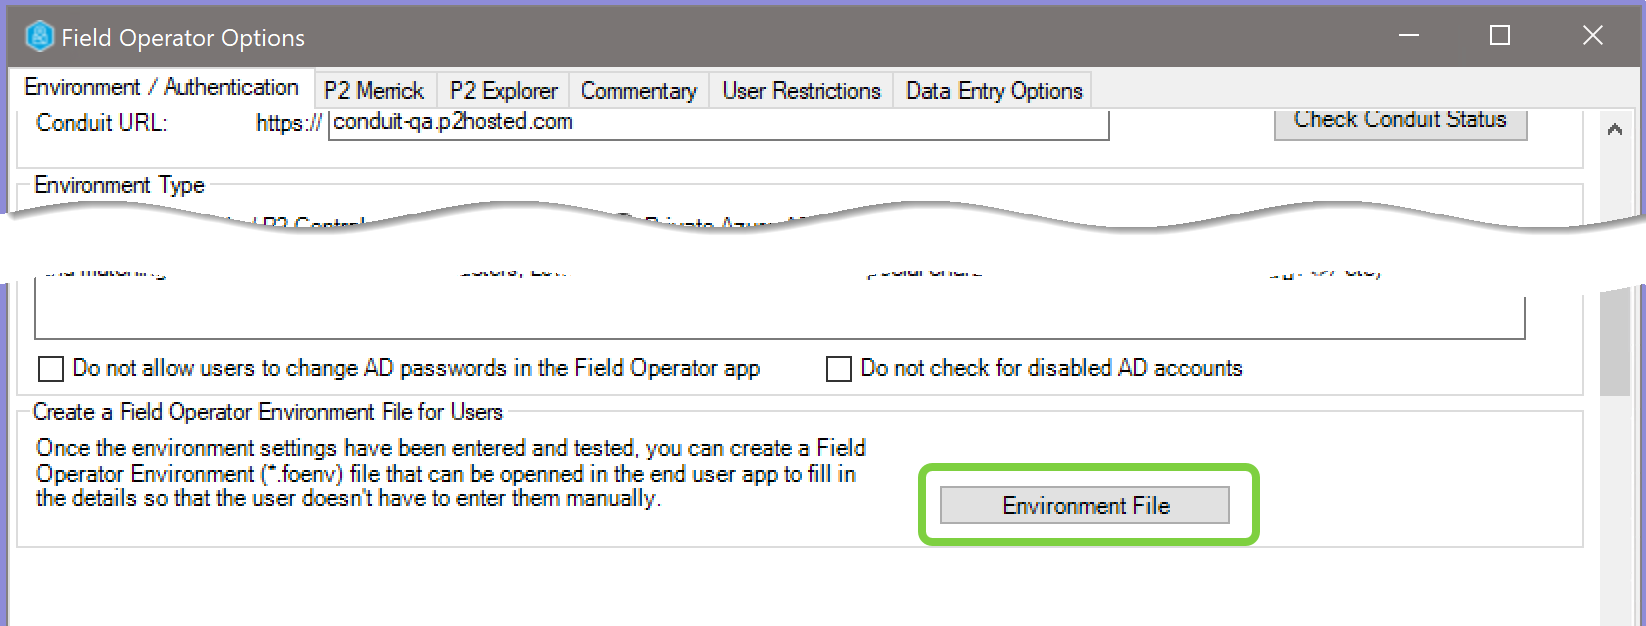
After configuring and saving the options for a Field Operator instance, return to the Environment / Authentication tab of the Field Operator Options screen and select the Environment File button.
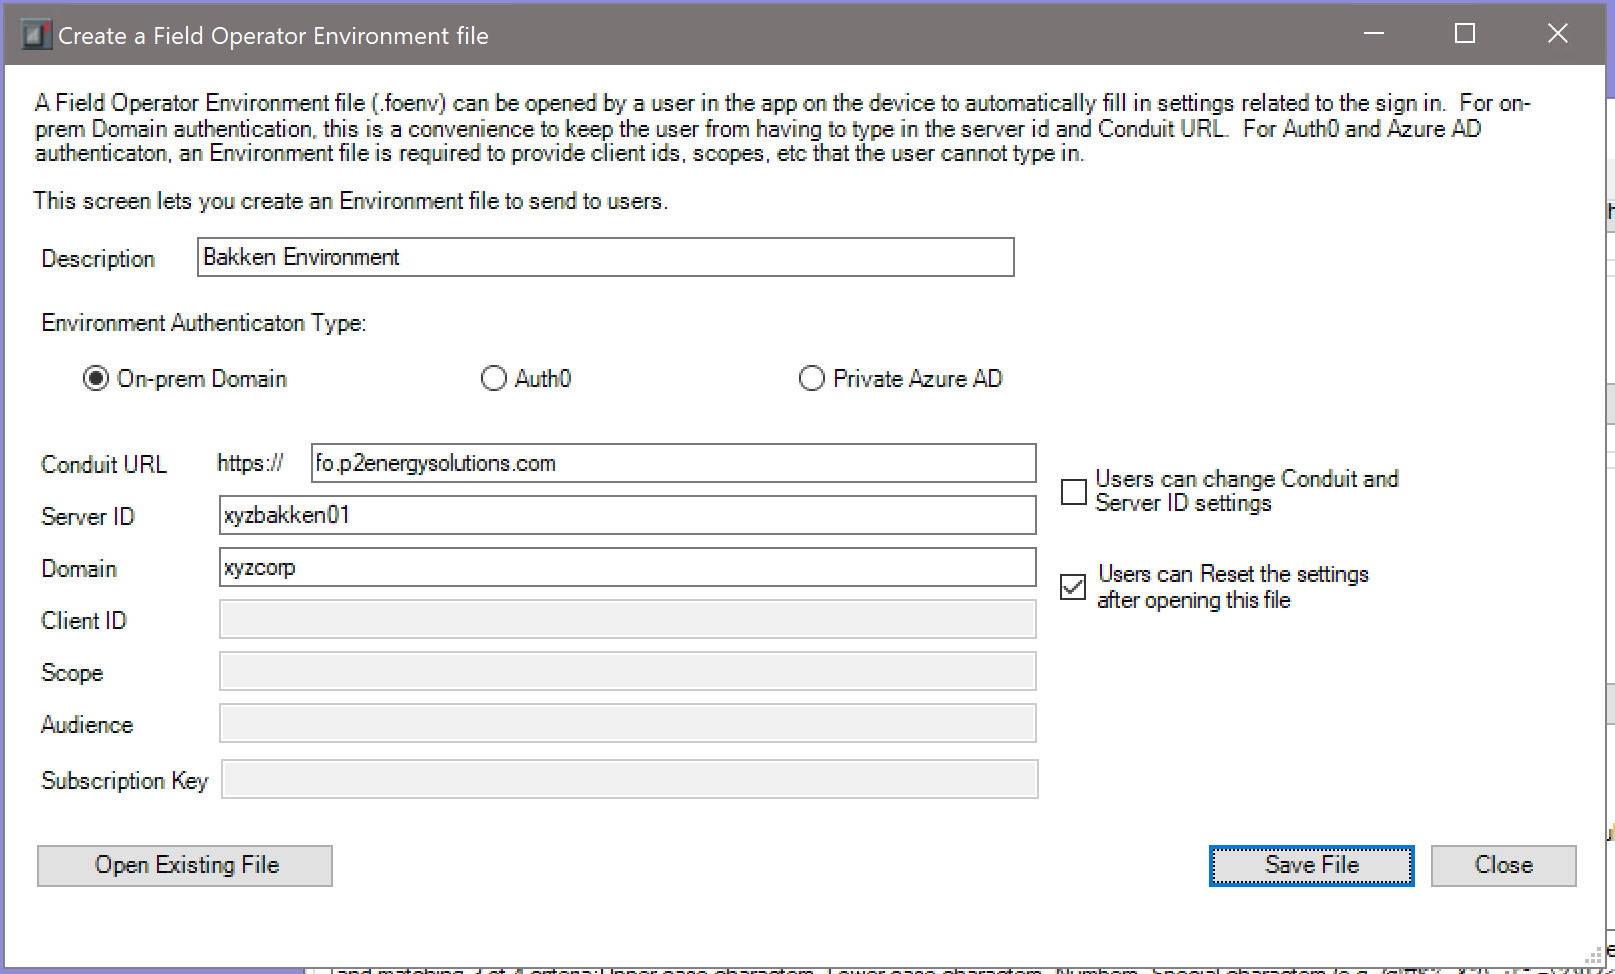
Fill in the details as follows:
- Description – Once signed in, the user will see this description on the Server Connection page. For example, “Signed into Bakken Environment as johndoe”
- Environment Authentication Type – Select the appropriate type for your environment. For most companies this will be On-Prem Domain
- Conduit URL – Should be automatically populated with the conduit to which your instance is configured to connect. Default is fo.p2energysolutions.com
- Server ID – Will default to the Server ID that you set earlier on the Environment / Authentication tab
- Domain – Will default to the domain on which the application is running. Ensure that this matches the domain that users will type when they log into their windows computers
- Users can change Conduit and Server ID settings – When checked, these inputs are greyed out so that the user cannot modify the entries
- Users can Reset the settings after opening this file – Deselecting this checkbox will remove the Reset and Open a Field Operator Environment file options for the user
When the user opens an .foenv file, the data is stored in the application folder as Environment.foenv Reset allows the user to delete the current Environment.foenv file and manually enter the settings.
You should only deselect Users can Reset the settings after opening this file if you are tightly controlling your users’ devices with your Mobile Device Management (MDM) system and have the ability to push a new Environment.foenv file to users should something change.
Client ID – specific to Auth0 and APIM only. To be configured with the assistance of IFS OI personnel.
Scope – specific to Auth0 and APIM only. To be configured with the assistance of IFS OI personnel.
Audience – specific to Auth0 and APIM only. To be configured with the assistance of IFS OI personnel.
Subscription Key – specific to Auth0 and APIM only. To be configured with the assistance of IFS OI personnel.
Save the file (with an “.foenv” extension) and distribute it to users. Although this file can be emailed to users, they cannot open it by simply double-clicking it. Instruct the users to select Save As in their email application to save the file to the local hard drive. Then within the Field Operator app, the user will open the file from the Server Connection screen.
User Experience
If you’ve sent the Field Operator Environment file (“.foenv”) via email, the user should select Save As to store the file locally. Then the user will visit the Server Connection screen and select Open a Field Operator Environment file:
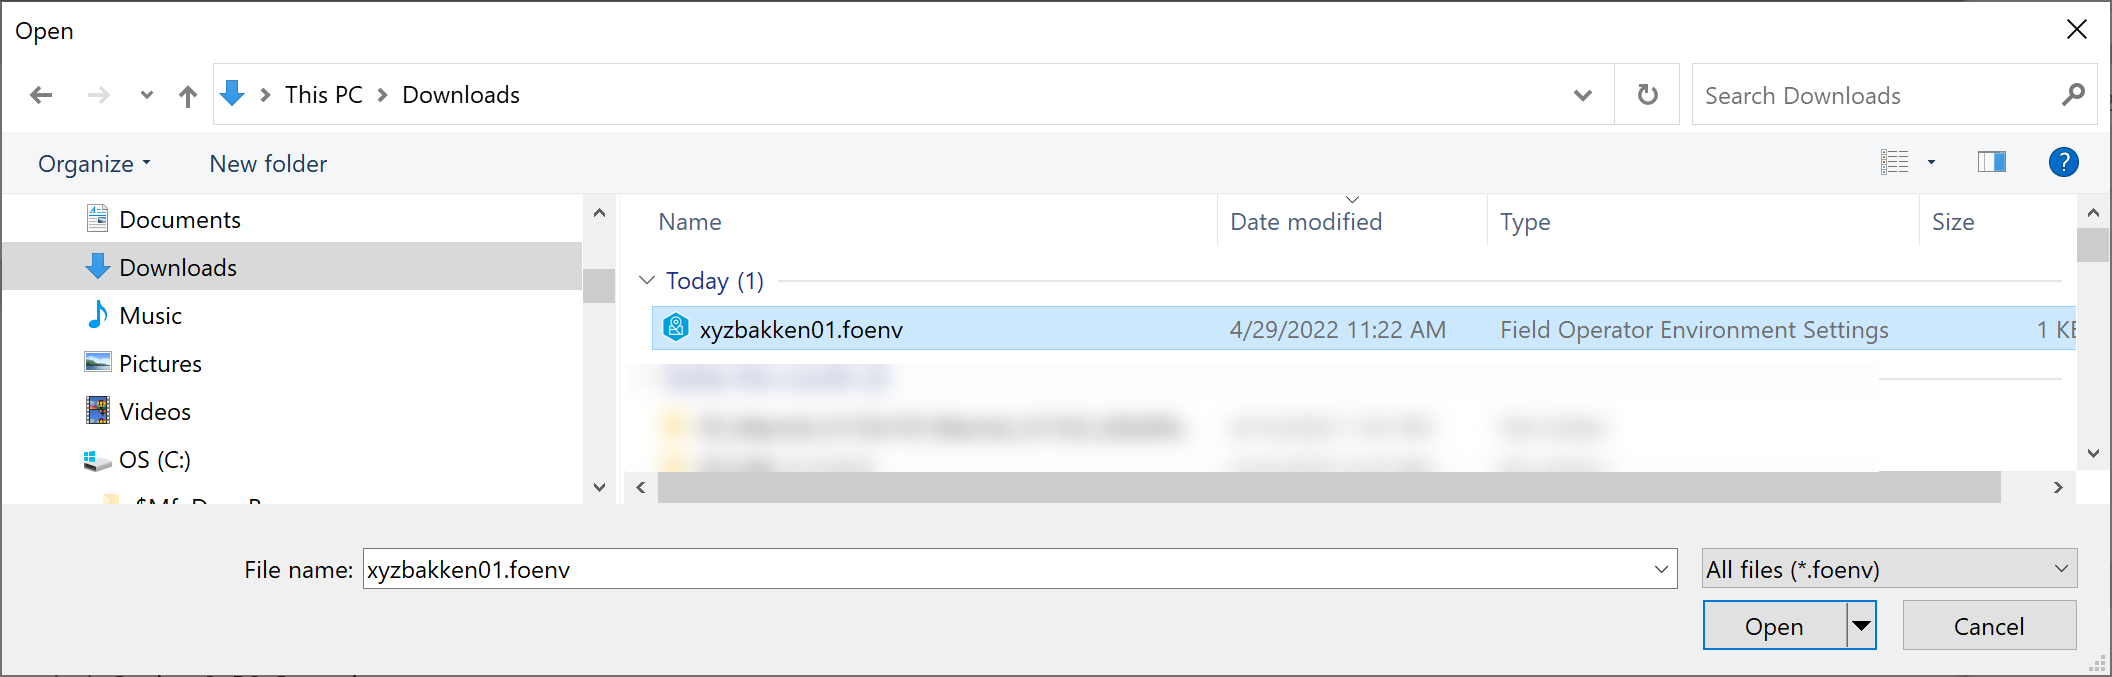
A standard Windows, Android or iOS dialog is displayed to allow the selection of the file from the local disk.
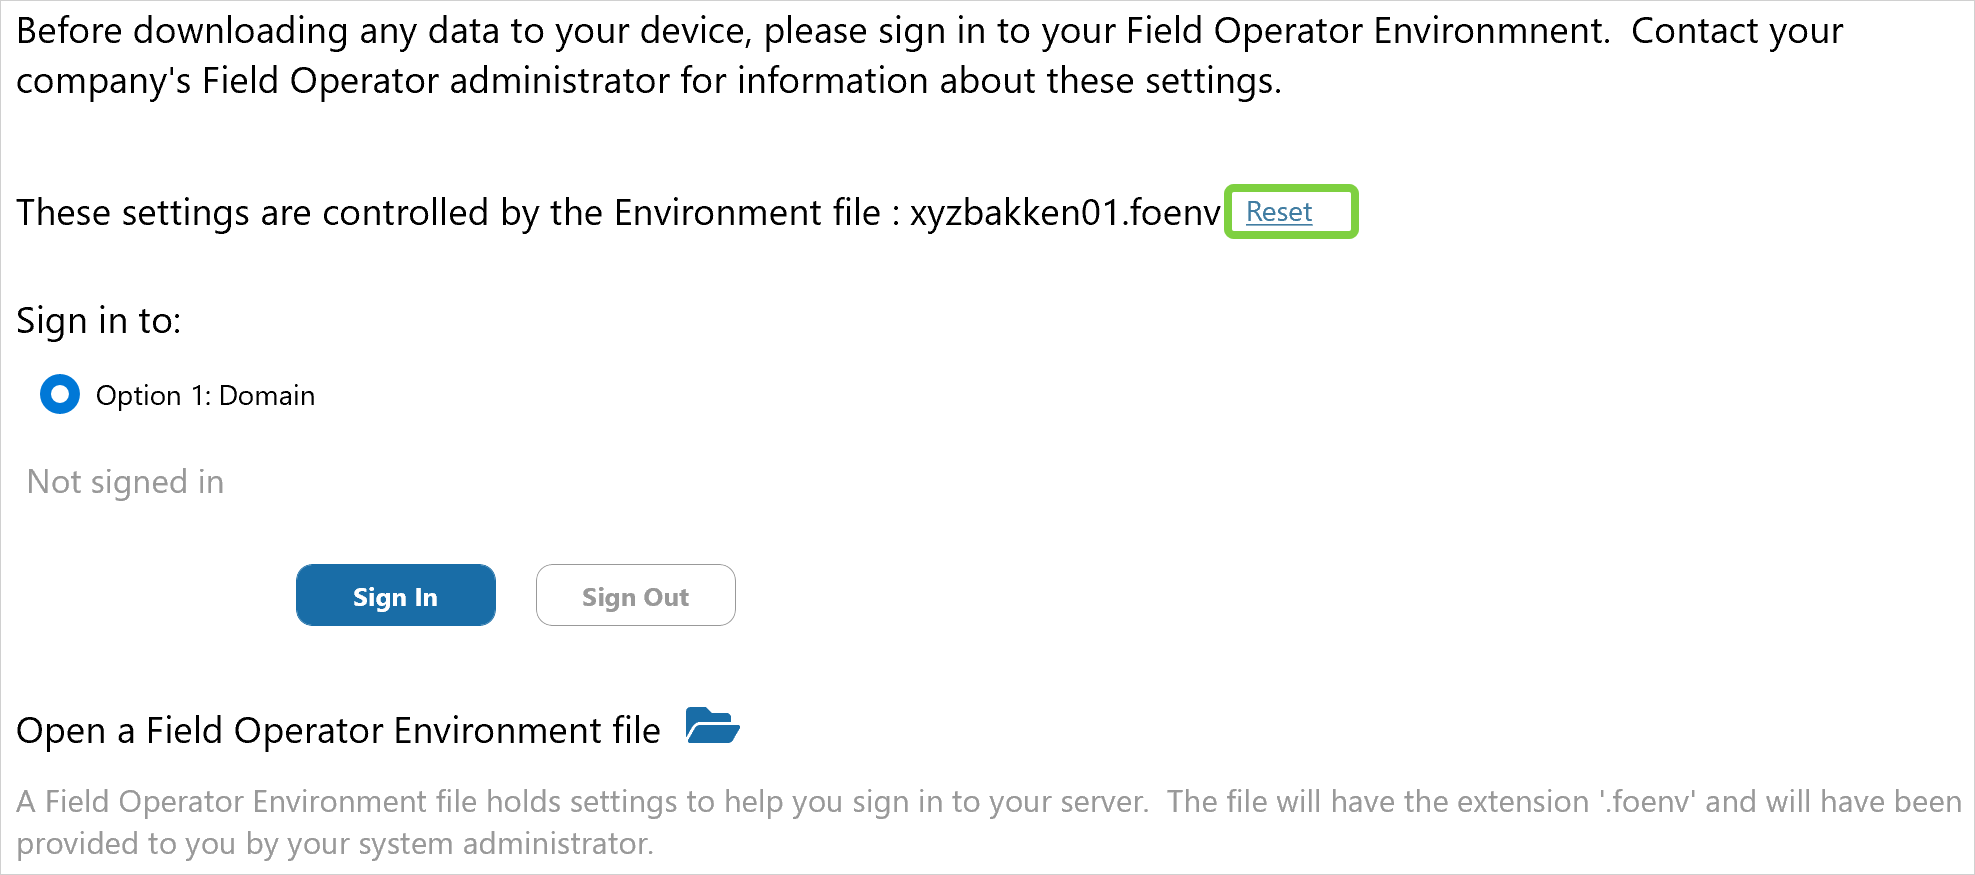
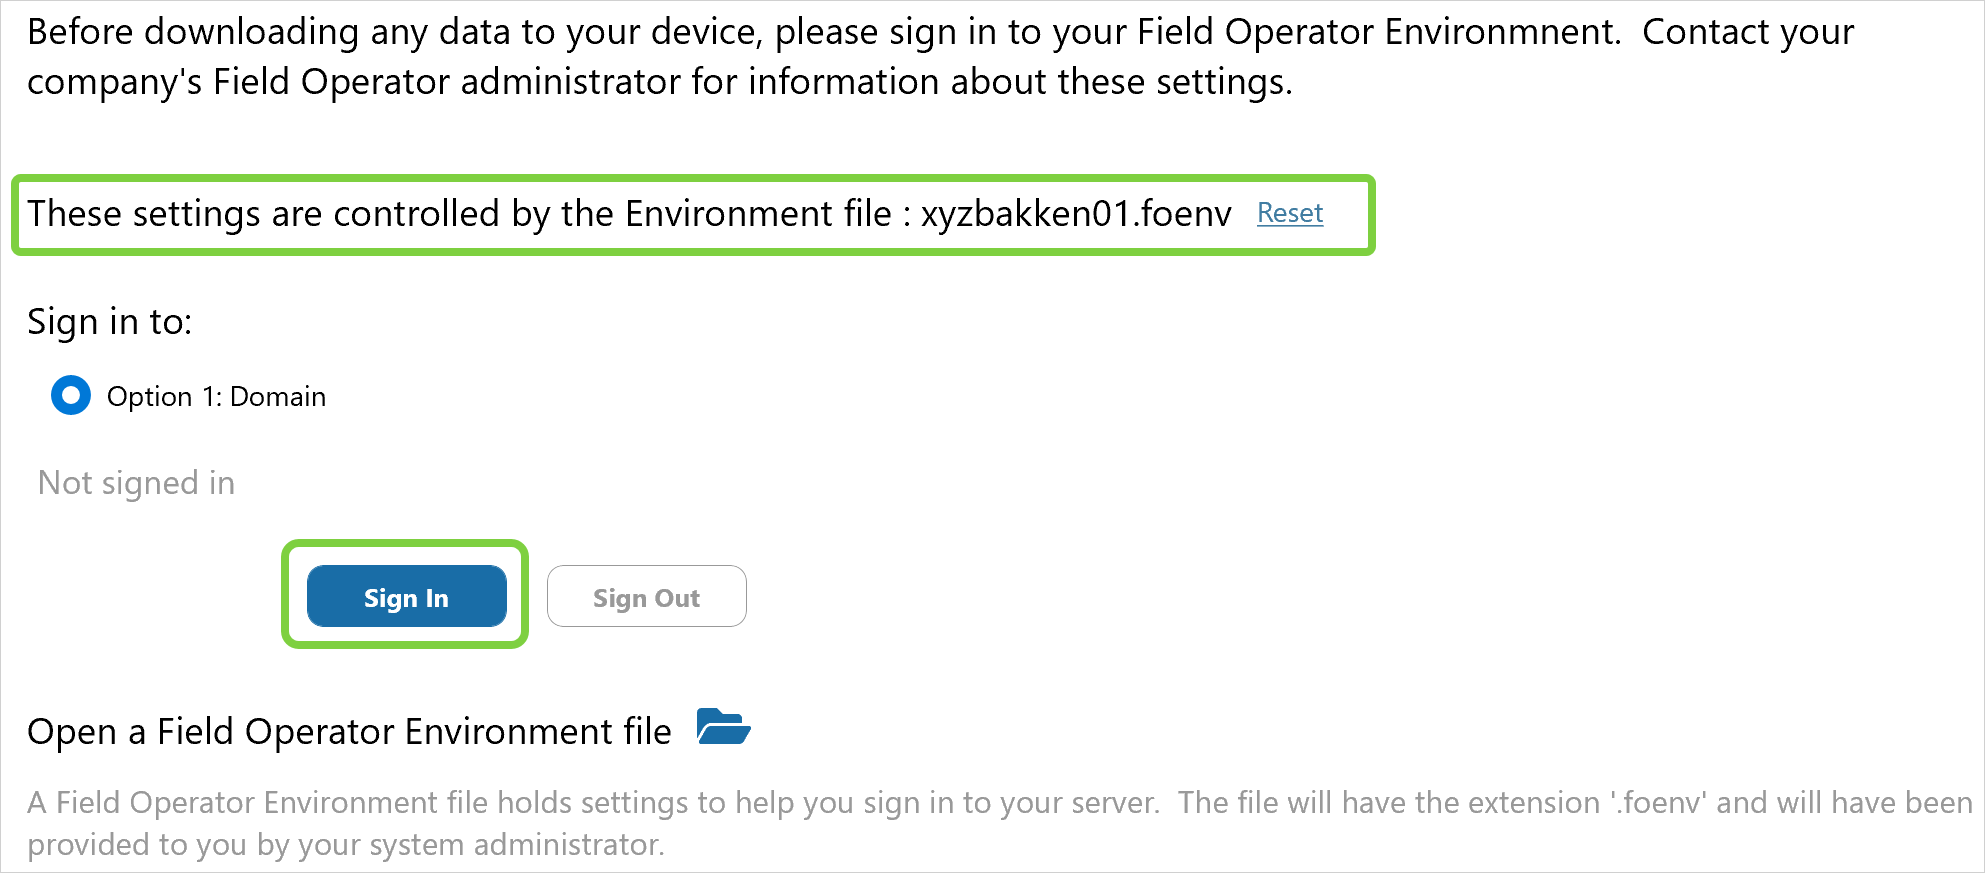
After selecting the file, the screen indicates that the settings are controlled by the environment file. The correct environment is selected and the user clicks Sign In to continue.
On the Sign In page, the settings you’ve specified in the environment file are automatically filled in and are disabled / enabled based on the settings in the file.
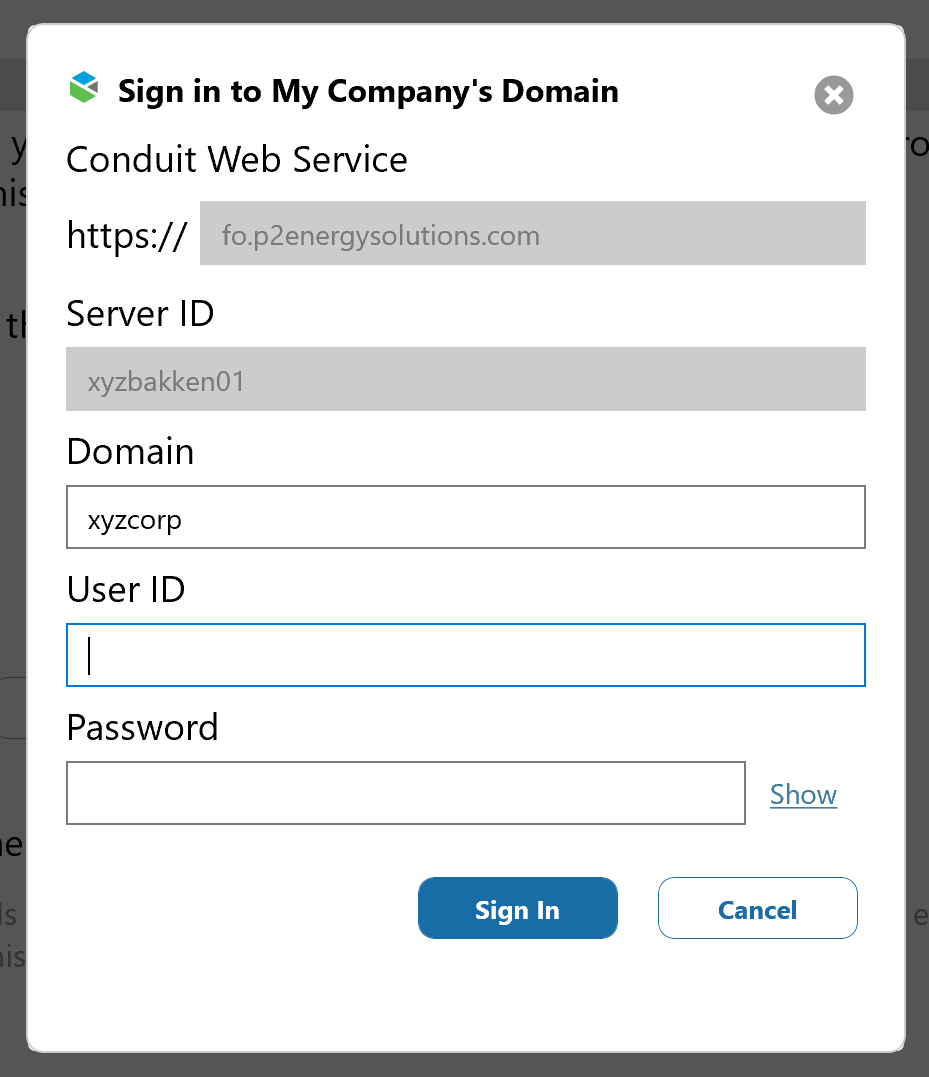
Users now need to enter their User ID and Password to continue.
Most users will open the environment file once, sign in and not return to the Server Connection screen.
If an advanced user needs to connect to a different server, (for example, to connect to a different environment for testing a new version of the app), the user can either open a different “.foenv” file or click Reset to enter the settings manually. (please note Known Issue Switching Environments).
User Authorization in the Field Operator Configuration Utility
Once a user is authenticated, the system checks the Authorization settings to determine which Routes or Workbooks are allowed to be downloaded.
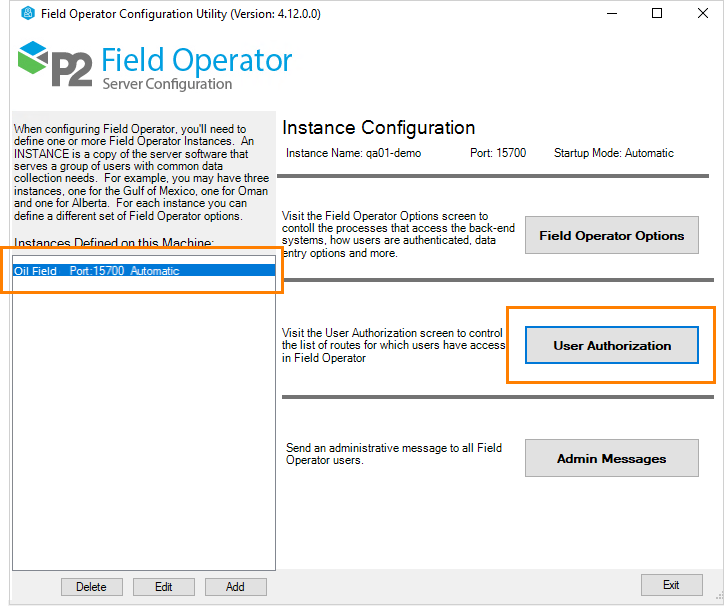
The User Authorization dialog for the Instance is opened from the Field Operator Configuration Utility.
Administrating User Access Rights
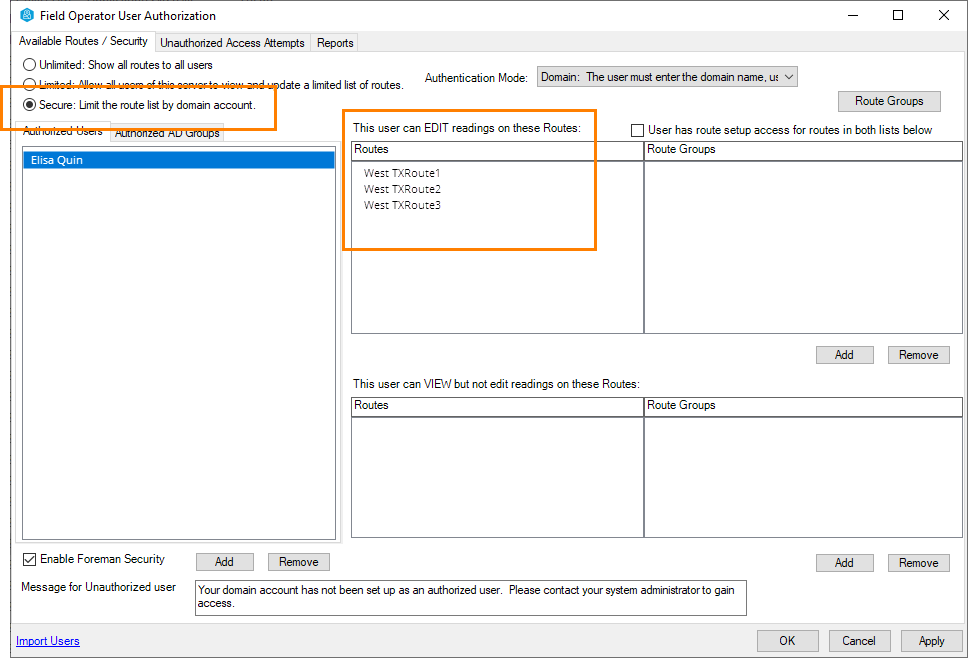
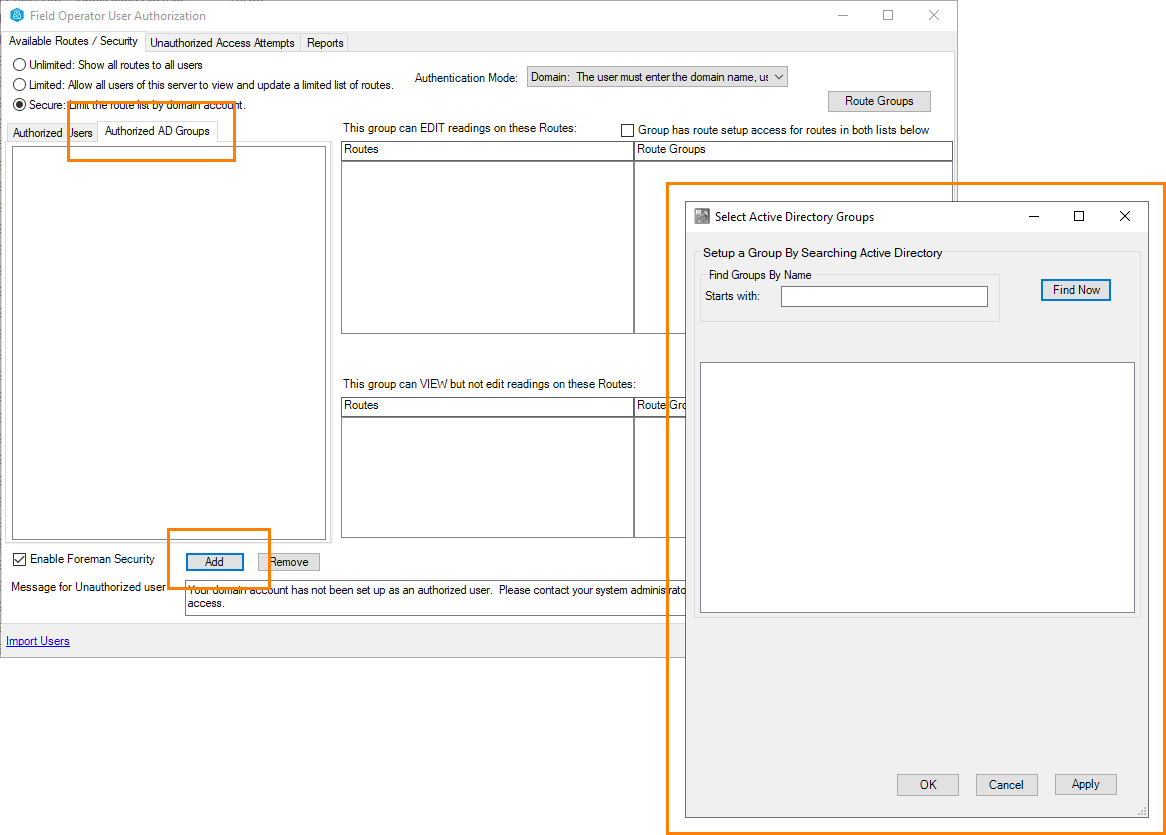
Select the Secure option for limiting routes to see the list of authorized users. When a user is selected, the list of routes available for that user to view or edit will be displayed.
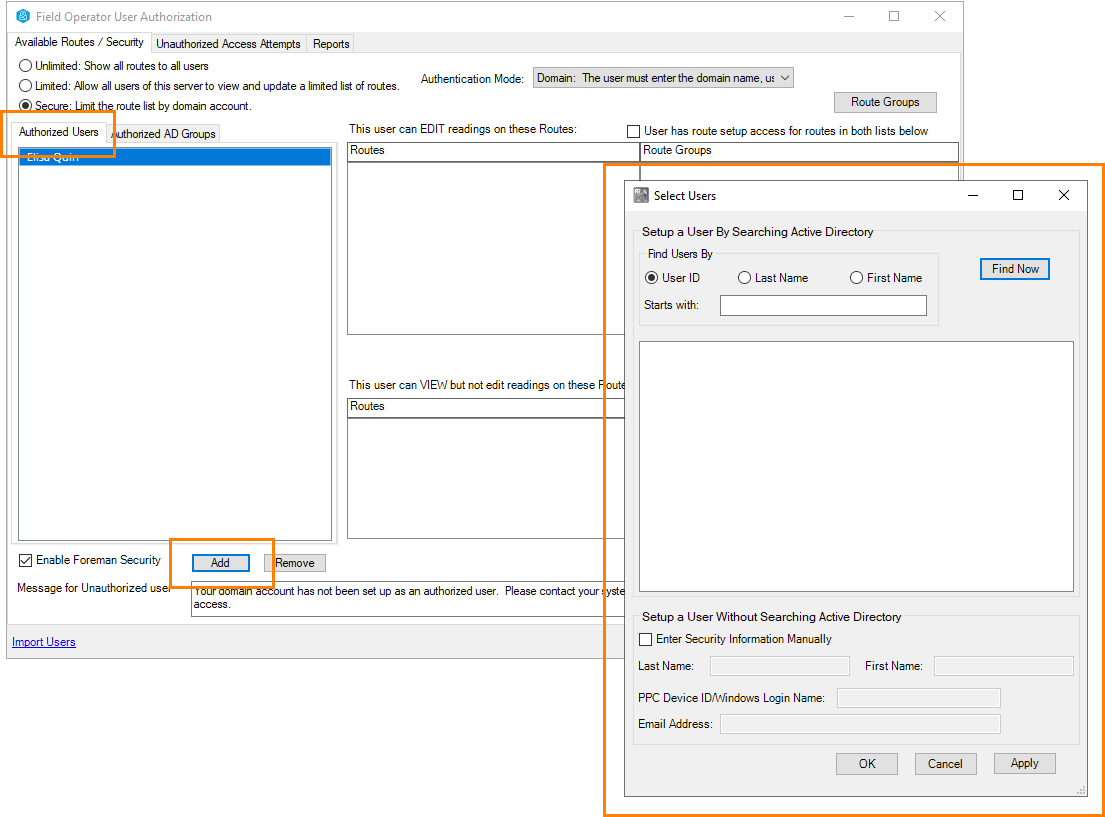
Users can be added and deleted from the Authorized Users tab.
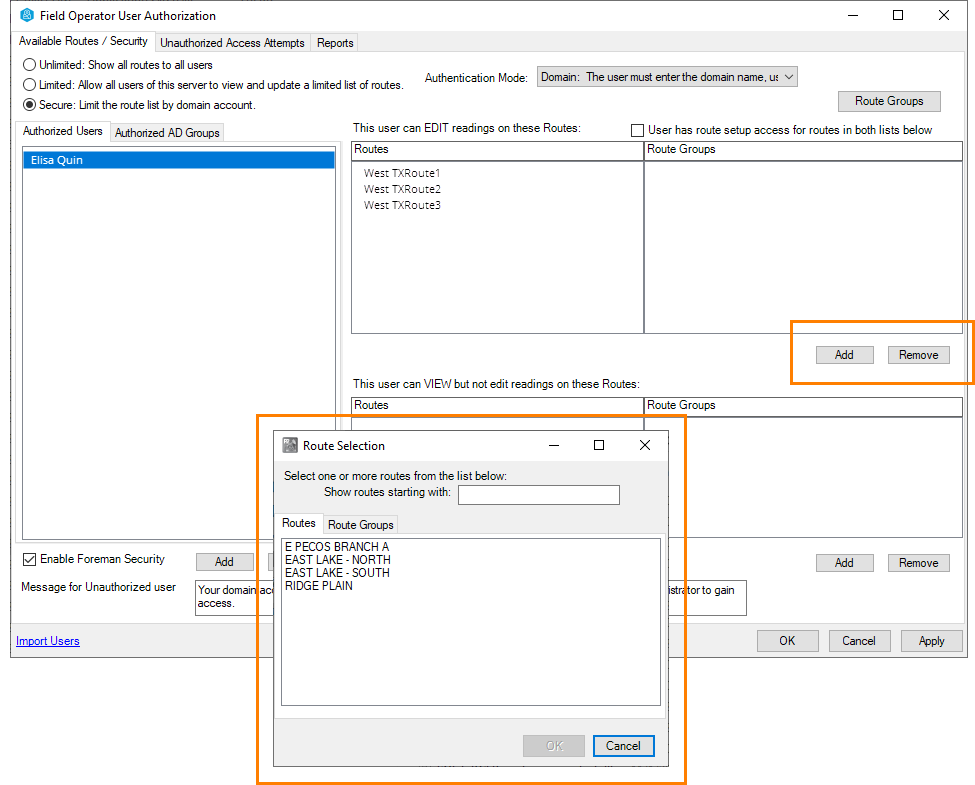
Access to individual routes can be added and removed for each user.
Groups can be added and deleted by selecting the Authorized AD Groups tab. As members are added to the Active Directory group they will be automatically authorized for the group route(s).
Release History
- Authentication and Authorization (this release, 4.11)
- Authorize users based on Active Directory group membership
- Authentication and Authorization (4.6.2)