ON THIS PAGE:
The Active Directory Sync command line utility allows you to sync P2 Explorer groups and users with your Active Directory.
The utility is located in the following folder in the installation directory, by default:
C:\Program Files\P2 Energy Solutions\P2 Explorer\Security\
Configuring the Utility
The Active Directory Sync uses information specific to your organisation that is stored in the securitysync.xml configuration file. A sample configuration file is provided and is located at:
C:\ProgramData\P2 Energy Solutions\P2 Explorer\securitysync.xml.sample
To customise the file:
- Rename securitysync.xml.sample file to securitysync.xml.
- Add the details of the Groups you wish to sync.
- Copy the ActiveDirectory and/or AzureActiveDirectory parameter values from the ServerConfig.xml file.
Securitysync.xml.sample file:
<?xml version="1.0" encoding="utf-8" ?>
<Configuration>
<Global>
<!-- Group names from Active Directory which you want to sync into P2 Explorer -->
<!-- <GroupNames>
<Name>Group1</Name>
<Name>Group2</Name>
...
</GroupNames> -->
<GroupNames></GroupNames>
<!-- Whether to update existing user descriptions from source, defaults to false -->
<UpdateUserDescription>false</UpdateUserDescription>
</Global>
<ActiveDirectory>
<!-- Whether to use the local host as the domain authority or the domain, defaults to false -->
<IsLocalHost>false</IsLocalHost>
<!-- Optional, the domain host to use -->
<Host></Host>
<!-- Optional, the domain user name that has access to domain users and user groups -->
<Username></Username>
<!-- Optional, the encrypted password of the domain user -->
<Password></Password>
</ActiveDirectory>
<AzureActiveDirectory>
<!-- The Azure Directory (Tenant) Id to connect for authentication -->
<DirectoryId></DirectoryId>
<!-- The registered P2 Explorer Application Client Id -->
<AppClientId></AppClientId>
<!-- The registered P2 Explorer Application Client Secret -->
<AppClientSecret></AppClientSecret>
</AzureActiveDirectory>
</Configuration>
Running the Utility
To sync users and groups into the P2 Explorer database, open a command prompt and type:
P2.Security.ADSync.Console.exe source=[source]
Source:
- To sync from on premise Active Directory, use AD
- To sync from Azure Active Directory, use AzureAD
Using Windows Task Scheduler
A PowerShell script has been added to make it easier for people to use the Windows Task Scheduler to run tasks.
To register an Active Directory sync to run nightly at 1am, a PowerShell script has been included in the installation directory that will schedule it as a Windows Task. To run this, use the following command (running as an Administrator):
powershell.exe -File "C:\Program Files\P2 Energy Solutions\P2 Explorer\Security\ScheduleADGroupSync.ps1"
The script will prompt for the source and user identification.
Source:
- To sync from on premise Active Directory, use AD
- To sync from Azure Active Directory, use AzureAD
User: A user with sufficient privileges to run P2 Security AD sync utility from the task scheduler.
The script will prompt you for the password of “user” and then register the Active Directory sync task to run at 1am.
The script can be modified by anyone with knowledge of PowerShell to modify the frequency and time of the scheduled task. If modifying this, you should first copy the script to another folder so that another user does not assume the script has the default behaviour.
Deregistering Synchronisation
To deregister the Active Directory sync as a Windows Task, run the following (running as Administrator):
powershell.exe -File "C:\Program Files\P2 Energy Solutions\P2 Explorer\Security\RemoveScheduledADGroupSync.ps1"
Azure Active Directory Sync
The following additional steps are needed to set up Azure Active Directory.
Configuring Client Secret
To obtain the AppClientSecret value, add a New client secret on the Certificates & secrets page in the Azure configuration.
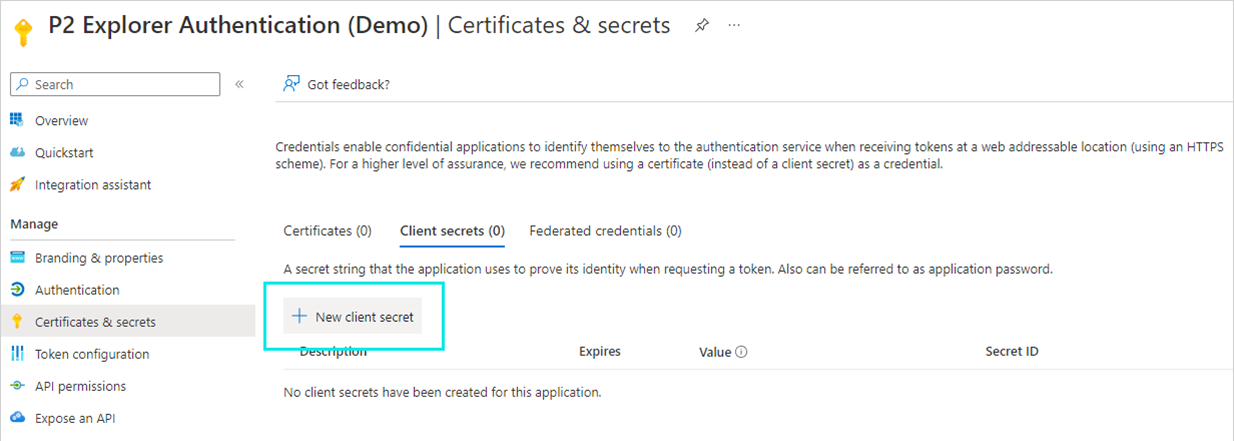
Copy the value allocated to the secret you created, into the AppClientSecret parameter in the securitysync.xml file.
Configuring Permissions
To configure the permissions, select the API permissions page in the Azure configuration and add Directory.ReadAll Application permission.

Reconfiguring AD Sync
If you need to reconfigure AD Sync following an upgrade, follow these steps:
- Open the securitysync.xml file, and add the relevant ActiveDirectory and/or AzureActiveDirectory parameter values.
Prior to v4.11.0, parameter values needed to be added as part of the command line parameters, in the PowerShell script used for the Windows task scheduler. This script was simplified when support for Azure AD was added, and parameters are now contained in the configuration file.
- If using AD (not AzureAD) and you want to change the format of user display names, update the UserDisplayNameFormat in the ServerConfig.xml file.
- Deregister the sync, following the instructions above.
- Reconfigure Windows Task Scheduler to run as needed, following the instructions above.
Release History
- Active Directory Sync 4.11
- Added support for Azure Active Directory
- Active Directory Sync 4.6.7
- Initial version