ON THIS PAGE:
When you add entities to a worksheet, the data that is fetched is based on the parameters that have been set on the Fetch Parameters pane. From here, you can set start and end times, sample type, and interval. Once you save the fetch parameters, they are then available in the Fetch Parameters drop-down list.
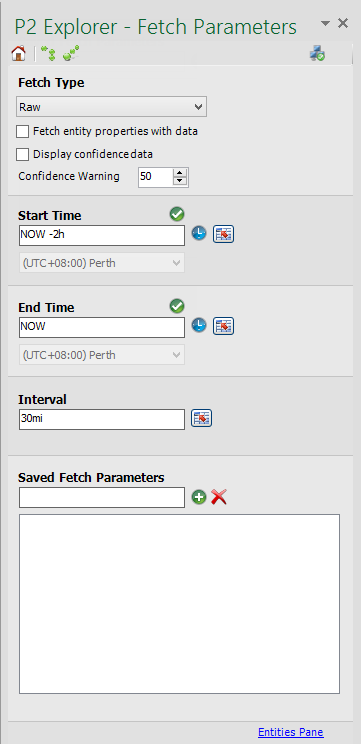
The Fetch Parameters pane allows you to define the parameters that are used when P2 Excel Add-in retrieves data from P2 Explorer. Once you have defined a set of parameters, you can save them for future fetches.
For ad-hoc queries, the currently selected parameters can be used in a data fetch. To use these, make sure that you have selected Current Fetch Parameters from the Fetch Parameters drop-down list on the Entities Pane.
Available parameters are listed in the following sections.
Fetch Type
The type of fetch that you would like to do:
- Average
- Last Known Value
- Linear Interpolate
- Raw
Fetch entity properties with data: Whether to include the core properties (Entity Name, Description, Type, Measurement Type, Units, and Location ) in the spreadsheet when the data is retrieved. If this check box is cleared, then P2 Excel Add-in does not include the above properties in the spreadsheet.
Display confidence data: Whether to display the confidence values of the entities on the worksheet. This displays the confidence values in a separate column next to the entity value.
Confidence Warning: Displays a comment on the value cell when the confidence value of an entity is below the specified limit, and showing the confidence value of the entity at that point in time. The default is 50.
Start Time and End Time
You can specify the Start Time and End Time in one of three ways: Fixed value, defined value in a cell, or normalised time.
Fixed Value
A fixed value is an absolute time in ISO-8601 format. The start and end times will default to the current time of your machine when you open this task pane.
To select a different start or end time, click the Time ![]() icon. This invokes a date/time picker you can use to select a different date or time. The date/time picker shows the time entered into the Start Time and End Time fields, or the current time if NOW is specified or if the value in the field is not valid. If a time is selected using the picker, then it will overwrite any existing times in the Start Time and End Time field. However, the selected time zone will remain unchanged. The time zone is set to the local time zone by default.
icon. This invokes a date/time picker you can use to select a different date or time. The date/time picker shows the time entered into the Start Time and End Time fields, or the current time if NOW is specified or if the value in the field is not valid. If a time is selected using the picker, then it will overwrite any existing times in the Start Time and End Time field. However, the selected time zone will remain unchanged. The time zone is set to the local time zone by default.
Defined in Cell
You can select a Start Time and End Time which is specified in a cell of the spreadsheet. To do this, click the Define Cell ![]() button. This disables the fixed time controls and enables the controls that allow you to type in the cell name (such as A1 or $A$1 or $A1 or 'Sheet'!A1) or click on a cell.
button. This disables the fixed time controls and enables the controls that allow you to type in the cell name (such as A1 or $A$1 or $A1 or 'Sheet'!A1) or click on a cell.
Excel Date/Time values can be used in cell references as can normalised time and string-based time formats as defined in the Fixed Value.
Normalised Time
Normalised Time allows you to use special time keywords such as NOW, MN, and MIDNIGHT, and an offset to specify the date and time. A Normalised Time string takes the form of:
Keyword [Offset] [Offset].
Each of the offsets must be provided as a set of three values: a sign (+/-), a number (7,3,12), and a type (y,m,d,h,mi,s).
Examples:
|
NOW -2d NOW NOW -1h MIDNIGHT -7d +6h MN+6h |
Two days prior to the current date/time of the client machine. The current date/time of the client machine. One hour prior to the current time. One week prior to the current date at midnight plus six hours; this equates to 6am seven days ago. 6am this morning. |
Additionally, if you omit the sign, it will be interpreted as a plus (+).
Keywords
|
NOW MN MIDNIGHT |
Current Time Midnight prior to current time Midnight prior to current time |
Offset Types
|
y m d h mi s |
Year Month Day Hour Minute Second |
If the time you have entered is valid, each text box is marked with a green success symbol ![]() indicating that the value entered is valid.
indicating that the value entered is valid.
Interval
The Interval parameter is the length of time (in seconds, minutes, hours, or days) between each data point retrieved. For example, with a start time of 2003-01-28T8:00:00 and an interval of 5 minutes, data points will be retrieved at 2003-01-28T8:00:00 and then five minutes later at 2003-01-28T8:05:00, and so on.
If the end time is an exact integer multiple of intervals after the start time, then the last value retrieved will be at the end time. Otherwise, the last value retrieved will be before the end time. For example, if the end time is 2003-01-28T8:10:00 then values will be retrieved at 8:00, 8:05, and 8: 10 (the end time). If the end time is 2003-01-28T8:12:00 then the same values will be retrieved.
The interval can be entered as:
[Offset] [offset]...
| 5mi | 5 minute interval |
| 1h+5mi | 1 hour and 5 minutes = 65 minutes |
| 300 | System defaults to seconds in no offset provided. |
Saved Fetch Parameters
Parameters can be saved for use at a later time. For example, it may be useful to have a set of fetch parameters that defines a fetch for the last week's values.
To save a fetch, enter a descriptive name for the fetch and click the Add Fetch icon ![]() . If a fetch with that name already exists you will be prompted to overwrite it.
. If a fetch with that name already exists you will be prompted to overwrite it.
Click Yes if you want to overwrite the existing fetch, or click No and choose another name to continue.
Deleting a Saved Fetch
You can delete a saved fetch by selecting the fetch and then clicking the Delete ![]() icon.
icon.
Note: Use this with caution, as you are not prompted to confirm the deletion and the action is not reversible.