ON THIS PAGE:
A Form defines both the type of entries that will be created, and the fields that the entries will contain.
Forms can be:
- Case Entry: An ongoing issue that also appears in Case Management. These entries remain visible in Shift Log until they are closed.
- General Entry: An ongoing issue that only appears in Shift Log. Similar to Case entries, they will remain visible in Shift Log until they are closed.
- Log Entry: An entry (“comment” in previous Shift Log versions) that only appears in a particular shift.
When a workbook is configured to contain a Case Entry, for example, you need to specify the Case Entry Form that will determine the fields.
Case, General, and Log entries all have a different set of default system fields associated with them. In addition to these, you can add further fields as required.
Types of Forms
The three different types of forms are designed for different things - they are similar, but different. They are designed for different purposes, and have different default fields. However all entry types can have any number of fields in addition to the default fields.
Here's a quick guide to help you understand the difference:
| Log Entry | General Entry | Case Entry | |
| Purpose | Designed to be contained within a shift. The Event Time determines what shift these entries will appear in. | These entries will appear in a workbook until they are closed. They are not tied to a shift. | These are similar to general entries in that they will appear in a workbook until they are closed. However they will also appear in Case Management. |
| Default Fields |
|
|
|
In addition to the above default fields, all entries also contain the following system fields:
- Created By
- Created Date
- ID
- Last Modified By
- Last Modified Date
Forms can also be used in more than one component, which means that the forms are "shared" - and the entries stored against the form can also be shared among workbooks. This way, you can avoid creating duplicate forms and instead apply filters on the workbook itself to restrict the displayed entries to a certain type.
For example, you could have a single form for HSE issues, and use that form in workbooks for Area 1, Area 2, and Area 3. You can then filter the form to only show entries for the relevant area, while retaining a master list in yet another workbook for the HSE manager who oversees all of the those issues. You can filter the form on any field that the form contains, and you can add multiple filters if desired.
Creating a Form
Note: Before creating a Form, you need to know what type of form you want to create.
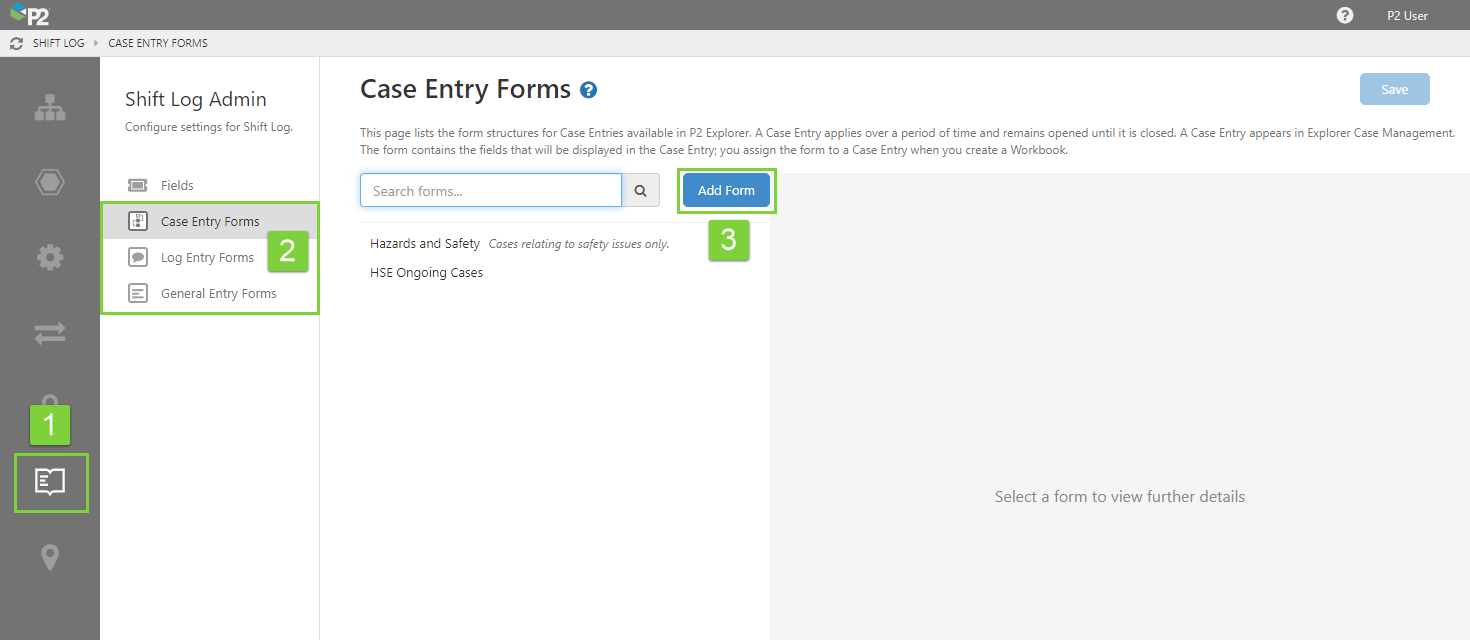
To create a new Form in P2 Server Management:
1. Open P2 Server Management, and click the Shift Log ![]() icon.
icon.
2. Before creating a Form, you need to know what type of Form to create. Depending on the type, click Case Entry Forms, Log Entry Forms, or General Entry Forms. (In the following example we'll use a Case Entry Form).
3. Click Add Form. You can also click an existing form in the list to edit its details.
4. In the Form Details section on the right, type a Name that is not already being used and does not contain any reserved characters.
5. You can also provide a Description to explain what the form is about and how it should be used.
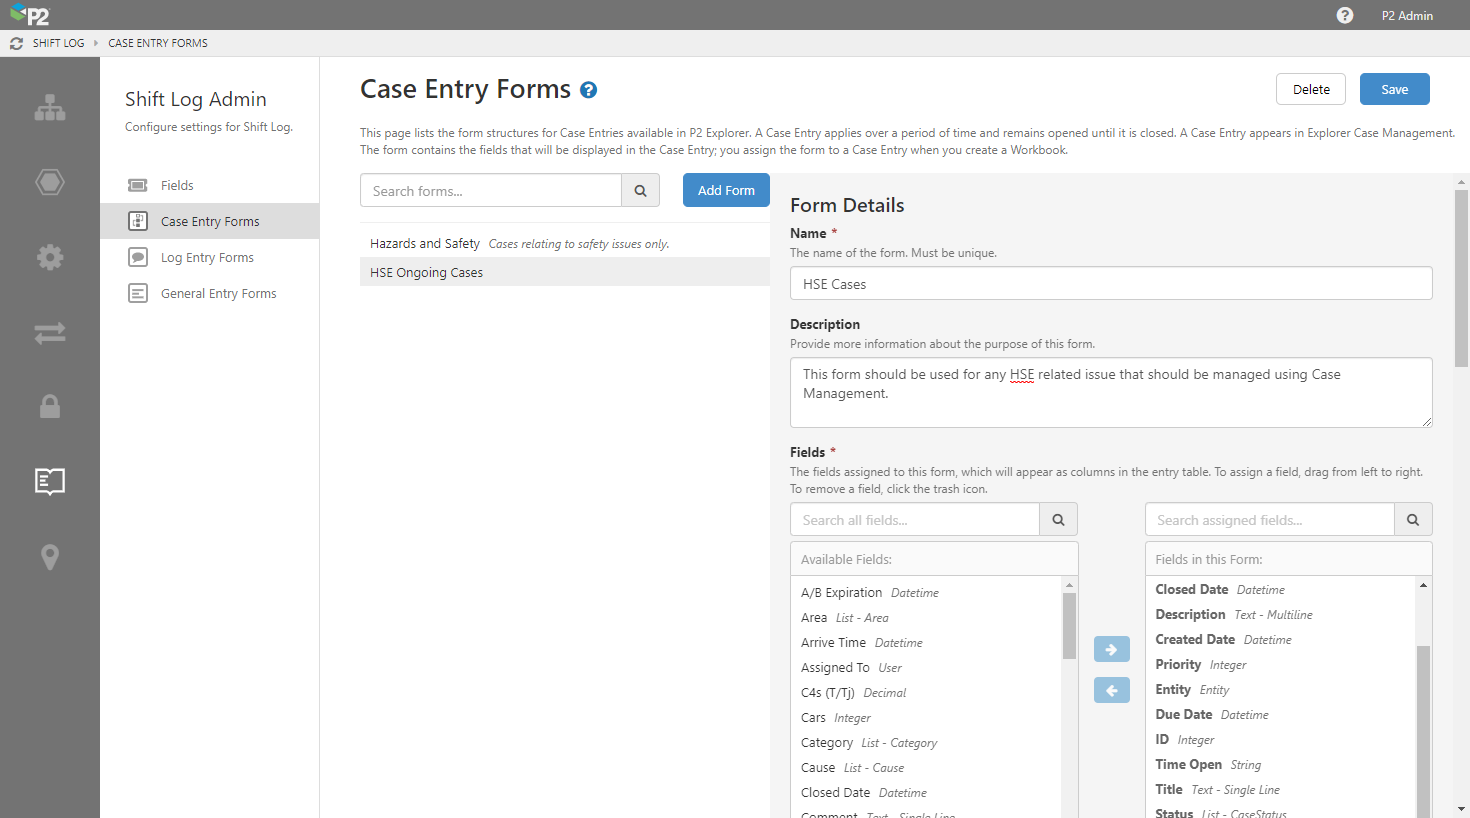
6. Next, choose the Fields that you want to appear in the entries that use this form.
To add a field to the form, first click the field on the left and then click the right arrow to add it to the form.
- All of the available fields are listed on the left, and the fields contained in the form are listed on the right. Fields that are bold cannot be removed from the form, however in the next steps you may choose to hide them from display, if desired.
- Note that the visible list of fields is limited to the first 40 fields. If the field you want is not in the list, use the search box to find it.
Watch the following video to see this in action.
At this point, you can simply save the form and be done with it, however you also have to opportunity to refine the form's configuration. You can:
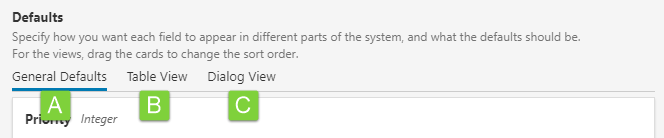
- Specify default behaviours for the form [A].
- Refine how the fields appear in the table view on a workbook [B].
- Refine how the fields appear in the entry form dialog [C].
These refinements are done further down the page - you will need to scroll a bit to see the next section. The more fields you have, the longer this list will be.
7. On the Defaults tab, you can specify for each field if it should be:
- Editable - users will be able to edit this field in the entry form dialog in a workbook.
- Mandatory - this will be a required field in the entry form dialog in the workbook.
- Default value - what, if any, the default value should be when the field is used in any workbook.
Caution: Note that it would be possible for users to create an invalid entry if a field is marked as mandatory, not editable, and has no default value. This would have no noticeable effect, but may not be your desired behaviour.
8. Click the Table View tab. For the fields on this tab, you can specify:
- Hidden - the field will not be shown in the table for the workbook.
- Width (px) - you can optionally specify a default width for the column of this field, when it appears in the table for the workbook. If the column is blank, a default width will be calculated.
- Sort order - you can click and hold each "card" to change the sort order using drag and drop.
Note: The order of the fields in the Table View and Dialog View is not related to the order of the field in the assigned fields box.
9. Click the Dialog View tab. For the field on this tab, you can specify:
- Hidden - the field will not be shown in the entry form dialog, which means that users will not be able to change the field's value. Note that if you do this, you should specify a default value if the field is deemed mandatory.
- Depending on the type of field, other options may be available, such as the maximum number of characters for a single line text field, or the height for a multiline text field.
- Sort order - you can click and hold each "card" to change the sort order using drag and drop.
Watch the following video to see how to sort.
10. When you have finished, click the Save button in the top right corner.
You can now use this form in a workbook. Note that Explorer must be reloaded for this form to become available in workbooks.