ON THIS PAGE:
Downtime events can occur for many reasons, can be for short or extended periods of time, and can be used to mark multiple entities down at once.
Downtime events can be added from the Daily Production details page, and assigned a category, reason and downtime hours. The total amount of downtime can be entered directly, or it can be calculated by the system from the start and end dates of the event.
Add Downtime Event
Access the downtime event dialog by tapping:
1. The dropdown on the right side of the Downtime field
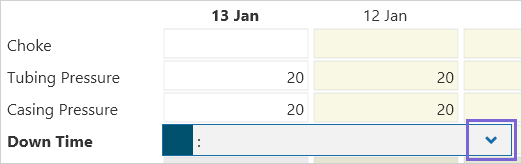
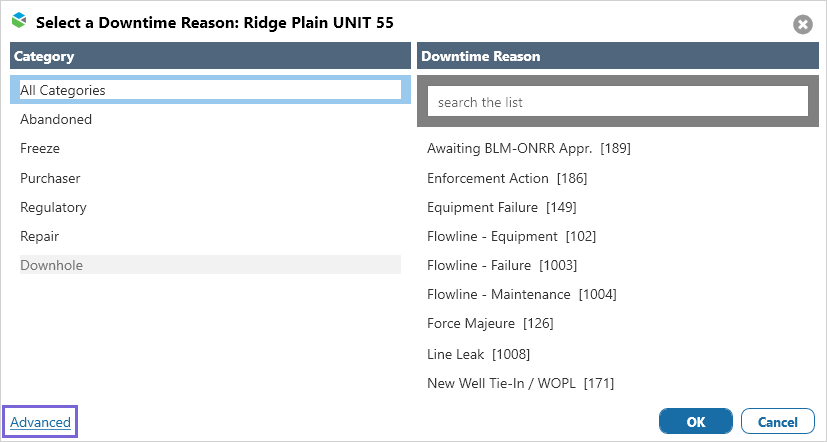
2. The Advanced link at the bottom of the downtime reason list
In the downtime event dialog, downtime hours are allocated to selected entities, and a downtime reason is assigned.
Downtime hours can be:
- Calculated by the system from the start and end times, or
- Entered as a total number of hours for one record date
Add a New Downtime Event dialog:
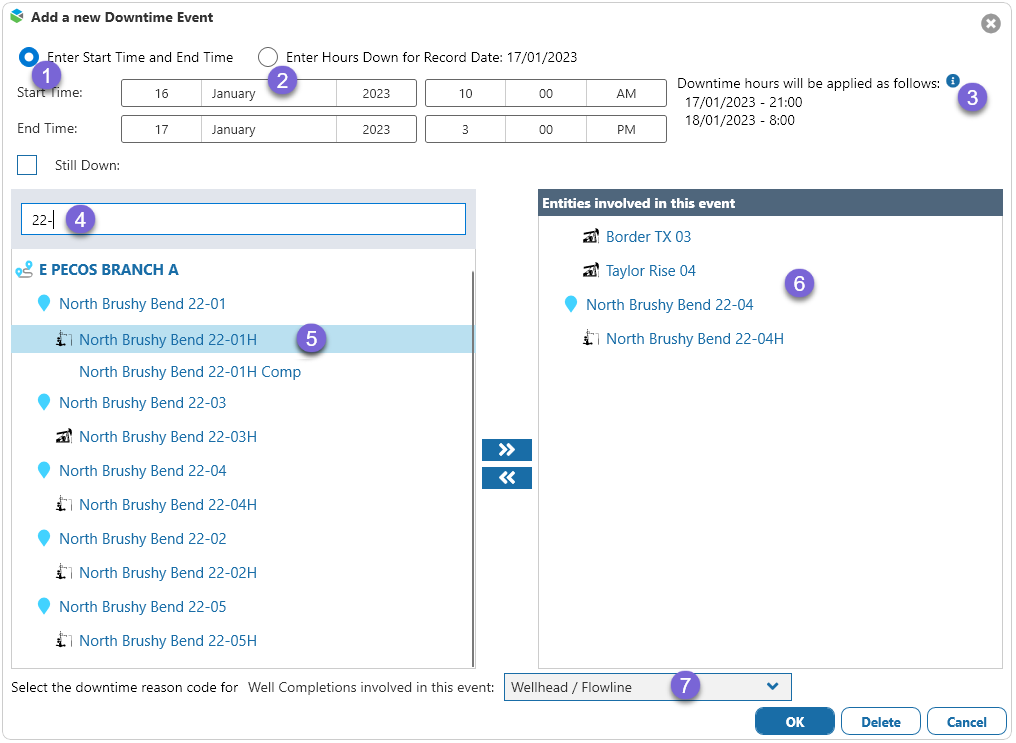
| 1. Start Time and End Time | Select Enter Start Time and End Time and enter the Start Time and End Time of the event, to allow the system to calculate the hours down.
|
| 2. Hours Down | Select Enter Hours Down for Record Date to add a total number of hours to all of the event entities, on the selected Record Date. Enter the Hours Down as hours and minutes (max of 24:00 in this mode).
|
| 3. Information | Tap to see how a downtime event is applied to daily records. |
| 4. Search | Search for completions and equipment affected by the event in the list on the left and move them to the Entities involved in this event list on the right. |
| 5. Routes, Locations and Entities | Entities can be added individually to the event list or as part of a location or route. |
| 6. Event Entities | Entities involved in the event. |
| 7. Reason | Select a reason for the downtime. If both completions and equipment are affected then two reasons will need to be selected, one for completions and one for equipment. |


When the downtime event is saved, the daily record for each entity involved will be updated with the number of hours entered for the event. The downtime event ![]() icon indicates that the downtime is related to an event.
icon indicates that the downtime is related to an event.

Tapping on ![]() opens the downtime event editor to allow the user to change or delete the event.
opens the downtime event editor to allow the user to change or delete the event.
How Downtime Hours are Calculated from Start and End Times
The application can use the start and end times of the event to calculate the number of downtime hours.
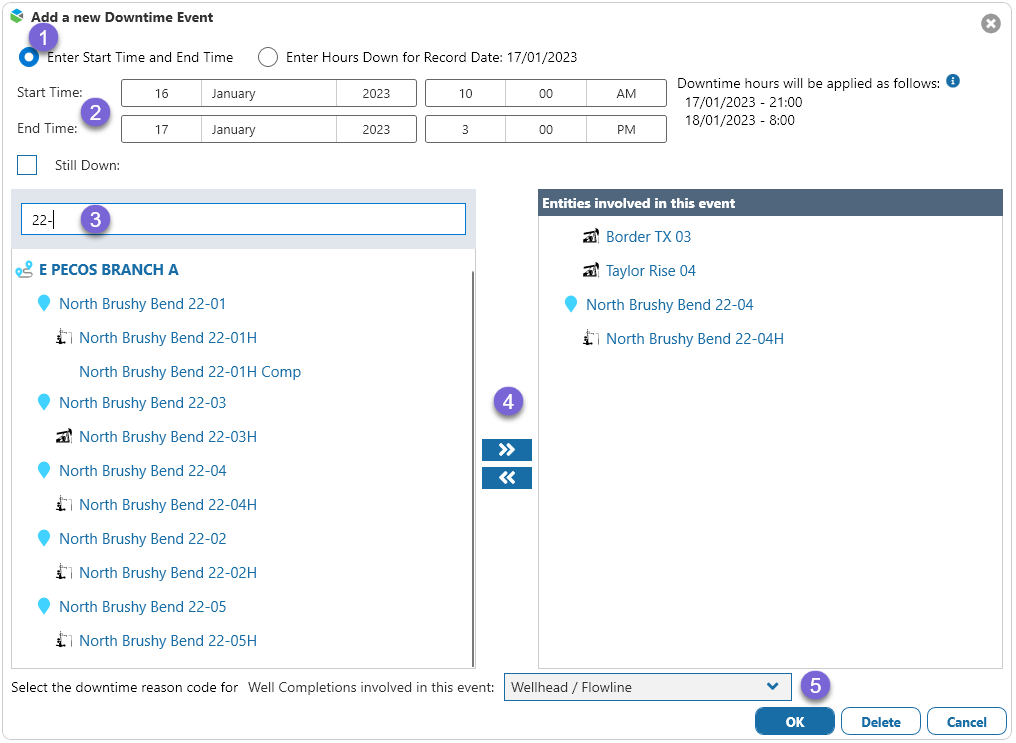
To do this, enter the event details in the Add a New Downtime Event dialog by:
1. Selecting Enter Start and End Time
2. Entering the Start Time and End Time of the event
3. Searching for completions and equipment in the left list
4. Moving selected completions and equipment to the Entities involved in this event list on the right
5. Selecting a reason for the downtime
Note: If both completions and equipment are affected, then one reason will need to be selected for completions and one for equipment.
To understand the computation of downtime hours based on a start and end time, we must first consider the difference between Production Date and Record Date.
In common oilfield daily production calculations, the lease operator is assumed to be on site at the start of the production day, and he or she is reading the production for the previous day. On January 11th, you are recording the production that happened on January 10th. The Production Date is January 10th and the Record Date is January 11th.
The dates shown at the top of the data columns are Record Dates.

For example, if a tank contained 100 barrels yesterday morning (at the start of yesterday’s production day) and it contains 150 barrels this morning (at the end of yesterday’s production day), then we enter 50 barrels of production for the Production Date of yesterday. But, since we’re recording it today, the Record Date is today.
Examples of Downtime Hours Calculations
The following examples will describe how a downtime event is distributed across dates in Field Operator. In these examples, the start of the production day is 7:00 AM (your administrator can change the start of day time setting).
Example 1: A downtime event starts at 7:00 AM on January 10th and ends at 7:00 AM on January 11th. The total downtime = 24 hours. All 24 hours of this event fall in the Record Date of January 11.
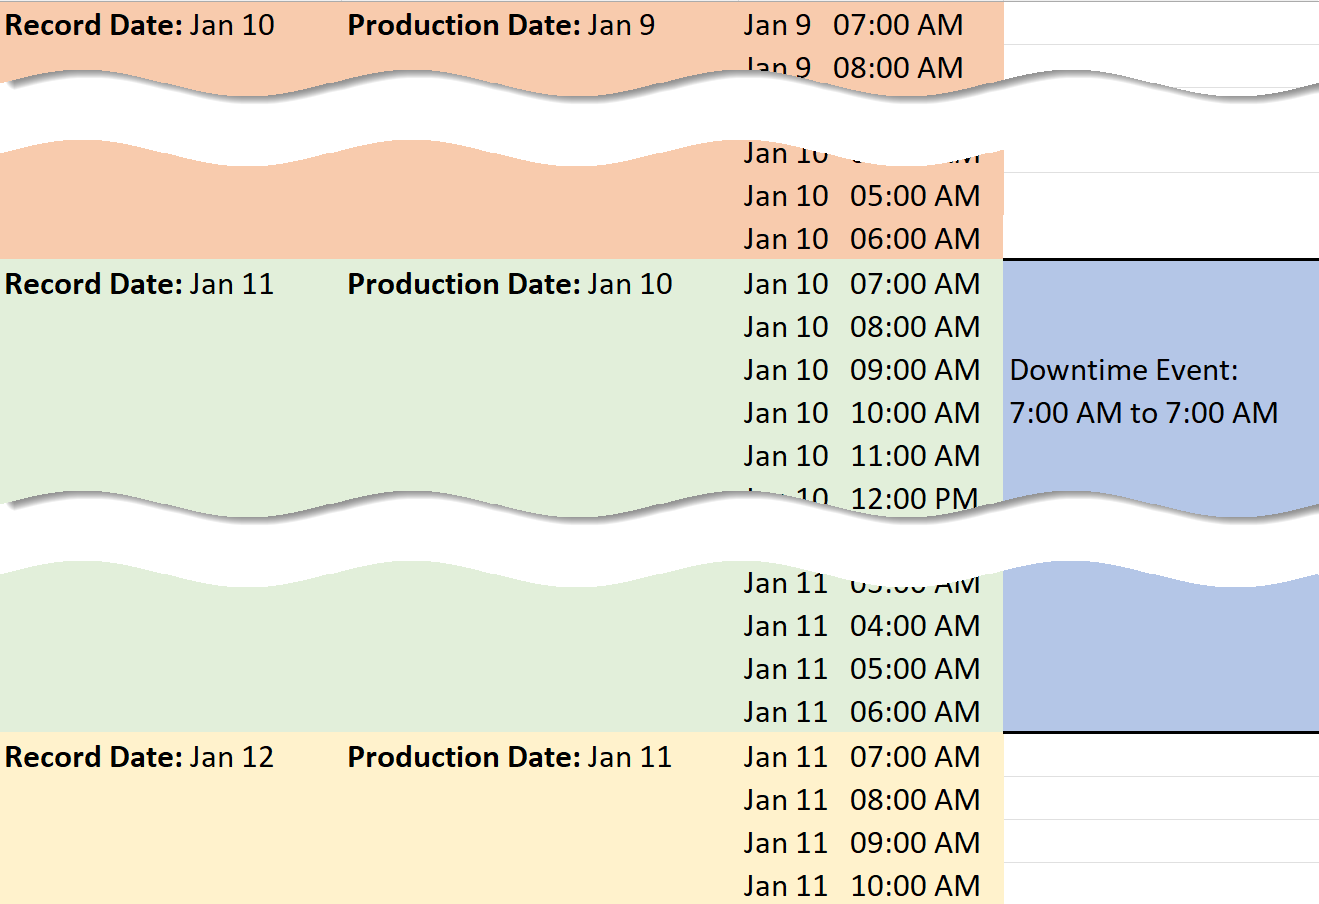
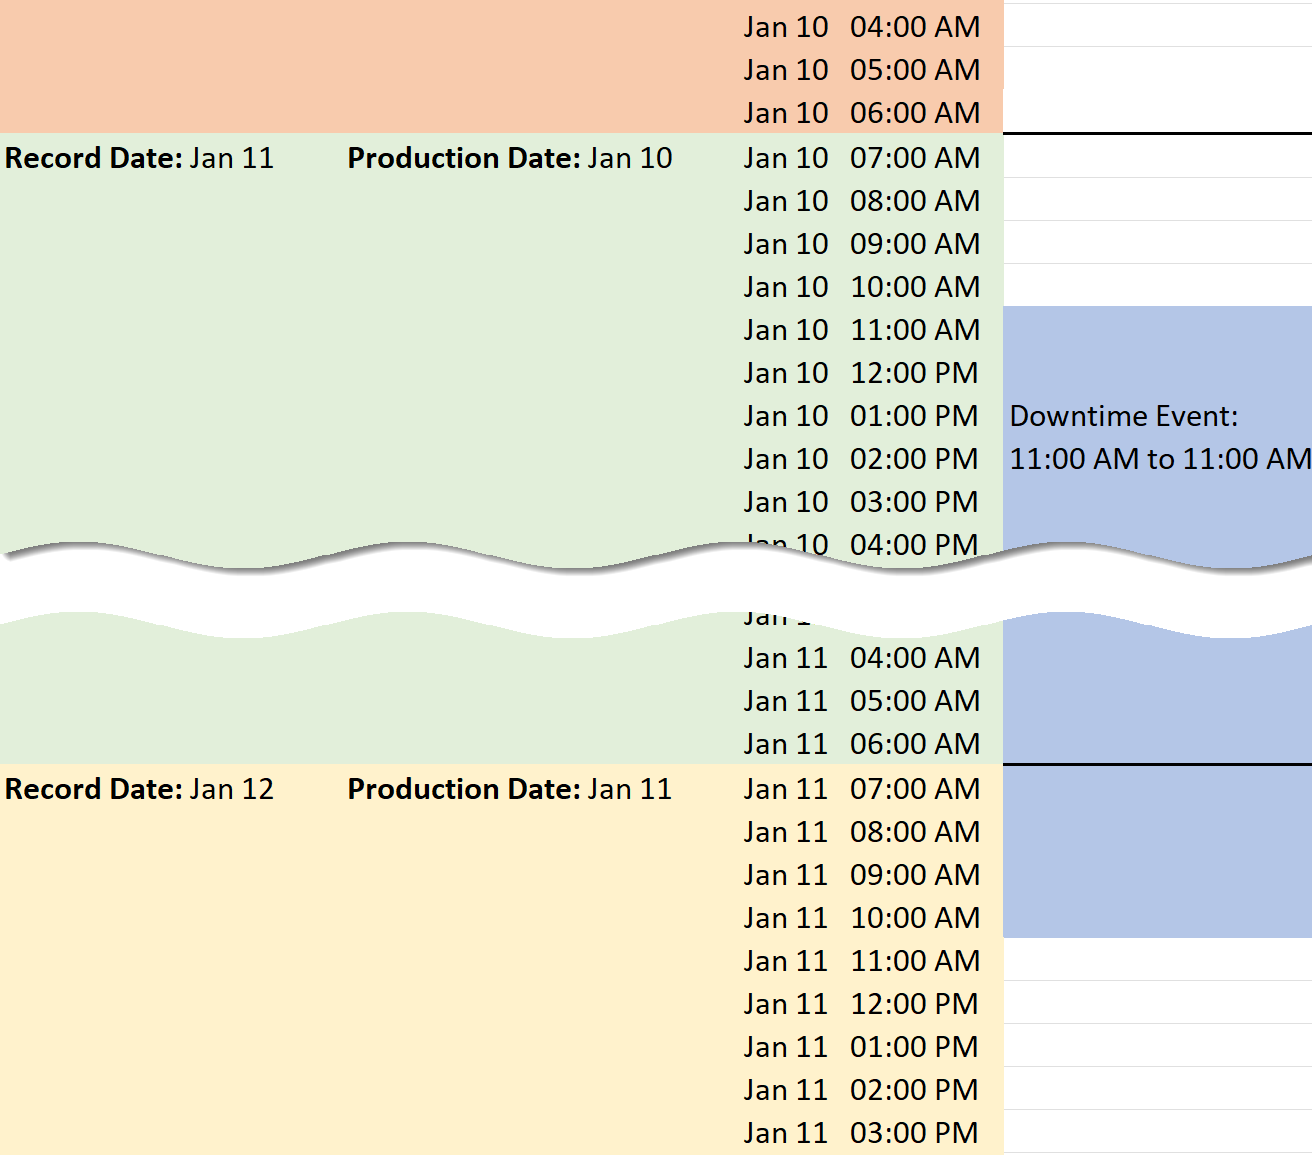
Example 2: A downtime event starts at 11:00 AM on January 10th and ends at 11:00 AM on January 11th. The total downtime = 24 hours. This event is split between two days:
- Record Date: January 11: 20 hours (11 AM to 7: AM)
- Record Date: January 12: 4 hours (7 AM to 11 AM)
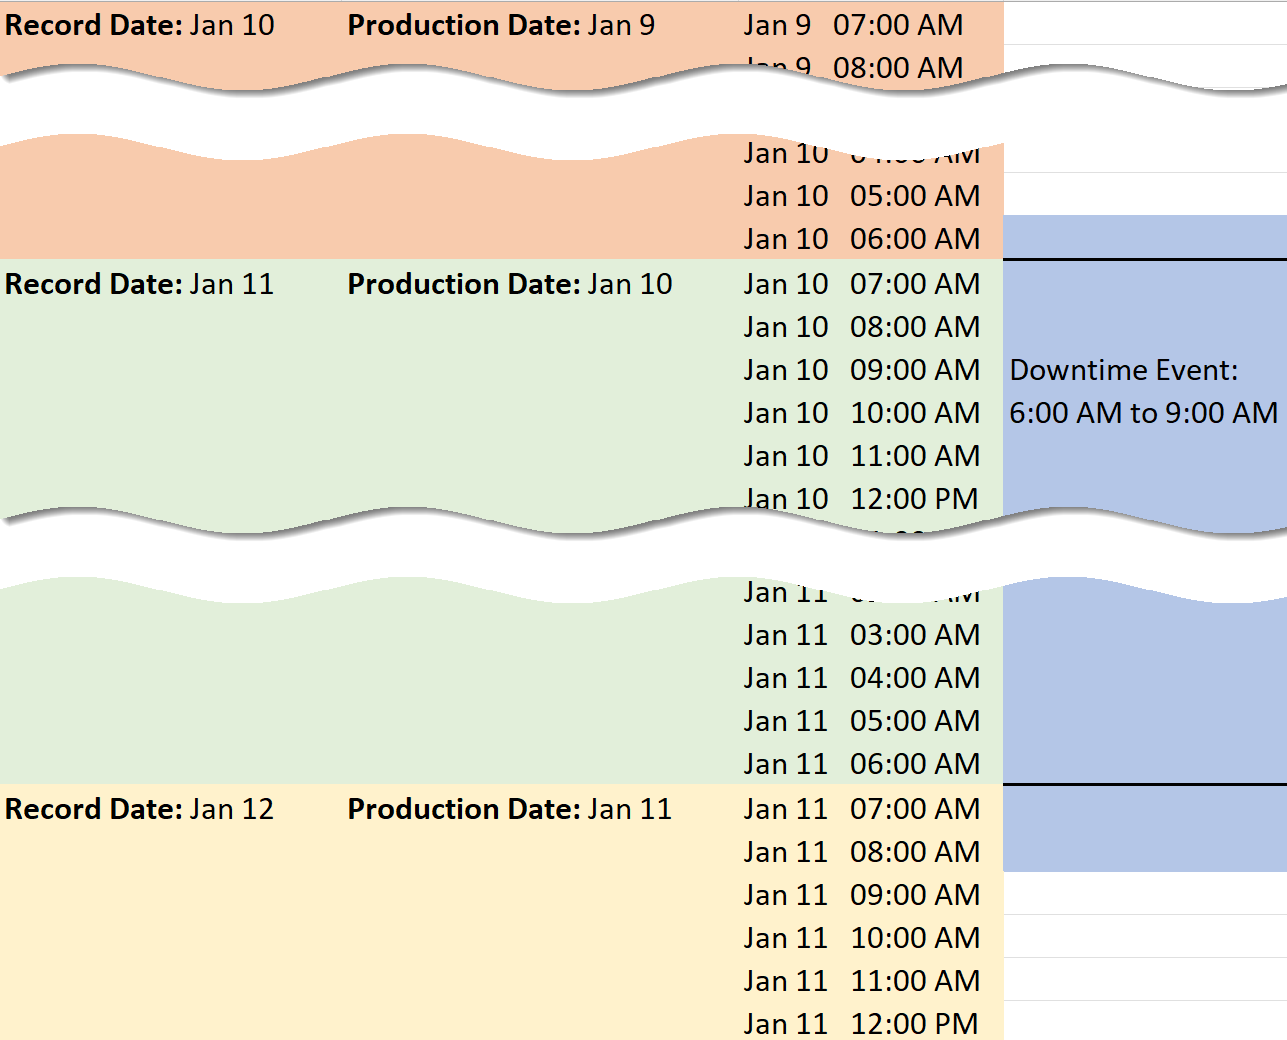
Example 3: A downtime event starts at 6:00 AM on January 10th and ends at 9:00 AM on January 11th. The total downtime = 27 hours. Even though it’s only 27 hours, this event spans 3 record dates:
- Record Date: January 10: 1 hour (6 AM to 7: AM)
- Record Date: January 11: 24 hours (7 AM to 7 AM)
- Record Date: January 12: 2 hours (7 AM to 9 AM)
Recording Data for Tomorrow
Sometimes, you may be recording data for tomorrow. Let’s say you arrived at a well site at 9:00 this morning and had to shut the well down for maintenance. Then you started the well back up at 1:00 PM. You can enter a downtime event with the start and end times, but since the downtime was during today’s Production Date, it would not normally be Recorded until tomorrow. Go ahead and save the downtime event and you’ll see the downtime is applied to the daily record tomorrow morning in Field Operator.
When you save an event that spans into tomorrow’s record date, Field Operator will display the downtime event ![]() icon in the label section of the screen. Tap on the icon to edit the event if necessary. Tomorrow morning, after you sync with the server, the affected entities will automatically have a blue record with the downtime hours filled in.
icon in the label section of the screen. Tap on the icon to edit the event if necessary. Tomorrow morning, after you sync with the server, the affected entities will automatically have a blue record with the downtime hours filled in.

Marking an Event as “Still Down”
The Field Operator Downtime Event editor allows you to mark an event as ongoing by selecting Still Down.

When this option is selected, the End Time field is disabled and the event is considered on-going, until you deselect Still Down and enter an end time.
Every morning Field Operator will process downtime events that are marked as Still Down and will update the current record date’s downtime with 24 hours down. Once a user deselects Still Down and enters the end of the event, the last record date will be updated for all affected entities and the server will stop processing the event.
Note: The time when Still Down events are processed is set by an administrator in the configuration. This option can be disabled.
If Still Down processing is turned off on the server, then a user must perform a carry forward or type a white record into the Field Operator application for the daily records to be updated. It is recommended that Still Down automatic processing be left on so that if a user skips a day, the daily records get updated appropriately. If the Field Operator server is down for some reason at the time of processing, selecting Refresh Download Folders will invoke the process, or on the next day the missing record will be updated. Up to 7 days of missing daily records will be updated when the Still Down processing occurs.