Overview
IFS OI Explorer allows controls to subscribe to events that have been set on a page or a dataset.
An event is something that causes a change on the page. Events can be published by:
- A control on a page
- A dataset on a page
- A page itself
Controls can subscribe to these events, and use them to trigger a change on the page. You can use events to do things such as:
- Populate a list, such as a combo box
- Assign a default value to a control
- Change the time range for a chart or diagnostic trend
- Change the displayed text of a label
For example, you can use an event to populate a combo box, and then when the user selects an option from the combo box, this changes the title of the page.
You can also assign defaults to an event, which means that when you first load a page, controls can display default value.
Note: An Event can only refer to events on the same page. It cannot refer to events on another page.
Tutorial
In this topic, we'll show you how to populate a combo box with data sourced by the FINANCIAL column of a dataset. This is done by setting an event on the dataset.
We're then going to place a text label on the page which shows the value of the VALUE column for the item you have selected from the combo box. And then we're going to assign a default value to the event so that the combo box is not empty when the page is loaded.
![]()
Now, let's look at how we're actually going to do this, step-by-step.
Step by Step: Populating a Combo Box from a Dataset
Before you start, open a new tab in Explorer and click the “Create a New Page in Studio Mode” thumbnail. Choose the grid layout – you can adjust the rows and columns if you like but it’s not important for this exercise.
You may need to adjust the configuration to suit your data that you have available at your site.
Step 1. Add a Combo Box to the page and configure it
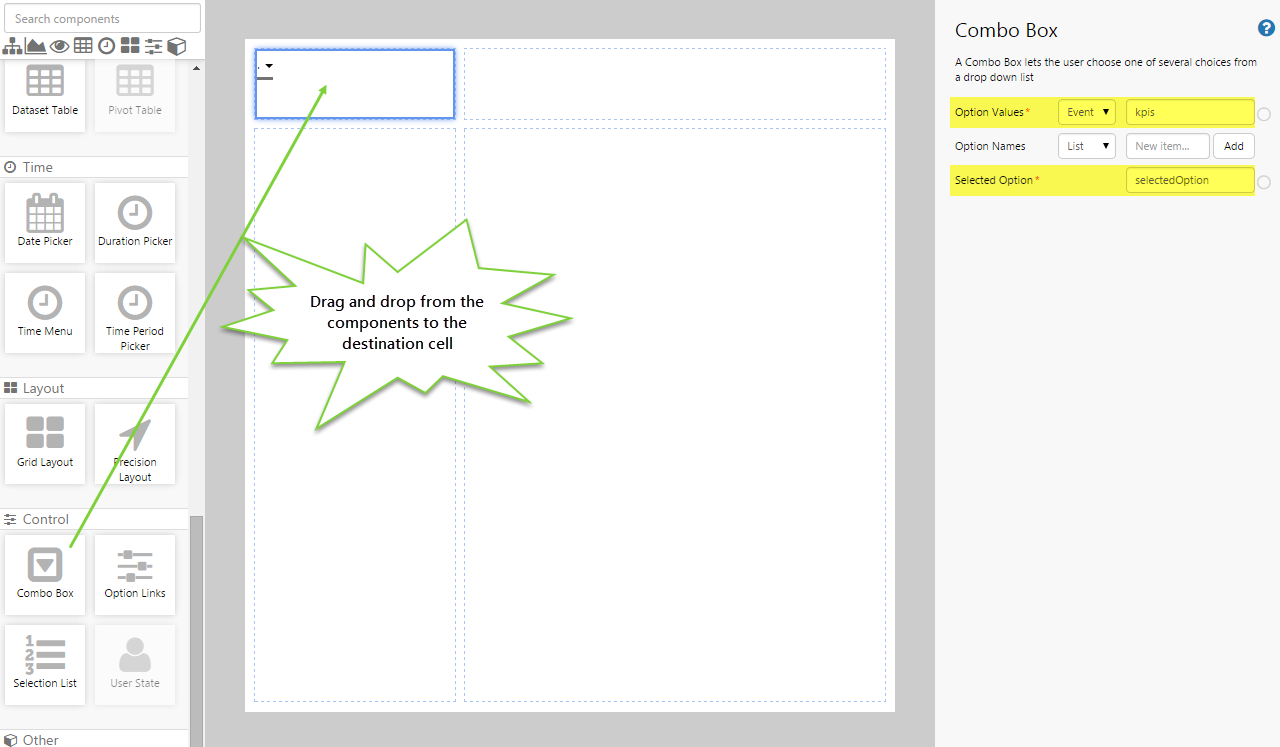
Drag and drop the Combo Box control onto a grid cell. Configure it as follows:
- Option Values: (Event) kpis
- Selected Option: selectedOption
Step 2. Add and configure source data
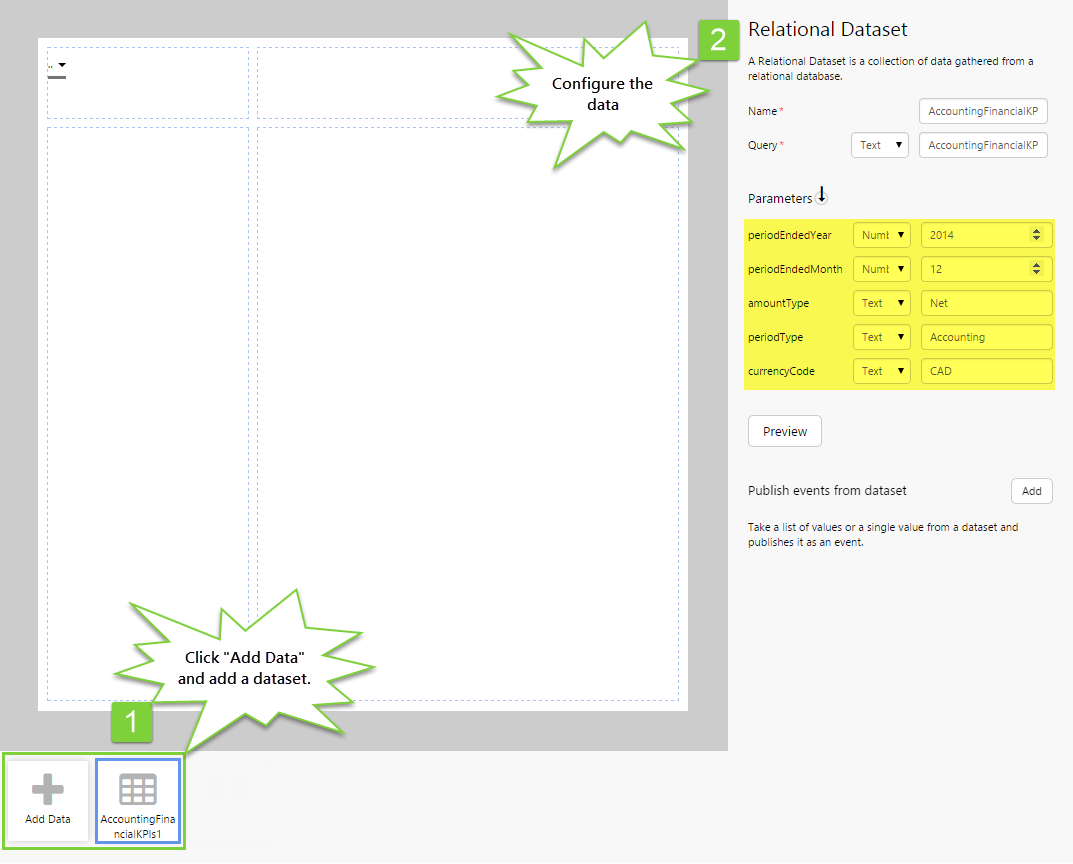
Click "Add Data" and add the AccountingFinancialKPIs dataset. Then configure the parameters as follows:
- periodEndedYear: (Number) 2014
- periodEndedMonth: (Number) 12
- amountType: (Text) Net
- periodType: (Text) Accounting
- currencyCode: (Text) CAD
After configuring the parameters, you can click the "Preview" button to see the data. The FINANCIAL and VALUE columns are the ones we are interested in.
Step 3. Add an event that will be published by the dataset
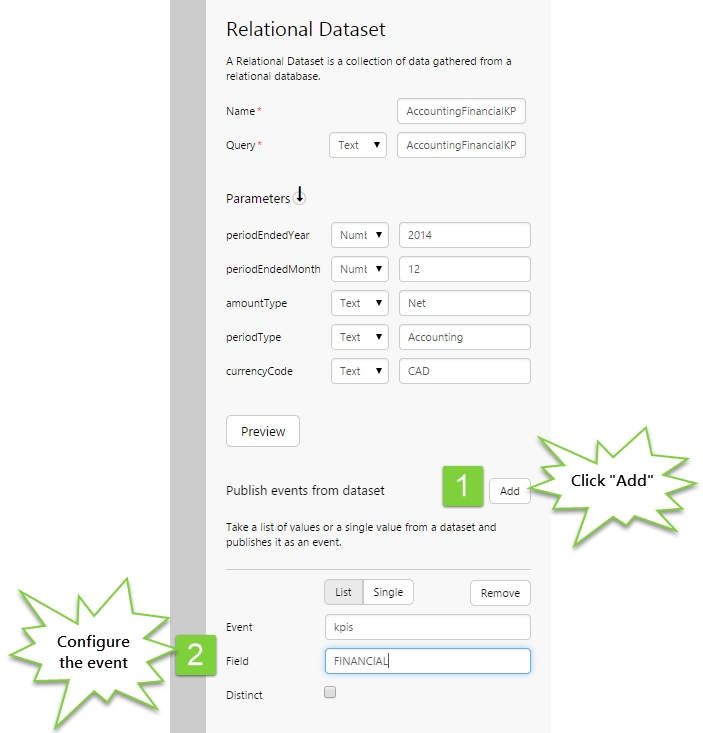
You configure the events to be published by the dataset in the section located below the parameters. For dataset events, you can configure an event that publishes a list, or an event that publishes a single value. In this step, we'll create an event that publishes the list of values from the FINANCIAL column of the dataset.
- Click the "Add" button to add the event.
- Configure the event as follows:
- Click "List".
- Event: kpis
- Field: FINANCIAL
Notes:
- Field is case-sensitive.
- Selecting Distinct means that if the column contains more than one instance of the same value, only the first instance will be returned. E.g. If the Sales KPI is present more than once, only the first occurrence of Sales will be shown in the combo box.
Step 4. Add the 2nd event
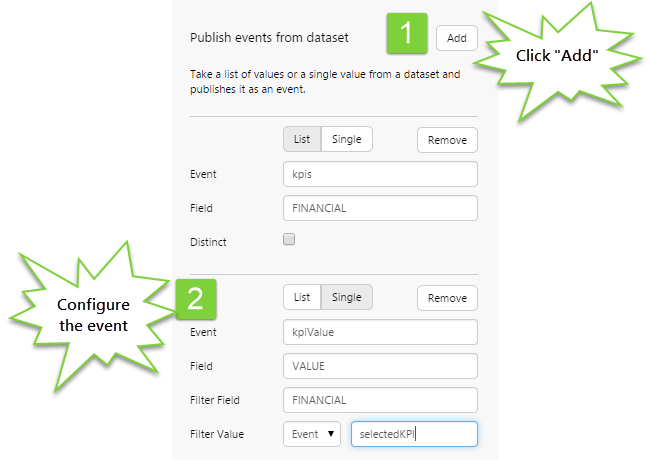
In this step, we'll create a second event that publishes a single value from the selected row of the FINANCIAL column.
- Click the "Add" button to add the event.
- Configure the event as follows:
- Click "Single".
- Event: kpiValue
- Field: VALUE
- Filter Column: FINANCIAL
- Filter Value: (Event) selectedKPI
Notes:
- Field and Filter Field are case-sensitive.
- When the user selects a value from the combo box, the kpiValue event is published. This is the event we will listen to in the next step.
- Filter Column and Filter Value. This event publishes the value of selectedKPI. This value is taken from the VALUE column, and is the value which is located on the same row as the item selected from the combo box.
Step 5. Add a Text Label
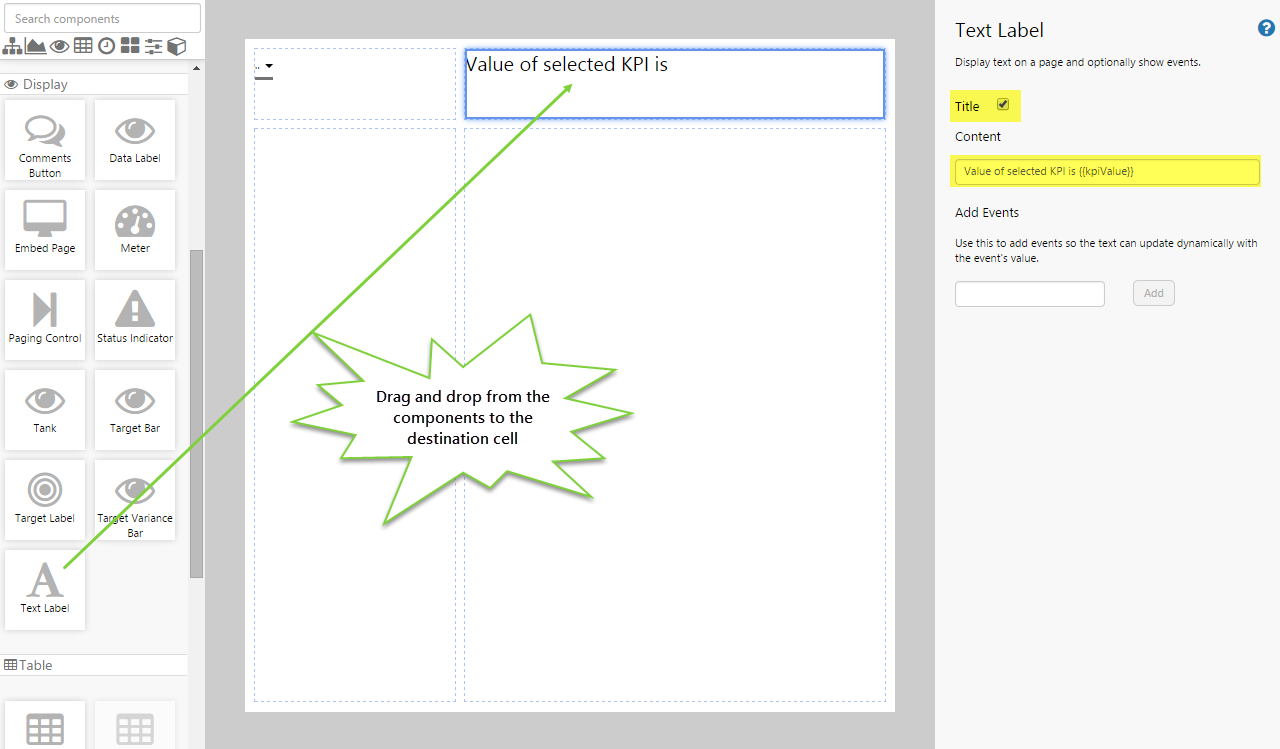
Combo boxes don’t normally do anything by themselves – you use them to drive other controls. Let’s add a text label and observe it being driven by the combo box.
- Drag and drop a Text Label onto another cell on the page.
- Select the Title check box.
- Add the following content: Value of selected KPI is {{kpiValue}}
Switch to Live Mode, and watch the kpiValue value change as you choose different items from the combo box.
Step 6. Set a default value for the combo box
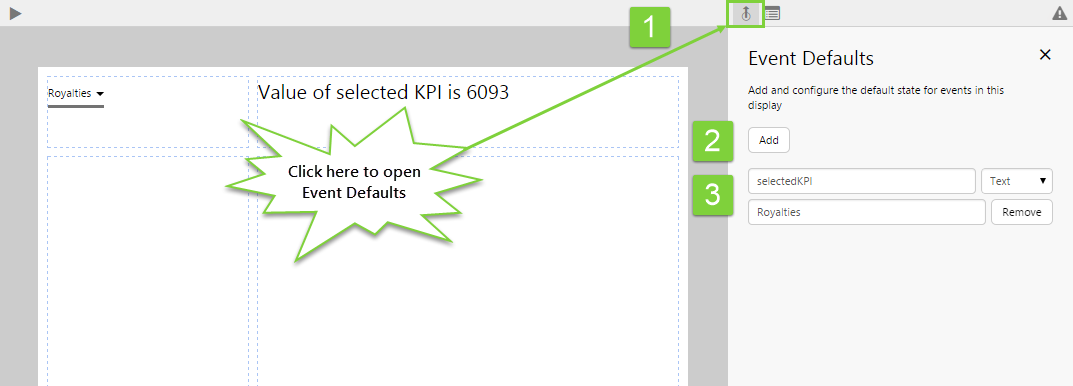
You will have noticed that when you first loaded the page after switching to Live Mode, the combo box didn't display anything, and therefore the label didn't display any data. Often we will want to show the users something by default, before they select an item. Let’s switch back to Studio and add a default for the combo box event.
- Click the Event button in the toolbar. This opens the Event Defaults panel.
- Click the "Add" button.
- In the first entry box, type the name of the event. In this case, we want to configure a default for selectedKPI. This is the event that is generated when the user selects something from the combo box.
- In the drop-down list, select Text.
- In the 2nd entry box, type Royalties.
- You need to be familiar with your dataset to know the possible values that you can enter here. A good way to find out what to enter here is to go to your dataset, and click the "Preview" button. In our case, we know that this event selects a value from the FINANCIAL column, so you can enter any value from this column as the event default.
Step 6. All done!
![]()
Congratulations! You now have a fully functioning combo box that displays a list populated by a dataset. When the user chooses an item from the combo box, the text label displays the value of the KPI. When the page is first loaded, the combo box displays Royalties. Switch to Live Mode to see this in action.
![]() Don't forget to save your page!
Don't forget to save your page!