ON THIS PAGE:
This article is about how to create entities using P2 Server Management or the Import/Export spreadsheet. For general information on entities, see: Entities, the Backbone of all Data.
Every now and then, you will need to add a new asset to your system. In P2 Server, these are known as entities. Configuring an entity is a crucial step in setting up a system to model your assets. You can configure an entity using Server Management or the Import/Export spreadsheet.
Before you start, spend some time thinking about where this entity sits in your asset model, which templates you want to use, and what are the attribute values you want to retrieve.
Server Management
In P2 Server Management, fully configuring an entity requires 4 main steps, all performed through the Entities menu option:
- Adding the entity.
- Assigning the templates.
- Configuring the attribute values.
- Assigning the primary templates.
The only prerequisite is that you must have already created the templates you intend to use.
Adding the Entity
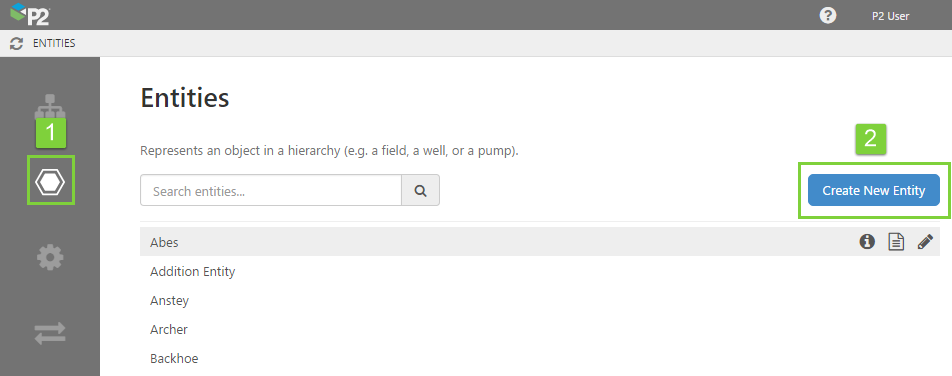
1. Open P2 Server Management, and click the Entities ![]() icon.
icon.
2. Click Create New Entity.
Note: If you want to edit an existing entity, select it from the list below the Create button.
3. Give the entity a name, display name, and a description. Note that the name cannot contain reserved characters. For the description, it's often useful to provide a broader explanation of the asset that is represented by this entity.
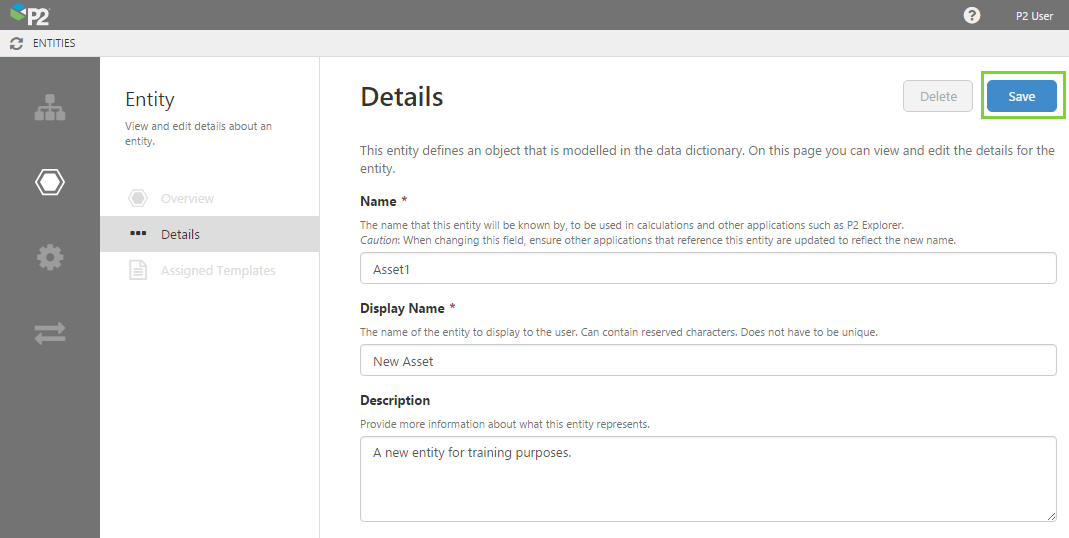
4. Click the Save button in the top right corner.
After you have saved, the Assigned Templates menu item becomes active.
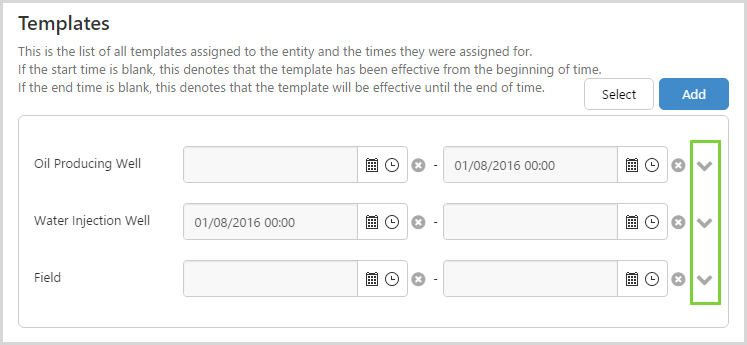
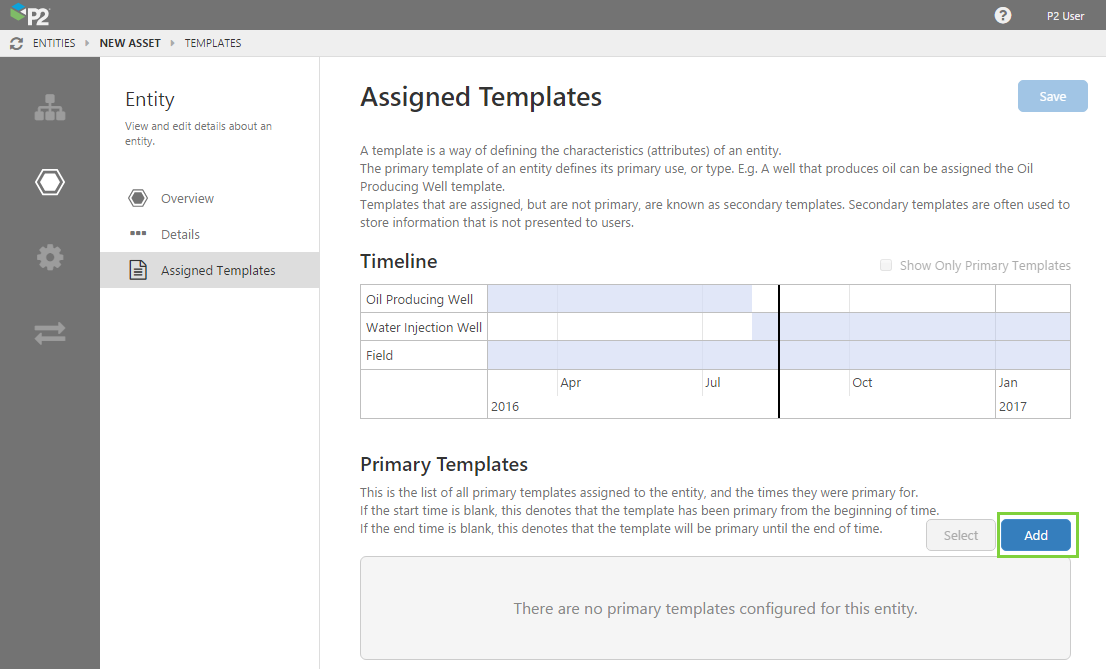
Assigning the Templates
For this next step, you must have already created a template. You will now assign a template to this entity. This will enable all of the attributes associated with that template to be passed on to the entity. The entity will then be responsible for populating the attributes with actual values for that specific entity.
Before you move to the next step, make sure you know what all your applicable templates are, and which is to be primary.
5. Click Assigned Templates.
6. Click the Add button next to Templates.
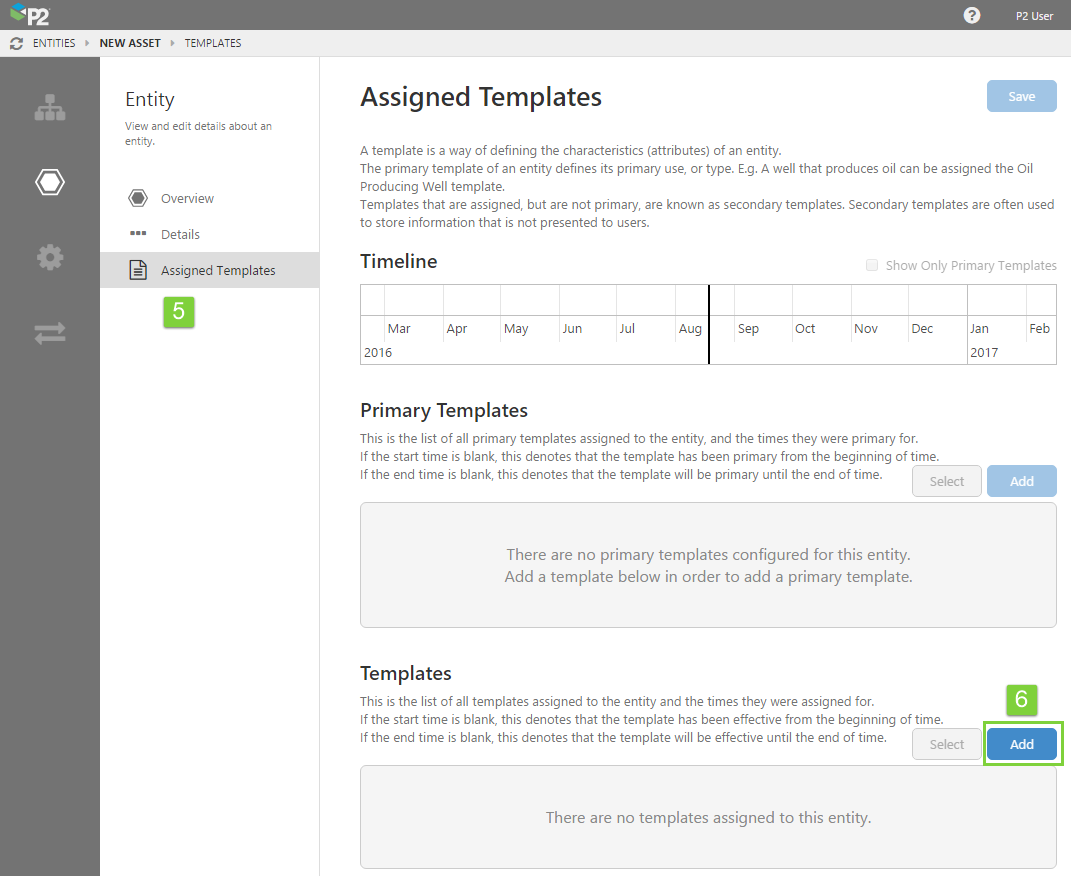
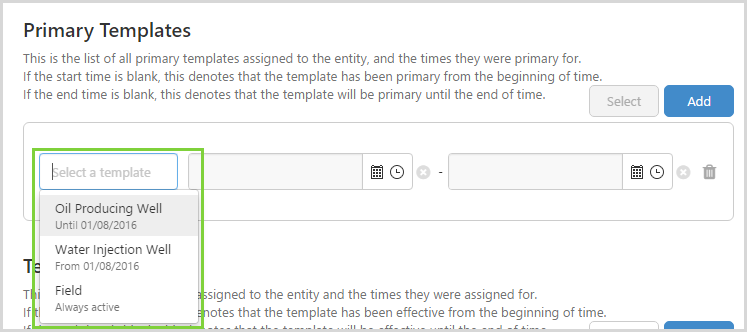
7. Add as many templates as you need. Only templates that have already been added to the system will be available. Each template you add is known as a template instance.
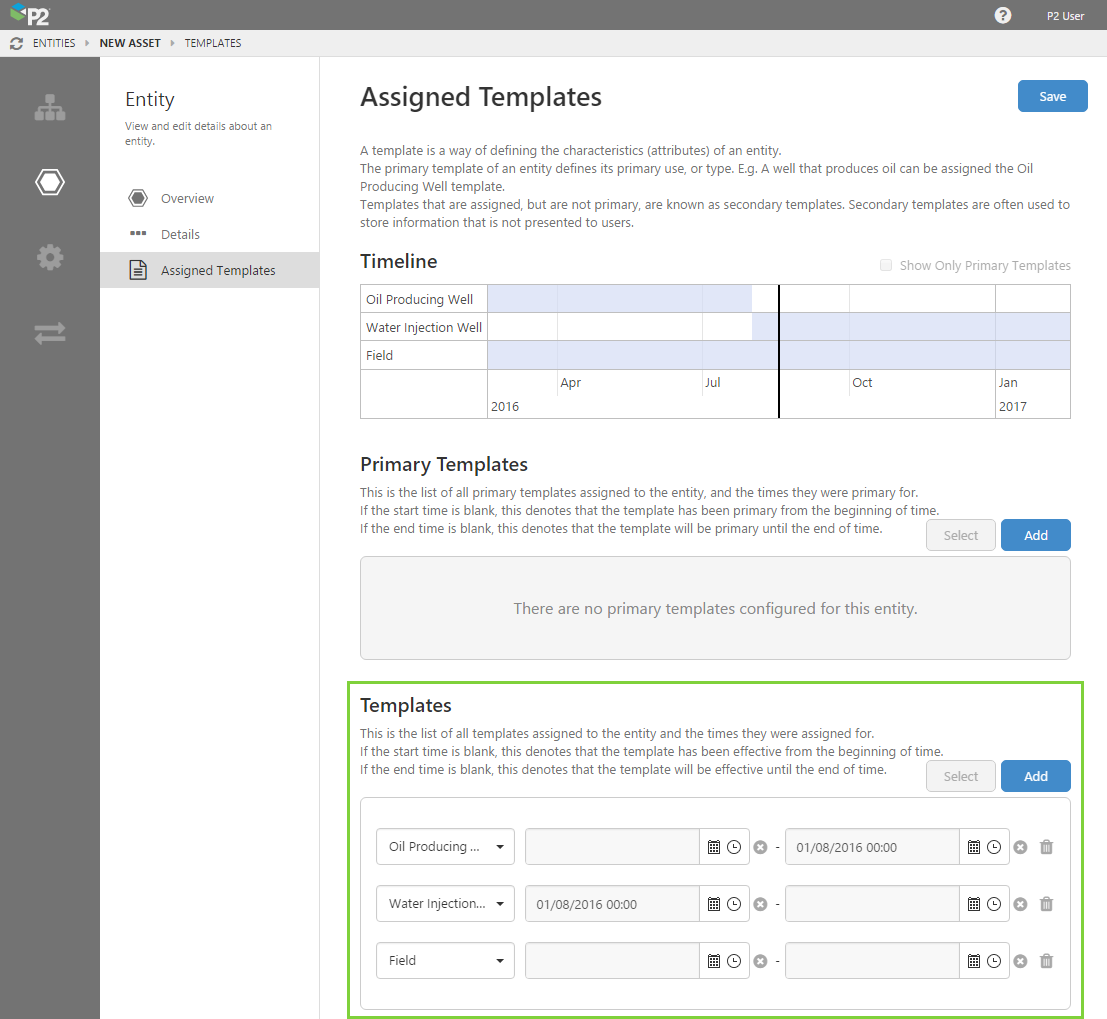
First, select them from the drop-down list, and then assign date ranges for when they apply. Date ranges may overlap. As you add the templates, you will notice the Timeline being updated.
8. Click the Save button.
Configuring the Attribute Values
You will notice that the template instances now have a drop-down arrow next to each of them.
This is where you configure where the attributes will retrieve their values from for this entity. So while a Water Injection Well may already have an attribute for Bottom Hole Pressure, the entity still needs to pull that attribute value from somewhere. This is where you configure that.
You will need to perform the following step for each template instance, if you want the attribute to produce a value.
9. Click the drop-down arrow next to the template.
10. Click the attribute you want to configure. This will reveal if the attribute already has a value. If this is a new entity, the values will be unassigned.
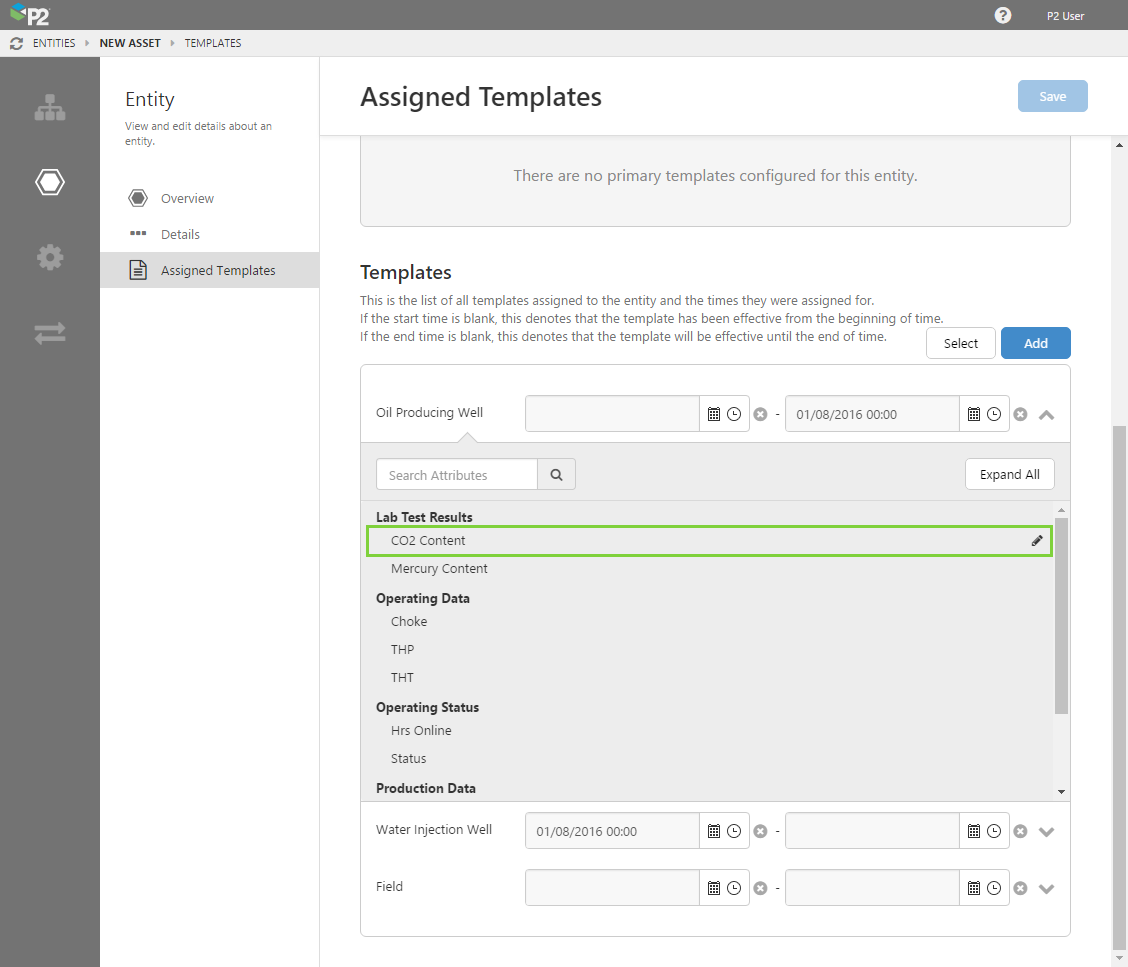
11. Click the edit ![]() icon for the attribute to configure it.
icon for the attribute to configure it.
The Attribute Values page opens. As attributes are also time-aware, this page contains a timeline view similar to the one on the templates page.
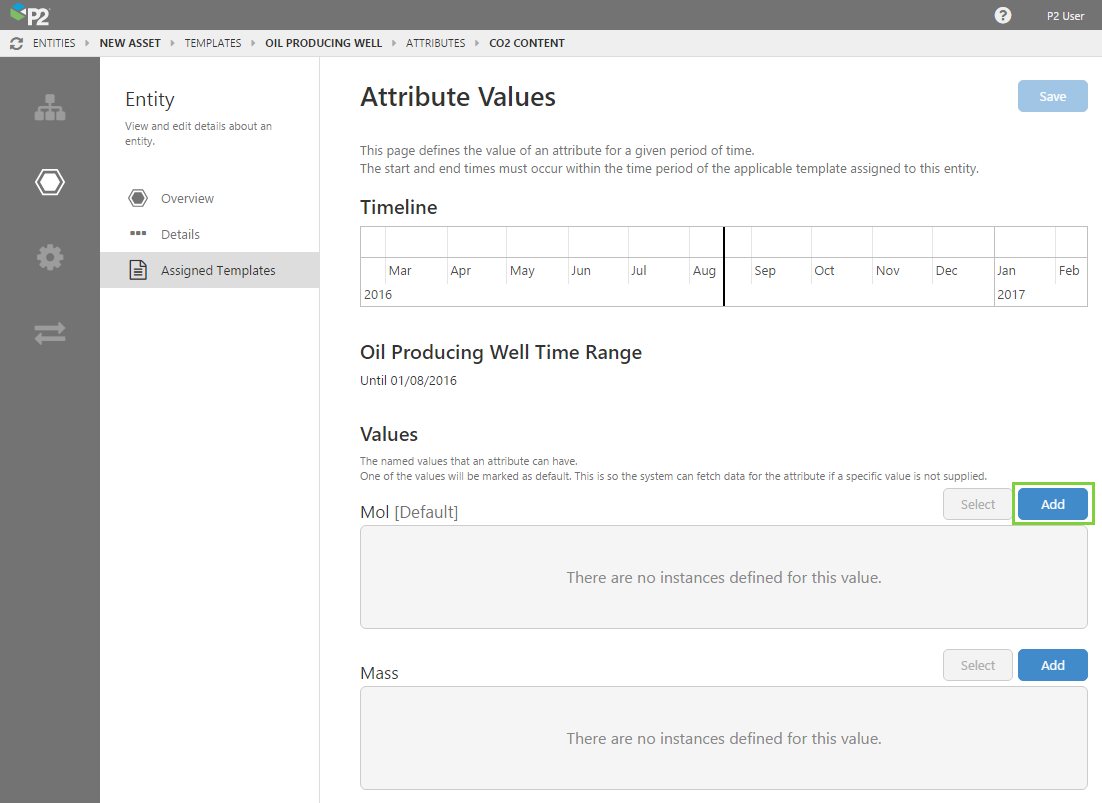
12. Click the Add button. You can add as many attribute values as necessary.
An attribute can have a number of values, and they can be of different types. For example, for one date range you may want the attribute to have a fixed value and for another date range you may want the attribute to get its value from a tag.
Note also that the time ranges available for an attribute are tied to the time range of the template instance, and cannot extend beyond the template instance's start or end times. Date ranges for individual attribute values cannot overlap.
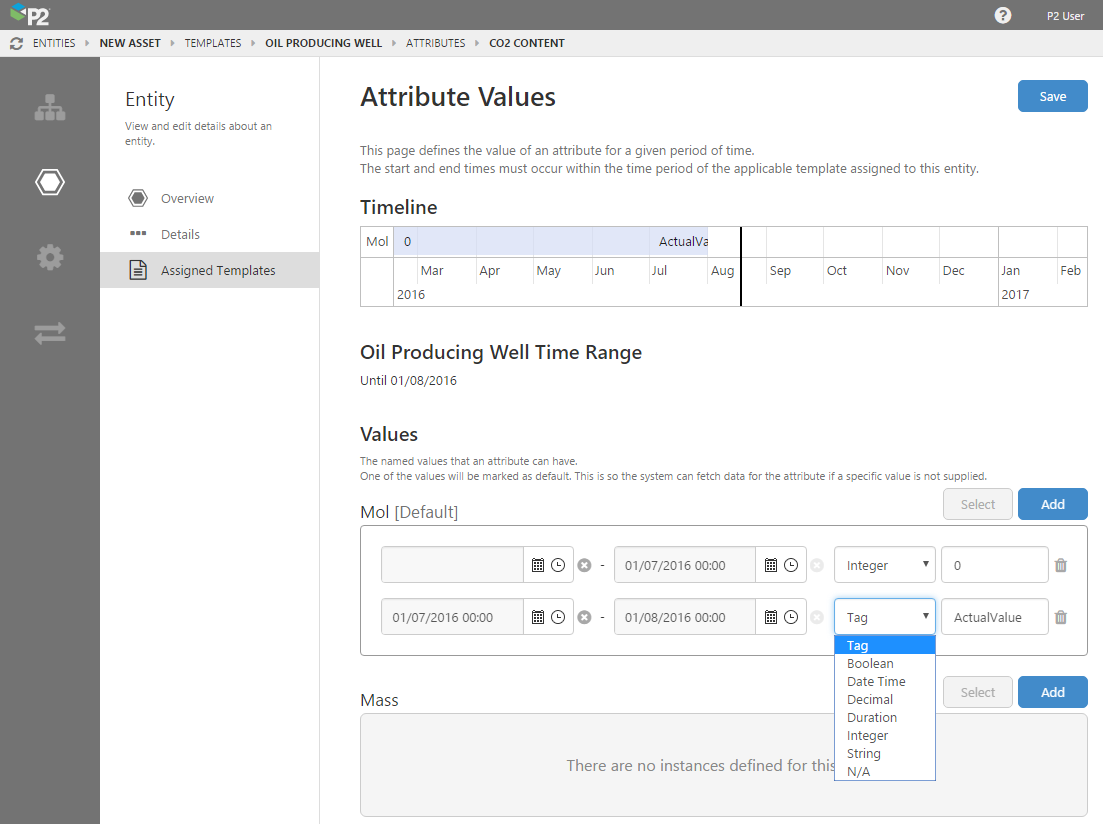
13. When you have finished configuring your attribute values, click Save in the top right corner.
Assigning the Primary Templates
14. Click the Assigned Templates menu item again, and click the Add button next to Primary Templates.
As you add templates, you will notice that only the templates you added in the previous step will be available for adding as a primary template.
You should assign at least one primary template. The date range for the primary template must also fall within the date range of the template instance.
E.g. If you choose Oil Producing Well for the primary template, the applicable primary date range must not end after 1st March 2016. In fact, if the template you choose has an end date, it will automatically be entered for you. You may change the end date such that it occurs earlier, but it cannot occur later.
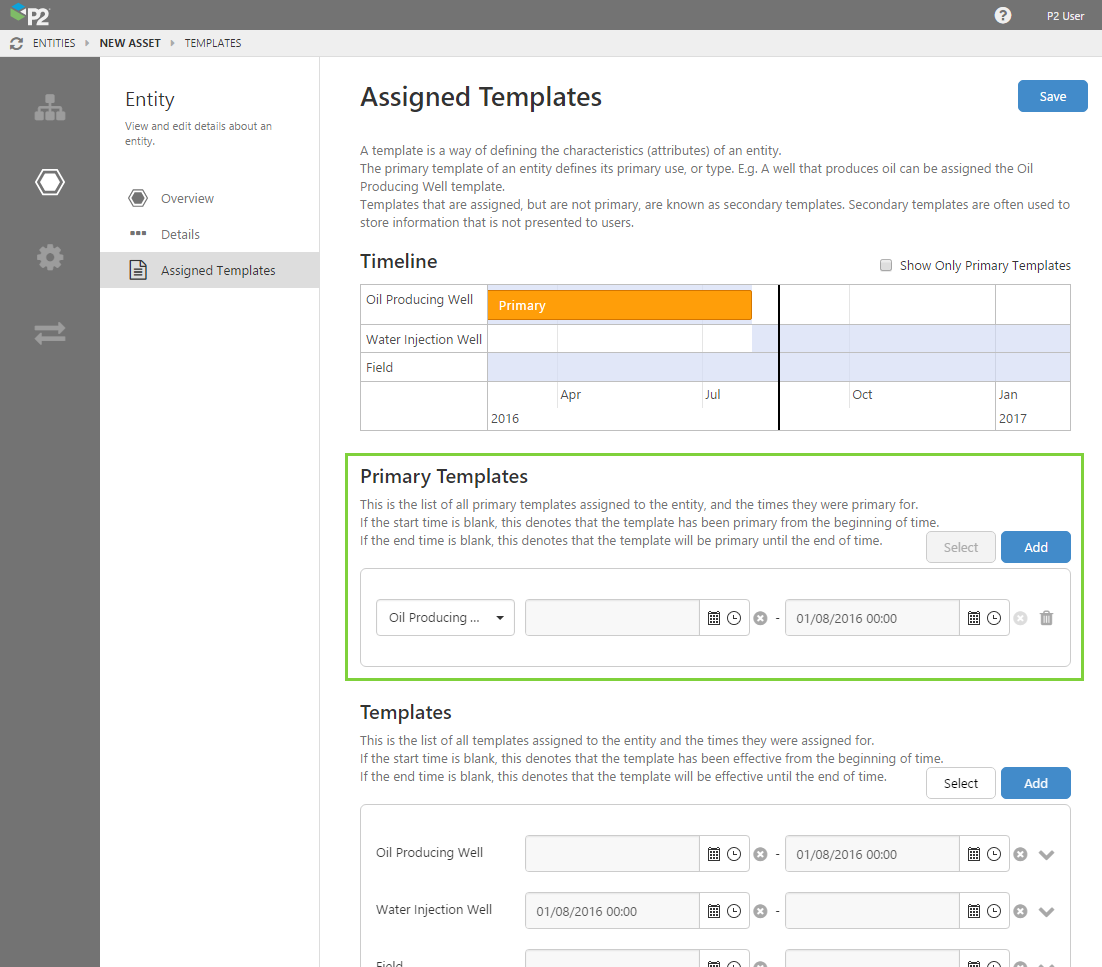
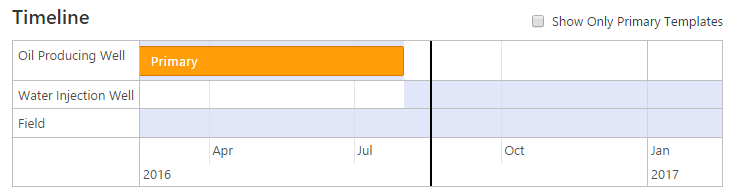
As you add the primary template, you will notice the timeline automatically update to reflect your changes.
15. When you have finished assigning templates, click the Save button in the top right corner.
Done! After completing the above steps, you will have a properly configured entity.
You should now add the entity to a hierarchy so you can include it in an asset model.
Import/Export Spreadsheet
The Import/Export spreadsheet is generally only used to make bulk changes, but it provides access to some advanced functionality not currently available through Server Management.
If you want to configure entities as part of a bulk configuration, you need to use several tabs in the Import/Export spreadsheet:
- Entity
- Template Instance
- Attribute Value
Look for the red comment ![]() icon in the row headers, to get help with each column.
icon in the row headers, to get help with each column.
DO NOT fill in or change anything in the Global Id field – this is the unique identifier for the entity, template instance, and attribute values, that allow them to be tracked across systems, and when anything is renamed. It is automatically generated by the system.
Entity Tab
The screenshot below shows an example of the basic definition for an entity (click to enlarge).

There are 2 important parts to this sheet: the Entity and the System Identifiers.
Let's first look at the Entity. Each entity is on a different row, and each entity has a Name, Display Name, and Description. These fields may also be configured through Server Management.
Now, let's focus on the 3B-2A-8 entity on row 3, and scan across to look at columns E-G. These columns define the system identifiers that allow a set of names to be mapped between an entity in P2 Server and the corresponding asset in an external system. Currently, you cannot do this using Server Management, this must be done through the Import/Export spreadsheet.
To add more system identifiers for an entity, you need to add more repeating sections like E-G. If you look at columns H-J, you will see that they add another system identifier - this time for P2 EU. This means that the entity is available in 2 other systems, and P2 Server is to treat them as the same entity.
You can add as many system identifiers as you need to, by adding more repeating sections like columns E-G.
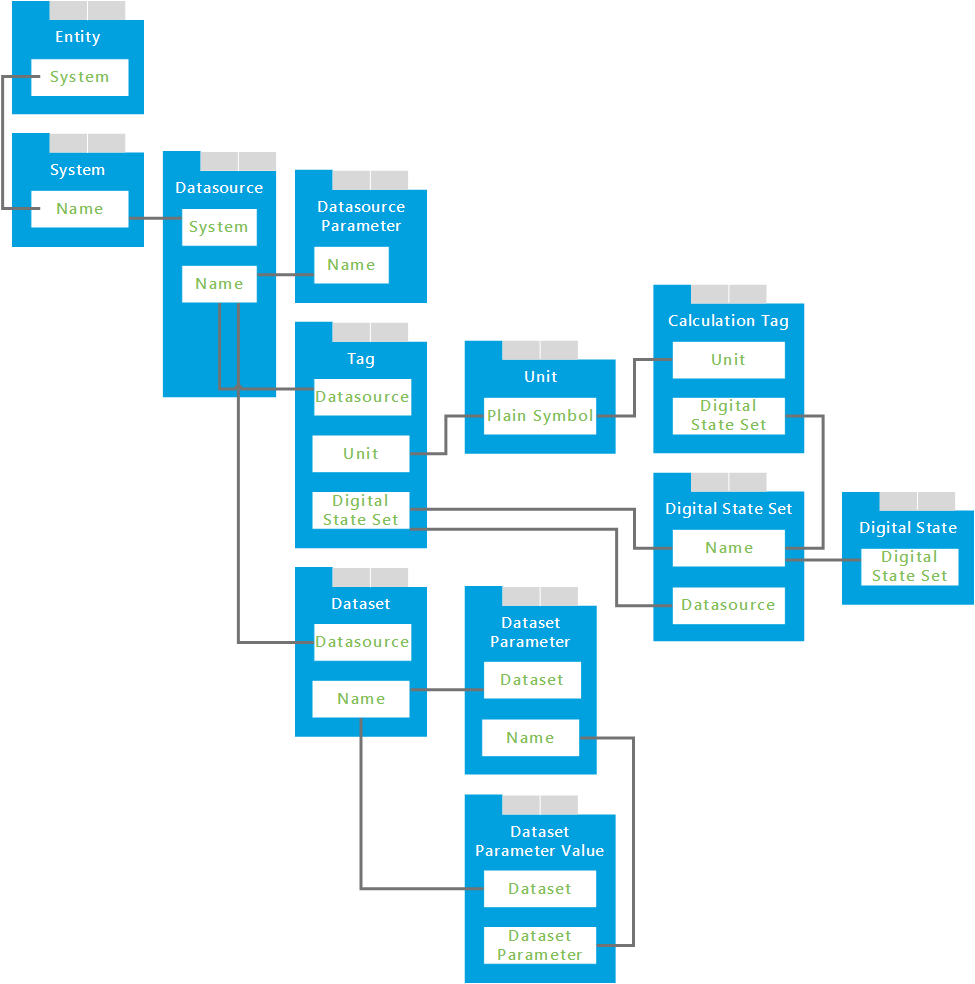
Dependencies
The Entity tab has dependencies with the following tabs: System, Entity, Link Group, Link, and Template Group. Understanding these dependencies assists in resolving import errors.
Direct Dependencies
The Entity tab has a direct dependency on information from the System tab, because a column on the Entity tab directly references a column on the System tab.
| This column | On this tab | Why you need to pay attention |
| Name | System | Required by the 'System' column on the 'Entity' tab. |
Cascading Dependencies
A cascading dependency exists when a dependent tab (above) has additional dependencies. These are the columns that you need to pay attention to:
| This column | On this tab | Why you need to pay attention |
| System | Datasource | References the 'Name' column on the 'System' tab. |
| Datasource | Datasource Parameter | References the 'Name' column on the 'Datasource' tab. |
| Datasource | Tag *For dependencies of the Tag tab, see Editing Tags and Creating a Calculation. |
References the 'Name' column on the 'Datasource' tab. |
| Datasource | Dataset | References the 'Name' column on the 'Datasource' tab. |
| Dataset | Dataset Parameter | References the 'Name' column on the 'Dataset' tab. |
| Dataset | Dataset Parameter Value | References the 'Name' column on the 'Dataset' tab. |
| Dataset Parameter | Dataset Parameter Value | References the 'Name' column on the 'Dataset Parameter' tab. |
Here is a diagram of the dependent tabs and columns. Use this to help you visualise how the dependencies work, and ensure all required columns are completed. Use the comments inside the spreadsheet to help you.
Template Instance Tab
The screenshot below shows an example of a template instance, which connects a template with an entity for designated periods of time (click to enlarge).

There are 2 important parts to this sheet: the Template Instance and the Primary Time Periods.
Let's first look at the Template Instance. Each template instance is on a different row, and each instance has an Entity, Template Definition, Start Time, and End Time. The same rules apply here as when you add a template instance in Server Management. If you look carefully at rows 2498-2500, you can see that these are the template instances configured in Server Management, using the above instructions on this page.
Now, let's focus on the 3B-2A-8 entity on row 3, and scan across to look at columns F-H. These columns define the time periods that this instance is the primary template.
To add more primary time periods for the template instance, you need to add more repeating sections like F-H. If you look at columns I-K, you will see that they add another time period for which the template is considered the primary template for that entity.
You can add as many primary time periods as you need to, by adding more repeating sections like columns F-H.
Dependencies
The Template Instance tab has dependencies on the following tabs: System, Entity, Link Group, Template Group, and Template Definition.
Direct Dependencies
The Template Instance tab has direct dependencies on information from the following tabs: Entity System tab, because a column on the Entity tab directly references a column on the System tab. Understanding this dependency assists in resolving import errors.
| This column | On this tab | Why you need to pay attention |
| Name | Entity | Required by the 'Entity' column on the 'Template Instance' tab. |
| Name | Template Definition | Required by the 'Template Definition' column on the 'Template Instance' tab. |
Cascading Dependencies
A cascading dependency exists when a dependent tab (above) has additional dependencies. Several important dependencies exist for the following tabs:
Click the links above to check these dependencies.
Attribute Value Tab
The screenshot below shows an example of an attribute value, which associates a real-world value with an attribute on a template, when it is assigned to an entity (click to enlarge).

If you look carefully, you can see that these are the template instances configured in Server Management, using the above instructions on this page.
Dependencies
The Attribute Value tab has dependencies on all tabs except for the Hierarchy and Hierarchy Relationship tabs. Understanding these dependencies assists in resolving import errors.
Direct Dependencies
The Attribute Value tab is directly dependent on the Entity, Template Definition, and Attribute Definition tabs, because columns on the Attribute Value tab directly reference columns on those tabs.
| This column | On this tab | Why you need to pay attention |
| Name | Entity | Required by the 'Entity' column on the 'Attribute Value' tab. |
| Name | Template Definition | Required by the 'Template Definition' column on the 'Attribute Value' tab. |
| Name (Attribute Definition object type) | Attribute Definition | Required by the 'Attribute Definition' column on the 'Attribute Value' tab. |
| Name (Attribute Value Definition object type) | Attribute Definition | Required by the 'Attribute Value Definition' column on the 'Attribute Value' tab. |
Cascading Dependencies
A cascading dependency exists when a dependent tab (above) has additional dependencies. Several important dependencies exist for the following tabs:
Click the links above to check these dependencies.