You can add an entity to a worksheet via drag and drop from the Find Entities ![]() panel. You can add a single entity or multiple entities, and you can also select the type of information to include on the worksheet.
panel. You can add a single entity or multiple entities, and you can also select the type of information to include on the worksheet.
Fetch Parameters
The lower half of the Find Entities panel defines the type of information that is included in the worksheet for the selected entities.
The Fetch Parameters drop-down list lets you choose which set of saved parameters you would like to use during a fetch. You can save common parameters for fetches that you do on a regular basis. For example, you might be interested in the last 24 hours of raw data.
![]()
For ad-hoc fetches, select the Current Fetch Parameters item in the drop-down list. The fetch will then use whatever is currently configured on the Fetch Parameters task pane.
Single Entity
To add a single entity, drag the entity from the hierarchy or search results, onto the worksheet and drop it onto a cell.
The Single Point Fetch section controls what is placed onto the sheet when you drag and drop an entity.
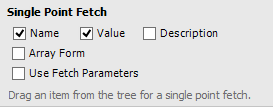
- Name: Adds the Entity Name.
- Value: Adds the current value of the entity.
- Description: Adds the description of the entity.
- Array Form: Adds the data in a strict format that allows the system to refresh the value on the spreadsheet. The cell contents, however, cannot be manually changed. To update the values, press F9. If this option is not selected, free form text is placed onto the worksheet, which cannot be refreshed.
- Use Fetch Parameters: The fetch parameters are defined in the Fetch Parameters pane. Which parameters are used depends on what has been selected in the Fetch Parameters drop-down list. Click the Parameters Pane link to open the Fetch Parameters task pane. Selecting the Current Fetch Parameters item uses whatever is currently configured on the Fetch Parameters panel.
Multiple Entities
When you add multiple entities to a worksheet, the data that is fetched is based on the parameters that have been set on the Fetch Parameters pane. From there, you can set start and end times, sample type, and interval. The saved fetch parameters are then available to you in the Fetch Parameters drop-down list.
There are two ways to add entities, either as drag drop items or as an array form.
- Drag Drop Items: Adds the entities as free form text, which can be changed or manipulated as required. This type is better suited for graphing or pivot tables than the array form.
- Array Form (Deprecated): This format is no longer supported from Excel Add In v4.0 and later.
To add multiple entities to the worksheet:
- From the entity hierarchy or search results, use the check boxes to select the entities.
- Choose the fetch parameters from the Fetch Parameters drop-down list.
- From the Multi Item Fetch section, drag the Drag Drop Items icon onto a cell in the worksheet.
Drag Drop Items
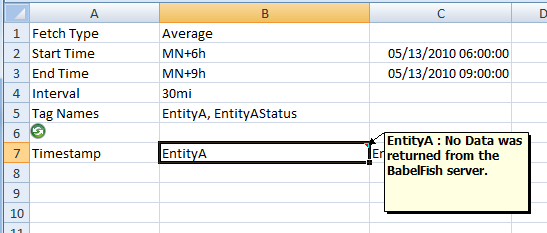
The Drag Drop Items (formerly known as Free Form) Multi Item Fetch creates a table that looks like the following:
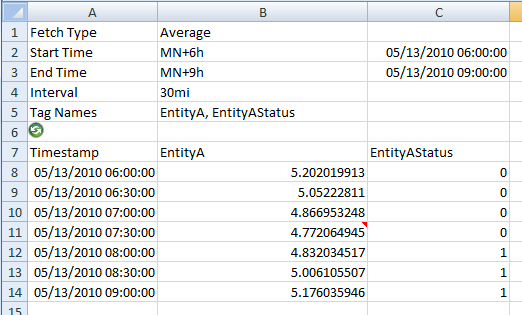
The Start Time and End Time can be an Excel date/time, normalised time, or string date/time format. In the preceding example, the Start Time and End Time are normalised. When data is fetched in this mode, the actual start time and end time is displayed in the corresponding column.
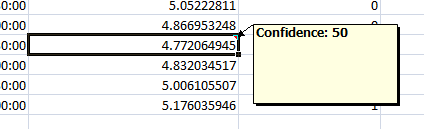
When the fetch is performed and a value has a lower or equal confidence to the preconfigured setting, a comment is added to the cell. Hovering over the comment displays the confidence value.
Add date/times that are inserted into cells are the same format as the defined string in the configuration panel.
When an error occurs during a fetch or no data is returned, the title row is updated by adding comments to the cells to indicate the error or issue. This information can also be viewed in the status panel.