ON THIS PAGE:
This application allows you to define instances of the Field Operator Server and configure various settings for each instance. The settings dictate how users connect to an instance and certain behaviours of the application. The configuration application is a windows application, run on the computer where the Field Operator Server components were installed. Much of the information edited with this application is stored in files on the server.
Open the configuration application by launching IFS OI.FieldOperator.Config.exe as administrator. If you chose to do so, the setup program will have created a shortcut on the desktop of the server computer.
Instance definition
1. Launch the Field Operator Configuration Utility (if not already open).
Note: Always run the Configuration Utility as an Administrator because it needs to update configuration files on the server computer.
When you first open the Configuration Utility, there will be no instances in the list.
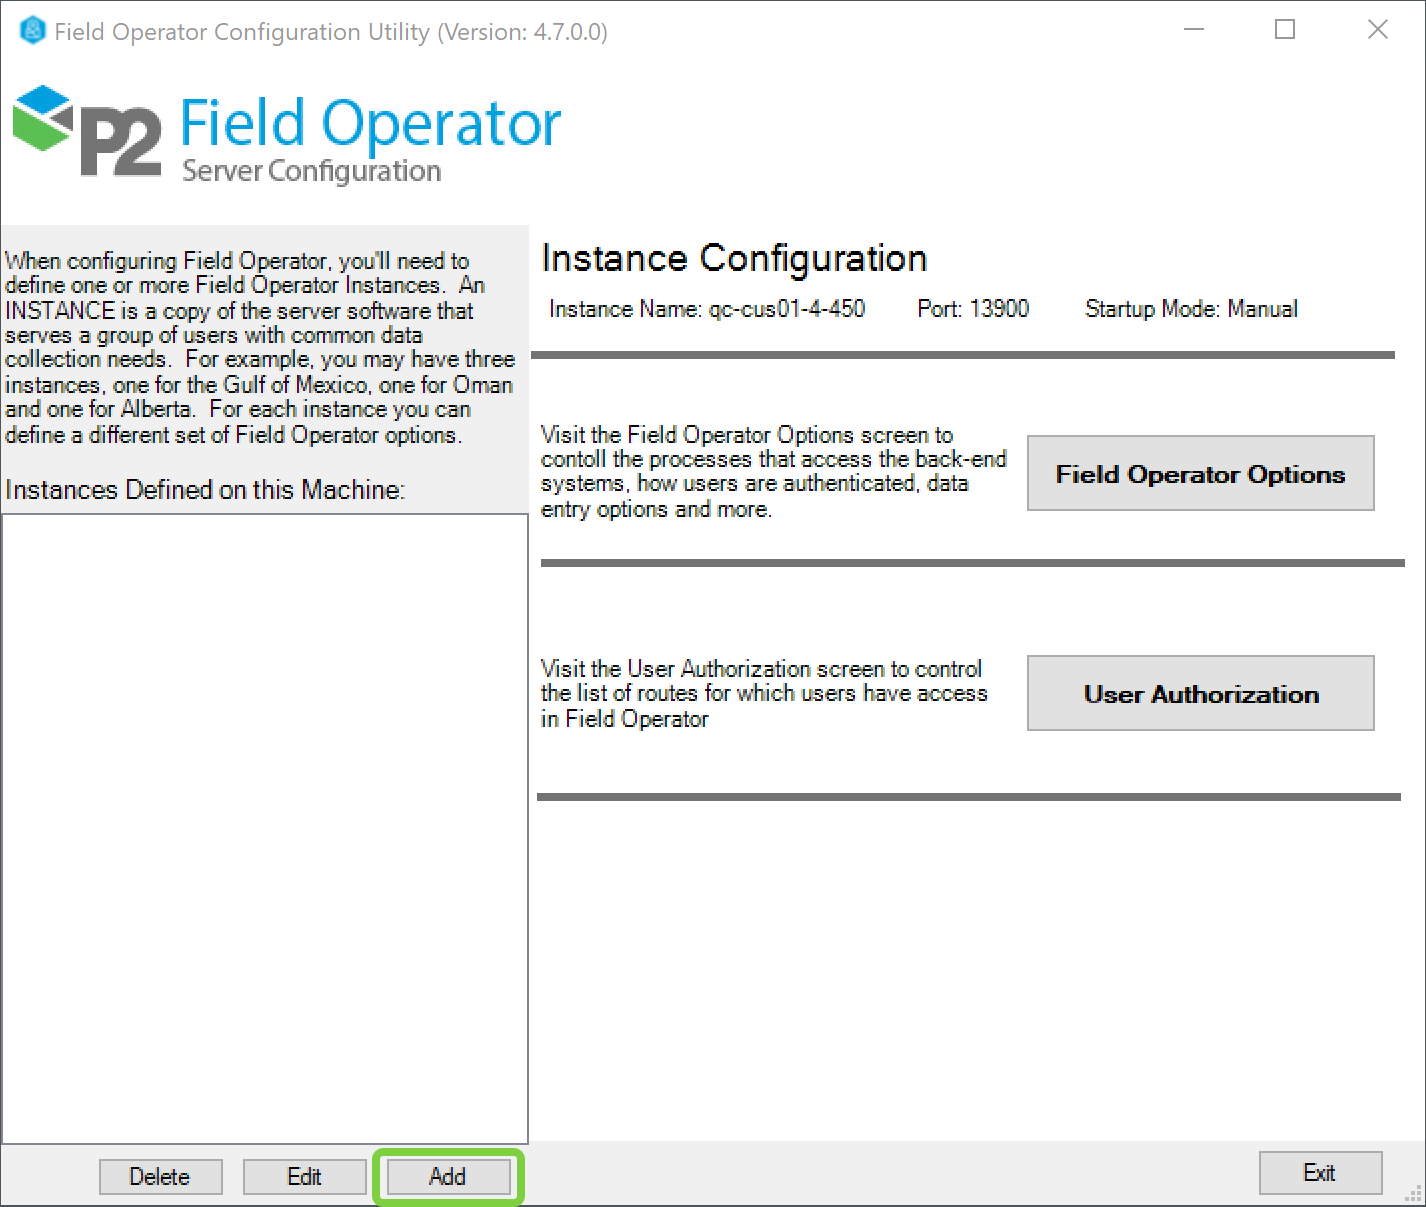
2. Click the Add button to set up the first instance or select an instance in the list and click Edit.
3. Complete the Define a Field Operator Instance page with the credentials necessary to connect to your IFS OI Merrick and IFS OI Explorer implementations.
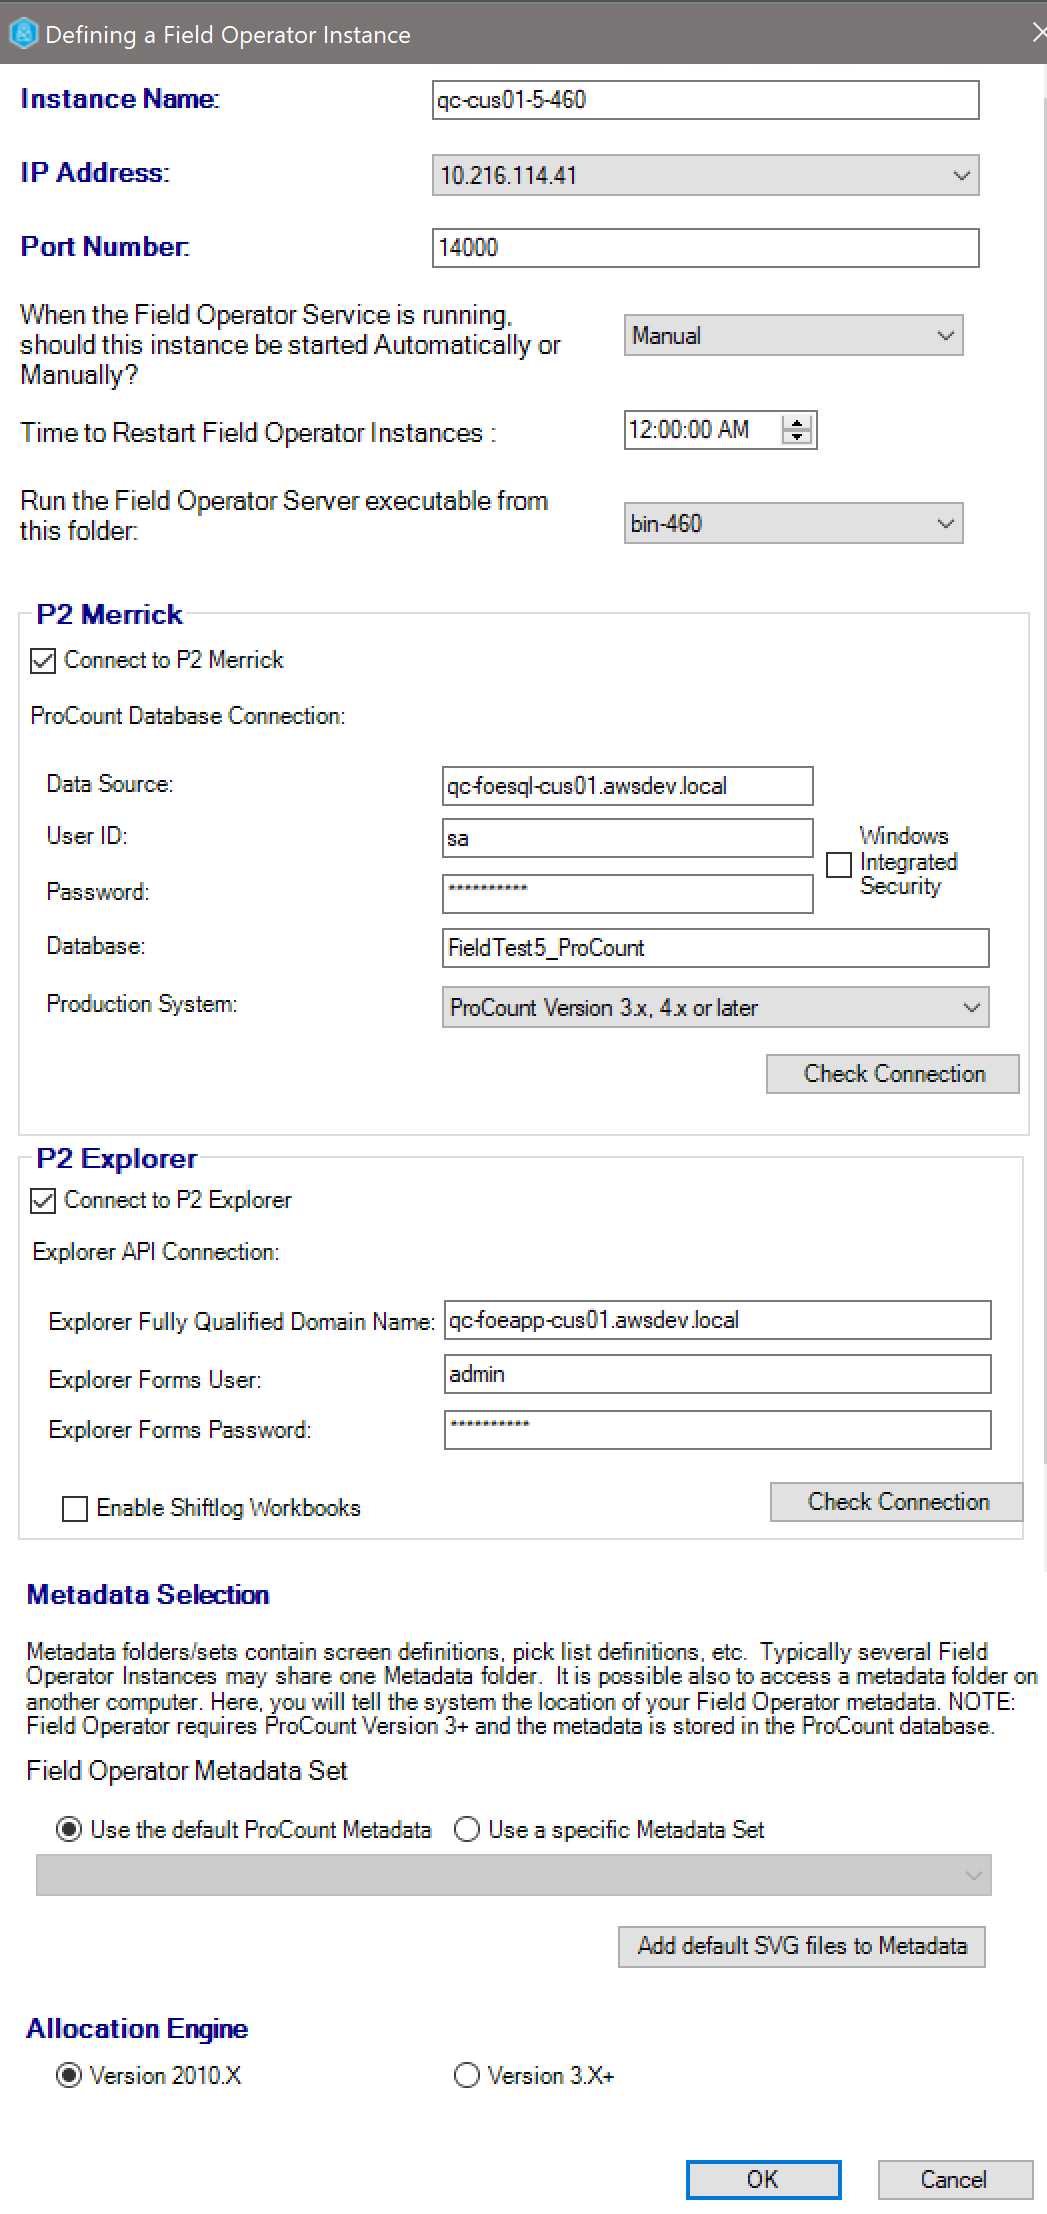
Instance Name: Give the instance a name that will help you recognize it later in the Enterprise Manager. Most companies define Instances to match organizational units or regions of users within their company.
IP Address: This should default to the first IP Address available on the machine. If you see an IPV6 address in this drop-down, please refer to Appendix A: Disabling IPV6.
Port Number: This is necessary for the Route Setup application. Route Setup communicates with the Field Operator server via TCPIP sockets. Typically use the default port number but note that you’ll need this later when configuring the Route Setup app for users.
Automatic or Manual: This setting specifies whether the instance will be started automatically when the machine is rebooted. The default is Automatic. Manual can be helpful for temporary test instances that you only want to run occasionally. Remember, each instance is watching the source data for changes that need to be downloaded to user devices. See Field Operator Sync Process.
Set time to Restart Field Operator instances: The Instance bounces each night at this specified time to restart counters such as the number of connections today, etc. The default time is midnight.
Run from this folder: This is how you run multiple versions of the Field Operator server software on one computer. See Running multiple versions of the Field Operator Server on one computer
Connect to IFS OI Explorer: Input the credentials for the IFS OI Explorer Forms account with Administrator privileges that you’ve collected before the installation (see the Field Operator Server 4 Installation Guide which was downloaded from the IFS OI Store when you downloaded the software.)
Enable Shiftlog Workbooks: As of version 4.7, please leave this deselected unless your company is working directly with IFS OI development on this beta functionality.
Connect to IFS OI Merrick: Input the information for the ProCount database that you’ve collected before the installation. The ProCount database must be SQL Server database and must be upgraded to the version of Field Operator being configured. Note: Typically, you can update the ProCount database even if you’re still using a previous version of the Merrick software. For example, Merrick 3.16 will continue to run if the database is upgraded to 4.x. Please check with P2 support for exact compatibility with the versions you’re working with.
Production System: You must select ProCount Version 3x+, 4x or later to support Field Operator devices. As defined in the Field Operator Installation Guide, the ProCount database must be updated to the version of Field Operator Server that you are installing, using the Database Upgrade process in the Merrick setup program.
Field Operator Metadata Set: Screens for ProCount, Carte and Field Operator are all defined in the Merrick Metadata configuration utility. Within that utility, you can define multiple sets of metadata. Many companies will only have one set of screens in production but may want to define different sets for test. The Field Operator instance is instructed to use a given set with this configuration. If in doubt, choose the default.
Allocation Engine:
4. Click OK.
The database connection will be validated and then the instance will show in the Instances list.
Note: for testing purposes, the Connect to IFS OI Explorer setting can be deferred, but commentary will be disabled in the application. If you’re still in the process of setting up IFS OI Explorer, you can deselect this setting and get the system running for IFS OI Merrick first and then return to this setting later when IFS OI Explorer is running.
Note: The Connect to IFS OI Explorer setting has changed from earlier versions. Before v4.6, ProCount, Carte and Field Operator all used the same connection setting which was stored in the ProCount database. Now, the setting in the Field Operator Configuration Utility only applies to Field Operator. To see commentary in ProCount and Carte you also need to enter this information in the Merrick Metadata Configuration Utility. (this allows you to start using commentary in Field Operator without affecting ProCount and Carte, and bring ProCount and Carte commentary on-line later.)
Field Operator Options
Once the instance has been defined, select it from the instance list and select Field Operator Options to configure the various settings that control the application’s behaviour. Depending on the instance definition, different tabs of information may appear here. For example, if you have not yet connected to IFS OI Explorer, the IFS OI Explorer and Commentary tabs will not be present.
Environment / Authentication
Note: Settings on this tab must be completed before attempting to start an instance for the first time.
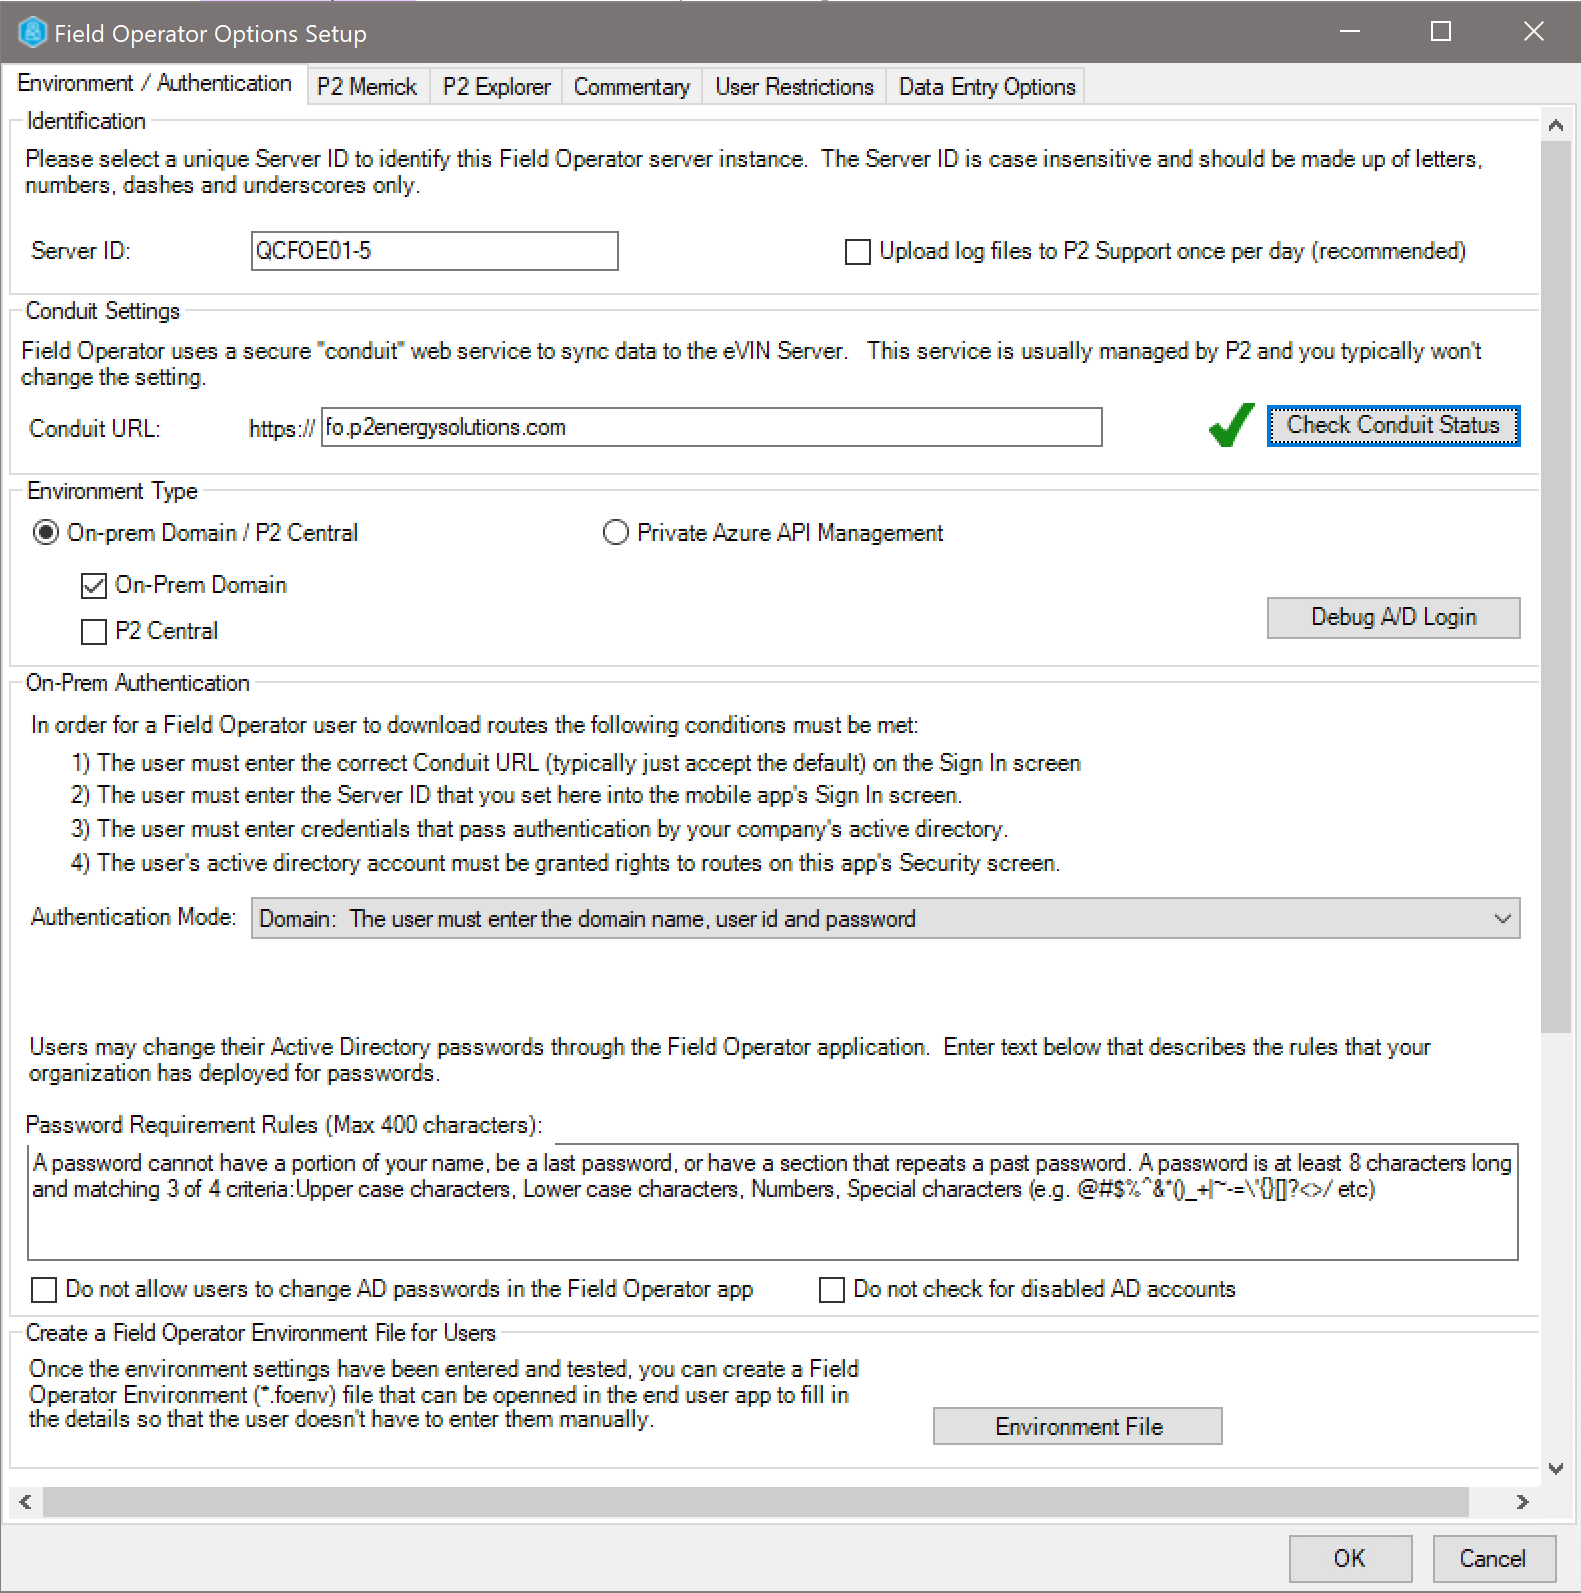
Server ID: This ID uniquely identifies your Field Operator Server instance within the user community. Choose an ID that will be unique to your company and identify the instance within your company. If your company is XYZ petroleum and you’re defining an instance for the Bakken region, an appropriate id might be XYZ-BAKKEN01.
Your users will need to know this ID (along with valid credentials to your domain). The users will need to type the Server ID into their devices. Before deciding on a Server ID, it’s a good idea to try typing it into a phone’s keypad to see if it’ll be difficult for your users.
Upload log files to P2 Support once per day: If this option is selected, your Field Operator Server will communicate via the standard fo.p2energysolutions conduit to an Field Operator Server running at IFS OI. The process will upload the eVINmmyy.log files, any eVINServerErrors.txt file, SyncLogmmddyy.csv files and any files in the UploadsErrors folder. When working with P2 Support, our personnel may ask you to invoke this process one time by selecting Server – Upload Logs to IFS OI in the Field Operator Instance Manager. IFS OI would appreciate you turning this option on even if you’re not actively working with P2 support, as a collection of this data will help IFS OI serve you better.
Conduit URL: Typically, you’ll leave the default value of fo.p2energysolutions.com. Some customers may be working with IFS OI directly to define a company specific conduit URL.
Environment Type: The word “Environment” is almost synonymous with “instance” in the Field Operator world. (Almost, but not quite…. it’s possible to have two environments that access one instance)
Users will sign into an Environment which connects to the instance. The main attribute of an Environment is how users are authenticated. This is a new concept in Field Operator version 4.7 as we’ve added the ability to authenticate using the IFS OI Central portal. See Authentication and Authorization in Field Operator. If you’re installing Field Operator on your company’s server, then the environment type will likely be On-Prem Domain.
- On-Prem Domain: This is the standard authentication method for companies who are installing the software on a corporate network. Users will enter their username and password which is authenticated against your Active Directory.
- IFS OI Central: Only used by IFS OI when the software is installed in the IFS OI hosting environment.
- Private Azure API Management: As of version 4.7, this authentication method is in beta test. Configuration is fairly complex, but this approach will let users be authenticated using MSAL which is a similar experience as signing on to a Microsoft Office 365 application.
For On-Prem Domain authentication, the following additional settings are required:
Authentication Mode: Please select Domain. Don’t select None in a production environment.
- Domain (recommended) requires a user to know your domain name, a valid domain account with a password and the Server ID.
- LDAP (soon to be deprecated) only requires the user to know a valid domain account with a password and the Server ID. You will specify the LDAP server with this option, so the user does not need to enter the domain name.
- None Do not use this in production. This option allows users to connect to the system without a user name and password and is only meant for quick setup of temporary development environments. Many functions will not work correctly if this mode is selected.
Note: IFS OI developers are considering removing the LDAP option in a future version of the software. Please switch to the Domain Authentication mode if you’re still using LDAP
Password Requirement Rules: When a user changes a domain password in the application, this text can describe the requirements that your organization imposes on passwords to help the user select a new password that complies.
Do not allow users to change AD passwords: If a user’s password is about to expire, Field Operator will display a screen that allows the user to change the Active Directory password in the app. Some customers do not want to offer this functionality through the app, so it can be turned off by checking this box. If this option is selected, the user will not receive any message when a password is about to expire. If a password expires, the sync process will fail with authentication errors.
Do not check for disabled AD accounts: Some company’s Active Directory service reports that all users are not enabled. Leave this selection de-selected unless you’re having a specific problem where each user receives a message that the account is disabled every morning.
Debug A/D Login: Most administrators will not need to access this screen. If the Field Operator Server is having trouble receiving information from your active directory, P2 Support may ask you to open this screen to help debug the problem.
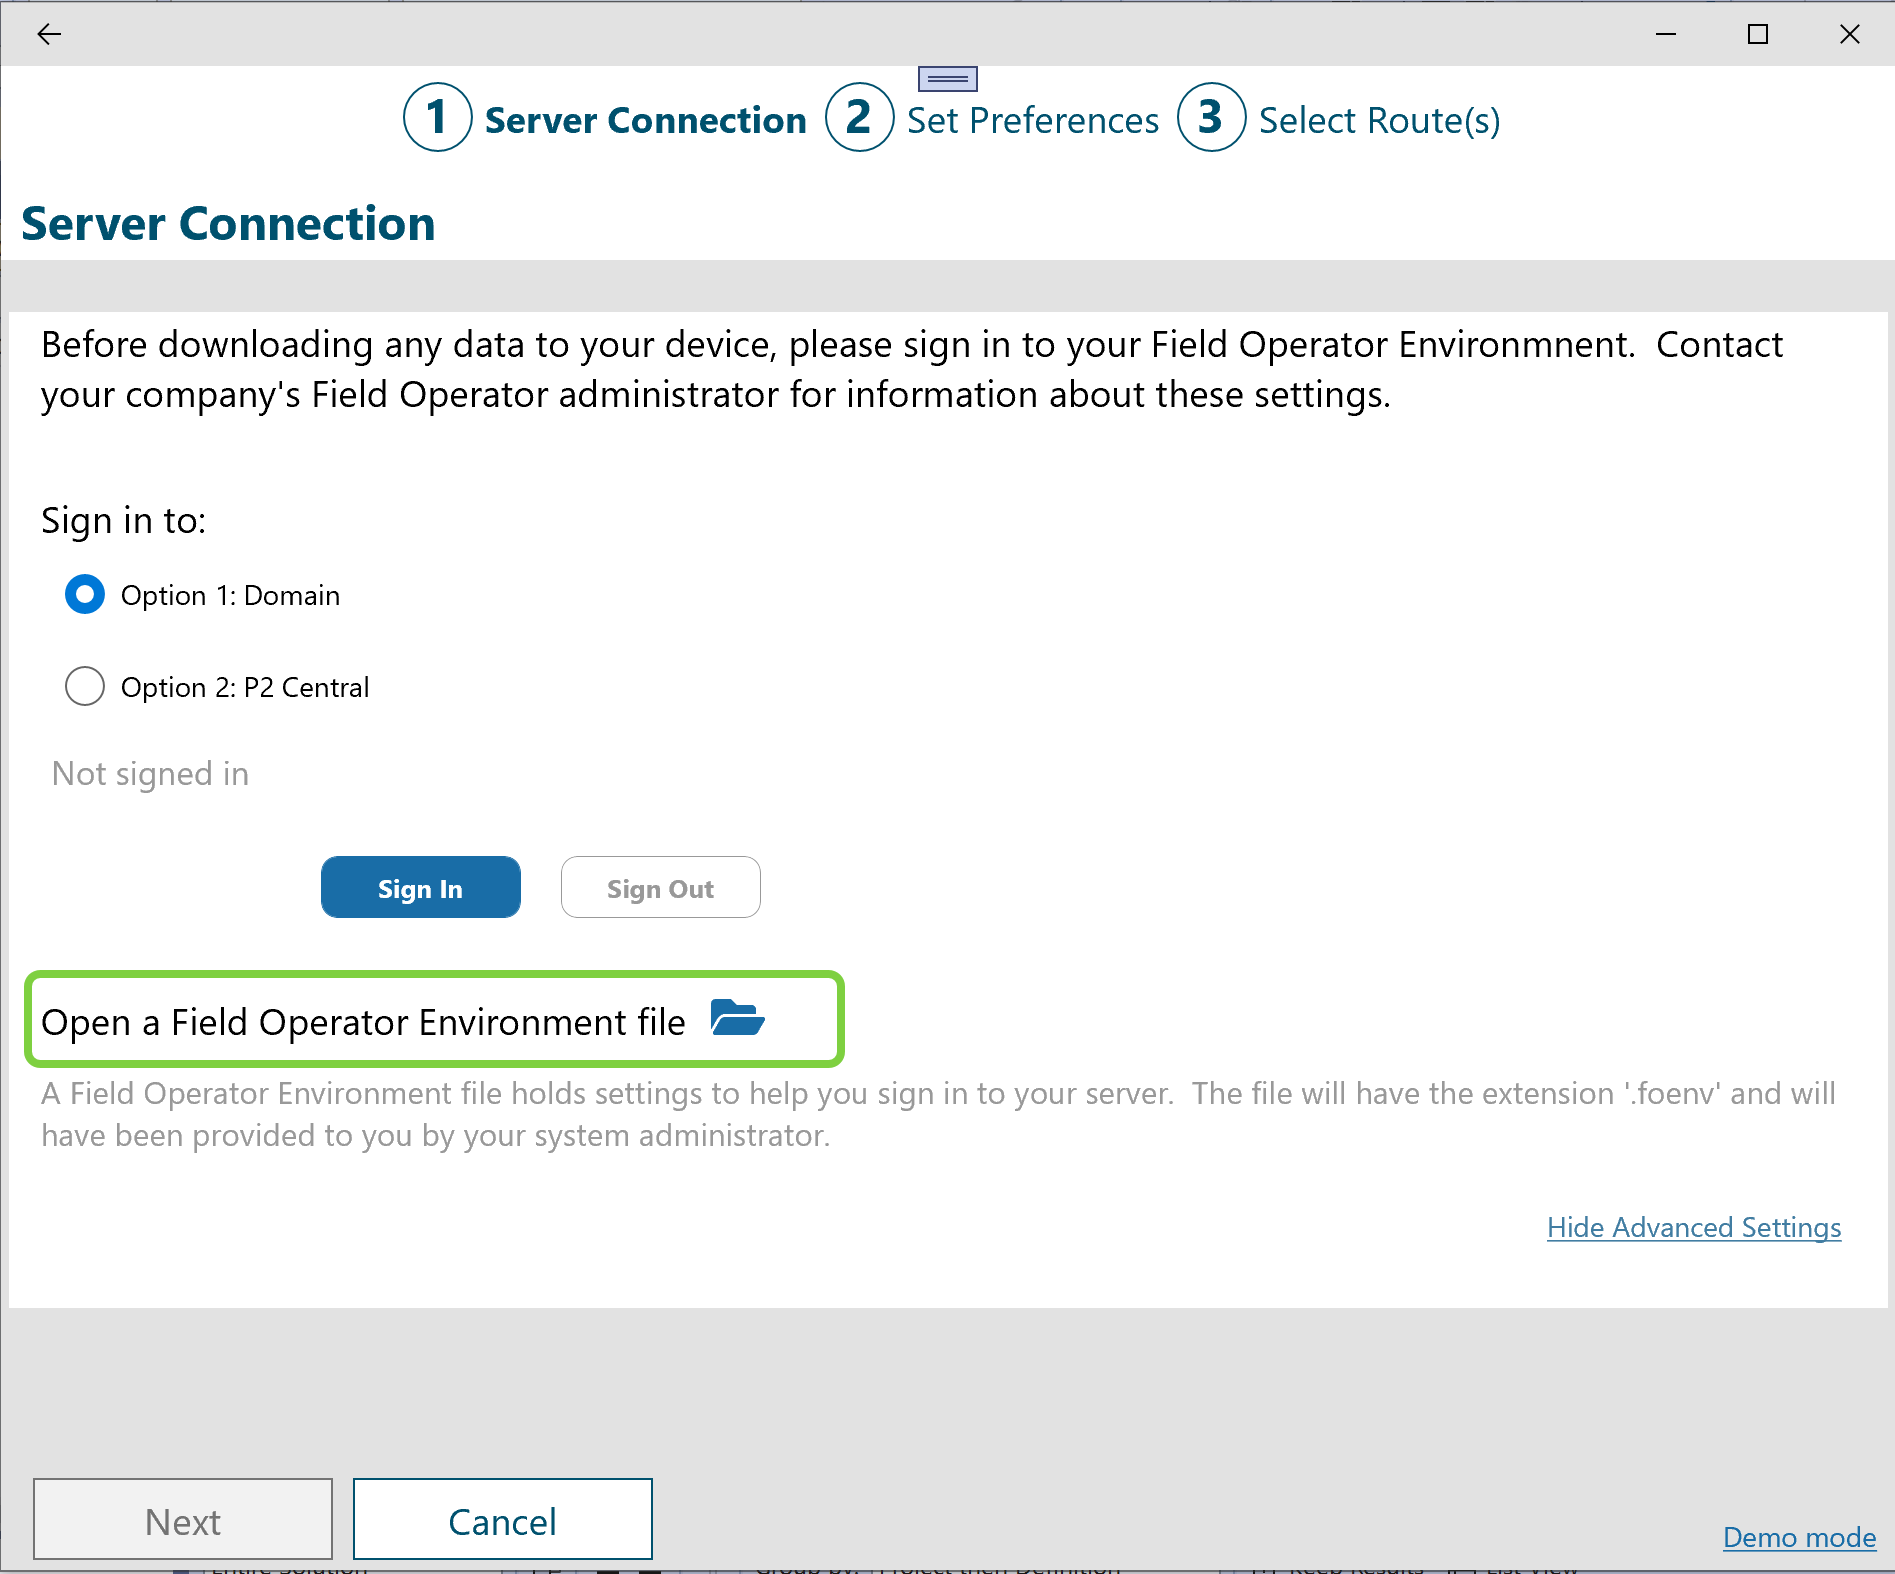
Environment File: This is a convenience feature to help your users select the correct settings when signing into the application on their remote devices. Before a user can access any data, he or she must sign into the environment.
Normally, the Sign In screen will ask the user to fill in the Server ID and Domain along with the user id and password.
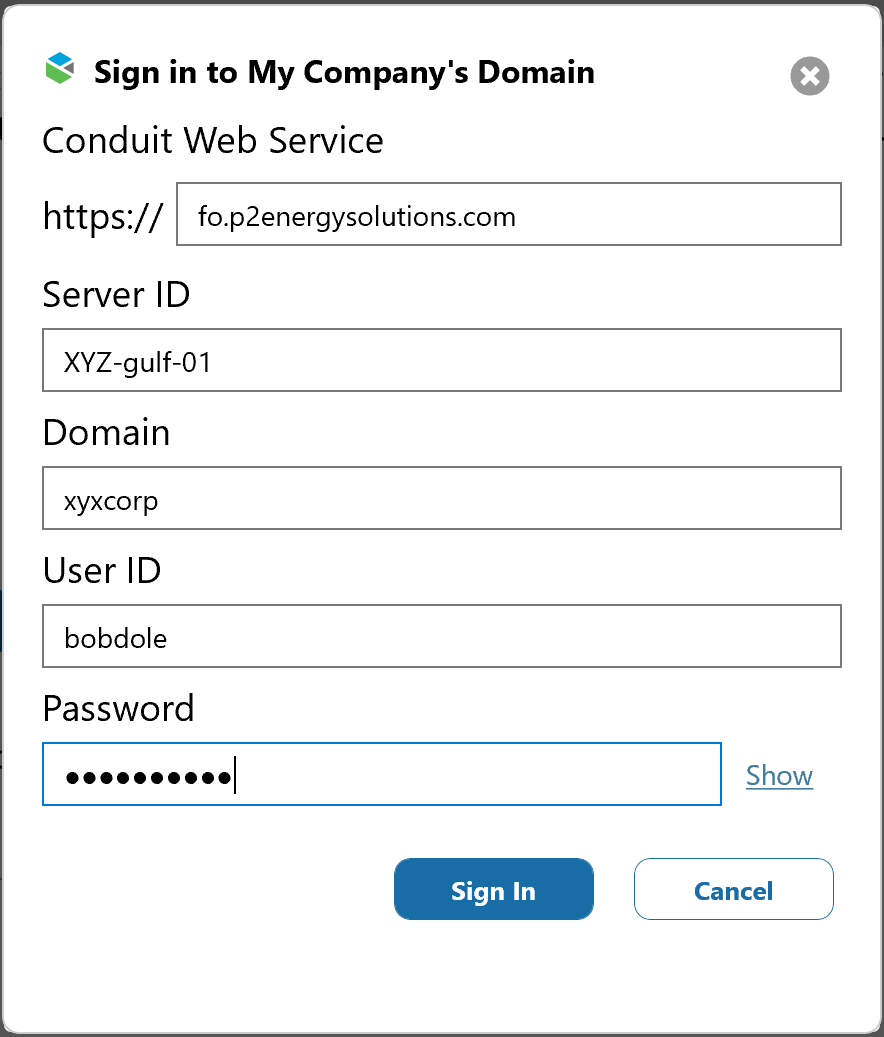
By providing a Field Operator Environment file (.foenv), you can fill in the Conduit Web Service URL, Server ID and Domain for the users so they only need to provide their User ID and Passwords.
Once you’ve entered all of your settings on the Environment / Authentication tab, click the Environment File button to generate a .foenv file.
IFS OI Merrick
The following settings control the Field Operator instance’s interaction with the ProCount database in IFS OI Merrick. This tab will only be visible if Connect to IFS OI Merrick is selected in the instance’s definition.
Test Environment: For testing, Field Operator: Explorer Edition offers the ability to treat a day in the past as if it’s today. This can be helpful for situations where a production database was copied to a test environment sometime in the past so there are no current readings. It’s hard to test with completely blank screens, so setting this date back to the date when the production database was copied allows testers to see data on their screens.
This is a change from the Field Operator Server. It works like Carte, not like eVIN. This setting is driven by the server and affects all devices as opposed to being set on an individual device.
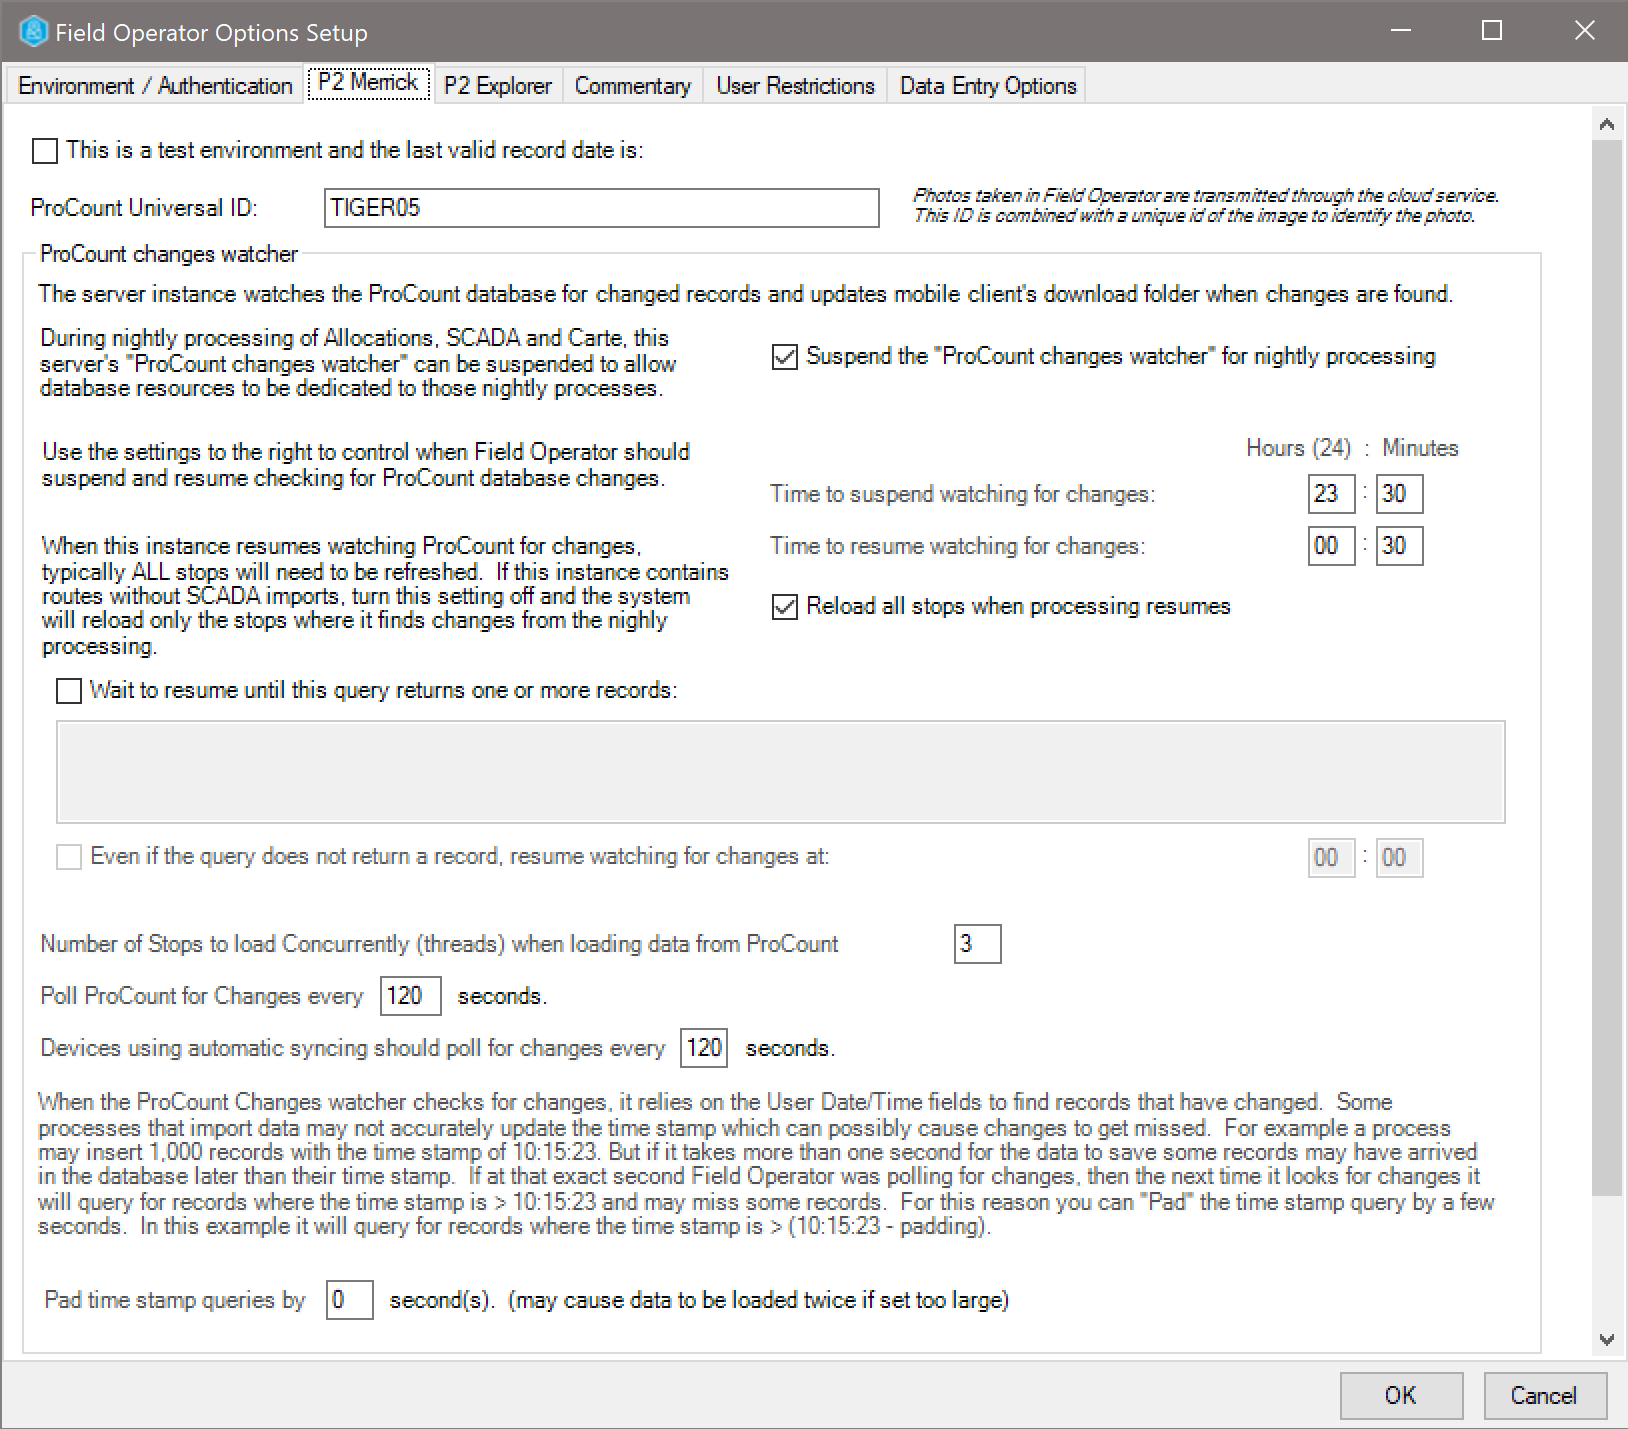
ProCount Universal ID: Enter a unique ID which uniquely identify your ProCount database. This ID is stored in the ProCount database and will be the same for all your Field Operator Server Instances. The ID is used to prefix any photos or file uploads from the devices as they flow to the cloud-based File Repository system. See IFS OI File Repository Service for details.
ProCount Changes Watcher: Field Operator: Explorer Edition introduces a new syncing concept to deliver data to the end users in a performant manner. See for details on the architecture and information on these settings.
IFS OI Explorer
The following settings control the Field Operator instance’s interaction with IFS OI Explorer. This tab will only be visible if Connect to IFS OI Explorer is selected in the instance’s definition.
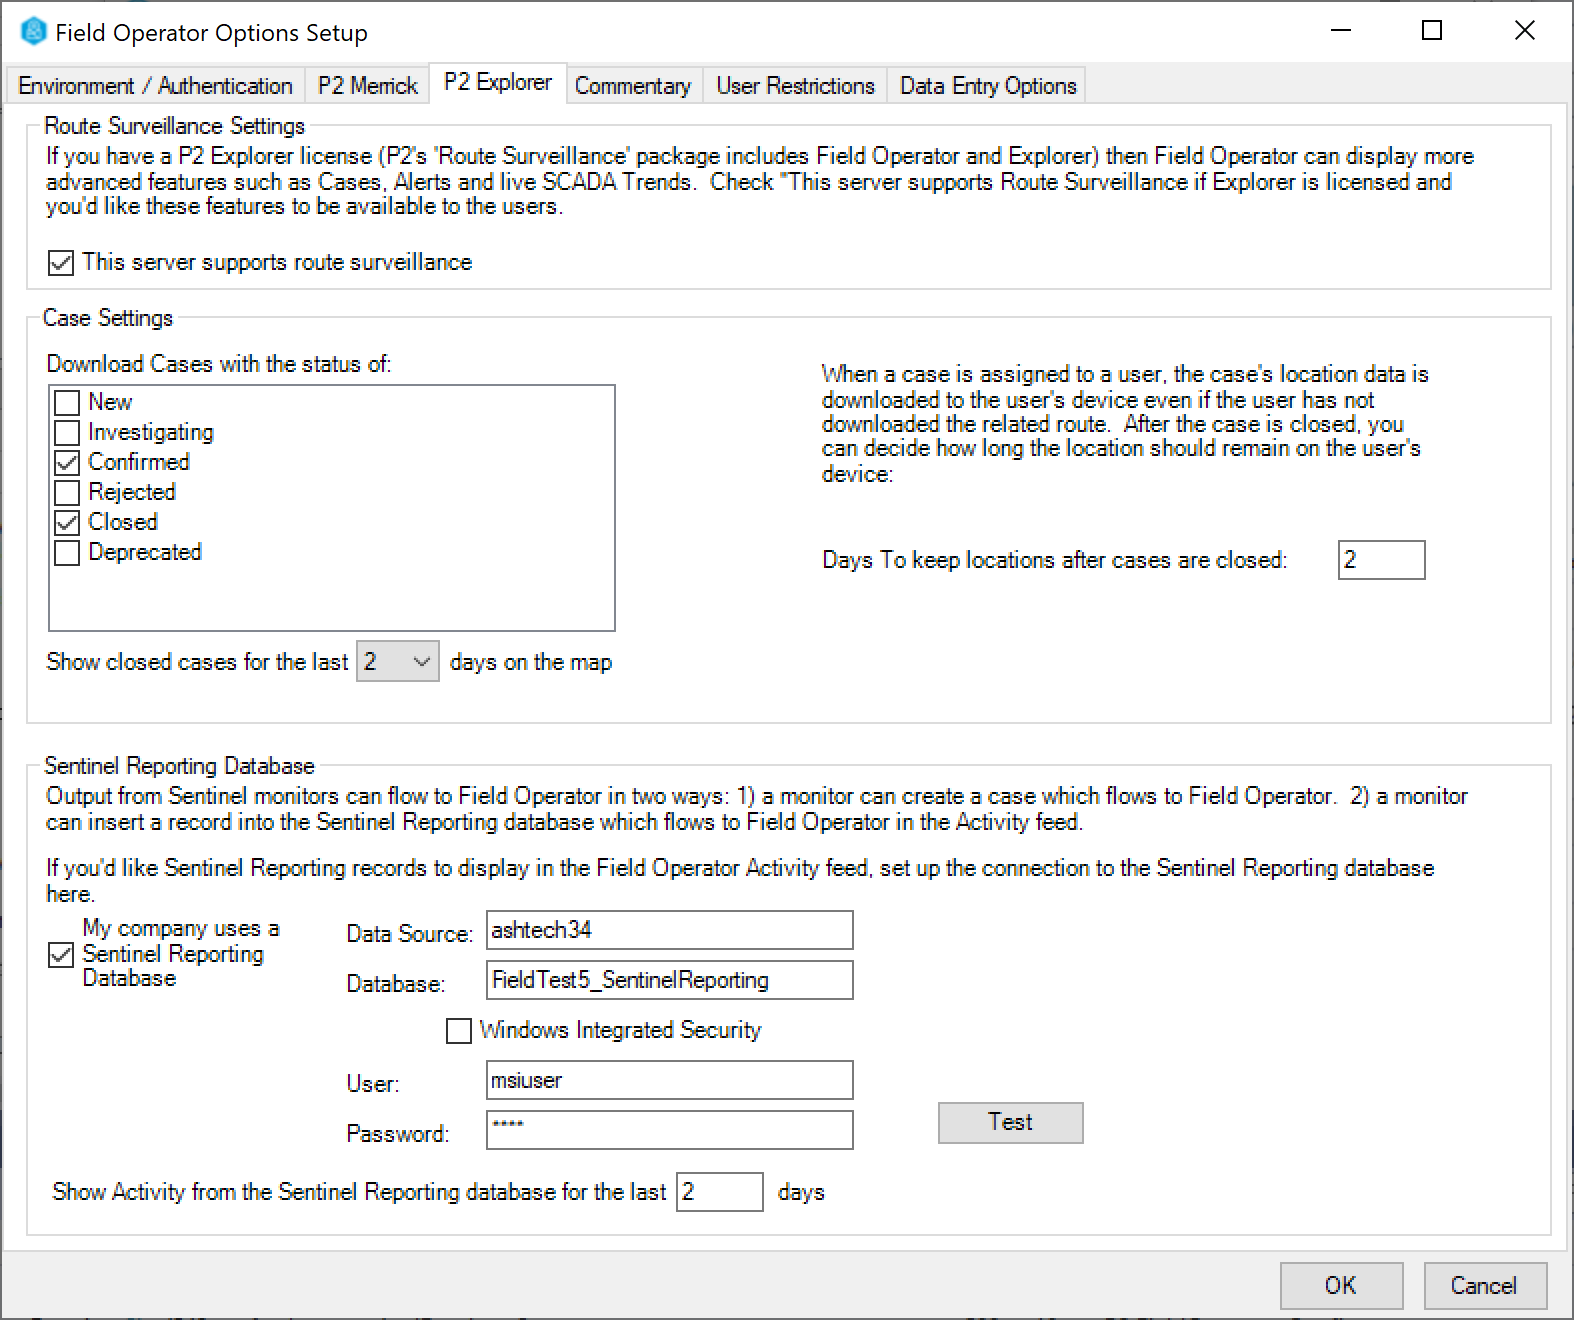
This server supports route surveillance: Select this checkbox if your company has licensed IFS OI Explorer. This turns on the following advanced features of Field Operator: Explorer Edition:
Cases: Cases are activities or events that may need further observation, investigation, and rectification.
Cases are raised (manually in Explorer or Shift Log, or automatically when Sentinel events occur) in the monitoring of entities (or assets, as they are called in Sentinel). See Case Management.
Download Cases with the Status of: This setting allows you to control which cases are seen by Field Operator users. As a default, Confirmed and Closed cases are downloaded. Depending on your workflow, you may want Field Operator users to see New cases, but may companies want someone in the back office to confirm the case before sending it to the field.
Show closed Cases for the last X days on the map: The map in Field Operator aims to show a user what is currently occurring in his area by displaying icons at the locations of recent cases, comments, alerts, etc. If all closed cases showed on the map, it would be very cluttered and less useful. It may make sense to show cases that were closed recently so that users see what has just been resolved. This setting does not affect the list of cases displayed in Grid view.
Days to keep locations after cases are closed: Field Operator can automatically download locations for which the user has Cases assigned. A user might not select routes to download, but simple Sign in and then let the system push locations where he or she is assigned work. Once a case is closed, it no longer makes sense to keep the location on the user’s device so this setting directs the system to remove the location after a set number of days.
Sentinel Reporting Database:
Sentinel is IFS OI’s monitoring software designed to detect Events in SCADA and other data streams which may need attention. Events raised by a Sentinel monitor flow to field users in two ways: 1) a Case can be raised (and optionally confirmed) and it will arrive to Field Operator in the Cases list. 2) the Event can insert a record in the Sentinel Reporting database. This record will flow to Field Operator as an Alert in the Activity feed.
Fill in the Sentinel Reporting Database section to connect the Field Operator Server to the Alert feed. Configure the reporting database to satisfy this select statement (the Field Operator Server will pass @DaysSetting from your setting in Show Activity from the Sentinel Reporting database for the last x days):
declare @DaysSetting int;

set @DaysSetting =2;

select distinct SentinelEvent.Id,

                BaseEntity,

                CONVERT(DATETIME, StartTime) as StartTime,

                EndTime,

                State,

                SeverityName,

                RecommendedAction,

                MonitorName,

                TestName,

                Severity.Color as SeverityColor,

                Severity.TextColor as SeverityTextColor,

                Severity.Ordinal as SeverityOrdinal,

                Value

                from SentinelEvent

                left join Severity on

	REPLACE(REPLACE(SentinelEvent.SeverityName, CHAR(13), ''), CHAR(10), '') = Severity.Name

                WHERE EndTime IS NULL AND IsCurrent = 1

                AND(RecommendedAction != 'N/A' AND RecommendedAction IS NOT  NULL)

                AND StartTime >= DATEADD(DAY, -@DaysSetting, CONVERT(DATETIME, GETDATE()));
Commentary
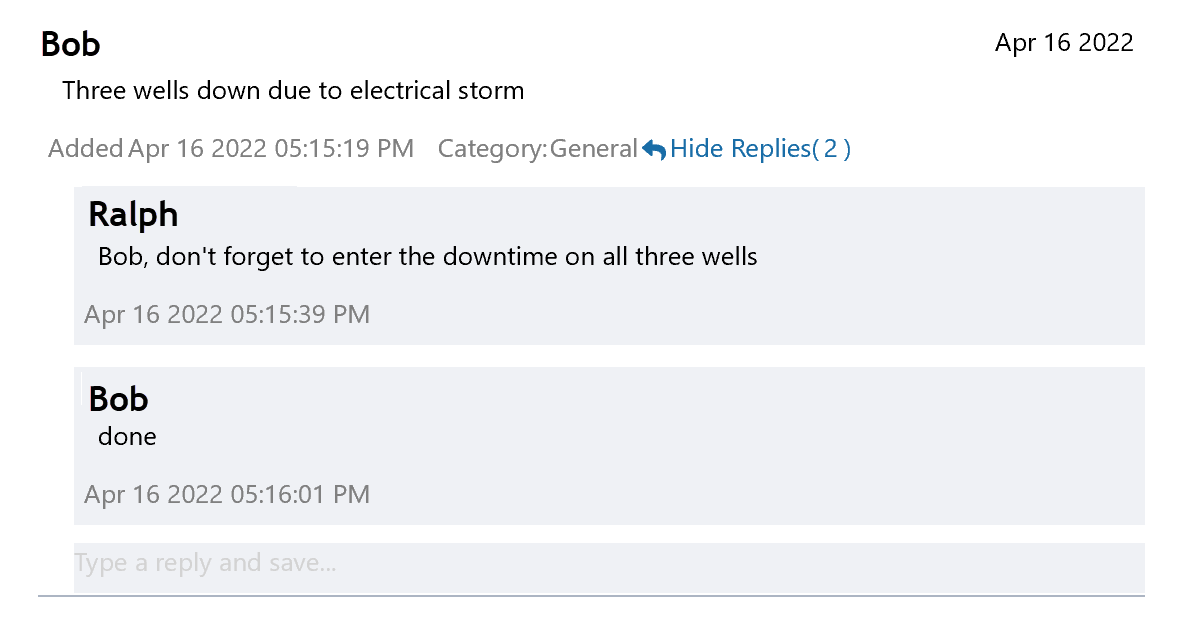
Field Operator: Explorer Edition has two levels of comments:
- Daily Notes can be entered by the operator each day on any entity and are considered a simple remark about that day’s reading. Daily notes are stored to the CommentsTb table in the ProCount database and the the com.Comment and com.CommentContextEntry tables in the Explorer database.
- Comments are higher level conversations about the entity which can include a thread of replies. Comments are saved to the com.Comment and com.CommentContextEntry tables in the Explorer database.
The following settings control Daily Notes and Comments
Note: The Comments functionality is only available to Field Operator instances that are connected to IFS OI Explorer
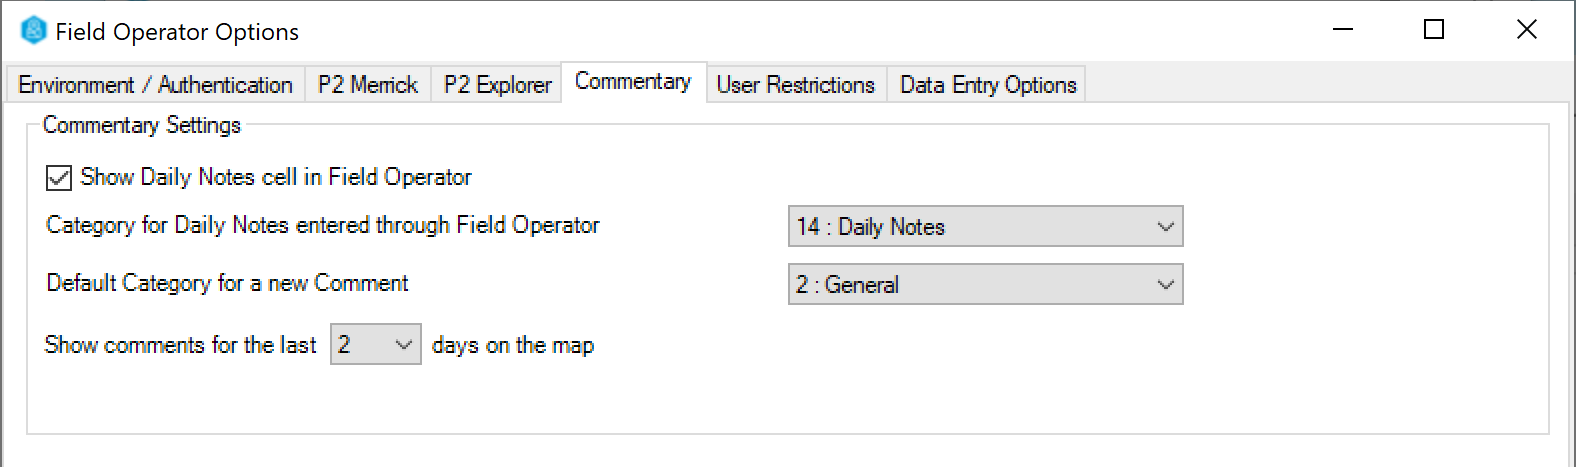
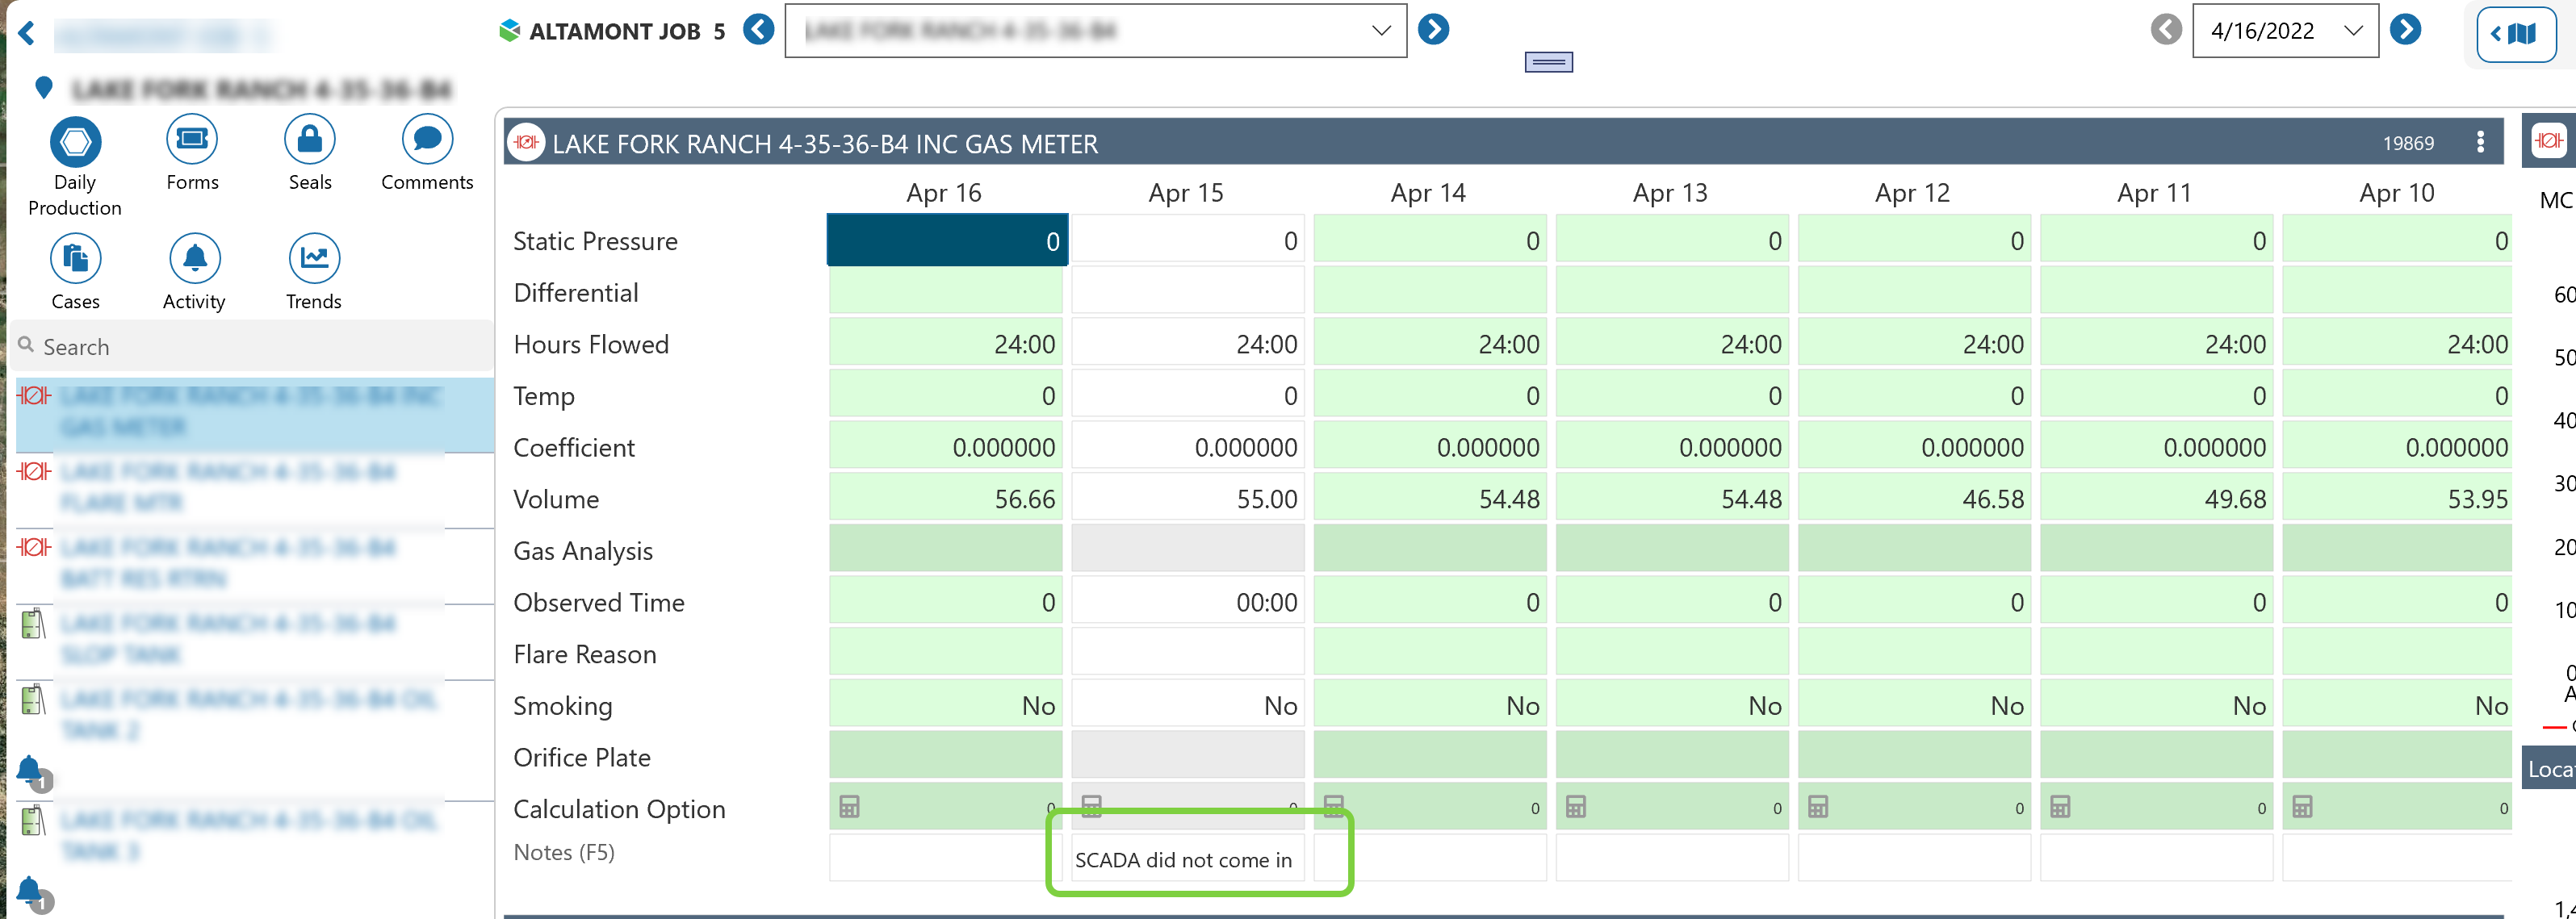
Show Daily Notes cell in Field Operator: If you’d like to hide the Daily Notes functionality on all screens, select this option.
Daily Notes Category:
Default Category for a new Comment: Select a category to be automatically selected when the user types in a new comment in Field Operator.
Show Comments for the last X days on the map: The map in Field Operator aims to show a user what is currently occurring in his area by displaying icons at the locations of recent cases, comments, alerts, etc. If all comments showed on the map, it would be very cluttered and less useful. This setting allows the admin to set which comments show as icons on the map. This does not affect the list of comments displayed in Grid view (Grid view displays the last 3 months of comments).
User Restrictions
This tab only applies to instances connected to IFS OI Merrick.
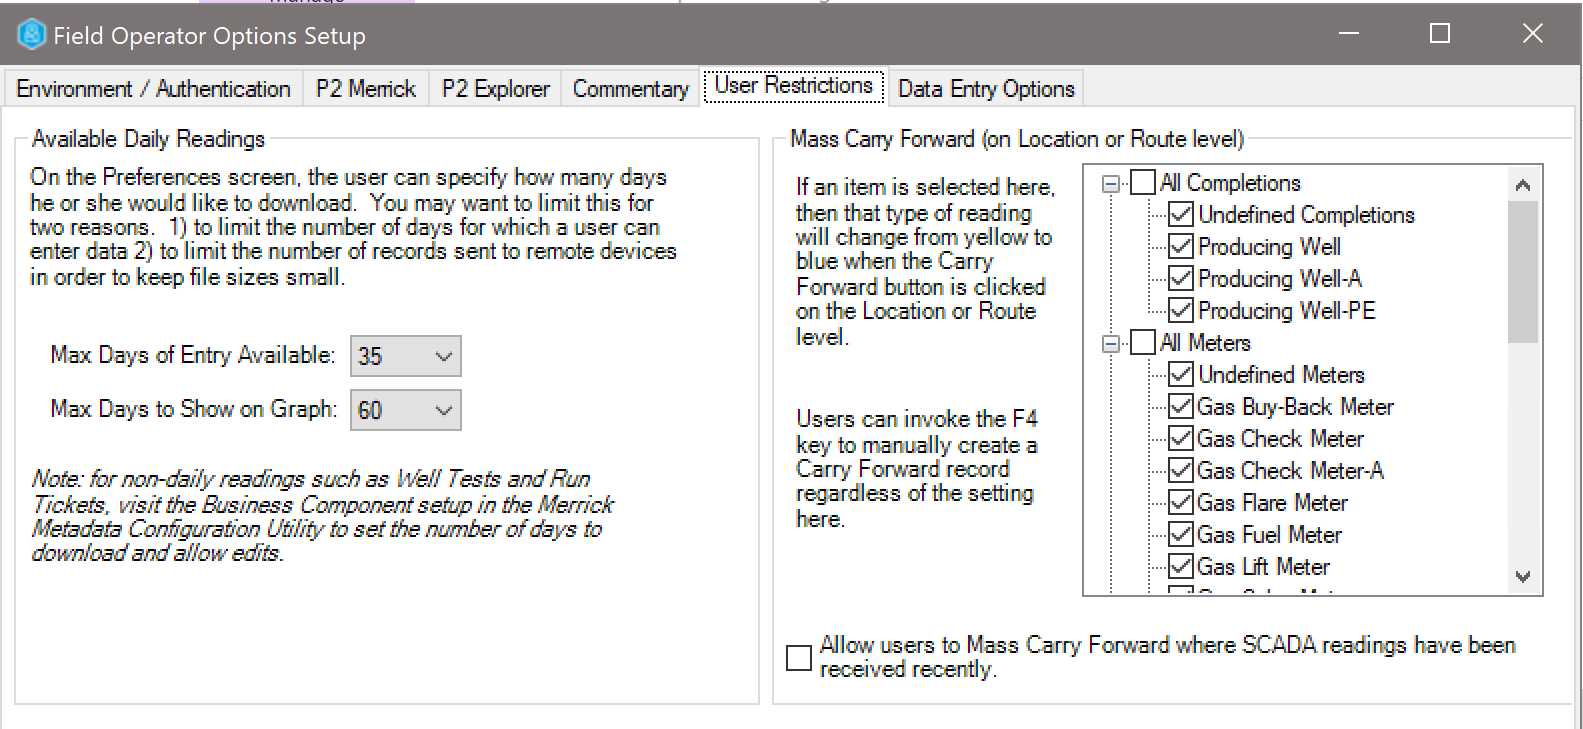
Available Daily Readings: This section controls the number of daily readings that can be downloaded to the devices. Users can choose to download less data than the settings here, but not more data.
Mass Carry Forward (on Location or Route level): The list of entities that can be controlled here is based on the configuration of Production Entities – Volume Types in the Merrick Metadata Configuration Utility. Selections here drives what will be carried forward via a mass carry forward action such as the Carry Forward button on the location or route level.
Even if an entity type is selected for mass carry forward in the list, if there has been SCADA data recently on a particular entity, the mass carry forward will be skipped for that entity unless the Allow users to Mass Carry Forward where SCADA readings have been received recently box is checked
Note: The Mass Carry Forward settings do not affect the F4 functionality. If the user clicks Carry Forward on the Route or Location and a record is left yellow because of these settings, he or she can still navigate to the entity and press F4 to create a blue record. The data source stored in ProCount is different for Mass Carry Forward -vs- F4 Carry Forward.
Data Entry Options
This tab only applies to instances connected to IFS OI Merrick.
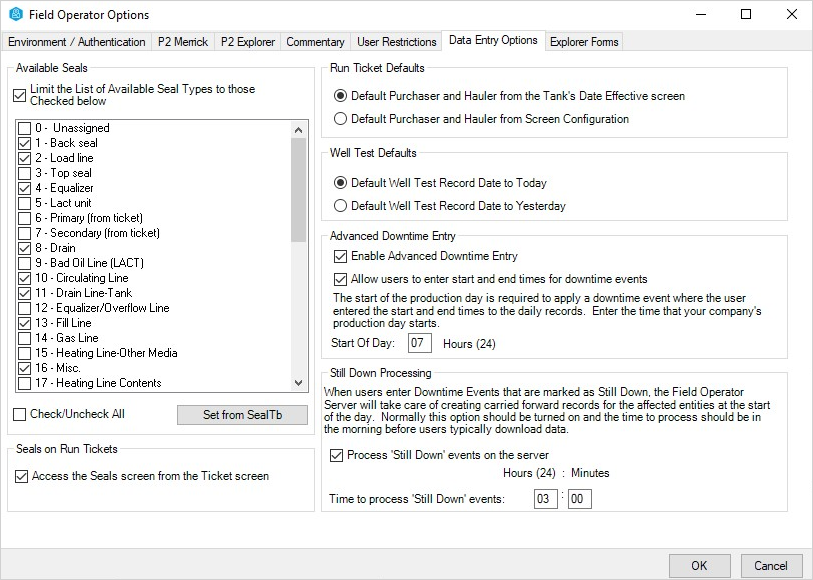
Available Seals: The list of Seals Types that show up on the Seals screen in Field Operator is driven by the left side of the Data Entry Options tab. It’s important to include all seals that are in use so that users can get to the records that they need, but it’s also important not to include seal types that are not in use. You can find the list of Seal types that are actually in use by querying the ProCount database

Seals on Run Tickets: Select to allow users access to the Seals screen from the Ticket screen in Field Operator.

Run Ticket Defaults: You can control how the Purchaser and Hauler is defaulted on new run tickets entered in Field Operator.
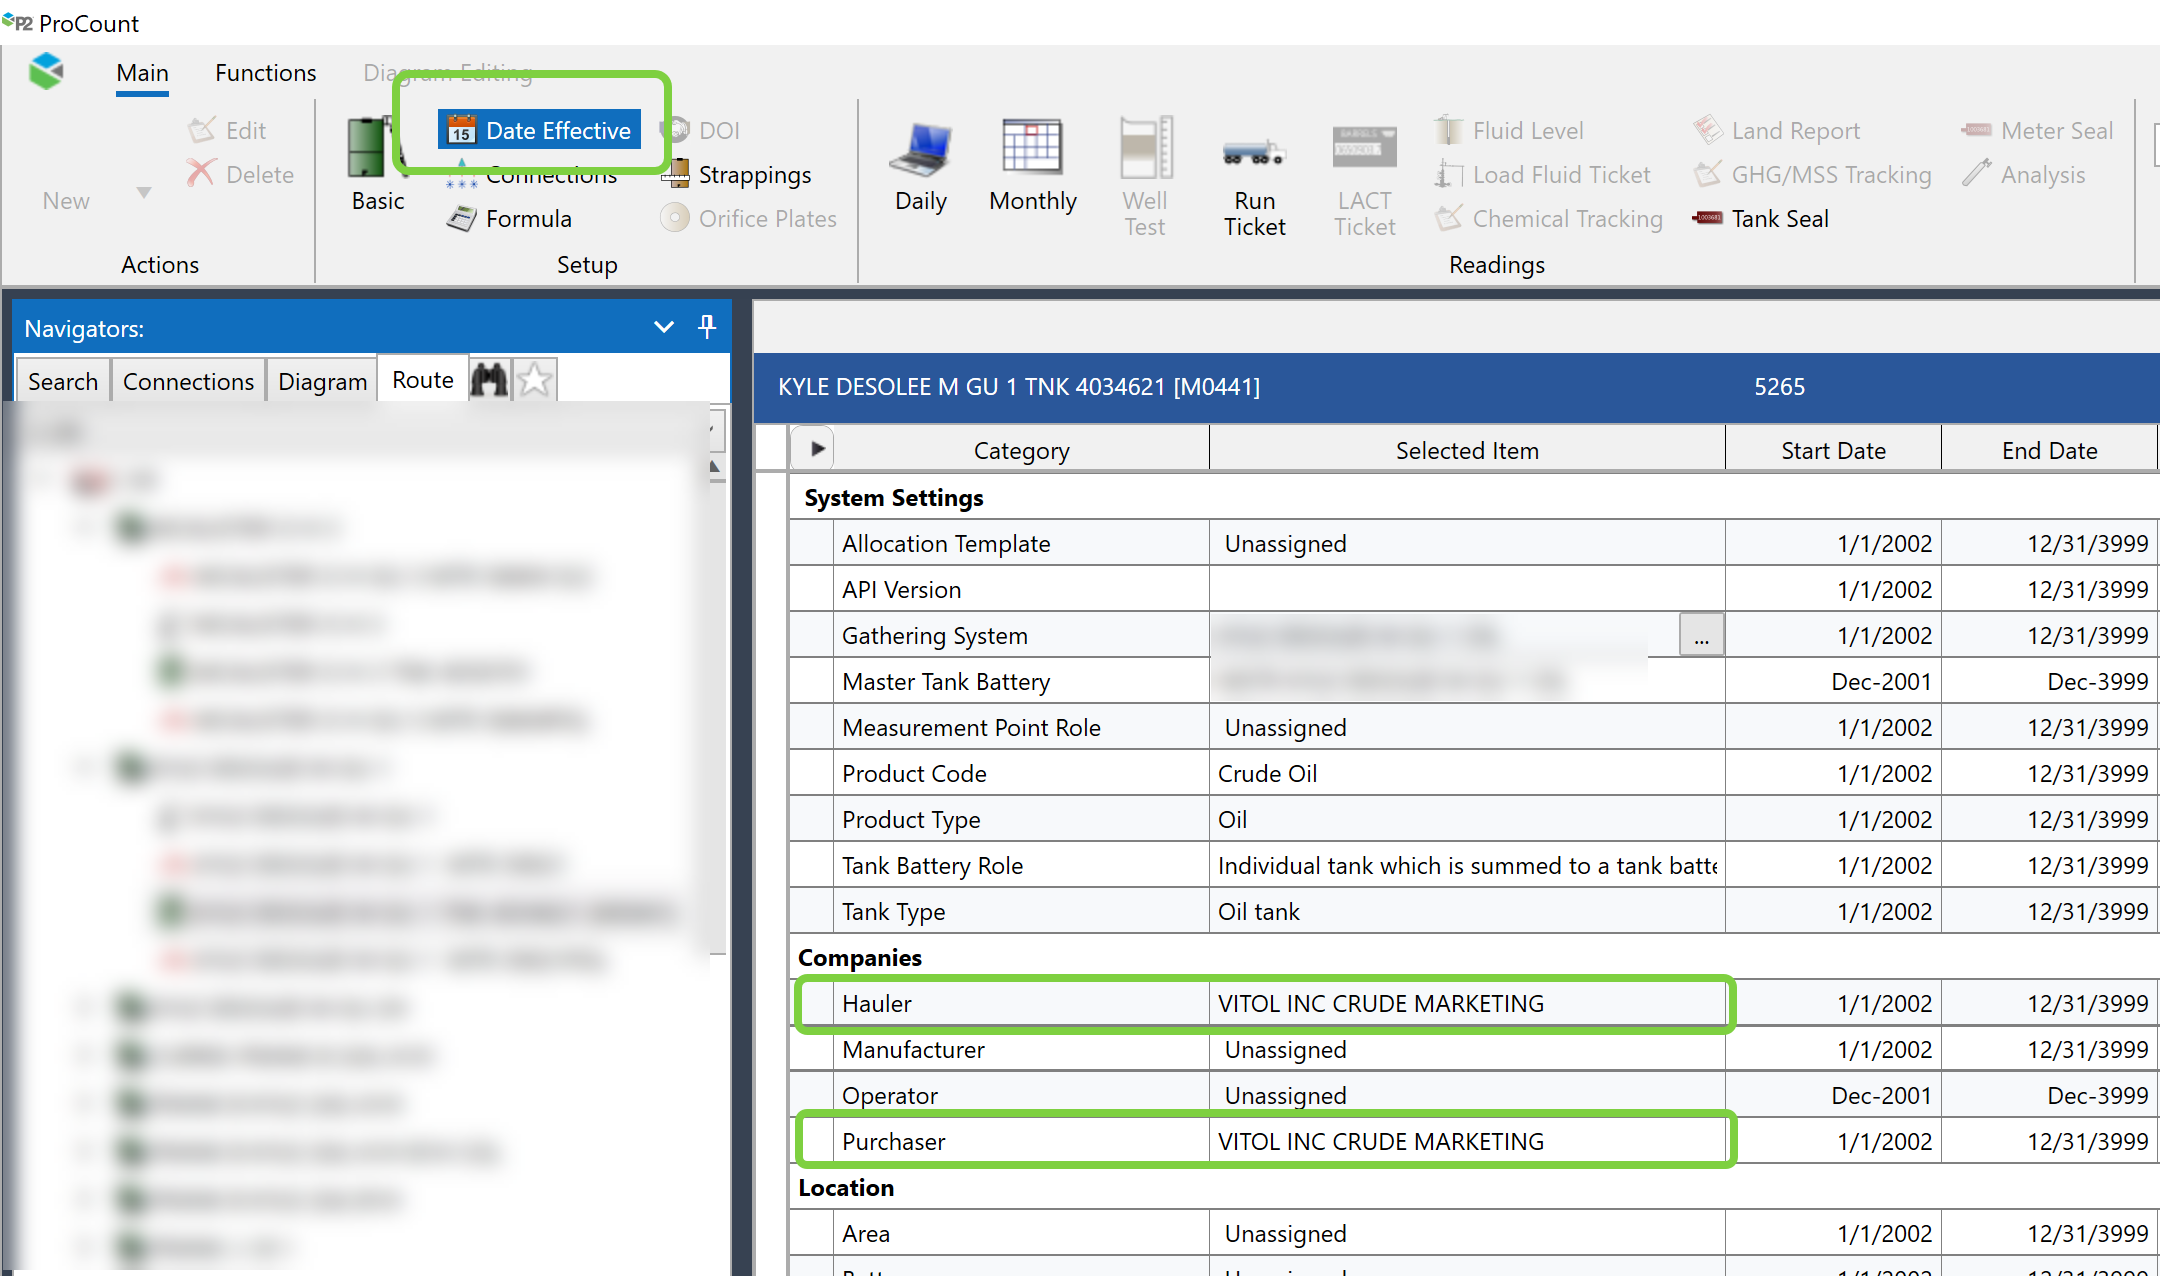
- Default Purchaser and Hauler from the Tank’s Date Effective screen: Using this option will default a new ticket with the companies set on the Date Effective screen in ProCount.
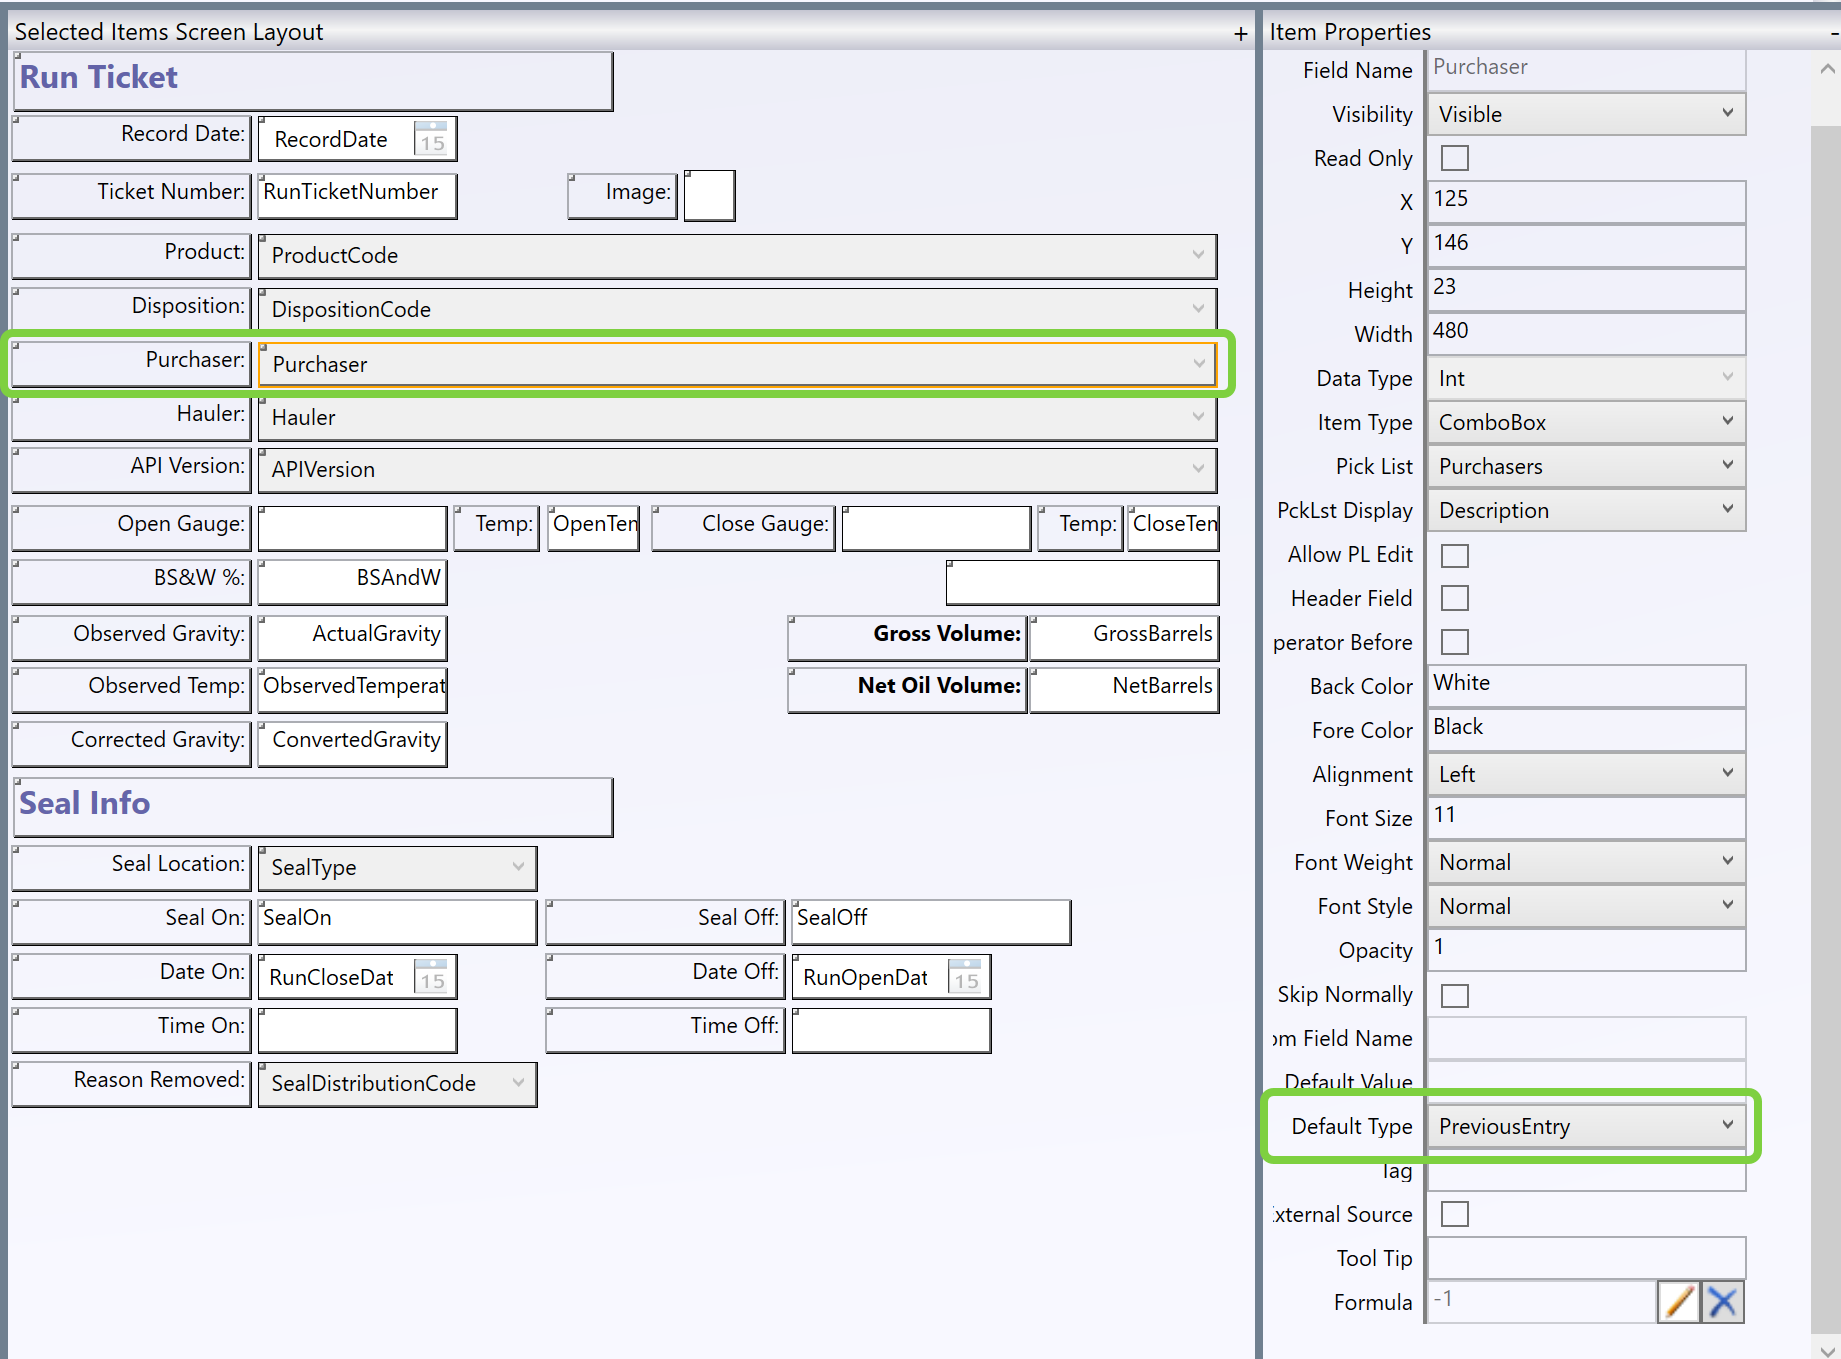
- Default Purchaser and Hauler from Screen Configuration: Using this option will default a new ticket with the settings on the Default Type on the screen’s setup in the Merrick Metadata Config Utility (typically Previous Entry which means the new ticket will default to the values on the last ticket entered for the tank):
Well Test Defaults: Admins can control whether a new well test entry defaults to today or yesterday.
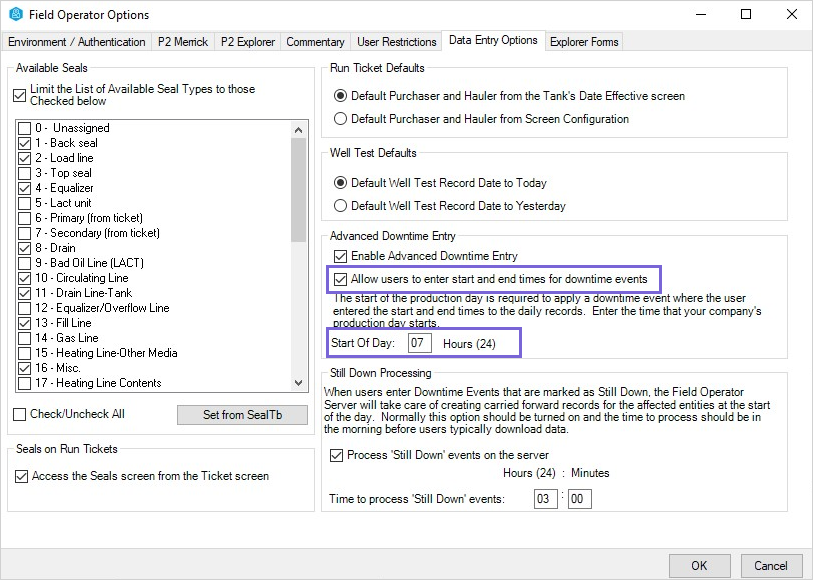
Advanced Downtime Entry: Management of downtime options:
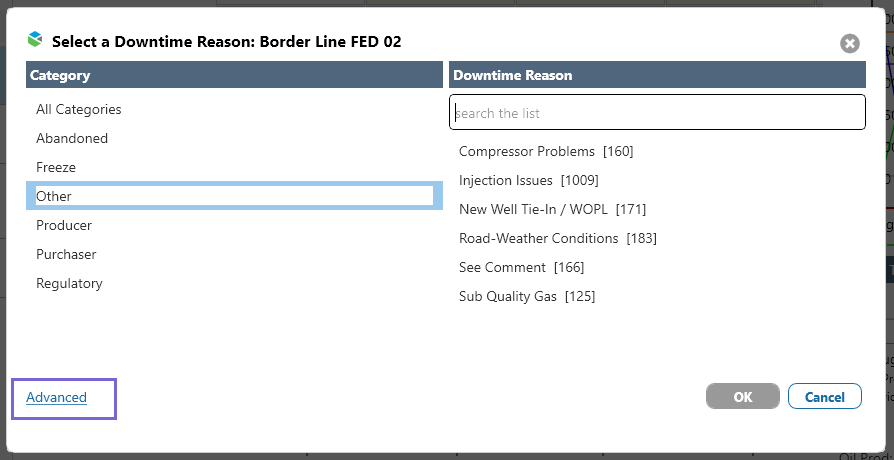
- Enable Advanced Downtime Entry: This option determines whether users have access to the Advanced link on the Select a Downtime Reason screen in Field Operator. The Advanced link gives access to the Add a new Downtime Event screen.
- Allow users to enter start and end times for downtime events: Admins can control whether users can enter start and end times for downtime events, and what time is set as the start of the production day.
Users are able to enter start and end times for downtime events; the production day starts at 7am:
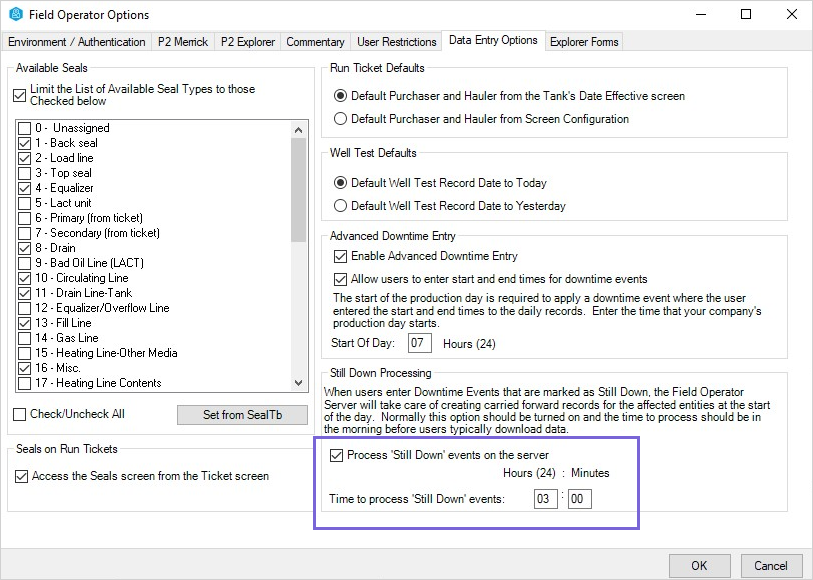
Still Down Processing: Admins can control whether records of events marked as Still Down are carried forward automatically at the start of the day, and at what time the carried forward records are created.
Field Operator Options configured to automatically create carried forward records for Still Down events; the carried forward records are created at 3am.
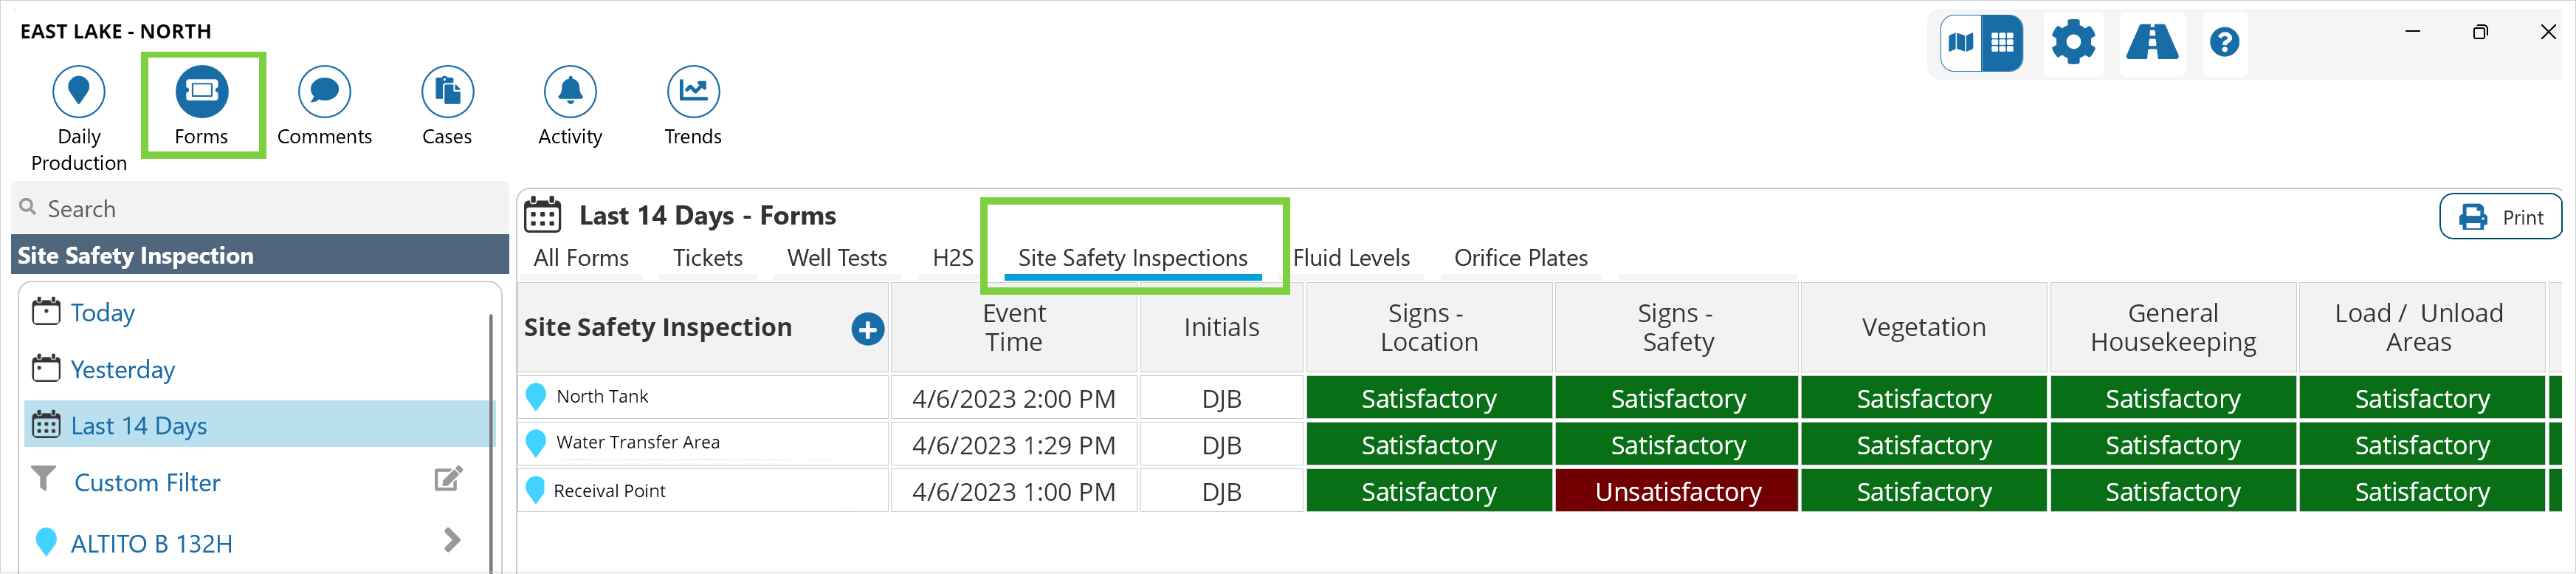
Explorer Forms
An Explorer Form is associated with a Merrick Production Entity on the Explorer Forms tab.
Select the Production Entity on the left and specify the Explorer Form(s) to be displayed.
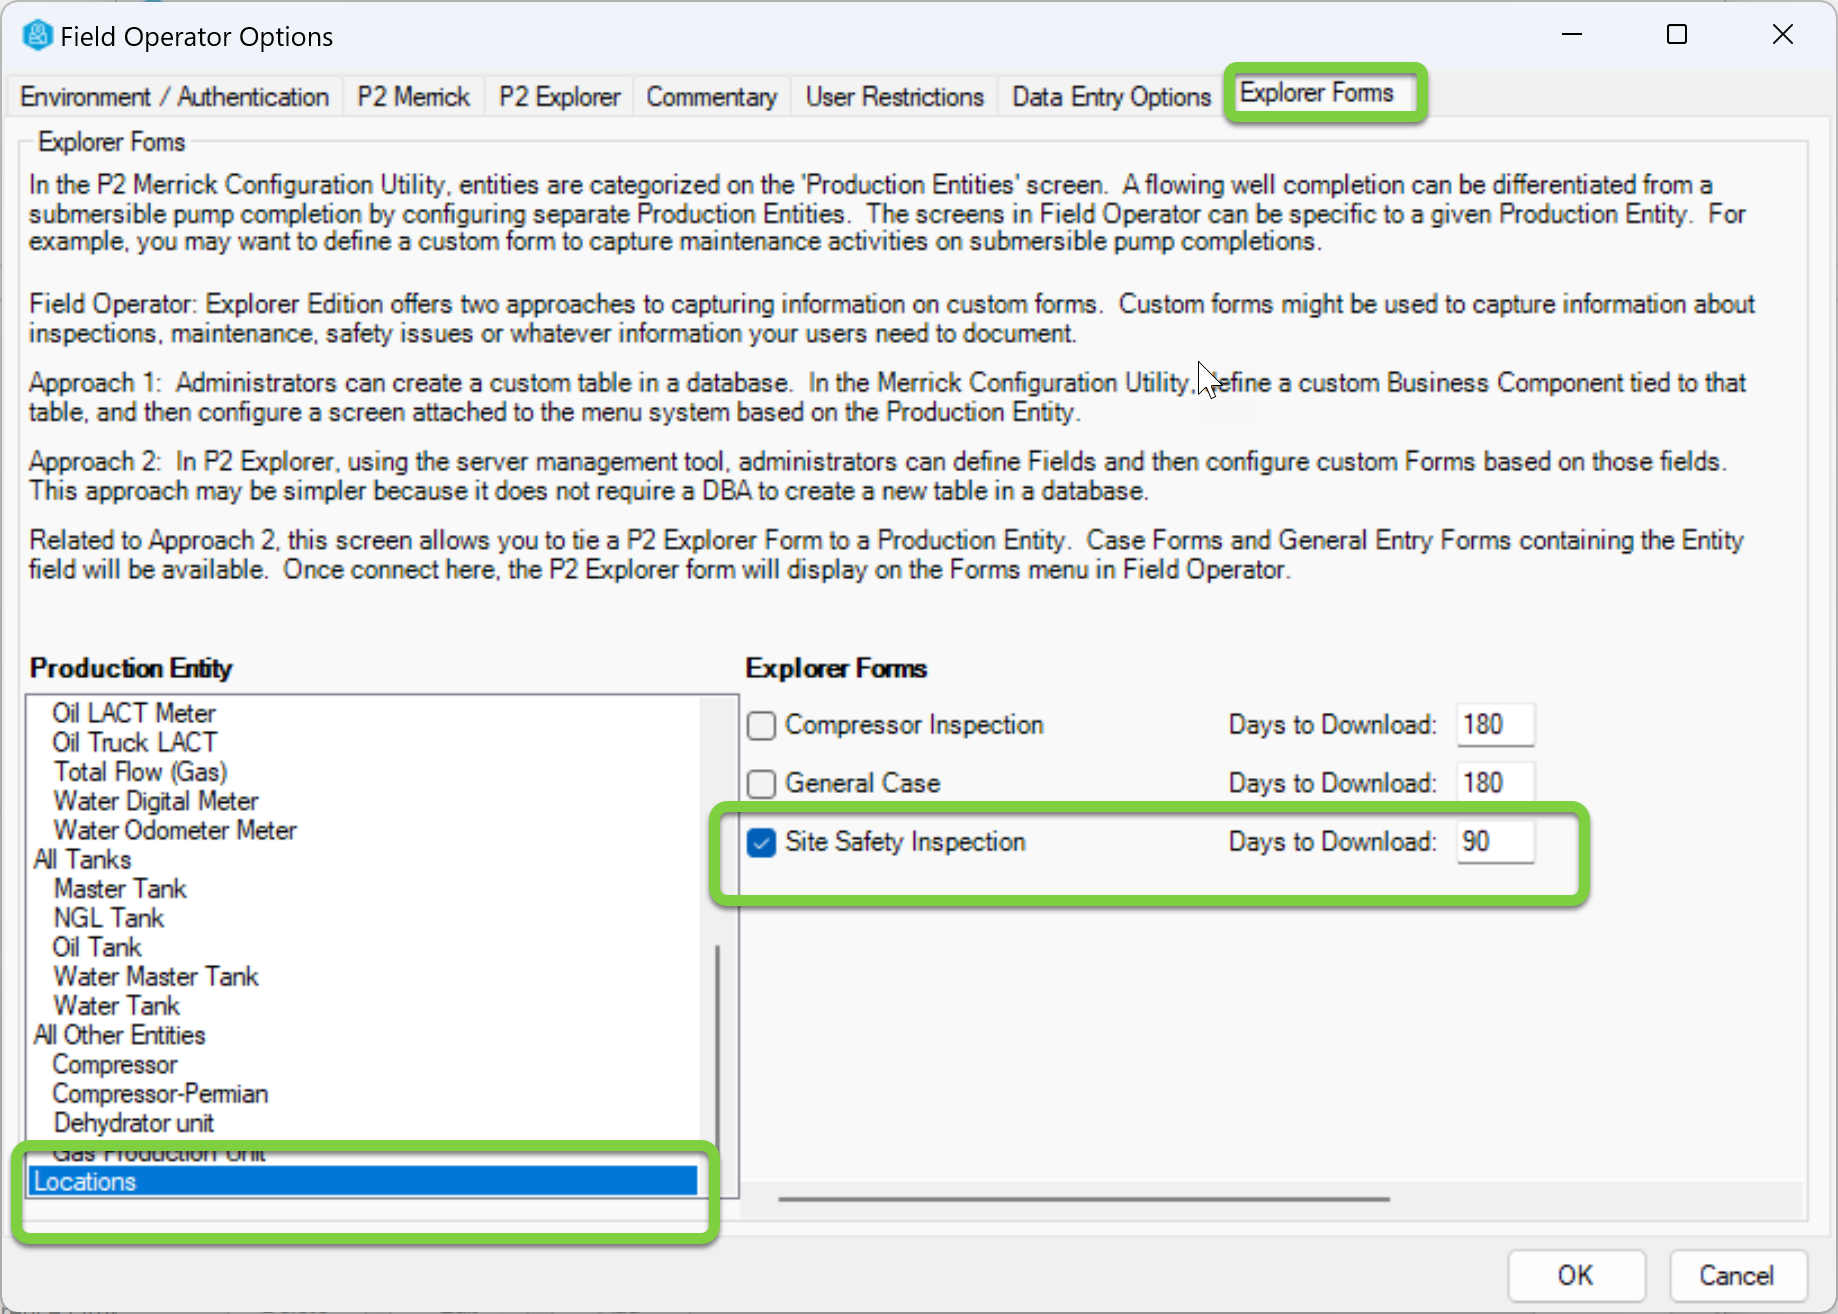
Once the Explorer Form is connected to the Production Entity, the form displays in Field Operator on the Forms menu alongside the standard Merrick Forms such as Well Tests and Run Tickets.
Release History
- Configuration Utility (this release, 4.11):
- Data Entry Options
- Access the Seals screen from the Ticket screen
- Enable Advanced Downtime Entry
- Explorer Forms Option
- Data Entry Options