ON THIS PAGE:
There are two types of readings that are entered into Field Operator, one is the Daily Readings, the other is Forms.
All readings that are not Daily Readings are Forms.
Finding a Form
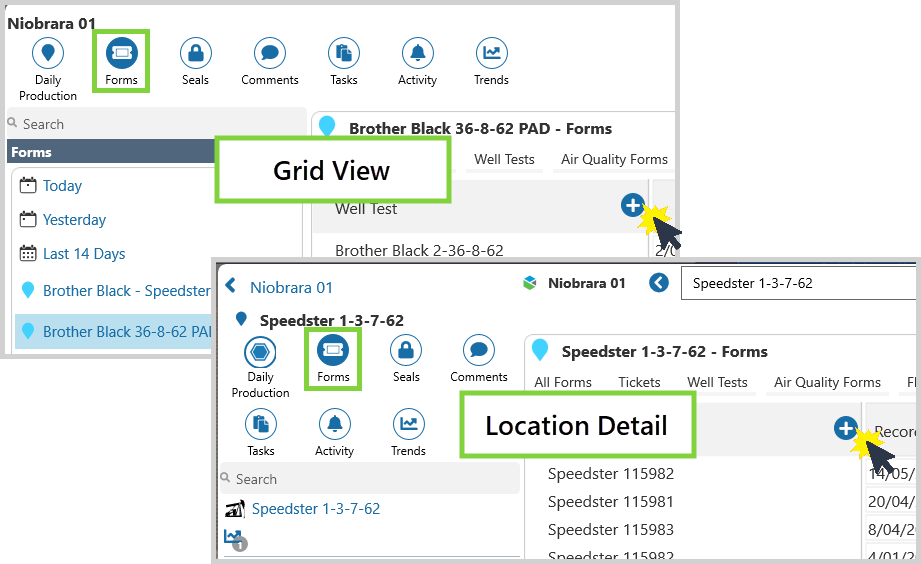
Select Forms on the Navigation Ribbon in Map View, Grid View, or Location Detail.
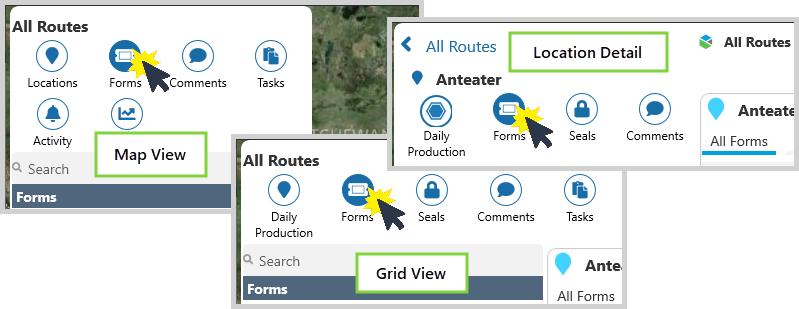
In Map View
A summary of the forms entered in the last two days is displayed in the Information Panel on the left side of the screen.
To open a form click the Location Summary, and the Location Overview box will open and display the selected form.
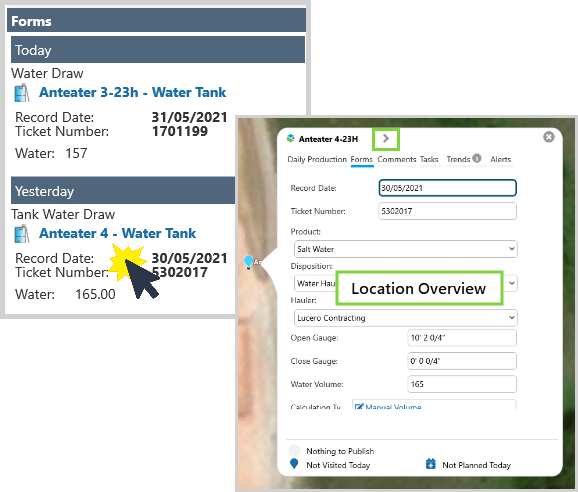
In Location Overview, scroll down to see other fields in the form that may not be visible. The form is not editable in this view.
Click on the Location Detail ![]() icon to open the form, and to edit it.
icon to open the form, and to edit it.
In Grid View
Forms from the last three months can be filtered by time or location, and by type.
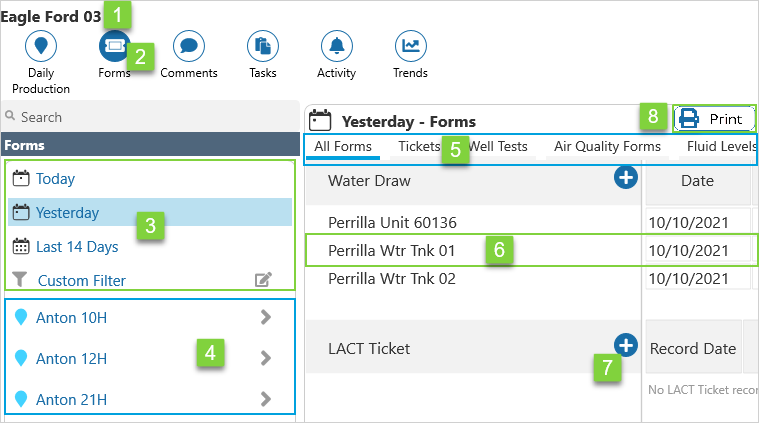
| 1. | Route | Name of the currently selected route. |
| 2. | Forms | Forms is the current Ribbon selection. |
| 3. | Time Frame | Click Today, Yesterday, Last 14 Days, or the Custom Filter to view the relevant forms. |
| 4. | Location | Click a location to view all the forms for the location. |
| 5. | Form Type | Click a tab to filter the list of forms by type. |
| 6. | A Form |
Click an entry to open and update, or delete a form. Forms are only editable for a fixed length of time. This time limit is set by the system administrator (in the Merrick Metadata Configuration Utility). Data entry fields are disabled in forms that are not editable. |
| 7. | New Form | Click the Add |
| 8. |
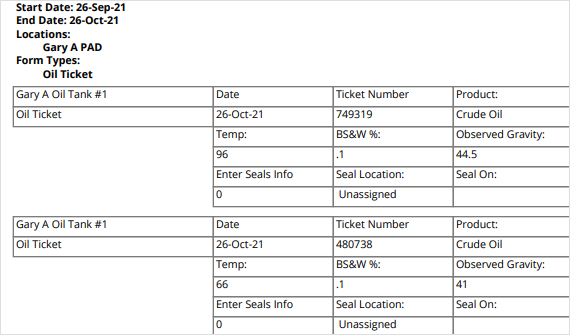
Click Grid View table of forms PDF:
Note: The system is generating the PDF based on the Grid View of the form as defined in the metadata. To configure the reports, in the Merrick Metadata Configuration Utility select Screens, Form Type, and edit the Grid View to the required view and print configuration.
|
Custom Filter
Click the edit ![]() icon to open the Custom Forms Filter.
icon to open the Custom Forms Filter.
The forms list can be filtered by location, type, or date.
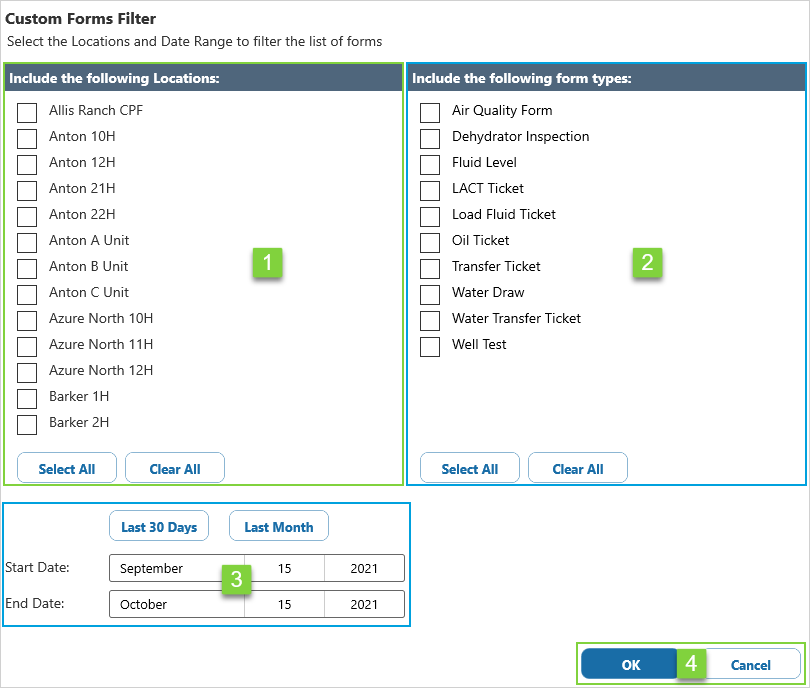
| 1. | Location |
Select individual locations or click:
|
| 2. | Forms |
Select individual form types or click:
|
| 3. | Date Range |
Select the:
|
| 4. | Actions |
Click:
|
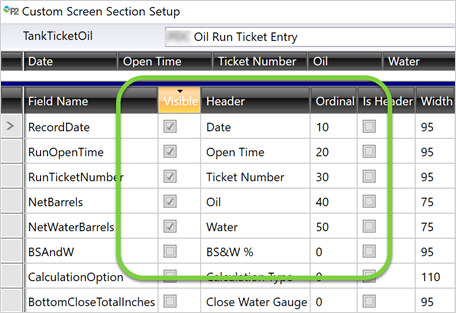
In Grid View there is up to three months of historical forms data available to view. Scroll down to view all the forms, and scroll across to view all the data in the forms.
In Location Detail
See all the forms for the selected location. The list of forms can be filtered by entity and type.
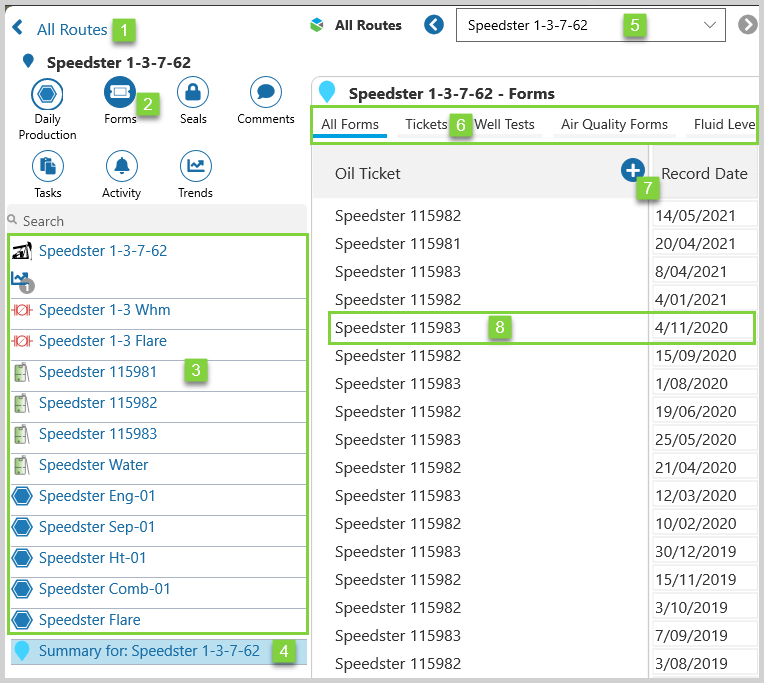
| 1. | Route | Name of the currently selected route. |
| 2. | Forms | Forms is the current Ribbon selection. |
| 3. | Entities |
List of all entities on the current route. Click an entity to view all the forms for the entity. |
| 4. | Location | Click the Summary to view all the forms for the location. |
| 5. | Location Selection | Click the forward |
| 6. | Form Type | Click a tab to filter the list of forms by type. |
| 7. | New Form | Click the Add |
| 8. | A Form |
Click an entry to open and update, or delete a form. Forms are only editable for a fixed length of time. This time limit is set by the system administrator (in the Merrick Metadata Configuration Utility). Data entry fields are disabled in forms that are not editable. |
Add a New Form
A new form can be added by clicking the Add ![]() icon from either Grid View or Location Detail.
icon from either Grid View or Location Detail.
The Add a new Form box opens.
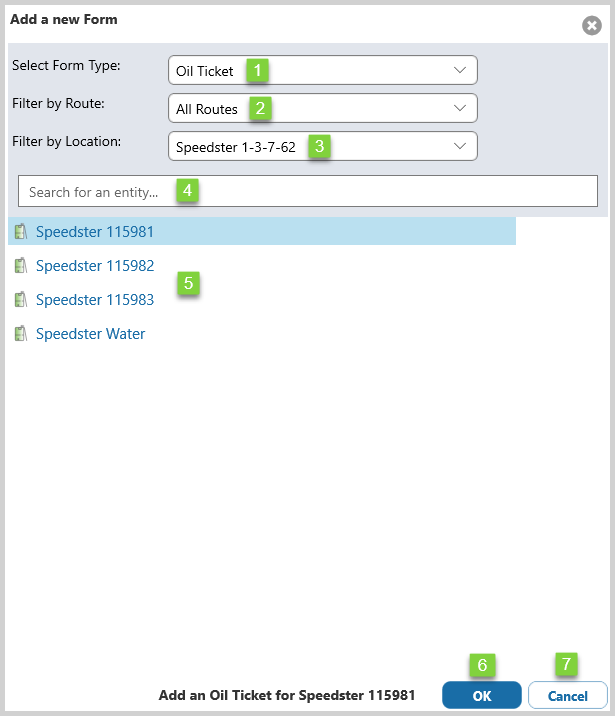
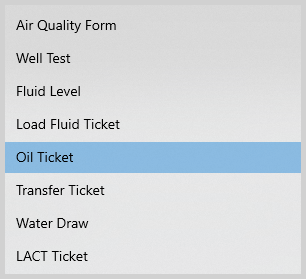
| 1. | Form Type |
Click the drop-down arrow and select a form type from the list.
The different forms have different purposes and are designed to collect data relevant to their use. |
| 2. | Route |
Click the drop-down arrow and select a route from the list. |
| 3. | Location | Click the drop-down arrow and select a location that is on the selected route. |
| 4. | Search |
Search for an entity in the currently selected location. Search results will automatically display when you enter:
|
| 5. | Entity | Select an entity from the list. |
| 6. | Add | Click OK to open the new form and enter the Form Readings. |
| 7. | Cancel | Click Cancel to go back to the previous screen without creating a new form. |
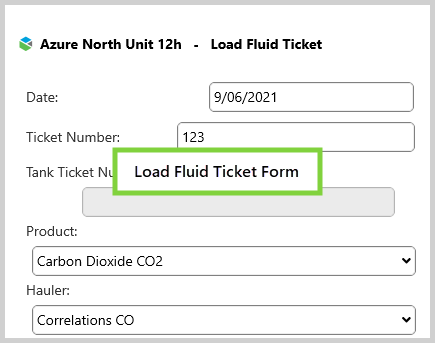
A new Well Test form:
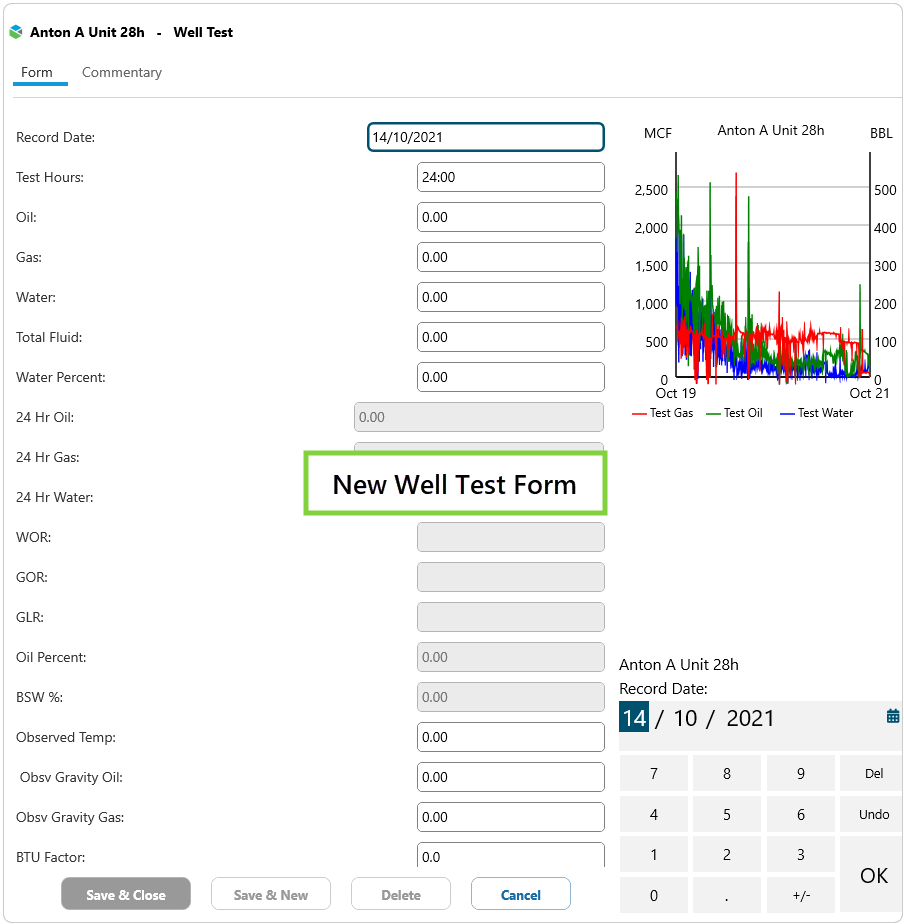
Entering Form Readings
The different forms are designed to collect a range of Form Readings.
The methods of data entry are the same across the different form types.
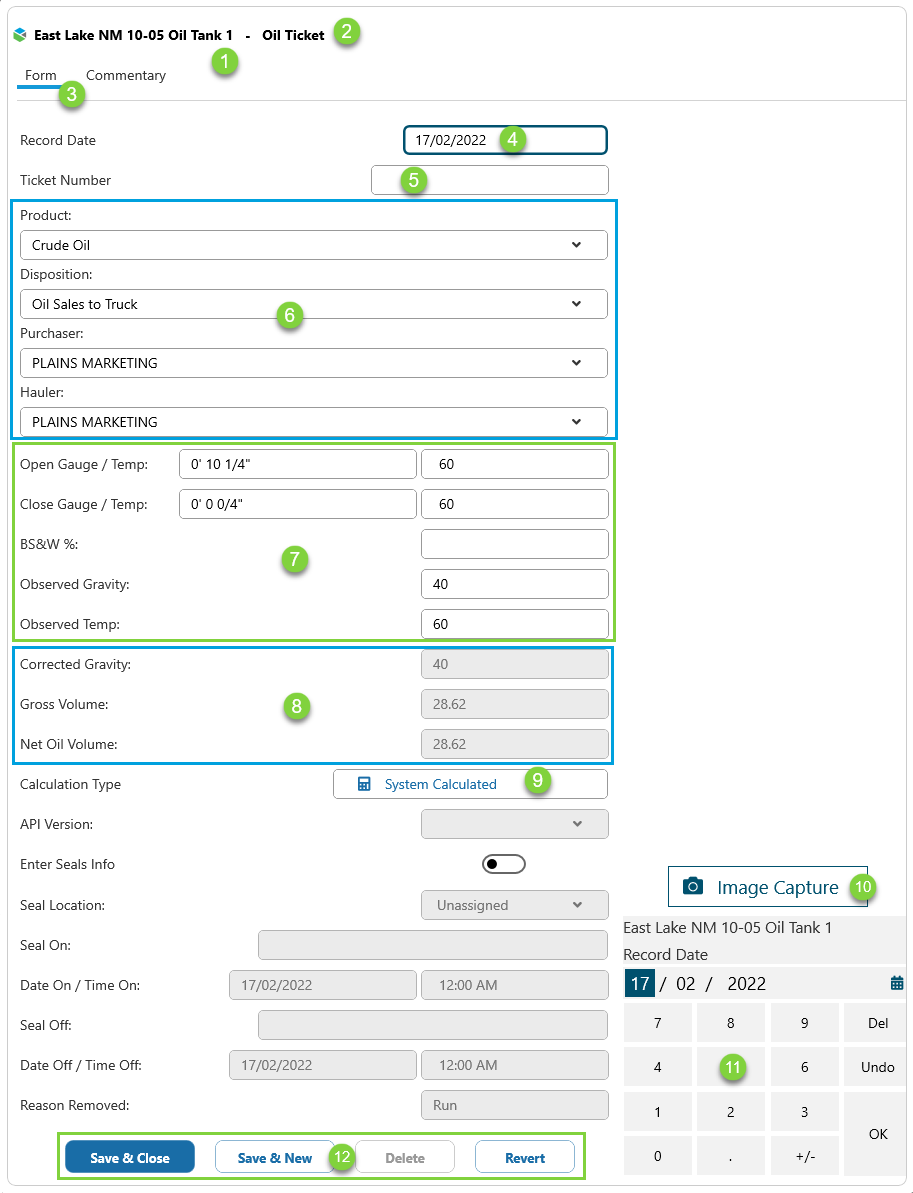
| 1. | Entity | Name of the currently selected entity. |
| 2. | Form | The type of form. |
| 3. | Data Type | Select Form or Commentary. |
| 4. | Date | The date the data was recorded. |
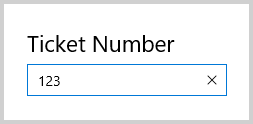
| 5. | Ticket Number |
Click the field to open the data entry box.
|
| 6. | Multi Select | Click the drop-down arrow for each field, and select an option from the list. |
| 7. | Readings |
Click a field and enter readings by using a keyboard, or the onscreen number pad. The active data entry field is outlined in dark blue. |
| 8. | Disabled Fields |
All greyed out data entry fields are disabled. |
| 9. | Calculation Type |
Click the field to choose between System Calculated, Manual Volume and Net Calculated. |
| 10. | Image Capture |
Click Image Capture to take a photo with your device's camera. The photo will be automatically attached to the form. |
| 11. | Number Pad |
Use to enter a value into an active data entry field. |
| 12. | Action Buttons |
Click on buttons to:
|
Entering Seal Readings
Seal readings may be entered in the Oil Ticket form.

| 1. | Enter Seals | Turn on the toggle to enable the seals data entry fields. |
| 2. | Location | Click the drop-down arrow and select an option from the list. |
| 3. | Fields |
Click a white data entry field to enter readings. The active field is outlined in dark blue. Grey fields are disabled. |
| 4. | Action Buttons |
Click buttons to:
|
Entering Comments
Comments can be added by selecting the Commentary tab at the top of the form.
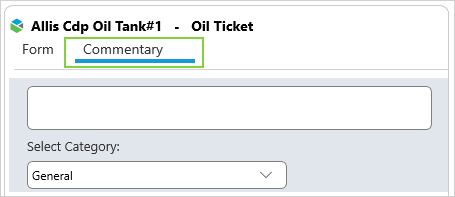
After saving your comment, select the Form tab to return to the form.
Editing a Form
Forms can be edited or deleted within a set period of time. This time limit is set by the system administrator (in the Merrick Metadata Configuration Utility).
To edit data in a form, click the relevant data entry field, enter the new value and click Save.
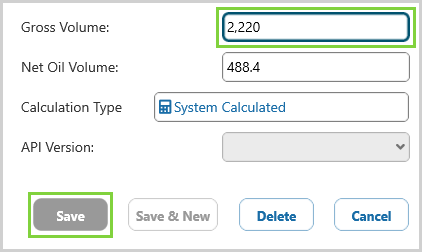
The data entry fields and all the Action Buttons except for Cancel, are disabled in forms that are not editable.

Release History
- Form Readings (this release 4.6)
- Name change - Map View changed to Map
- Name Change - Grid View changed to Grid Summary
- Icons added to entity names in the grid