Overview
Option Links is similar to a Combo Box, but instead of displaying the options in a drop-down list, it displays them as a line of buttons.
The following diagram shows a grid layout with an Options Link component:
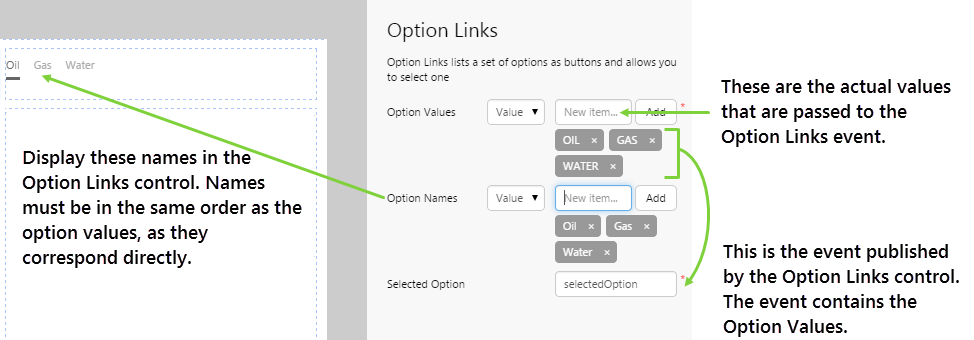
| Option Values: | The text that you want the control to pass to the event it publishes. This can either be a set of values in text format, or you can populate the values from an event. This value is required. |
| Option Names: | The text that you want the control to display on the buttons. This can either be a set of values in text format, or you can populate the values from an event. The names must be listed in the same order as the values. |
| Selected Option: | The name of the event that is published when the user selects a value from this control. This value is required. |
Tutorial
Option Links are a simple yet powerful way of providing interactivity on your dashboards. You can pass the selected value to other controls on the dashboard by publishing an event through the Selected Option field.
An event is something that causes a change on the page. For example, you could have an Option Links control that offers several different options. Perhaps you want to have a chart that updates when a different button is clicked.
In this tutorial, we'll look at adding a slightly more advanced Option Links control than that shown above. This Option Links will get a list of currency values from an event, and will display friendly names for the buttons. By default, the Option Links will select Australian Dollars. To top it off, we'll show another component consuming the published event when a user selects clicks a button from the Option Links.
![]()
Creating an Option Links control is simple, but requires a little preparation. Let's go through this process, step-by-step.
Step by Step: Creating an Event Controlled Option Links
Before you start, open a new tab in Explorer and click the “Create a New Page in Studio Mode” thumbnail. Choose the grid layout - you can adjust the rows and columns if you like but it's not important for this exercise.
If you have access to the training environment, you can follow the steps exactly as outlined here. Otherwise, you will need to adjust the configuration to suit your data.
Step 1. Add the Option Links to the page
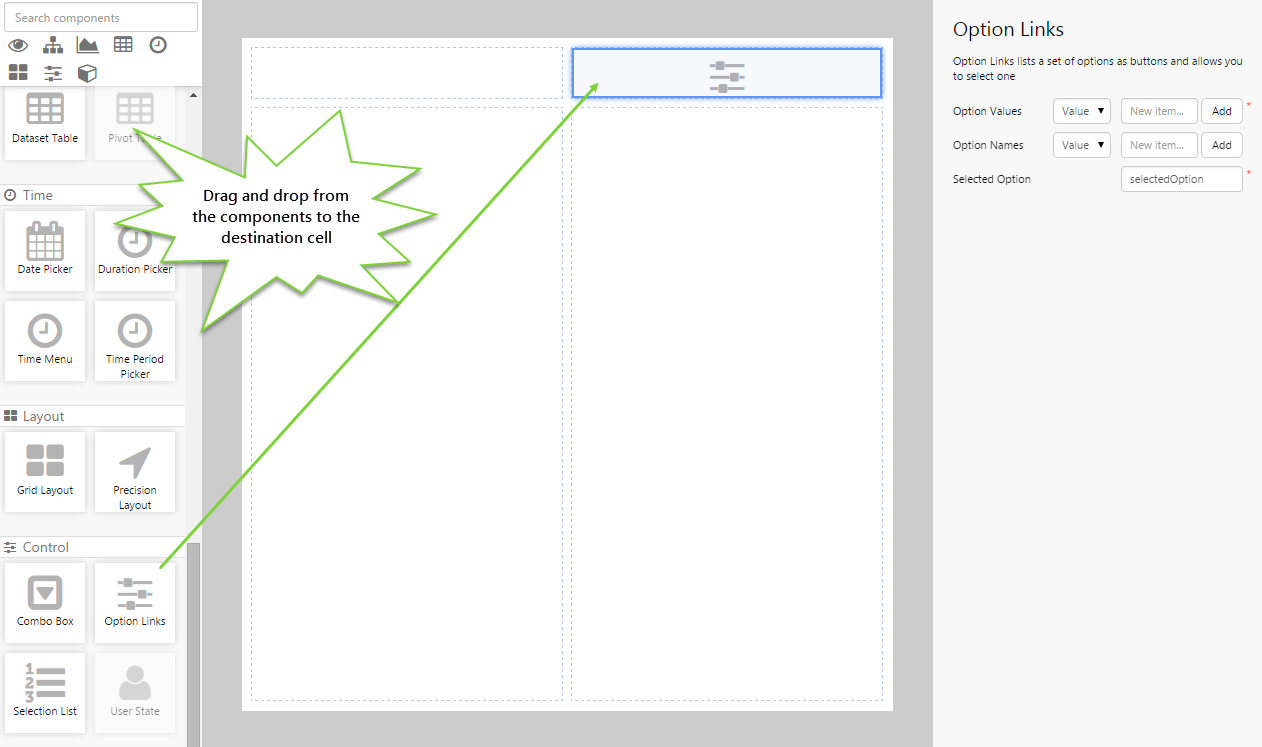
Drag and drop the Option Links component onto a grid cell.
Step 2. Configure the Option Links

In this tutorial, we want to populate the Option Links from events. The advantage in doing this is that other components on the page can also subscribe to the same events, thus your charts and tables (for example) can also be linked. Specify the following events:
- Option Values: optionValues
- Option Names: optionNames
- Selected Option: selectedOption
You'll notice that the Selected Option event is already filled in with a default event name. You can choose to change this name if you want, but often there's no real need to.
Step 3. Create the events
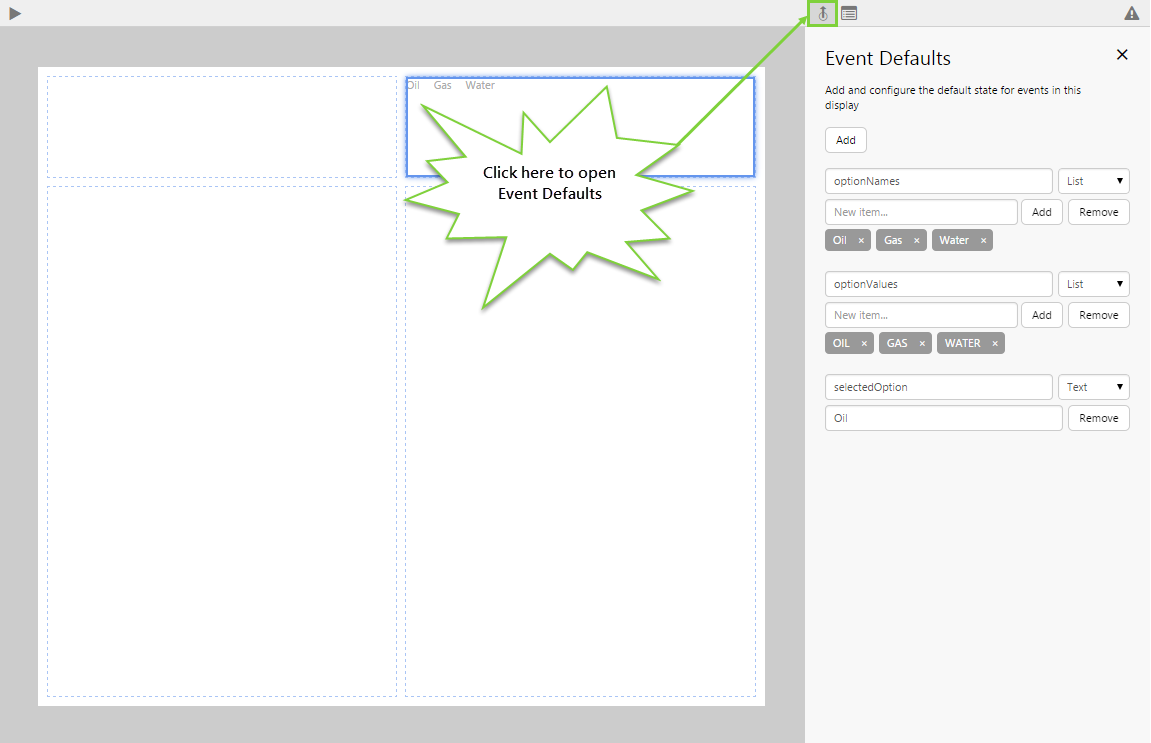
This is where you start to see some magic happen. You can create an event at any time.
- Click the Set Defaults button on the far right side of the Studio toolbar.
- Create an event called "optionValues" with a list of the following values: Oil, Gas, NGL.
- Create an event called "optionNames" with a list of the following values: OIL, GAS, WATER.
In this example, the names differ from the values only in terms of case. If the database is in mixed case you can use this property to present the user with options that are all in upper case. - Create an event called "selectedOption" with a string value of Oil.
In creating these events, we make them available not only to the Option Links we are creating here, but also to any other components we may want to place on the page.
Step 4. Add a Chart
Option Links don't normally do anything by themselves - you use them to drive other components. Let's add a bar chart and observe it being driven by the Option Links.
- Drag and drop a Chart onto another cell on the page.
- Add a dataset (e.g. ProdCompletionAllocations_Perth1)
- For the chart series:
- Type: Bar series
- Y Field: (Value) Alloc Vol
- Name: (Value) Allocations
- Filter Field: (Value) Product
- Filter Value: (Event) selectedOption
- For the X Axis:
- Field: (Value) Disposition
You can configure more chart options if you want, but it's not necessary for this tutorial.
Step 5. All done!
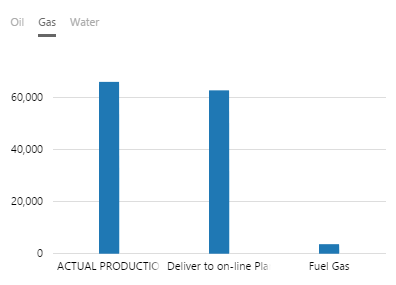
Congratulations! You now have a fully functioning Option Links that displays a list of products.
- Click the preview
 button on the Studio toolbar to see what your page will look like in run-time.
 - When the Option Links first loads, Oil is selected as the product.
- Watch the chart change as you choose different buttons from the Option Links.
![]() Don't forget to save your page!
Don't forget to save your page!