ON THIS PAGE:
Overview
The Relative Time trigger sets a time difference between two datetime variables on a page. It does this by applying a specified time offset to an input variable, and designating this new time to an output variable. The time difference is a period of time either before or after the input time.
The output variable can be used elsewhere on the page, effectively allowing you to have a relative time that keeps pace with the date and time that you are selecting.
It is useful when:
- There are two separate sets of timestamps on a page.
- You want to turn a single point in time into a range of time, either before or after a selected timestamp.
- You want to use a timestamp to drill down for more data within a particular time range.
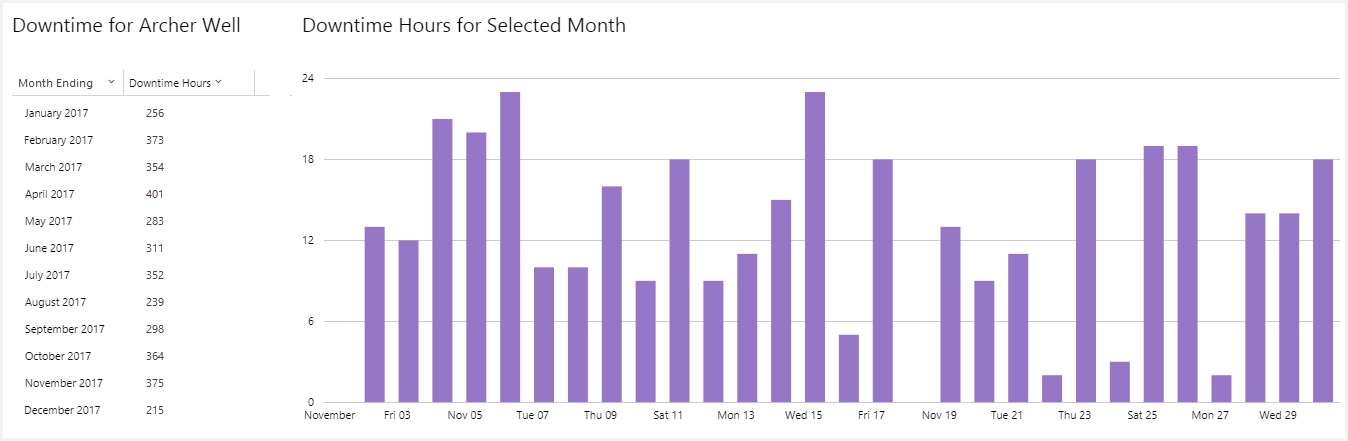
Using a relative time trigger, you could display a range of dates from a user-selected date. The example below shows the downtime hours for a selected month. The user selects a month from the data table on the left, and the relative time trigger outputs the date of 30 days before. The chart uses the user's selection as the data's end date, and the trigger supplies the start date.
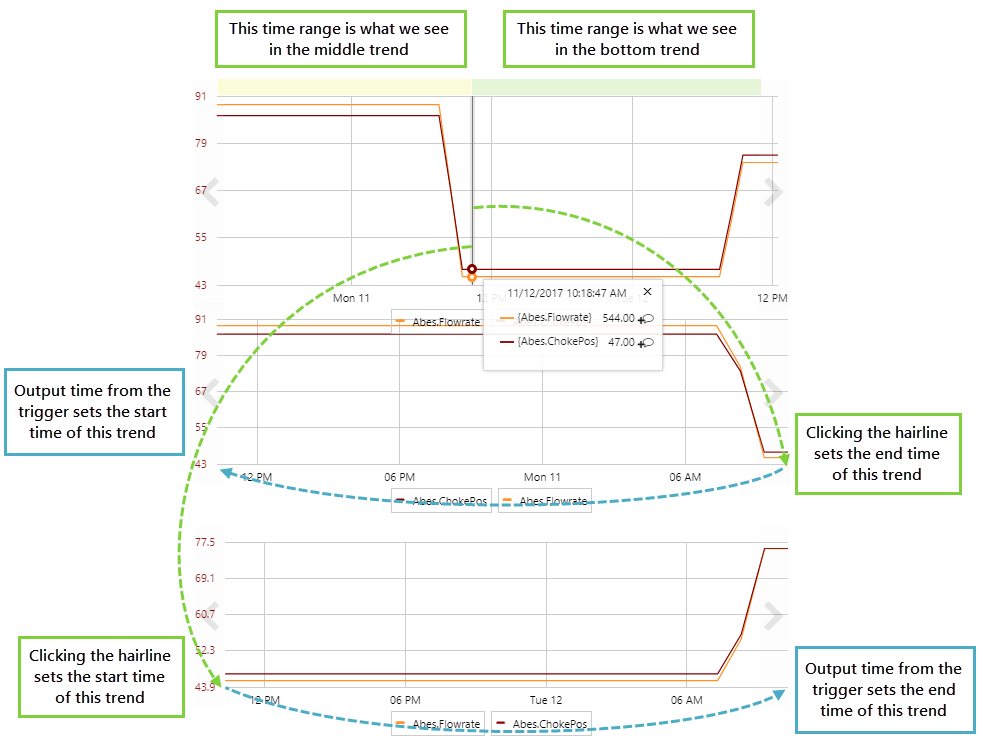
You can use the same principle to view further detail around any date selection. For example, view the last 7 days worth of severity 1 alarms for a pump or zoom in on a part of an embedded trend when the user clicks a hairline. We will cover this last example in the tutorial.
Configuration Overview
The following image shows how to use the configuration options of a relative time trigger:
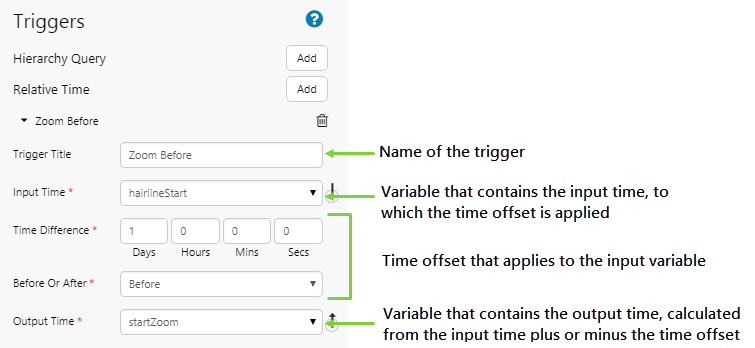
| Trigger Title | The name used to identify the relative time trigger. If not specified, the title will be 'Relative Time'. |
| Input Time | The variable that is used to calculate the relative time. |
| Time Difference | The time difference to maintain between the input time and output time. |
| Before or After | Whether the output time is set to before or after the input time. |
| Output Time | The variable that is updated after applying the relative time configuration. |
Tutorial
In this tutorial, we'll configure two relative time triggers. One of the triggers will show a period of time before the selected input time, and the other will show a period of time after the selected input time. We'll also add 3 embedded trends to a page. One of these will allow the user to select an input time by adding a hairline, and the other trends will show the different output time ranges. Effectively, a user will be able to click on a trend and zoom in on detail before and after the hairline time.
Note: When using a hairline to update another chart, it is possible to retrieve very large volumes of data during dragging of the hairline. Retrieving large amounts of historian data across a slow network can affect system performance for all users of the system.
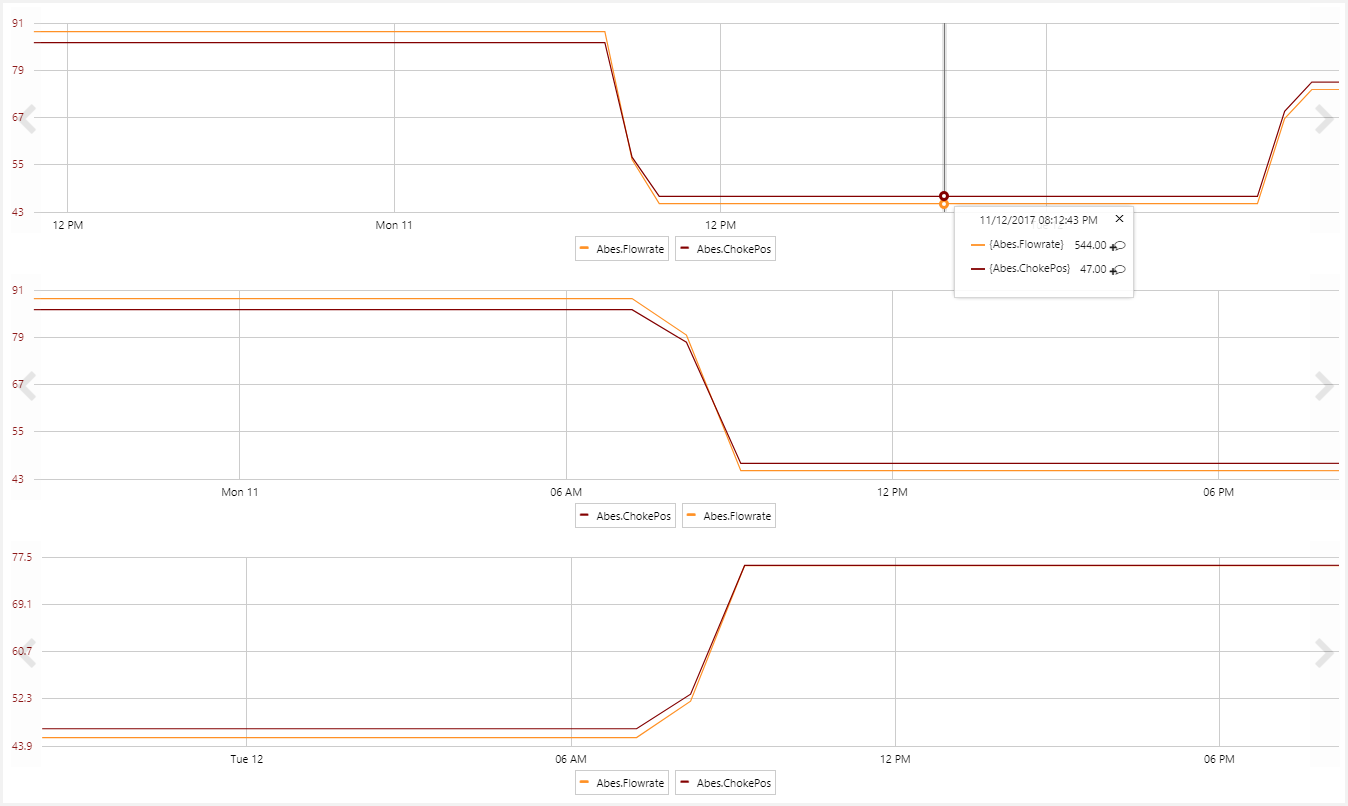
At the end of the tutorial, your page should look like this:
If you're unfamiliar with the process of building pages, read the article Building an Explorer Page.
Step 1. Prepare a Studio Page

Before you start, click the New Page button on the Home tab of the ribbon. Choose the Grid layout.
- Remove a column
- Add another row
- Assign a Column Spacing and Row Spacing of 10.
Step 2. Update Default Values
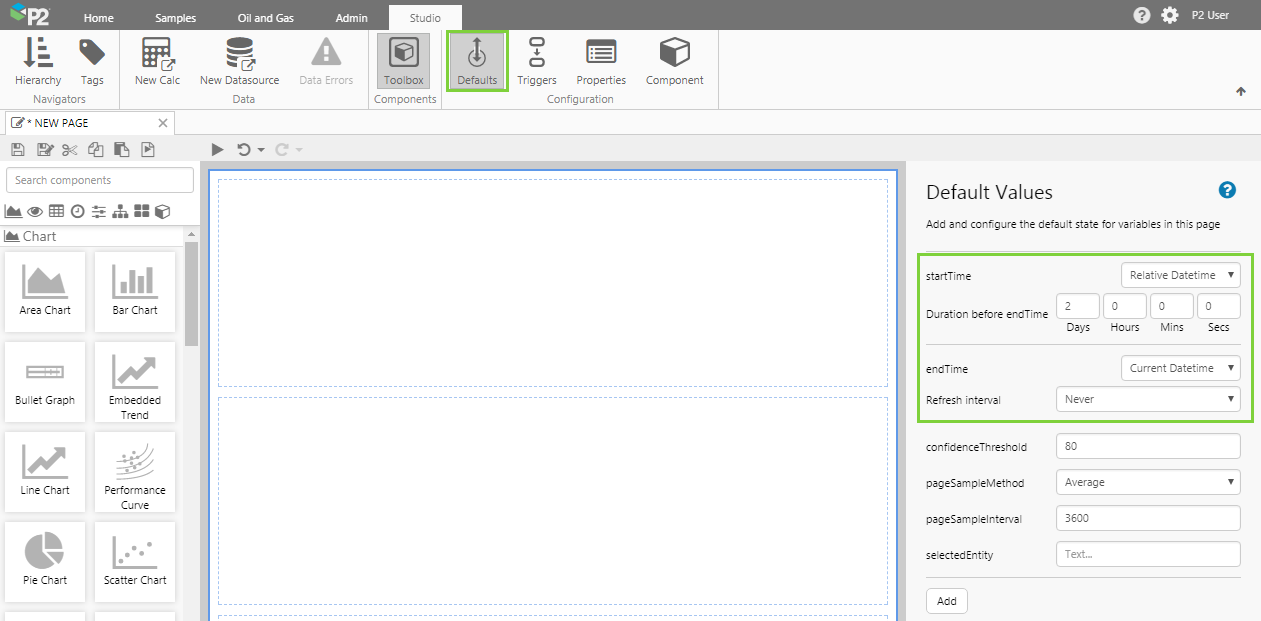
Open the Default Values panel, and update the startTime and endTime variables as follows:
| startTime | (Relative Datetime) 2 days | Set the start time to be 2 days before the end time. |
| endTime | (Current Datetime) Never | Set the end time to be the current time. |
We will use these variables in the first trend, which will show data for a period of 2 days before the current datetime.
Step 3. Add 2 Relative Time Triggers
In this step, we'll add 2 relative time triggers.
1. Click the Triggers ![]() button in the Configuration group on the Studio ribbon tab.
button in the Configuration group on the Studio ribbon tab.
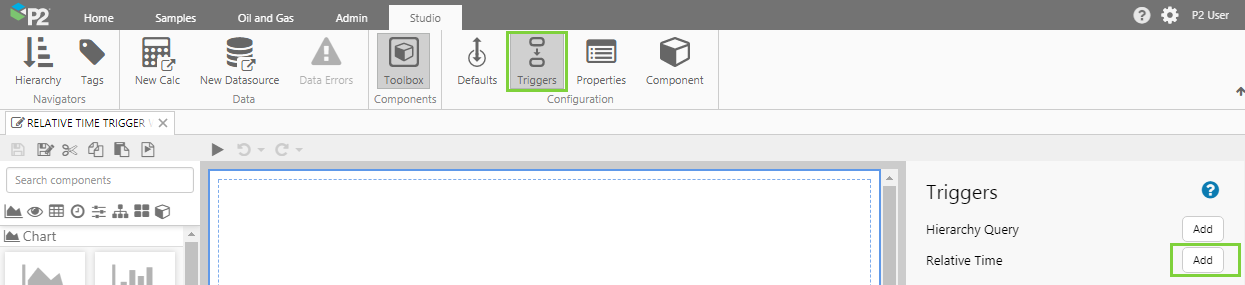
2. In the Triggers panel, click the Add button next to Relative Time, twice.
Step 4. Configure the First Relative Time

- Click the first Relative Time to expand the trigger.

Specify the settings as follows:
| Trigger Title | Zoom Before | Allows us to easily identify the trigger if we add multiple triggers to a page. |
| Input Time | hairlineStart | When the user clicks on the trend to add a hairline, the start time of the hairline will be used as the input variable. You could equally use the hairline's end time in this situation, it doesn't matter for this example. |
| Time Difference | 1 day | We are interested in a 1 day difference from the input time (hairline start time). |
| Before or After | Before | We want the period of time to be before the input time (hairline start time). |
| Output Time | startZoom | The variable containing the output time will be called startZoom. |
- Click the 2nd Relative Time to expand the trigger.
Specify the settings as follows:
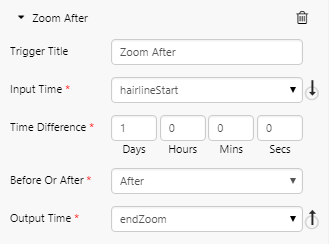
| Trigger Title | Zoom After | Allows us to easily identify the trigger from the first one we added. |
| Input Time | hairlineStart | When the user clicks on the trend to add a hairline, the start time of the hairline will be used as the input variable. You could equally use the hairline's end time in this situation, it doesn't matter for this example. |
| Time Difference | 1 day | We are interested in a 1 day difference from the input time (hairline start time). |
| Before or After | After | We want the period of time to be after the input time (hairline start time). |
| Output Time | endZoom | The variable containing the output time will be called endZoom. |
Step 5. Add 3 Embedded Trends
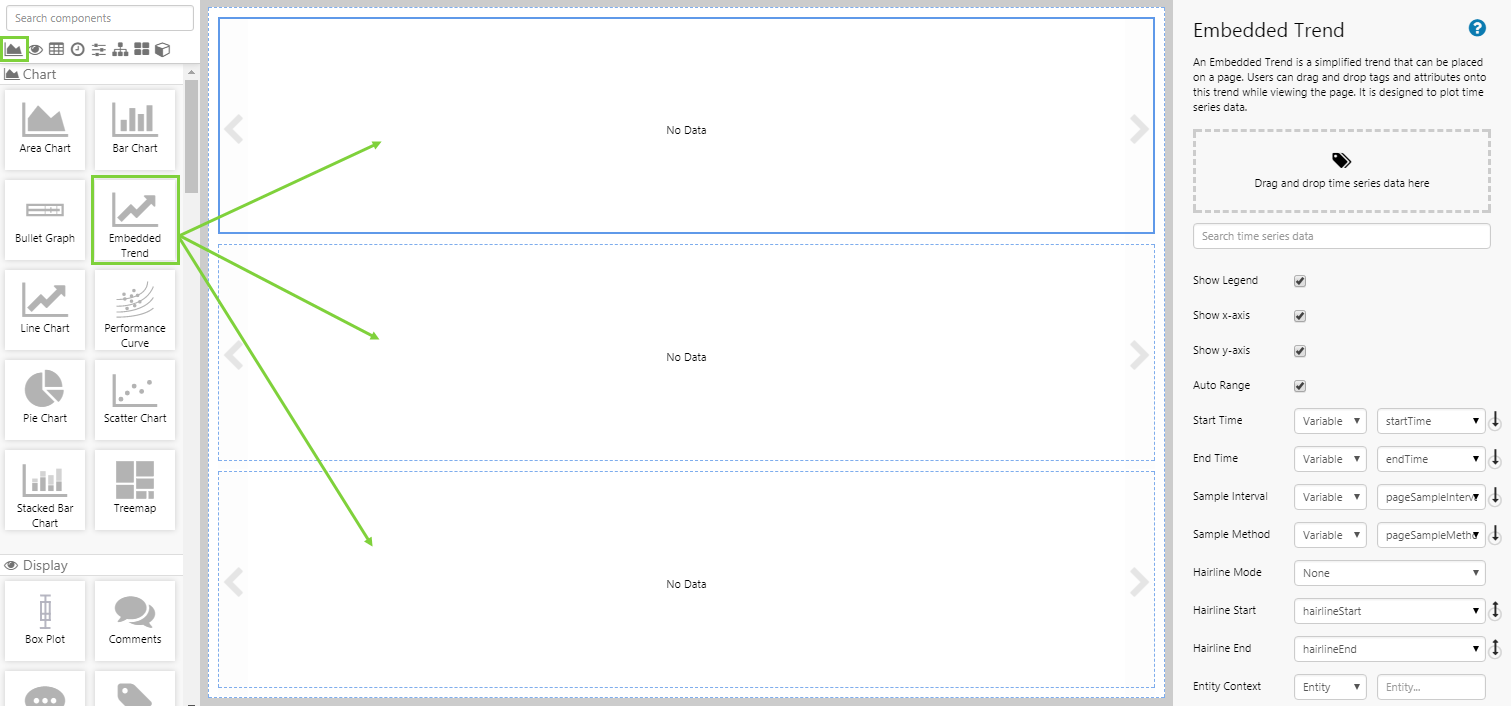
Drag and drop 3 embedded trends onto the page, one in each cell.
Step 6. Configure the Top Trend

The trend in the top cell will be the trend that the user clicks to get a hairline. The hairline will then set the input time, which will be processed by the relative time triggers.
Open the Tags Navigator, drag 2 tags onto the trend, and configure it as follows:
| Autorange | Off | Since autorange is based on the data it receives, we turn it off so that the trend lines match across all trends. |
| Start Time | (Variable) startTime | Use the page default startTime variable, which we have configured to the 2 days before the current date/time, |
| End Time | (Variable) endTime | Use the page default endTime variable, which we have configured to be the current date/time. |
| Hairline Mode | Single | We want the user to be able to set a single hairline, in order to set the input time variable for the trigger. |
| Hairline Start | hairlineStart | This is the variable we will be using to set the start or end time in our other trends. |
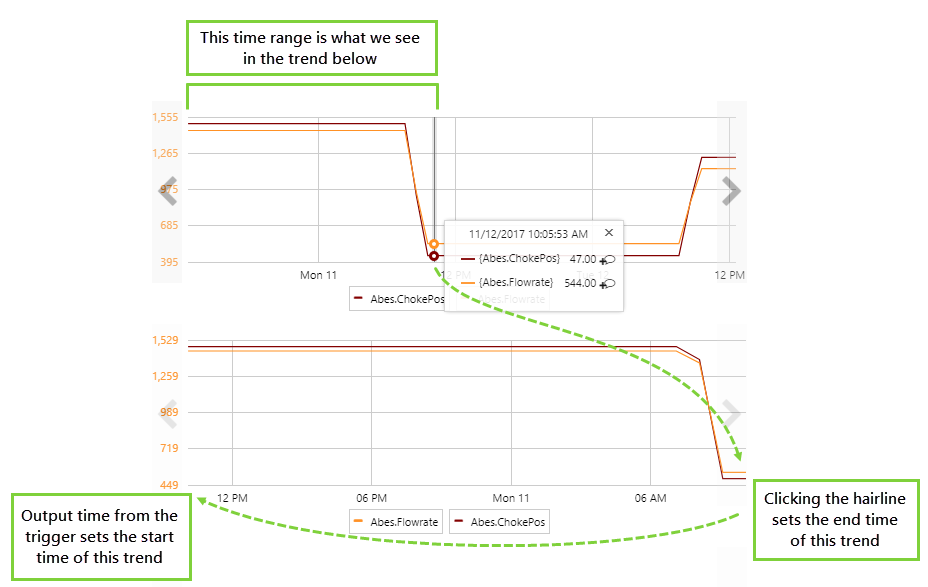
Step 7. Configure the Middle Trend

Click on the trend in the middle cell, drag the same 2 tags onto it, and configure it as follows:
| Autorange | Off | Since autorange is based on the data it receives, we turn it off so that the trend lines match across all trends. |
| Start Time | (Variable) startZoom | This is the output time from the trigger, which we will use as the start time of this trend. |
| End Time | (Variable) hairlineStart | When the user clicks the top trend, use the hairline to set the end time of this trend. |
| Hairline Mode | None | We don't need a hairline for this trend. |
To try out the functionality:
- Click the Preview
 button on the Studio toolbar to see what your page will look like in display mode.
 - Click the top trend to get a hairline.
- Notice that the middle trend updates, with the hairline time as the end time and the trigger setting the start time, so that the trend shows data from the day before.
Step 8. Configure the Bottom Trend
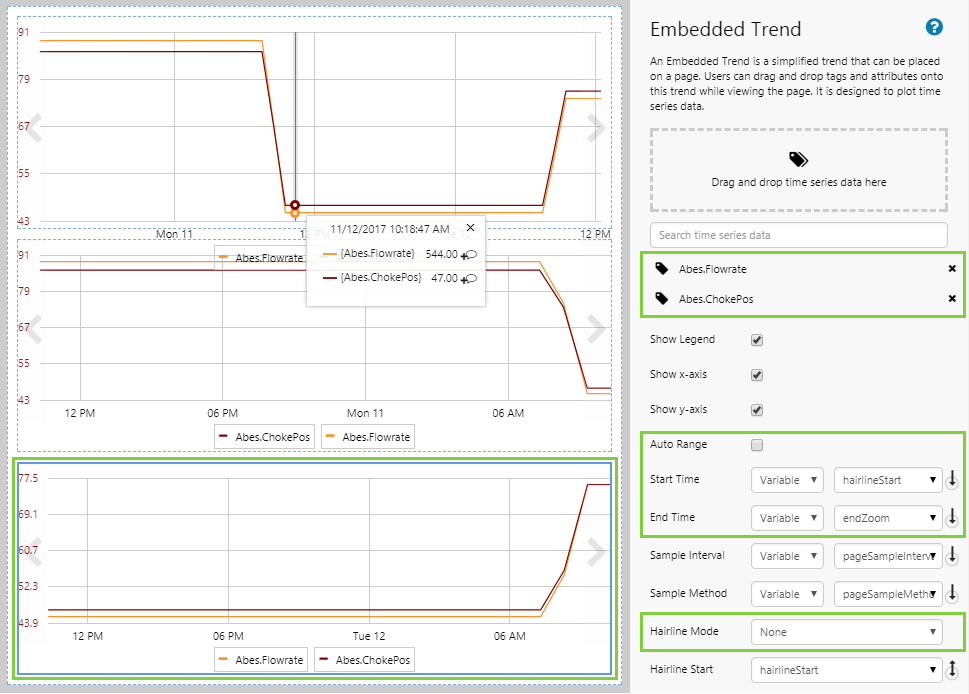
Click the Preview ![]() button again to return to design mode. Click on the trend in the bottom cell, drag the same 2 tags onto it, and configure it as follows:
button again to return to design mode. Click on the trend in the bottom cell, drag the same 2 tags onto it, and configure it as follows:
| Autorange | Off | Since autorange is based on the data it receives, we turn it off so that the trend lines match across all trends. |
| Start Time | (Variable) hairlineStart | This time we will use the hairline from the first trend to set the start time of this trend. |
| End Time | (Variable) endZoom | This is the output time from the trigger, which we will use as the end time of this trend. |
| Hairline Mode | None | We don't need a hairline for this trend. |
Step 9. All done!
Congratulations! You now have 3 embedded trends that use a relative time trigger to update when a user adds a hairline.
- Click the Preview button on the Studio toolbar to try out the functionality.
- Click the top trend to get a hairline.
- Notice that the middle trend updates, with the hairline time as the end time and the trigger setting the start time, so that the trend shows data from the day before.
![]() Remember to save your page!
Remember to save your page!