A Sub-Module is a self-contained unit of logic that performs a specific task. It can be used to:
- Create common, repeatable calculations that can be shared between processes.
- Simplify the appearance of a process in the Logic Editor.
To add a sub-module:
1. Open or create a new user process.
2. In the Logic Editor, right-click and select Sub-Module from the shortcut menu.
The sub-module component is added.

3. Double-click the sub-module component to open it.
When you open a sub-module, the validation toolbar displays a breadcrumb trail with the name of the Sub-Module, and the Back button is activated.
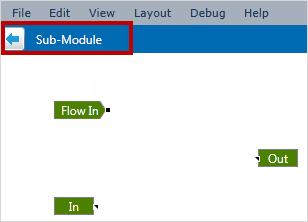
The Logic Editor also changes to display three components that are required by sub-modules:
Flow In: The data flow entry point into this sub-module. This is optional and depends on the external logic. For example, if you want the main process to start at the sub-module, you would attach the Start component to the sub-module's Flow In component.
In: The input value that is to be compared against the Flow In data stream.
Out: The value that the sub-module will output.
4. Add and link components to create the sub-module, as you would do for any other process.
The only requirement is that a sub-module must have inputs and outputs.

You can add further inputs and outputs, and also include other sub-modules, by right-clicking on the background and selecting from the shortcut menu.

In: Add another input value.
Out: Add another output value.
Sub-Module: Create a new sub-module within this sub-module.
Load: Import an existing sub-module (saved as a .sensm file on a computer to which you have access) into this sub-module.
5. Ensure all your In and Out components have a name assigned to them in the Properties panel.
These names will appear as the input and output pins in the sub-module component on the main screen.

6. When you have finished adding and linking components, return to the main process by clicking the Back ![]() button on the validation toolbar.
button on the validation toolbar.
7. To save the sub-module component to your computer, click it once to highlight it, and then right-click and select Sub-Module > Save.

You should save the file to a location on your computer, or a computer to which you have network access. The file type must be .sensm.