ON THIS PAGE:
All Flow Events present in a user process should be tested with a series of test cases to make sure you get the results you expect. You should test:
- Each flow event individually.
- All flow events at once.
There are two ways to supply test data:
- Manually specify single data points.
- Import data from a .csv file.
Single data point
Each of the Inputs are available in the panel for you to supply test values. In the following example, the process requires test values for Oxygen, Temperature, and Chlorine levels:

The purpose of the single data point test is to check the logic for a particular branch of the process. For example, that you have used the correct Boolean operator to achieve the desired outcome.
- For each of the inputs, specify a valid value before proceeding to test the process.
.CSV data file
When you select the .CSV data file option, you have the option of using a file that has already been created, or you can create one.
The purpose of using a .csv file is to check the logic of the entire process and to check for "dead areas" where the logic does not work. The test run cycles though each row of data, highlighting each component that is encountered. When you finish a test run, all components should be highlighted. If a component is missed, it means that there may be a flaw in the logic, or that the testing hasn't covered the appropriate scenario.
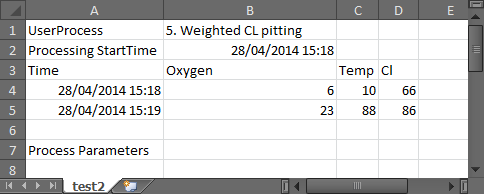
A valid .csv file looks something like this:
To create a data file:
1. Click Create.
2. In the Create .CSV test data file dialog box, specify the following:
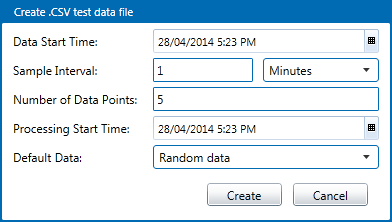
Data Start Time: The default time is set to the current time. You should change this if you have specific data windowing requirements.
Sample Interval: Specify the sample interval in days, hours, minutes, or seconds. You should change this if you have specific data windowing requirements.
Number of Data Points: This corresponds to the number of lines in the file containing data for the input variables to be tested. Typically you would want to test for various scenarios that should trigger different states. The maximum number of data points allowed is 1000. If you add more than 1000 data points, only the first 1000 will be loaded and the rest will be ignored.
Processing Start Time: By default, this is set to the current time. You should change this if you have specific data windowing requirements.
Default Data: Select Blank data to create a blank data file for you to modify before loading, or select Random data to generate random data for your input variables.
3. Click Create.
4. Type a name for your file and save it.
5. If you have created a blank data file, you should edit it now.
Now that you have created a data file with appropriate data, you need to load it in order to run the test.
6. Click Load.
7. Find your file and click Open.
The test data file is loaded to memory, where it will remain for this process until you end the session. The panel displays information about the file, however you cannot edit this information.
You may now test the process, firstly the individual flow events and then all flow events at once.