ON THIS PAGE:
Sometimes, you will need to move a page or trend in P2 Explorer, if it has been saved to the wrong place. Or you may want to save a copy of a page or trend. You may also need to delete a page, trend, or workspace. This article describes how to:
- Copy, move, rename and delete a page
- Copy, move, rename and delete a trend
- Delete and rename a workspace
You can also save a copy of a page while in Display mode: see Save a Copy of a Page from Display mode.
Note: New workspaces can only be created when you save a page, trend, or workbook.
Privileges
Privileges on a workspace apply to the workspace, and the displays (pages and trends) within that workspace.
| Privilege | What it means |
| View | See the workspace and its displays. |
| Edit |
|
| Delete |
|
Pages
Learn how to copy a page from Studio, and how to move, delete, or rename a page.
Move a Page or Copy a Page
Moving a page involves copying the page and then deleting the original.
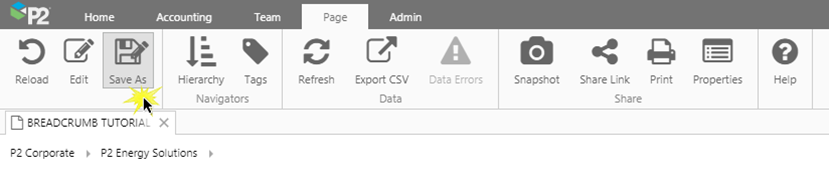
- Open the page in Studio (first open the page, and then click Edit
 on the Page tab of the ribbon).
 - Click 'Save As'
 on the Studio toolbar.
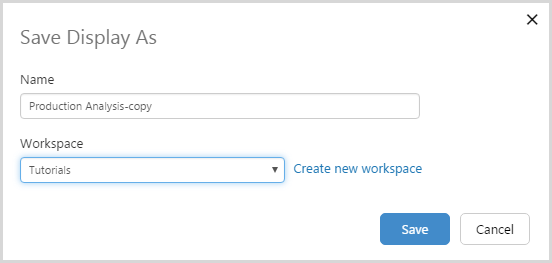
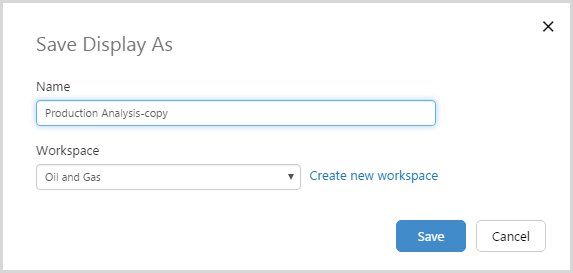
 - Save the page to a workspace. Note that -copy is automatically appended to the page name, so you may want to change this.
- If you want to move the page to a different workspace, select a different workspace or create a new workspace.
- If you want to copy the page to the same workspace, the name must be different to the current page (page names must be unique within a workspace).
This copies the page, and you will need to delete the old page if you want to remove it from the old workspace.
Rename a Page
Renaming a page can only be done by someone with permissions to access Explorer Studio. To rename a page:
- Open the page in Studio (first open the page, and then click Edit on the Page tab of the ribbon).
- Click 'Save As' on the Studio toolbar.
- Save the page with a new name, in the same workspace.
- Note that -copy is automatically appended to the page name, so you may want to change this.
- Page names must be unique within a workspace.
This copies the page, and you will need to delete the original page if you want to remove it from the workspace.
Delete a Page
Deleting a page can only be done by someone with delete privileges for that page's workspace. To delete a page:
1. Click Workspaces on the Home tab of the ribbon, and click the Workspace that contains the page you want to delete.
2. In the Workspaces window, click the Select button.
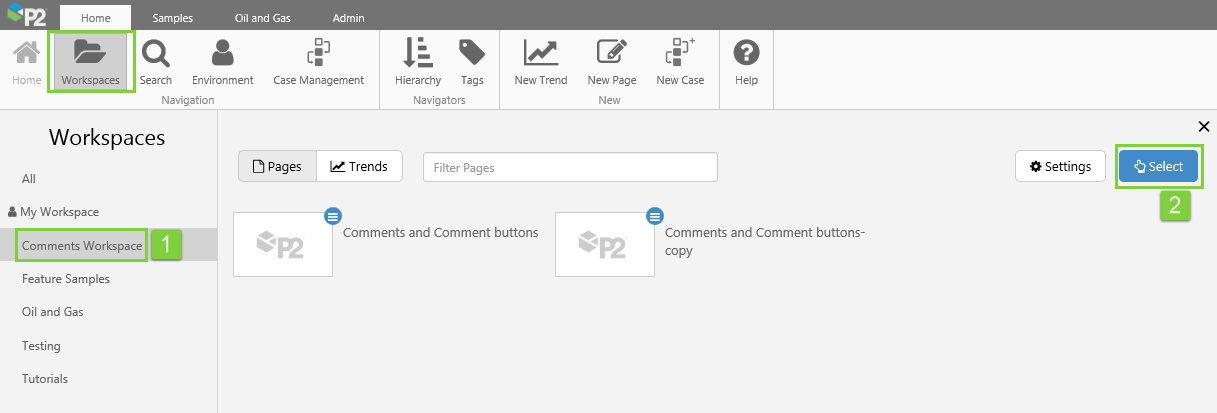
3. Click the page you want to delete.
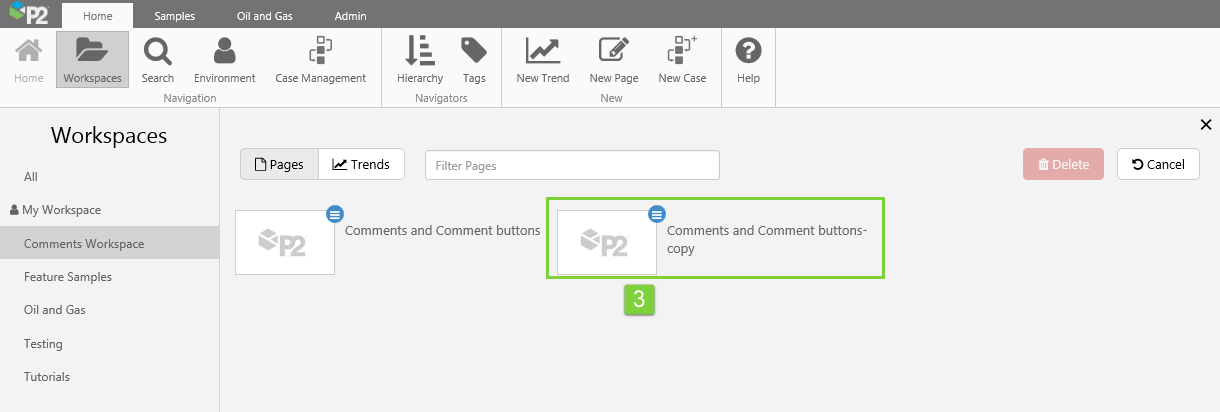
In this example, we have selected two pages to delete.
4. Click the Delete button. If you decide you don't want to delete after all, click Cancel.

5. At the prompt, click Yes, delete them, or Yes, delete it (if you have only selected one page).

The selected pages are deleted from the workspace.
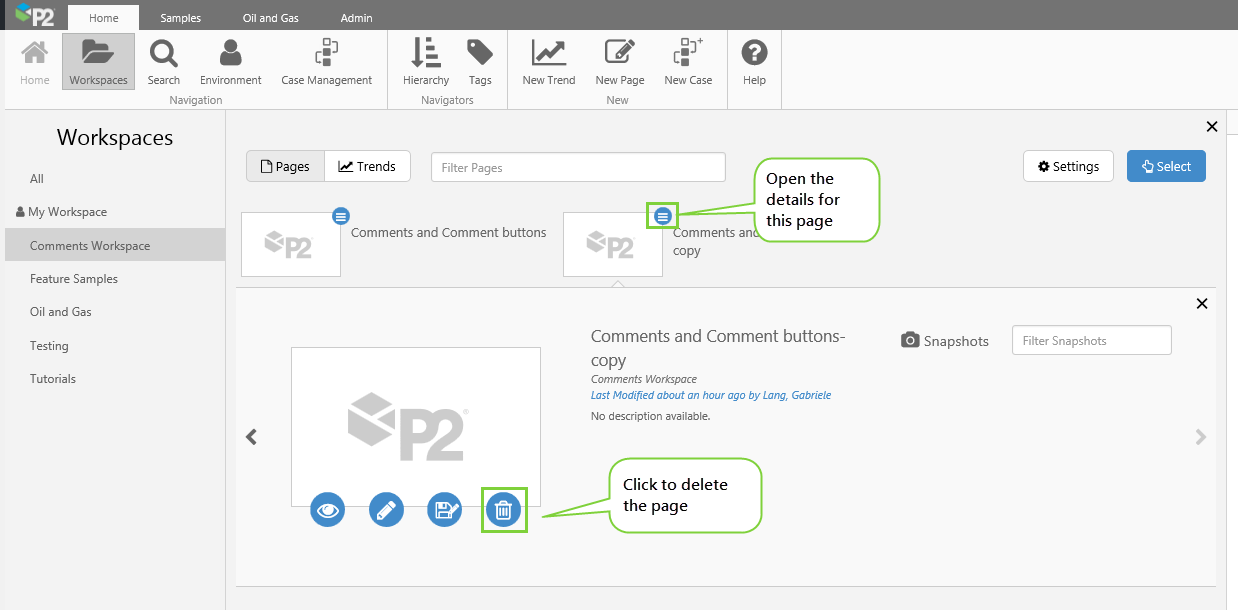
Alternatively, you can click on the Details ![]() button for a single page in the workspace, to open its Details box, then click the Delete
button for a single page in the workspace, to open its Details box, then click the Delete ![]() button, and click Yes, delete it in the confirmation dialog.
button, and click Yes, delete it in the confirmation dialog.
Note: You can delete any of the pages in your private workspace in My Environment. Hover over a page title in the My Pages list, and click the Delete ![]() button, then click Yes, delete it in the confirmation dialog.
button, then click Yes, delete it in the confirmation dialog.

Pages in Display Mode
As well as being able to save a page from Studio mode, you can also save a page from Display mode.
Save a Copy of a Page
You can click Save As either from a workspace detail for a page, or from the page itself, in Display mode.
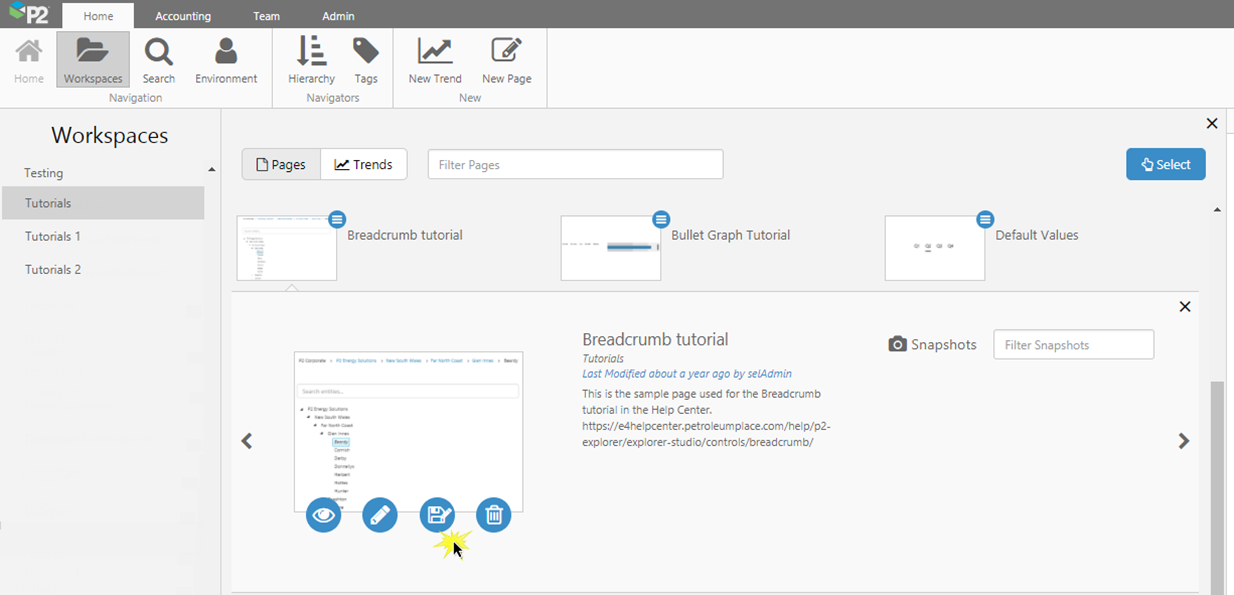
Clicking Save As in the Workspace Detail panel, for a page
Clicking Save As from the Page ribbon, for a page in Display mode
The Save Display As window appears, so that you can select a name and workspace to save the page to.

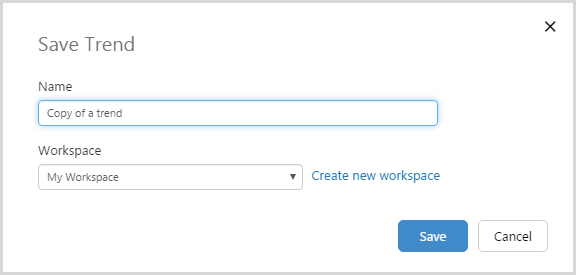
Save the page to a workspace. Note that -copy is automatically appended to the trend name, so you may want to change this.
- If you want to save the page to a different workspace, select a different workspace or create a new workspace.
- If you want to save the page to the same workspace, the name must be different to the original page name (page names must be unique within a workspace).
Trends
Learn how to copy, move, delete, or rename a trend.
Move a Trend or Copy a Trend
Moving a trend involves copying the trend and then deleting the original.
1. Open the trend.
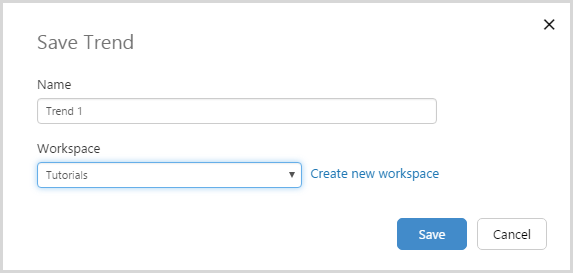
2. In the Trend tab of the ribbon, click the Save As button.

3. Save the trend to the new workspace. Note that -copy is automatically appended to the trend name, so you may want to change this.
- If you want to move the trend to a different workspace, select a different workspace or create a new workspace.
- If you want to copy the trend to the same workspace, the name must be different to the current trend (names must be unique within a workspace).
This copies the trend, and you will need to delete the old trend if you want to remove it from the old workspace.
Rename a Trend
1. Open the trend.
2. In the Trend tab of the ribbon, click the Save As button.
3. Save the trend in the same workspace. Note that -copy is automatically appended to the trend name, so you may want to change this.
Note: Trend names must be unique within a workspace.
This copies the trend, and you will need to delete the old trend if you want to remove it from the workspace.
Delete a Trend
Deleting a trend can only be done by someone with delete privileges for that trend's workspace. To delete a trend:
1. Click Workspaces on the Home tab of the ribbon, then click the workspace that contains the trend you want to delete.
2. In the Workspaces window, click the Select button.
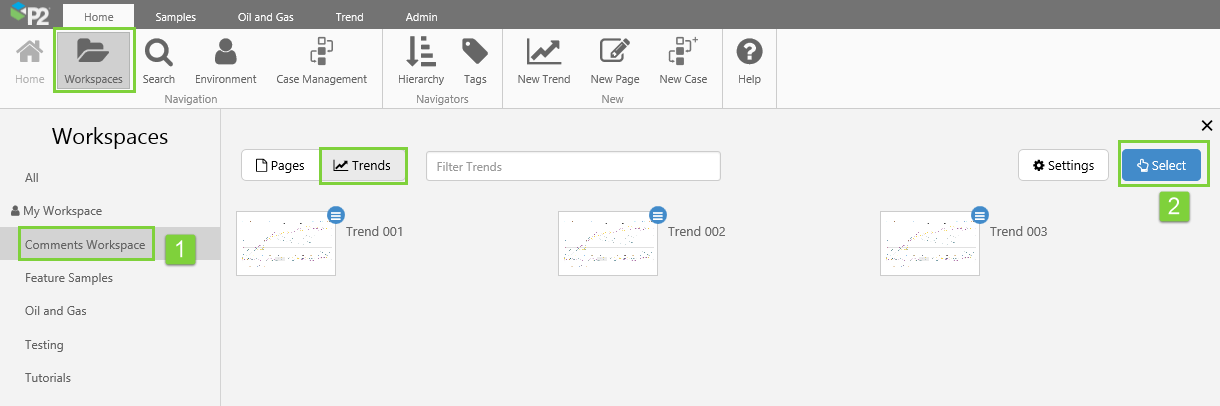
3. Click the trend you want to delete.
In this example, we have selected two trends to delete.

4. Click the Delete button.

5. At the prompt, click Yes, delete it, or Yes, delete them (if you have selected more than one trend).
The selected trends are deleted from the workspace.
Alternatively, you can click on the Details ![]() button for a single trend in the workspace, to open its Details box, then click the Delete
button for a single trend in the workspace, to open its Details box, then click the Delete ![]() button, and click Yes, delete it in the confirmation dialog.
button, and click Yes, delete it in the confirmation dialog.

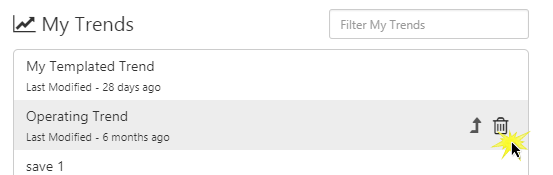
Note: You can delete any of the trends from your private workspace in My Environment. Hover over a trend title in the My Trends list, and click the Delete ![]() button.
button.
Workspaces
Workspaces are used for logically organising pages and trends. You can rename a workspace, or delete it if it is empty.
Delete a Workspace
A workspace can be deleted if there are no pages or trends in it, and if no displays have been submitted for approval. Private workspaces cannot be deleted.
Deleting a workspace can only be done by someone with privileges to delete the workspace. To delete a workspace:
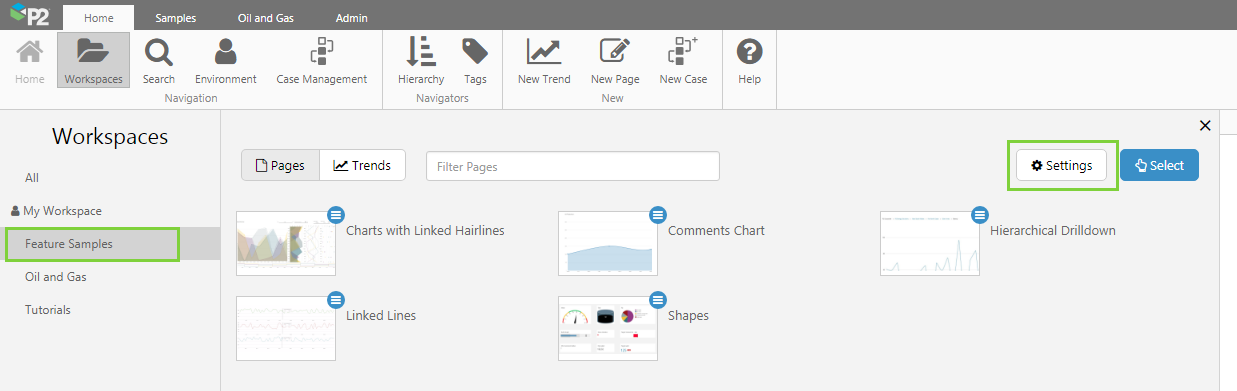
1. Click Workspaces on the Home tab of the ribbon, and click the Workspace that you want to delete.
2. In the Workspaces window, click the Settings button.
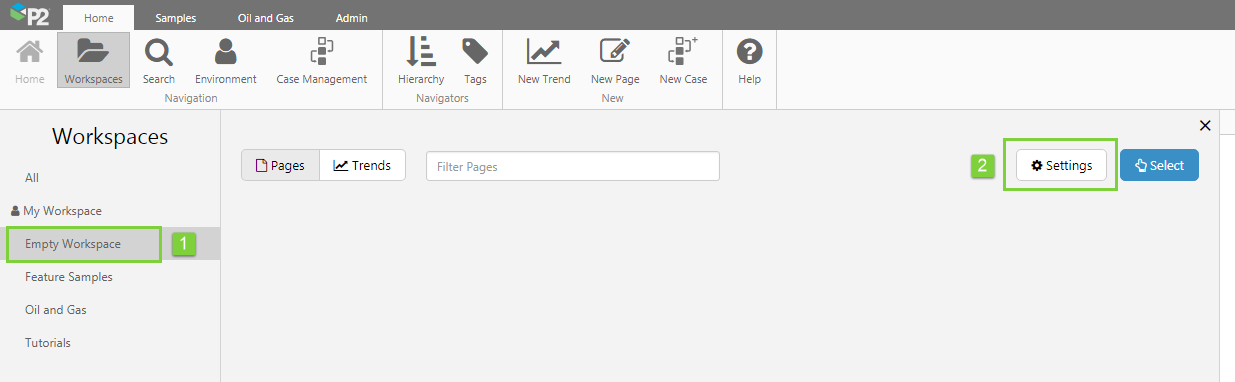
Note: There is no Settings button in the private workspace: My Workspace.
3. Click the Delete button, in the workspace settings view.
![]()
Note: The Delete button is greyed out if there are still pages or trends in this workspace.
4. In the confirmation dialog window, click the Yes, delete it button.

The workspace is deleted.
Rename a Workspace
A workspace name must be unique. Renaming a workspace can only be done by someone with privileges to edit the workspace.
To rename a workspace:
1. Click Workspaces on the Home tab of the ribbon, and click the Workspace that you want to rename.
2. In the Workspaces window, click the Settings button.
Note: There is no Settings button in the private workspace: My Workspace.
3. Click the Rename button, in the workspace settings view.
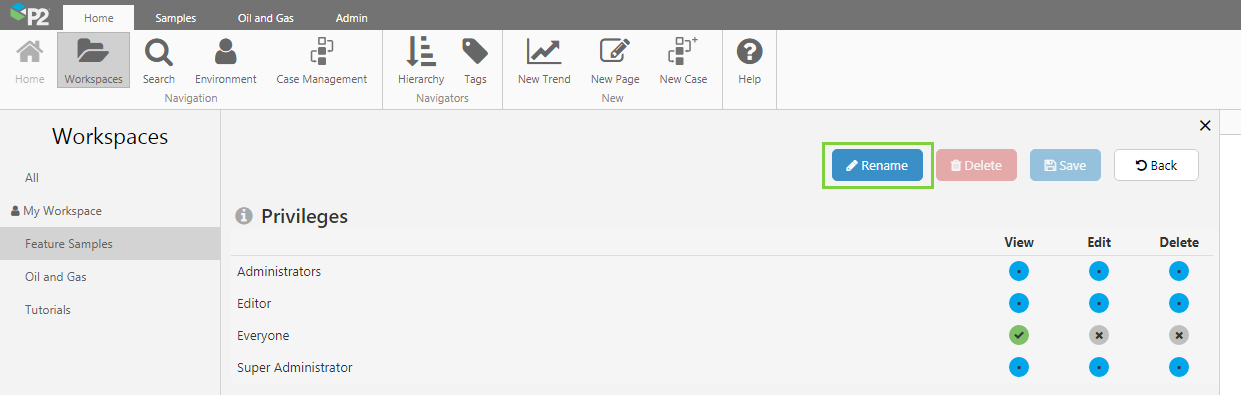
4. In the Rename Workspace dialog box, type the new workspace name, and then click Rename.

The workspace is renamed.
Release History
- Moving, Copying, Renaming & Deleting 4.6.4 (this release)
- You can now rename a workspace.
- Moving, Copying, Renaming & Deleting 4.6.0
- There is a new Settings button next to the Delete button in the workspace.
- Security privileges have changed. Read the new Privileges section at the top of this article for more details.
- Workspaces are no longer automatically removed when empty. You can choose to delete an empty workspace, in the new workspace Settings view.
- Moving, Renaming & Deleting 4.5.4
- You can now save a copy of a page, using Save As.
- There are now two buttons on the Trend ribbon, for saving trends. Save As saves a copy of the trend, while Save overwrites the current saved trend.
- Moving, Renaming & Deleting 4.5.3
- When deleting a display, the selected icon is now red instead of blue.
- Moving, Renaming & Deleting 4.5.2
- Initial release
I was searching for Help on how to create a new workspace, and I found only how to rename, delete workspace . Could you pls provide instruction on How to create new Workspace and whether I can create multi-tier workspace on Explorer 4.7. Thanks
Hi Lan, thanks for your question. Workspaces can be created when you save a page. For details, please see the FAQ: https://e4helpcenter.petroleumplace.com/help/p2-explorer/explorer-resources/faq-using-explorer/#How_do_I_create_a_workspace