ON THIS PAGE:
Overview
The following diagram shows a text label added to a grid layout:
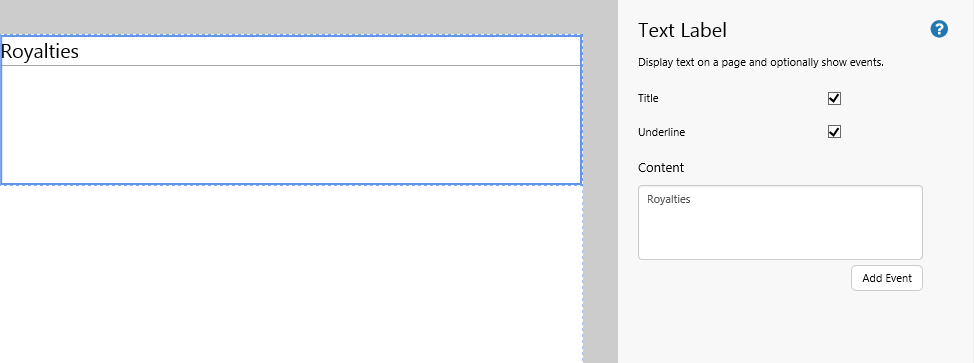
| Title: | Select the check box if this label is going to be a page title. This will style the text to a font size of 20px. |
| Underline: | Display a line beneath the text. The line extends the full length of the container. |
| Content: | The text that you want the label to display. This will style the text to a font size of 11px. |
| Add Event: | You can add an event to allow the text to update automatically depending on the value of another control on the same page. |
Label Formatting
The Text Label component has formatting options that you can apply to the embedded events sections of the label.
The available options relate to the event Type:
- List Formats
- Number Formats
- Entity Formats
- EntityList Formats
- Datetime Formats
Below are some examples of type formatting. There is also an advanced tutorial at the end of this topic, covering formatting.
Datetime Formats
The Datetime type has several formats. Here are some of the formats for the date Wed 19 Aug 2014 04:12:16 GMT.
| Format | Result |
| Full Date | 19 August 2015 12:12 |
| Date | 19 August 2015 |
| Day | 19th |
| Hour | 12 pm |
Number Formats
The Number type has several formats. Here are some of the results you'll get when you format the number 10,932.5821. The number separator depends on the locale of the user’s browser.
| Format | Parameter (for example: Separator, Symbol) | Result |
| Normal | (Separator) selected | 10,932.582 |
| Currency | (Symbol) $ | $10,932.58 |
| Scientific | (Decimals) 2 | 1.09e+4 |
| Decimals | (Decimals) 4 | 10,932.5821 |
List Formats
If you format the the list ['USD', 'CAD', 'NOK'] as commaSeparated, you will get the result USD, CAD, NOK
Tutorial 1: Adding a Label
Labels are so common on web pages that we barely even think about them. But Explorer's text label control allows you to display:
- A simple text label
- A large title or heading
- Different values based upon a defined event
For a standard label, you simply type the label text in the Content box, and you're done. To display a title for a page or a section of a page, select the Title check box and/or Underline.
However, you can also get the label to display different text depending on an event. For example, you could have a combo box that has several different options. Perhaps you want to have a label that displays what has been selected in the combo box.
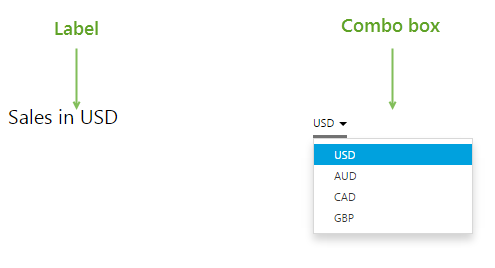
In this tutorial, we'll look at adding a page heading label that changes to display the currency that the user will select from a combo box on the same page. By default, the label will display USD.
Creating an event-controlled label is straightforward, but requires a little preparation. Let's go through this process, step-by-step.
Step by Step: Creating an Event Controlled Label
Before you start, click Workspaces on the Home tab of the Explorer Ribbon, then click the “Create New Page in Studio Mode” thumbnail. You should first add a grid to the canvas in order to be able to insert controls.
Step 1. Create an event
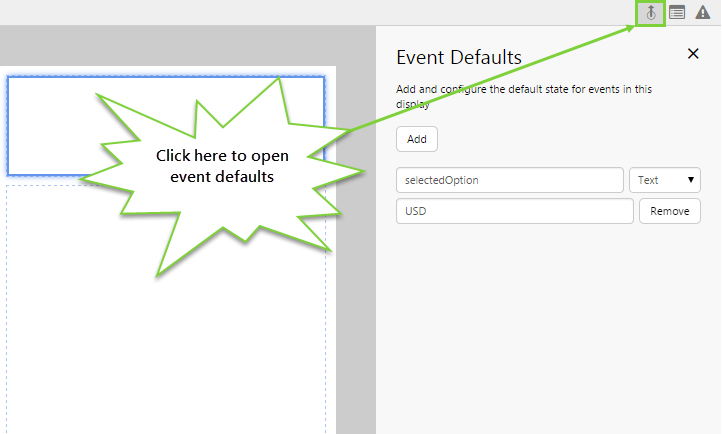
You can create an event at any time, but it's ideal to do this when you first start your page design.
Click the Event Defaults button on the far right side of the Studio toolbar, and configure the event. In this case, we want to configure an event called "selectedOption", with a default text value of USD.
Click the Event Defaults button on the far right side of the Studio toolbar to close the Event Defaults again.
Step 2. Add a combo box to the page and configure it
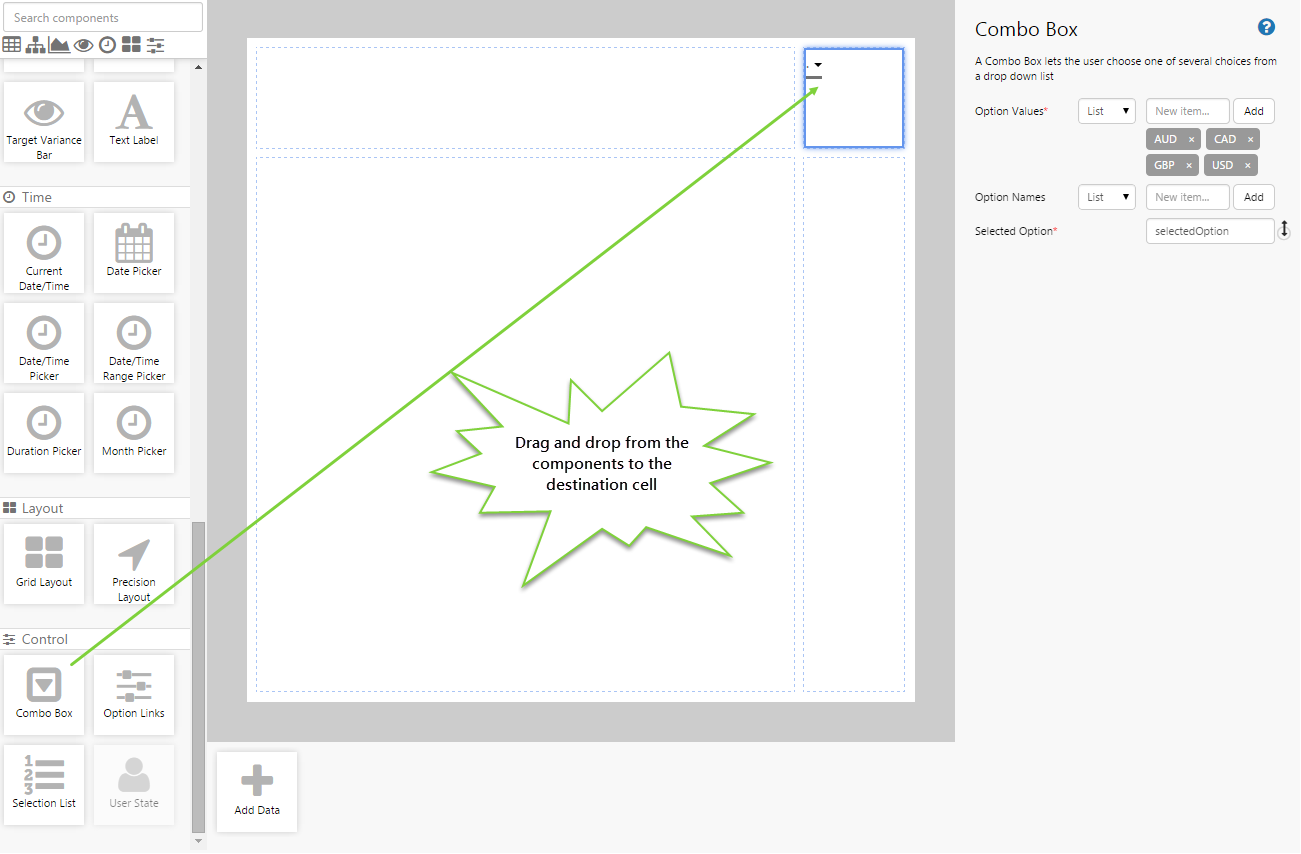
In this tutorial, we want to add a combo box which will contain 4 types of currency: AUD, CAD, GBP, USD.
Add each of the above to the Option Values list.
When the user selects a value from the combo box, we want the text label to display this value.
Step 3. Add the label to the page and configure it
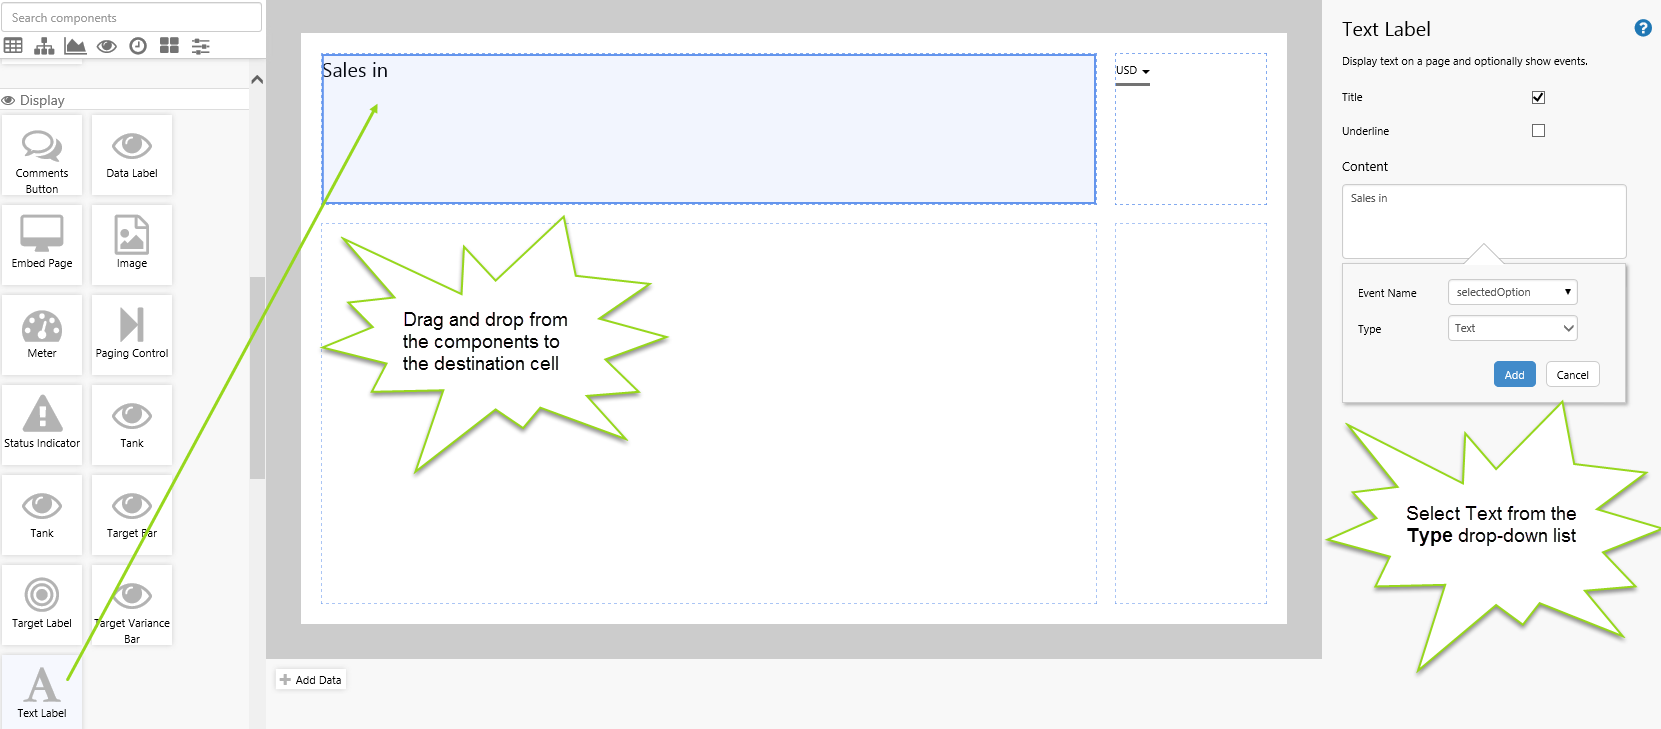
Drag a text label onto a grid cell, and configure as follows:
- Title: Select the check box.
- Content: Type "Sales in ".
- Click Add Event: An event window appears. Select "selectedOption" from the Event Name drop-down list, select Text from the Type drop-down list, and click Add. The word selectedOption is automatically inserted at the end of the text in the content box, followed by a colon and the text option, with the whole lot surrounded by two curly brackets, {{selectedOption:text}}. (If you like, you can just type the value directly into the content box instead of in here).
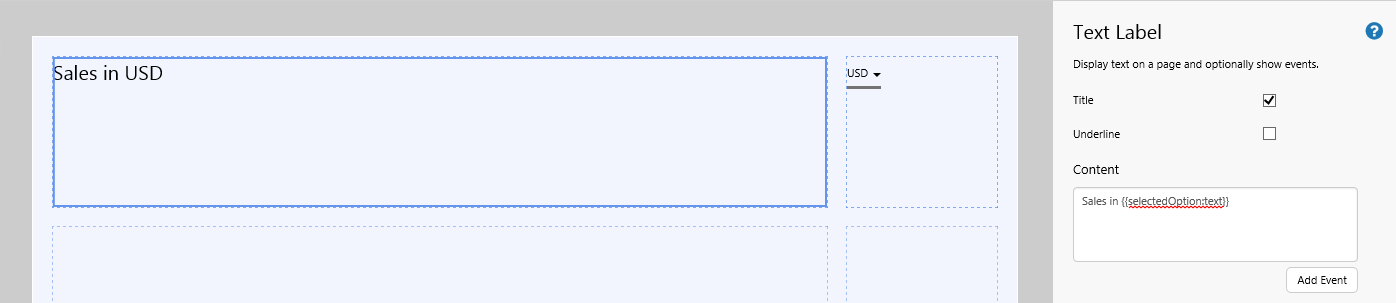
Step 4. All done!
Congratulations! You now have a label that displays the text determined by a combo box. In this case, the text of the page heading changes depending on the currency value selected.
![]() Don't forget to save your page!
Don't forget to save your page!
Tutorial 2: Adding Labels with Formatting
Sometimes you need to format your labels, especially when you are showing currencies or precise numbers requiring decimals or scientific formatting.
In this tutorial, we add several formatted labels, including one which shows the selected entities.
The Page in Studio Mode
This tutorial requires several labels. Let's go through this process, step-by-step.
Step by Step: Creating and Formatting an Event Controlled Label
Before you start, click Workspaces on the Home tab of the Explorer Ribbon, then click the “Create New Page in Studio Mode” thumbnail. You should first add a grid to the canvas in order to be able to insert controls.
If you have access to the training environment, you can follow the steps exactly as outlined here. Otherwise, you will need to adjust the configuration to suit your data.
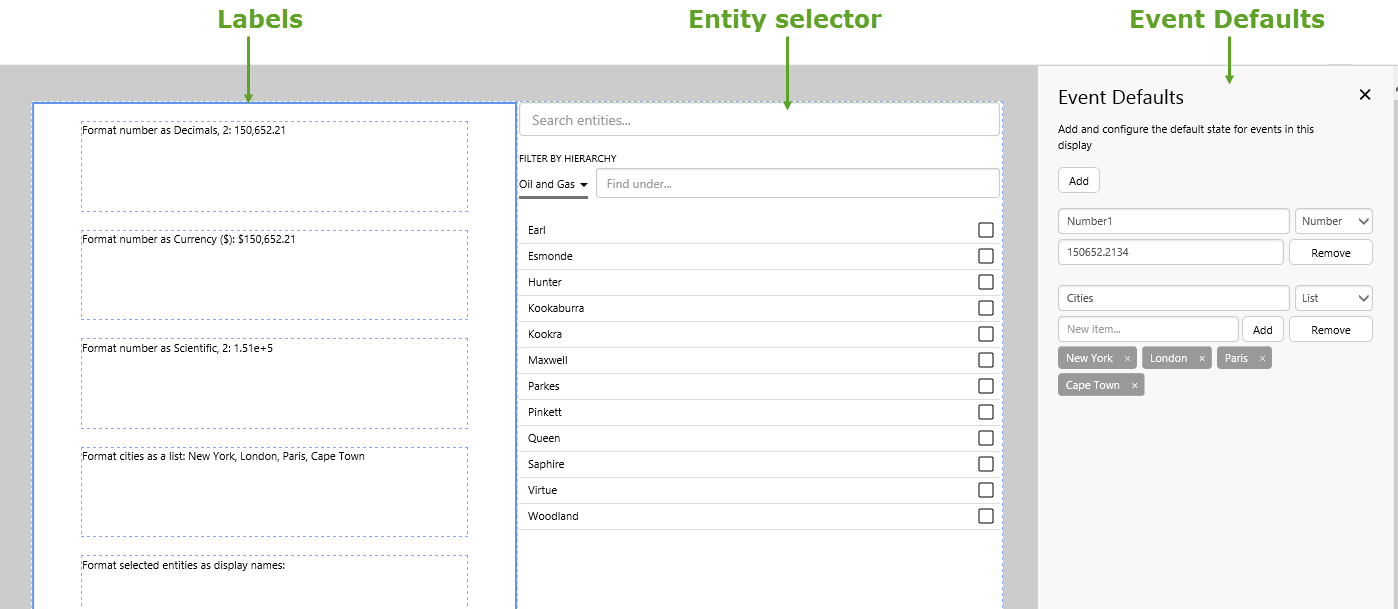
Step 1. Format your Grid Layout
Format your grid so that you have five rows on the left half of the page, and one on the right.
You're going to add labels on the left, and an entity selector on the right.
Step 2. Add Event Defaults
We will use the various formats of the number default in some of the text labels, and will use the list default in another.
Add a number default:
- Number1
- 150652.2134
Add a list default:
- Cities
- New York; London; Paris; Cape Town
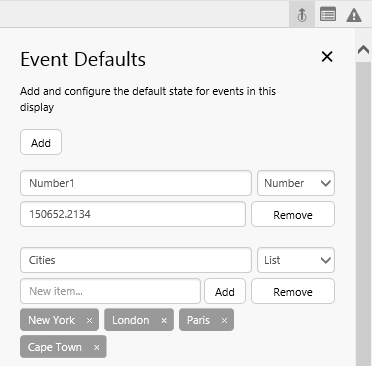
These defaults are used in the text labels to demonstrate formatting
Step 3. Add an Entity Selector
We will include the selected enties (selectedEntities) as formatted display names in one of the text labels.
Drag an Entity Selector onto the right side of your page.
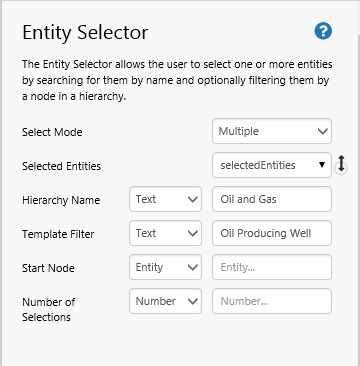
If you have access to the training environment, configure it to use the Oil and Gas hierarchy. Otherwise, configure it to suit another hierarchy.
- Select Mode: Multiple
- Selected Entity: leave as is (selectedEntities)
- Hierarchy Name: (Text) Oil and Gas
- Template Filter: (Text) Oil Producing Well
- Start Node: (leave blank)
- Number of Selections: (leave blank)
Step 4. Add Labels with Formatting
1. Drag a text label onto each grid cell on the left of your page.
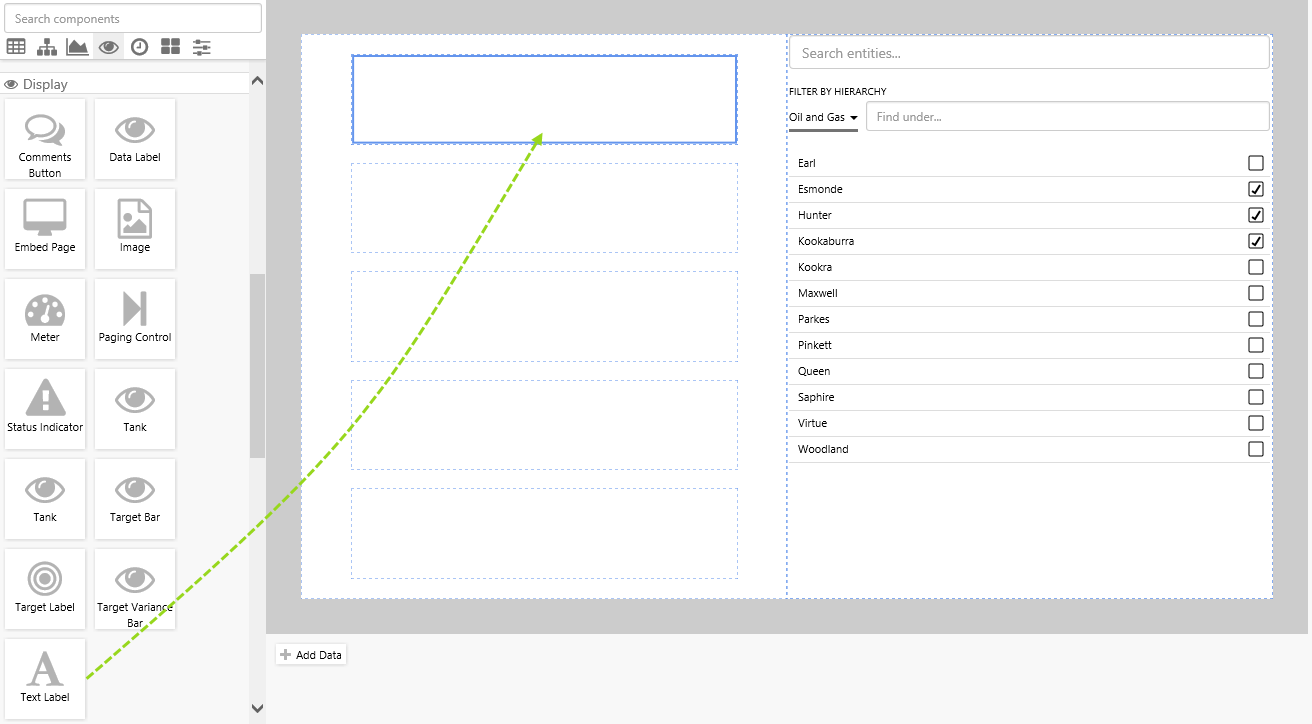
Add a Label to each Grid Cell on the Left
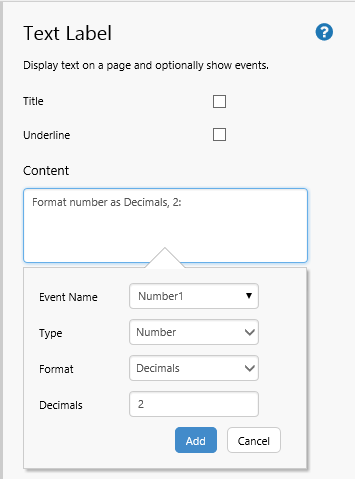
2. Configure the first text label as follows:
- Title: (leave unselected)
- Underline: (leave unselected)
- Content: Format number as Decimals, 2:
- Click Add Event: An event window appears. Select the following:
- Event Name: Number1
- Type: Number
- Format: Decimals
- Decimals: 2
- Click Add
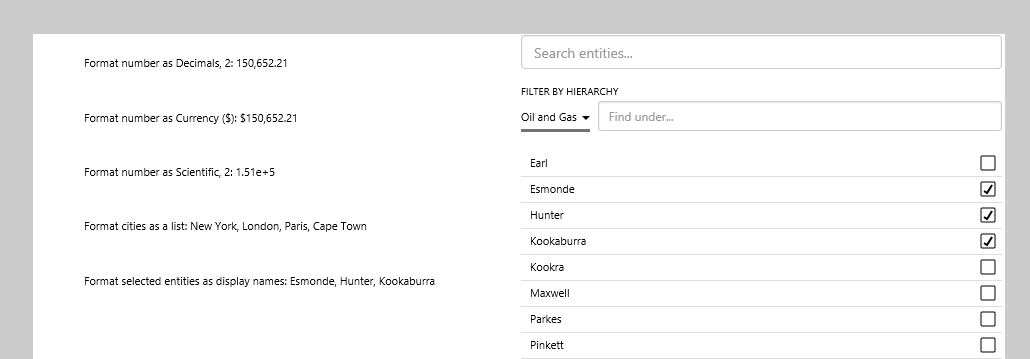
Configuring a Text Label with Decimal Formatting
3. Configure the remaining text labels in the same way.
Second Label: Currency Formatting
- Title: (leave unselected)
- Underline: (leave unselected)
- Content: Format number as Currency ($):
- Click Add Event: An event window appears. Select the following:
- Event Name: Number1
- Type: Number
- Format: Currency
- Symbol: $
- Click Add
Third Label: Scientific Formatting
- Title: (leave unselected)
- Underline: (leave unselected)
- Content: Format number as Scientific, 2:
- Click Add Event: An event window appears. Select the following:
- Event Name: Number1
- Type: Number
- Format: Scientific
- Decimals: 2
- Click Add
Fourth Label: List Formatting
- Title: (leave unselected)
- Underline: (leave unselected)
- Content: Format cities as a list:
- Click Add Event: An event window appears. Select the following:
- Event Name: Cities
- Type: List
- Format: Comma Separated
- Click Add
Fifth Label: Display Names Formatting
- Title: (leave unselected)
- Underline: (leave unselected)
- Content: Format selected entites as display names:
- Click Add Event: An event window appears. Select the following:
- Event Name: selectedEntities
- Type: EntityList
- Format: Display Names
- Click Add
Step 5. All done!
Congratulations! You now have formatted labels for your event defaults, as well as a formatted label that displays the entites determined by an entity selector. The text in the label changes depending on the selected entites.
![]() Don't forget to save your page!
Don't forget to save your page!