ON THIS PAGE:
The Trend Controls enable you to alter the time range of the chart, as well as the data collection method and interval.

The Trend Controls
The period of time the trend covers, the type of data plotted, and the time between data points can be varied by changing the Trend Controls.

| 1. | Start Time |
This is the start date and time of the trend. The Start Time can be used together with either the Duration, End Time, or Now options to set the time period of the trend. Click on the control to manually set the Start Time using the date and time picker. |
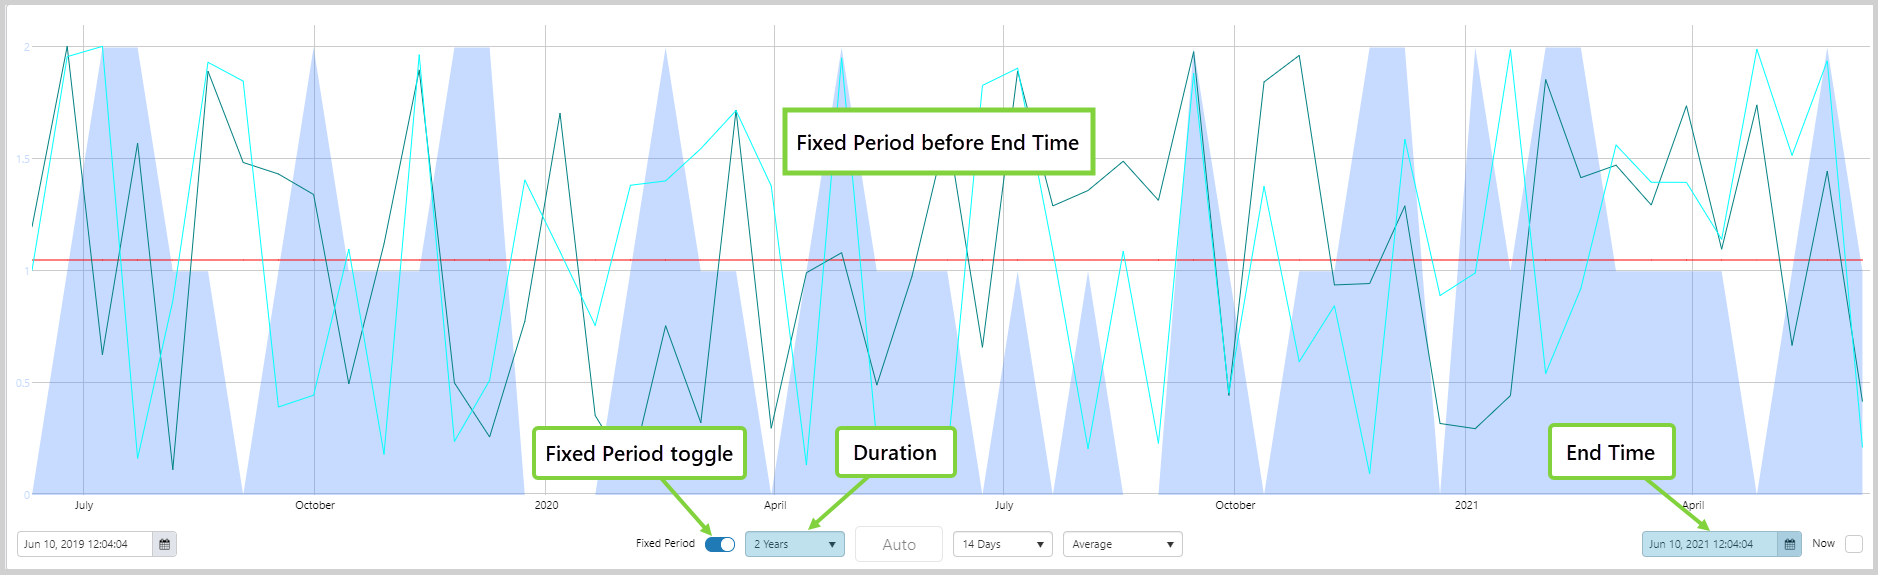
| 2. | Fixed Period | Toggle on to select a fixed duration for the trend. |
| 3. | Duration |
The Duration is a fixed period of time. For example, 5 minutes, 8 hours, or 2 years. Click on the drop-down arrow to select a time period for the trend. Note: |
| 4. | Fetch Type |
This button may appear as Auto or Fetch, depending on the duration of the trend, and the time frame limits set on the data fetch in the Configuration File. Auto - Data is automatically fetched. Fetch - Click on the button to manually fetch the data. |
| 5. | Sample Interval |
This is the elapsed time between data points. Click on the drop-down arrow to select a Sample Interval for the trend. See Notes on the Trend Controls below, for information on how the Duration, Sample Method and Sample Interval work together. |
| 6. | Sample Method |
This is the sampling method P2 Explorer uses to collect the trend data. Click on the drop-down arrow to select between Average, Raw, Last Known Value, Linear Interpolate, or Adaptive Raw. See Notes on the Trend Controls below, for information on how the Duration, Sample Method and Sample Interval work together. |
| 7. | End Time |
This is the end date and time of the trend. The End Time can be used together with either the Duration, or Start Time options to set the time period of the trend. Click on the control to manually set the End Time using the date and time picker. |
| 8. | Now |
Click on Now to select the current time as the End Time. When Now is selected the trend will automatically refresh at the Sample Interval rate. |
The Sample Method and Sample Interval can be changed in the Trend Controls. The Duration of the trend can be changed in the Trend Controls, the Range Selector and the Zoom function.
Notes on the Trend Controls
For performance reasons, the options available in the controls are interdependent.
Different Sample Intervals are available for different trend Durations to manage the size of the data fetch at any one time. In addition, for the Raw and Adaptive Raw Sampling Methods, the Sample Interval is set to Auto.
Preset configuration options, which have been added to limit the size of an automatic data fetch, can be changed by a site administrator in Explorer’s configuration file. These options include:
- The maximum duration of a Raw data fetch.
- The minimum trend refresh rate used when Now is set.
- The maximum duration of an automatic data fetch, after this time a manual fetch is required.
- The maximum duration of a data fetch.
Changing the Time Period of the Trend
The Trend Controls, the Range Selector and the Zoom functions can all be used to set the time period of the trend.
Using the Trend Controls
The trend time period can be set:
- With fixed start and end times.
- As a fixed time period that starts or ends at a particular time, or
- As a fixed time period that is constantly being updated with the latest data.
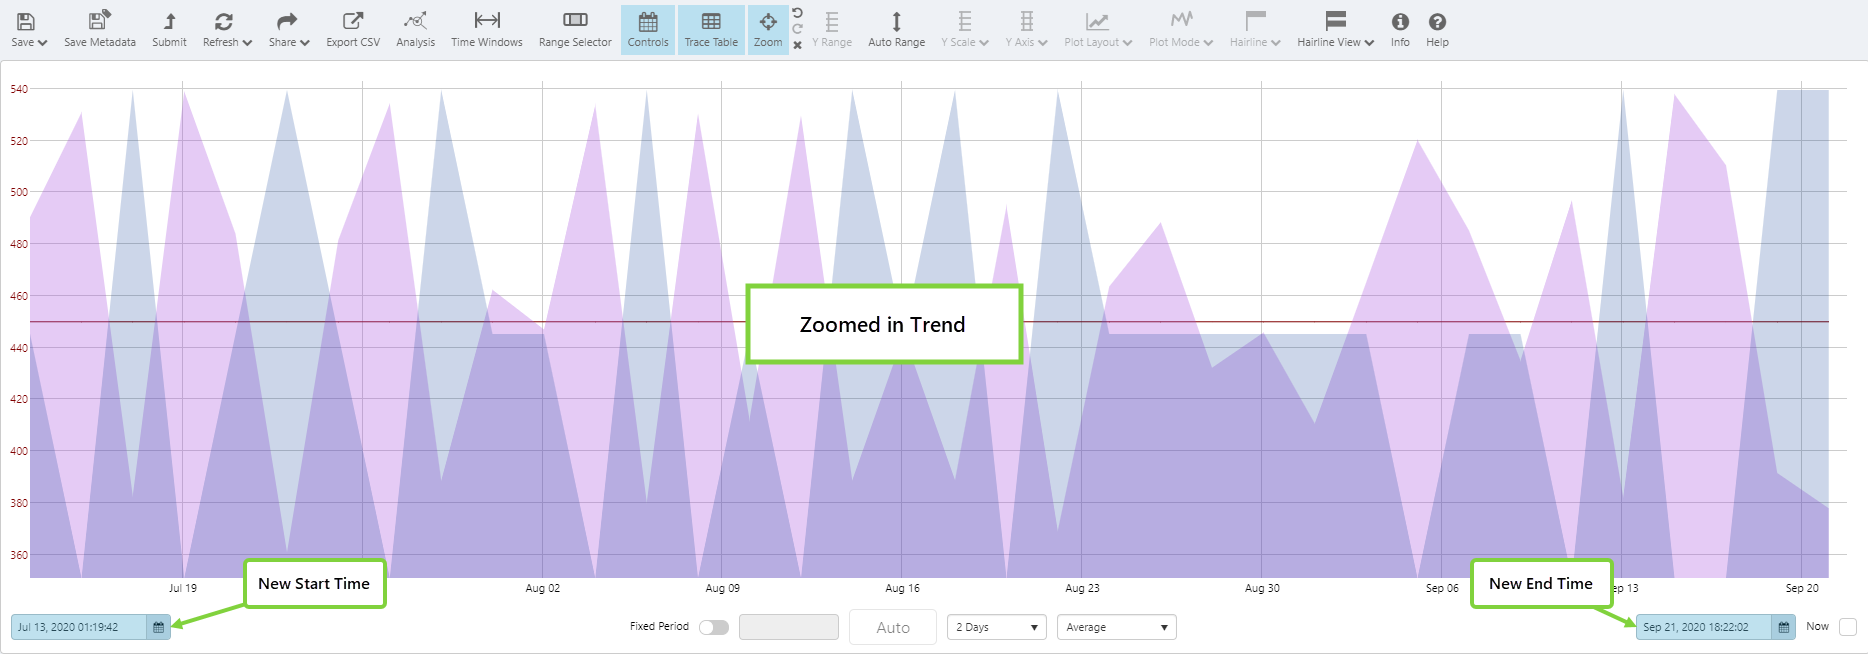
Fixed Start and End Time
By setting the Start Time and End Time, the trend will cover a fixed time range.
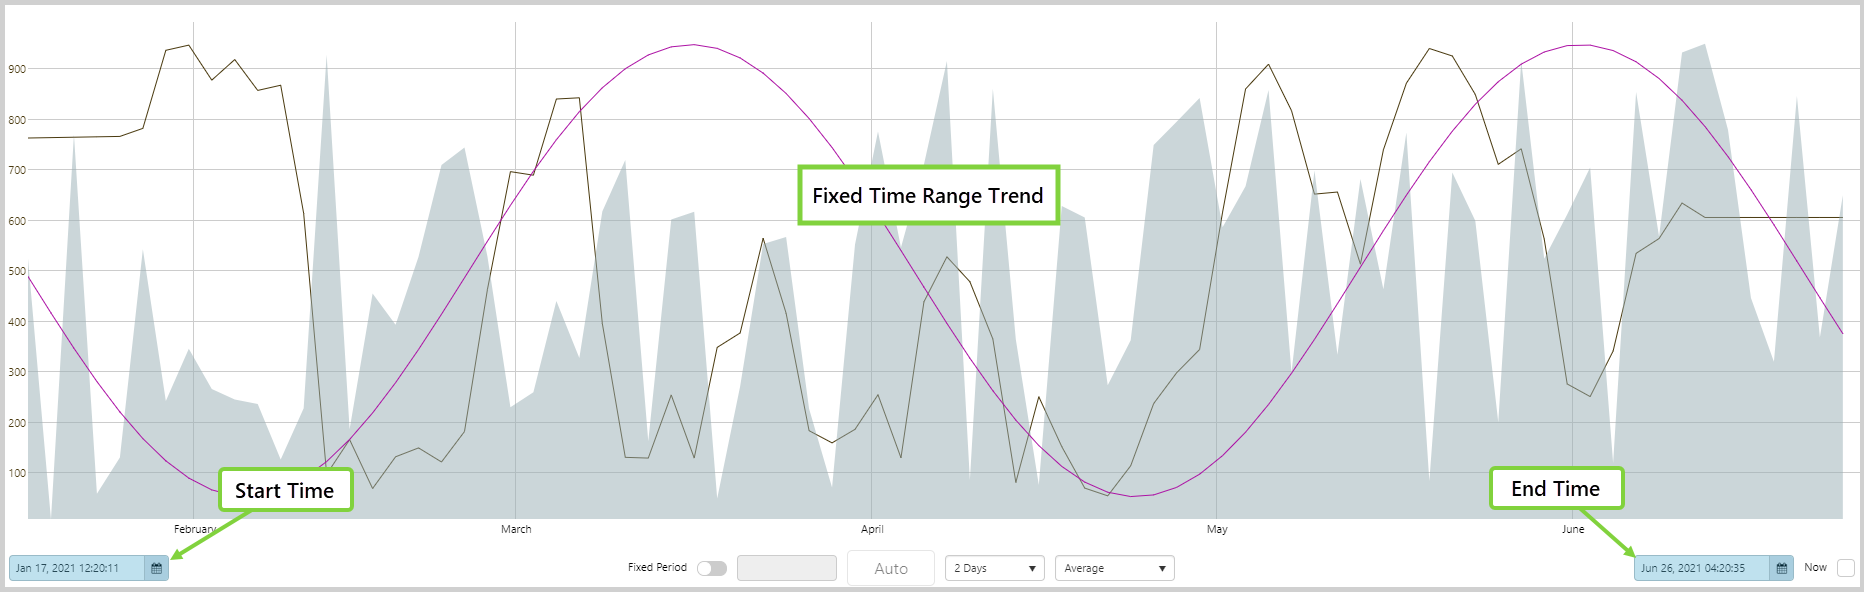
Fixed Period of Time and Selected Start or End Time
With Fixed Period toggled on and a Duration selected, the trend time range can be set as a fixed period of time beginning at the Start Time, or a fixed period of time finishing at the End Time.
With a fixed Start Time selected:

With a fixed End Time selected:
Fixed Period of Time preceding Now
When Now is selected, the End Time is constantly updated to the current date and time, and a new data point is plotted on the trend at the rate of the Sample Interval.

Using the Range Selector
The Range Selector, located below the Trace Window, works interchangeably with the Trend Controls to set the trend time range.
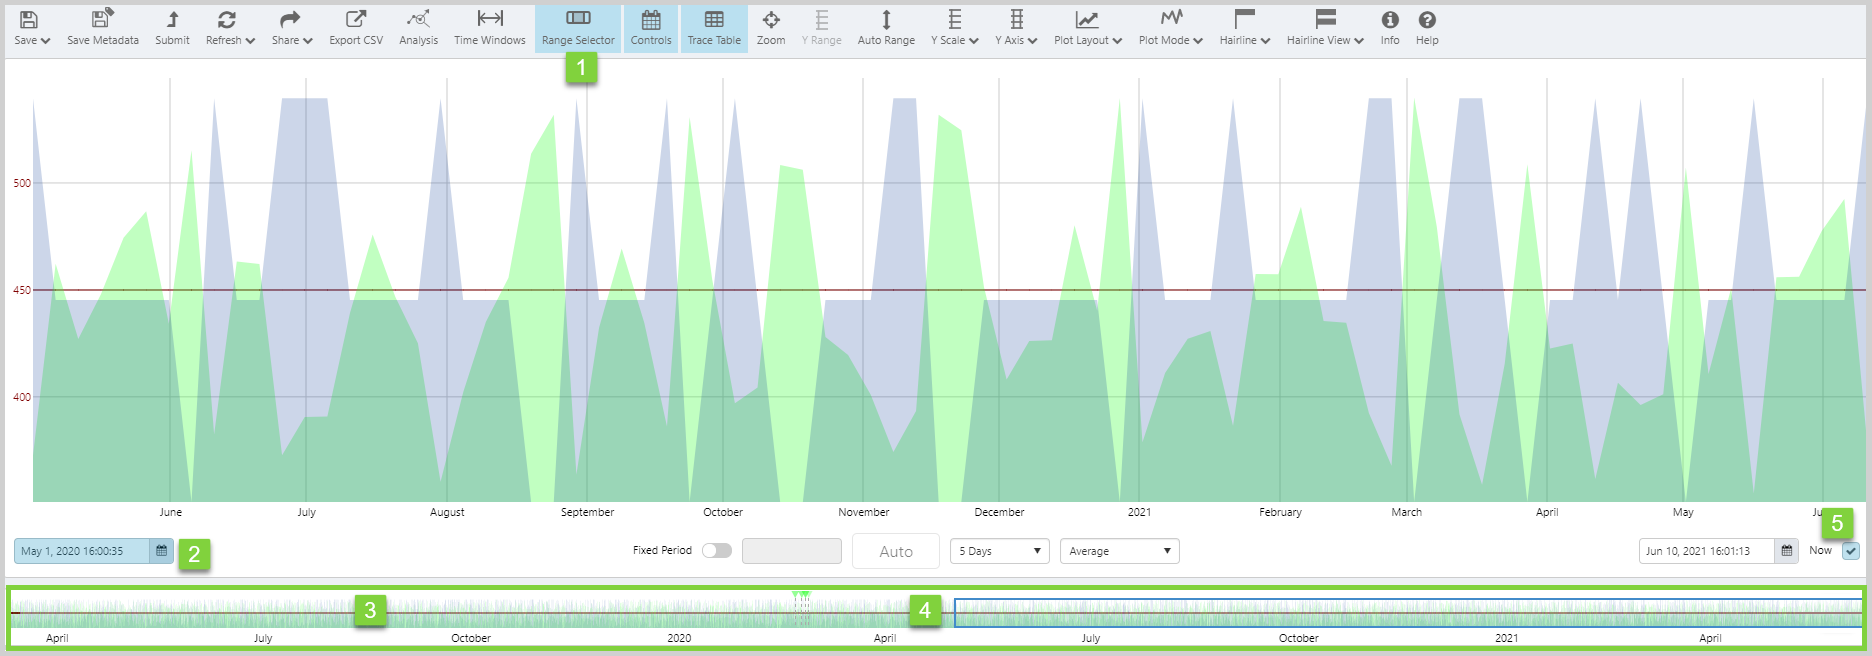
| 1. | Range Selector button | Toggle the button on to display the Range Selector. |
| 2. | Start Time | The Start Time is the currently selected starting time of the trend and the Range Selection. |
| 3. | Range Selector | The Range Selector. |
| 4. | Range Selection |
The Range Selection. Click and drag the Range Selection to change the time period of the trend. |
| 5. | Now | Now is currently the selected the end time of the trend and the Range Selection. |
Using the Zoom Feature
Use the Zoom function to look at an area of the trend in more detail.
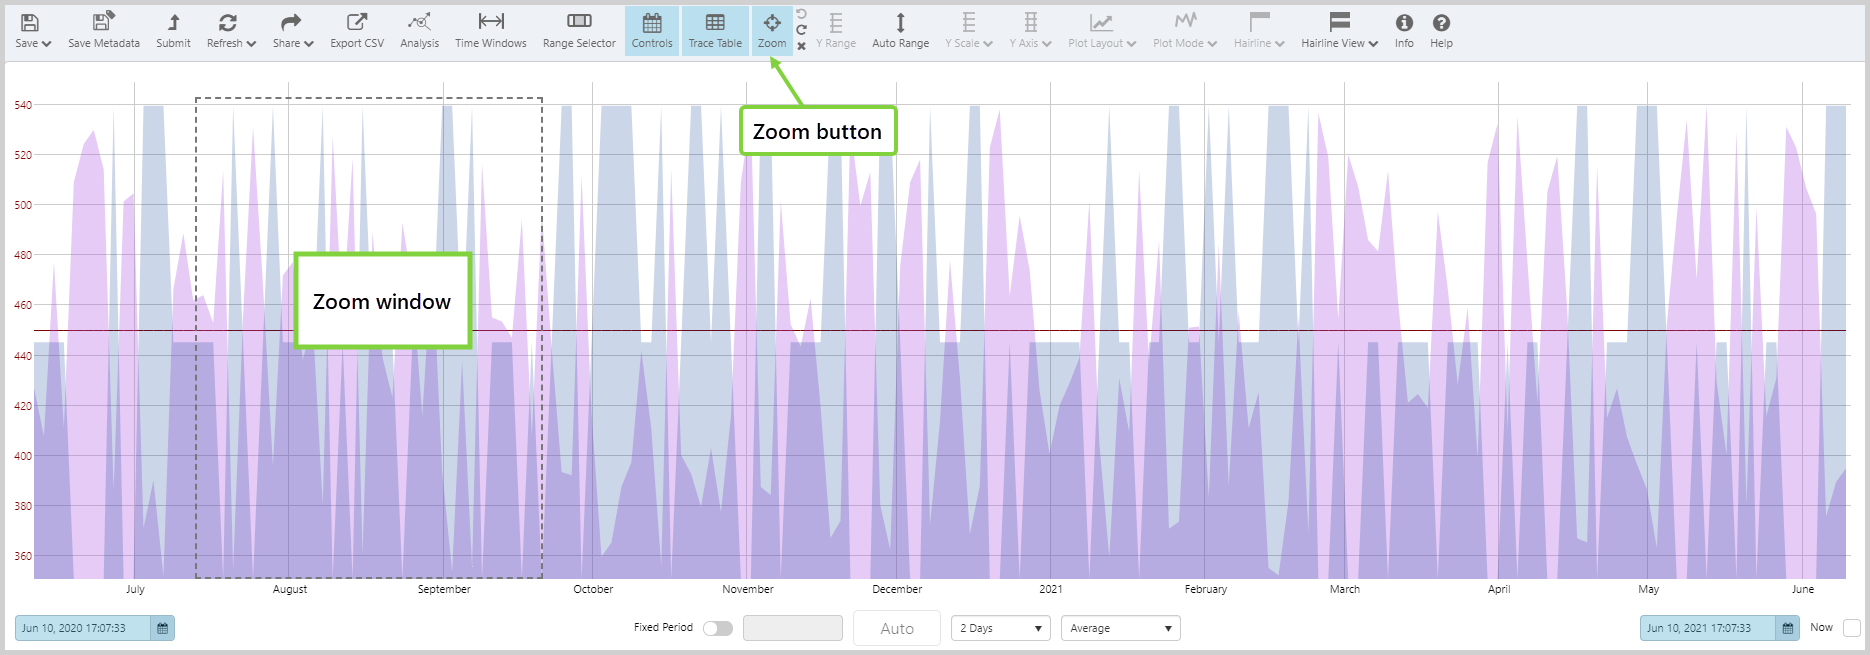
Zooming changes the selected time range.
The Adaptive Raw Sample Method
The Adaptive Raw sample method works differently from the other sample methods.
Adaptive Raw fetches far fewer data points from P2 Server (a maximum of 2000 points), yet renders a trend that is virtually identical to that produced when using the ‘Raw’ sample method (you may need to adjust the Sample Interval for Raw, to notice this).
The Adaptive Raw method renders the trend much faster than the ‘Raw’ method does. The Sample Interval is set to ‘Auto’, and is determined automatically to deliver the optimal number of data points. Server fetches the raw data points from the Historian, then uses an algorithm within its calculation engine to reduce the number of points, before sending these on to Explorer for the trend. (Please note that when you export to CSV, these are the same points that are exported; not the raw points from the Historian.)
Using the Adaptive Raw method, you can view granular trends over up to two years, rather than the preset limit of eight hours for the Raw method.
To further improve the speed of the data fetch, the maximum duration of data can be limited to reduce the sample size retrieved from the data source. This can be configured in Explorer’s web.config file by site administrators, using the setting (MaximumAdaptiveRawDuration).
The setting limits the duration dropdown in the Trend to only include options less than or equal to the configured maximum. If the maximum is set to 6 months, then options for 9 months, 1 year, and 2 years will not be available for selection in the Trend.

Note: When the Adaptive Raw sample method is selected, the trend will only export the rendered data, not all of the raw data.
Release History
- Trend Controls 4.9.7 (this release)
- Range Selector switched off by default
- Manual fetch button added
- Data fetch time limit set in configuration file