ON THIS PAGE:
Before you can get data into P2 Server, you must define a datasource. A datasource is a connection that allows P2 Server to retrieve data from an external system, such as a database, historian, accounting system, etc. Each datasource retrieves data from one source system. You need to define a connection for each system you want to connect to.
This article explains how to create a datasource, and the terms that relate to dataset datasources (e.g. data stored in SQL Server or Oracle databases).
You can add a datasource using P2 Server Management or the Import/Export spreadsheet.
Server Management
Step 1. Create the Datasource
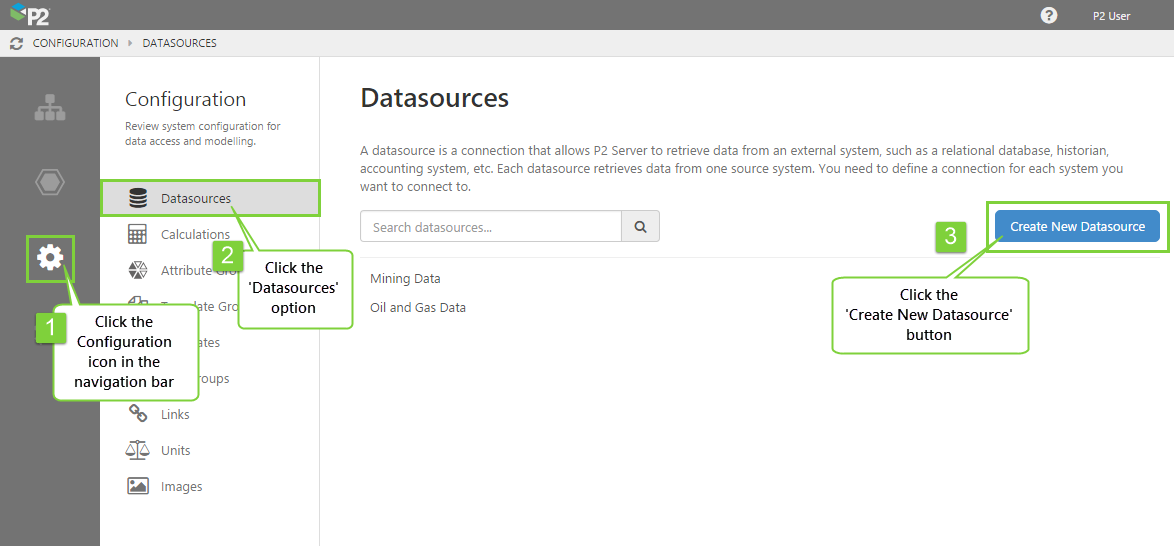
In P2 Server Management, adding a datasource is performed through the Configuration ![]() menu option.
menu option.
1. Open P2 Server Management, click the Configuration icon.
2. Select the Datasources ![]() option from the middle panel.
option from the middle panel.
3. Click the Create New Datasource button.
If you are updating a datasource, click the name of the datasource instead.
Step 2. Configure a Connection
The configuration parameters are different depending on the type of datasource you are configuring. For a dataset datasource, the parameters are as follows.
| Parameter | Description and example |
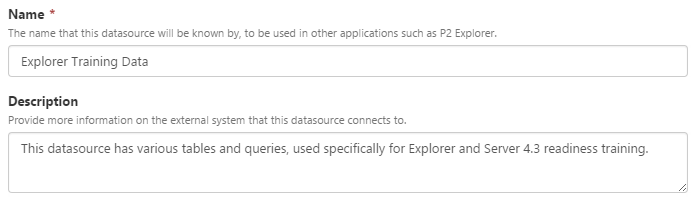
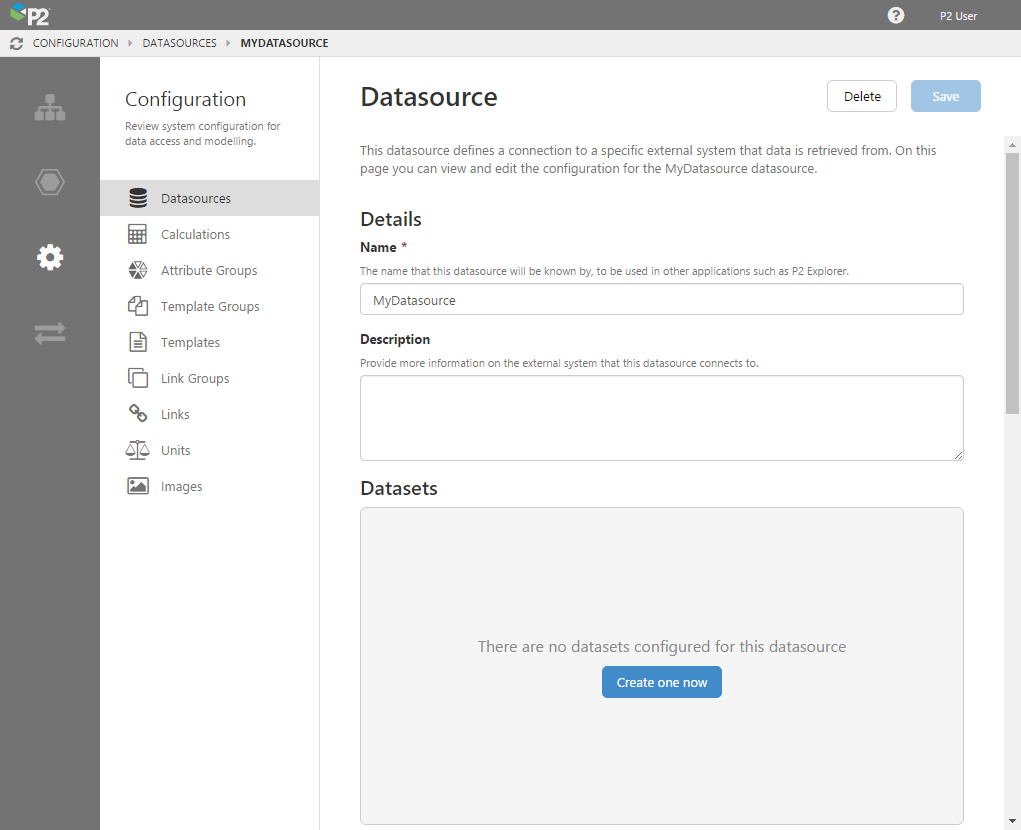
| Name |
The name that this datasource will be known by, to be used in other applications such as P2 Explorer. In the example below, the list of datasources appears in P2 Explorer when choosing a dataset.
|
| Description |
Detailed information on the external system that this datasource connects to. A good description helps to address any ambiguities when there are several datasources with similar names.
|
| Data Type |
The format of data retrieved by the datasource. For data stored in databases, you should choose "Dataset".
|
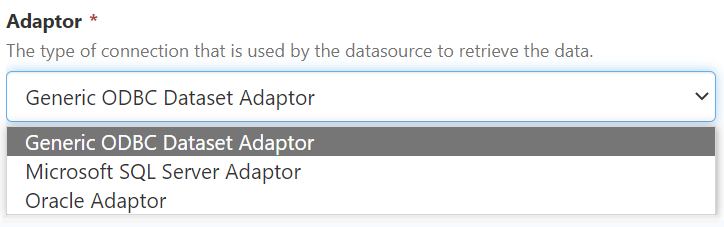
| Adaptor |
The type of connection that is used by the datasource to retrieve the data.
|
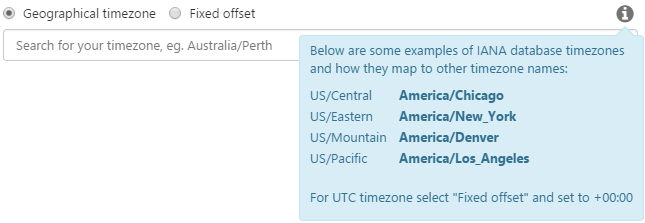
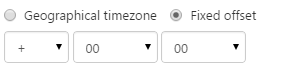
| Time Zone |
The time zone applicable for the location of the source system. Choose "Geographical Timezone" if you want the system to automatically obey daylight savings, otherwise choose "Fixed Offset" to specify the difference in hours and minutes from UTC. Geographical Timezone: Begin typing the name of the time zone you are looking for. This field uses predictive text, so choose one of the items that appears in the list.
Fixed Offset: Specify the offset from UTC/GMT (e.g. + 08 00).
|
| Adaptor Pool Size |
The adaptor pool hosts a number of adaptors (datasource connections), which can be called upon to retrieve data. You need to specify the minimum and maximum adaptor pool size by moving the sliders left and right. For more information on adaptor pool sizes, see "Datasources and Adaptors". |
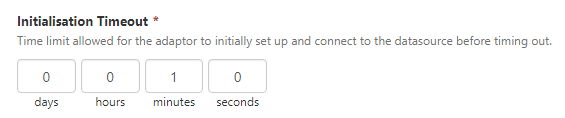
| Initialisation Timeout |
Applies to the initialisation of an adaptor, when it first connects to a datasource. This is the same as the Init_Timeout setting used in P2 Explorer 2.6.x. Note: This setting was added in P2 Server v 4.5.2.
|
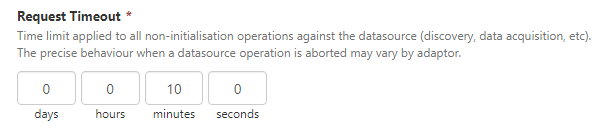
| Request Timeout |
Applies to all other operations against the datasource, such as tag fetch. It is similar to the Submit_Timeout setting used in P2 Explorer 2.6.x.
|

Step 3. Configure the Adaptor
The Adaptor Parameters depend on the adaptor that has been selected. The following tables list the parameters for each dataset adaptor, along with the name and type to be used in the Import/Export spreadsheet.
Microsoft SQL Server Adaptor
| Parameter | Description and example | Name | Type |
| Server | Name of the Microsoft SQL Server machine to connect to. E.g. Perauthor01 | Server | String |
| Database | Name of the Microsoft SQL Server database to connect to. E.g. ExplorerTrainingData | Database | String |
| Use Trusted Connection | Select this check box to use trusted connection, otherwise you must provide a user ID and password for the database. Options: True, False. | Use Trusted Connection | Boolean |
| User ID | User ID to use to connect to Microsoft SQL Server. E.g. sa | User ID | String |
| Password | Password for the User ID used to connect to Microsoft SQL Server. E.g. Password | Password | EncryptedString |
Supported Data Types
|
Fully Supported These types are fully supported; they are converted to relevant variable values |
Read Support These types have read support, but are always converted into string values |
Not Supported Adaptors will return an error when they encounter these data types |
|
|
|
Oracle Adaptor
| Parameter | Description and example | Name | Type |
| TNS | The TNS to use to connect to the Oracle database. E.g. L41LAQ.P2ES.COM | TNS | String |
| User ID | User ID to use to connect to the Oracle database. E.g. LRVRPT | User Id | String |
| Password | Password for the User ID used to connect to the Oracle database. E.g. Password | Password | EncryptedString |
| Use Oracle Time Zone Information | If this is not selected, dates and times will be assumed to be stored in the Oracle database in the configured time zone. If this is selected, time zone information will be requested from the Oracle database (by retrieving time-zone information provided by TIMESTAMP WITH TIME ZONE and TIMESTAMP WITH LOCAL TIME ZONE data types). | Use Oracle Time Zone Information | Boolean |
| Oracle Context Package | Name of the Oracle package which contains the stored procedure used for selecting which organization's data is to be used for queries. This is optional. | Oracle Context Package | String |
| Oracle Context Procedure | Name of the stored procedure which is used for selecting which organization's data is to be used for queries. This is optional. | Oracle Context Procedure | String |
| Oracle Context Parameter | Name of the stored procedure parameter which expects the organization identifier. This is optional. | Oracle Context Parameter | String |
| Oracle Context ID | Identifier of the organization to use. | Oracle Context ID | Integer |
Supported Data Types
|
Fully Supported These types are fully supported; they are converted to relevant variable values |
Not Supported Adaptors will return an error when they encounter these data types |
|
|
Generic ODBC Adaptor
Data type support of the ODBC Adaptor is determined by the third party driver being used. This means, the parameters that can to be used with the adaptor are determined by the choice of driver.
Follow the instructions for your selected driver to set up and use the adaptor.
Known keywords, eg PARAMS(), will work the same with any driver that supports their use.
Step 4. Save the Datasource
![]() Save your datasource by clicking the Save button in the top right corner.
Save your datasource by clicking the Save button in the top right corner.
Step 5. Add a Query
After you click the Save button, the Datasource page refreshes and the edit screen becomes available. The datasource has been created, but now you need to add some datasets.
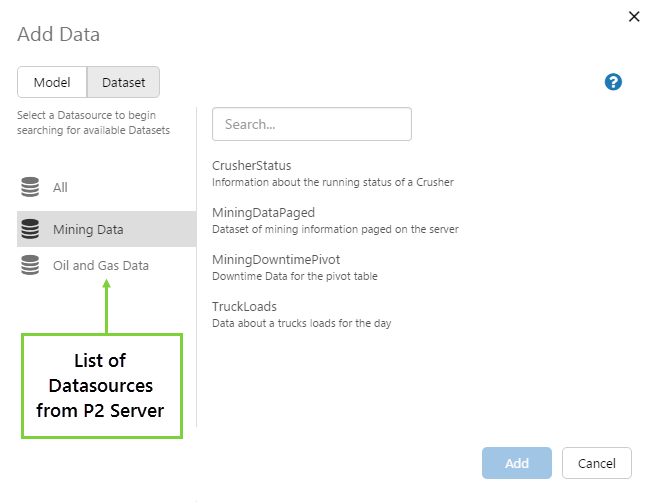
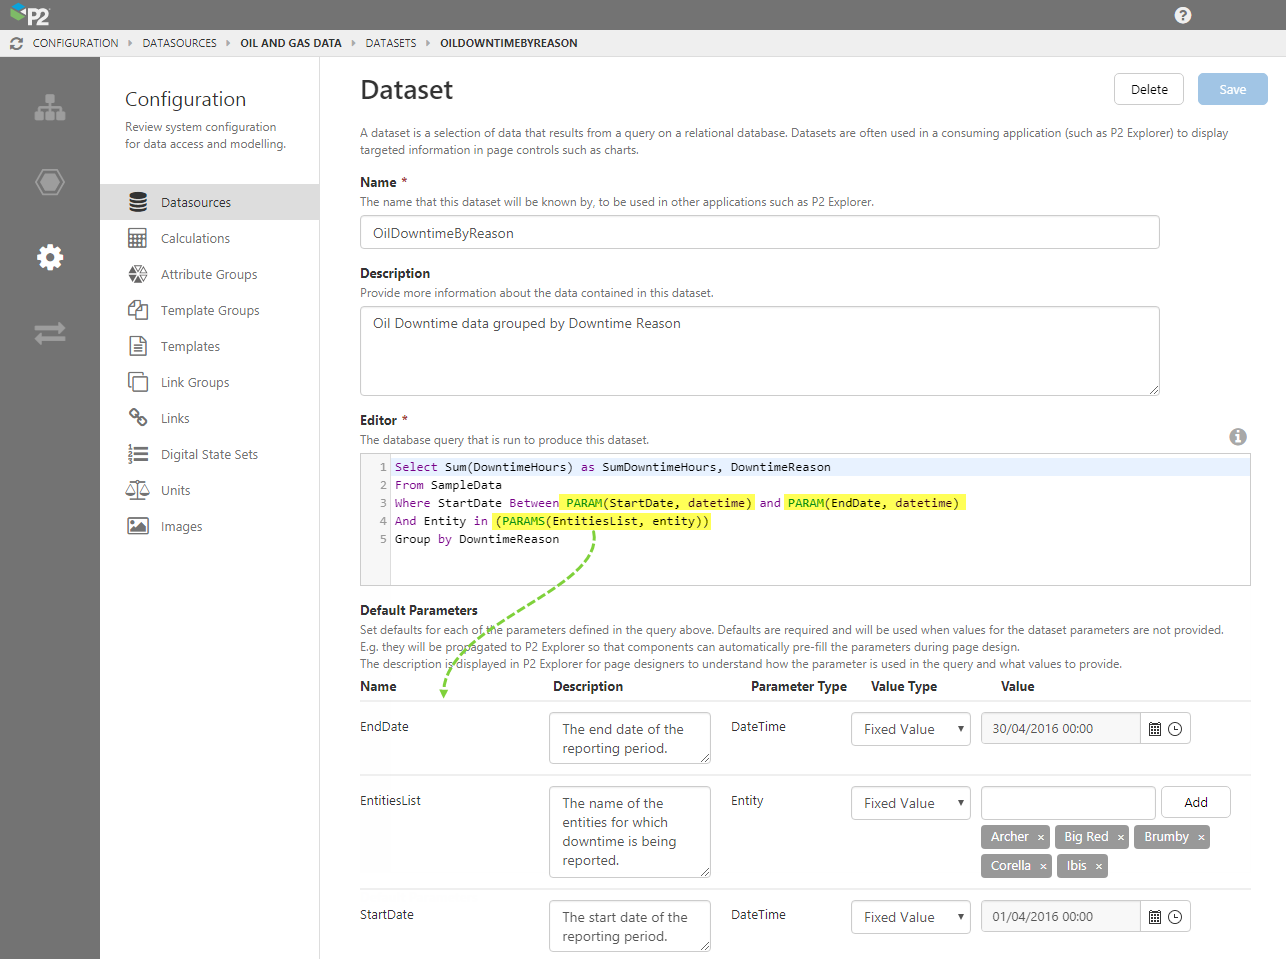
A dataset is essentially an SQL query. These are the datasets that can be added in P2 Explorer.
To add a dataset:
1. Click the "Create one now" button.
2. In the Dataset page, type a name and description for the dataset.
3. In the Query Editor, type the SQL query.
- For tips on writing the query, see "How to Write a Dataset Query".
- If you want to write a query that has paging enabled on the dataset, see "How to Write a Paged Query".
4. If you have used the PARAM or PARAMS keywords, a list of default parameters will appear below the query as you type.
These parameters must have defaults assigned to them. The defaults will automatically be passed into P2 Explorer and used to populate page components, if no other value is specified by the user.
Note: The Description field for the default parameter will be particularly useful to Explorer page designers, as it will help them to better understand the data they are using.
5. When you have finished, click Save.
You can keep adding as many datasets to the datasource as you want. Simply click on the datasource name and create another dataset.
Import/Export Spreadsheet
The Import/Export spreadsheet is generally only used to make bulk changes.
If you want to create or update dataset datasources as part of a bulk configuration, you need to use the following tabs in the Import/Export spreadsheet:
- Datasource
- Datasource Parameter
- System
Look for the red comment ![]() icon in the row headers, to get help with each column.
icon in the row headers, to get help with each column.
DO NOT change anything in the Global Id field - this is the unique identifier for the datasource that allows it to be tracked across systems, and when it is renamed. It is automatically generated by the system.
Datasource Tab
The screenshot below shows an example of configured dataset datasources. The fields are the same as the ones required when configuring the datasource connection using Server Management, following the above instructions on this page (step 2).
Key Points:
- The Name column must match the name of the datasource, as specified in Step 2 above.
- The Adaptor Name must match one of the adaptors available in the drop-down list in Step 2 above.
- Data Type must be Dataset.
- Timezone must be either a geographical timezone (available in the drop-down list in Step 2 above) or specified in UTC (e.g. UTC+08).
- Init Timeout and Request Timeout must be in the format: days:hours:minutes:seconds

Dependencies
The Datasource tab has a direct dependency on information from the System tab.
| This column | On this tab | Why you need to pay attention |
| Name | System | Required by the 'System' column on the 'Datasource' tab. |
Datasource Parameter Tab
The screenshot below shows an example of configured parameters for a datasource using the PI Adaptor. The fields are the same as the ones required when completing the datasource parameters using Server Management, following the above instructions on this page. See Step 3 above for the available adaptor parameters.
Key Points:
- Each parameter for each datasource must be added on a separate row.
- The Datasource column must match the name of the datasource, as specified in Step 2 above.
- The Name column is the name of the adaptor parameter, as specified in Step 3 above.
- Valid values for Type are: Boolean, DateTime, Decimal, Duration, Integer, String, EncryptedString. These are specified in the adaptor parameter tables in Step 3 above.
- Is Value Encrypted should be FALSE, unless 'Type' is 'EncryptedString'.

Dependencies
The Datasource Parameter tab has a direct dependency on information from the Datasource tab.
| This column | On this tab | Why you need to pay attention |
| Name | Datasource | Required by the 'Datasource' column on the 'Datasource Parameter' tab. |
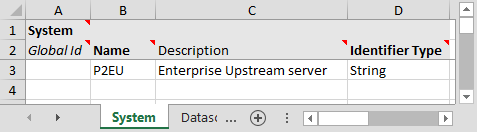
System Tab
The screenshot below shows an example of a configured external system. External systems cannot be configured in P2 Server Management, it must be done using the Import/Export spreadsheet. Before using this tab, please contact P2 Customer Support to check if the external system is supported.
Key Points:
- The Name column is the name of an external system.
- The Identifier Type must be either String or Numeric. This is the data type that the external system uses to uniquely identify its entities.
Dependencies
The System tab has no dependencies on other tabs.
Release History
- Creating a Dataset Datasource 4.10.5
- Generic ODBC Adaptor added to the installer
- Creating a Dataset Datasource 4.10.2
- Added support to connect to ODBC data sources
- Creating a Dataset Datasource (4.5.1)