ON THIS PAGE:
Overview
The entry components (Log Entry, Case Entry, and General Entry) allow users to make entries into an entries table. There are minor differences in the way the components are used, but the configuration is the same.
Explorer’s Entries subsystem is the cornerstone of our ‘single event’ philosophy. An entry is a record that connects data in such a way that it can be accessed by different IFS OI Explorer modules, such as Shift Log, Sentinel, and A-Plus. This means that an event in Sentinel can also be shared as an event in A-Plus, Case Management, and Shift Log. This results in a seamless user experience for the end user, team collaboration resulting in less double-handling of data, and contributing to better decision-making.
In Shift Log, the entry components allow entries to be created in workbooks. There are minor differences in the way the components are used, but the configuration is the same.
In A-Plus, the entry components can be added to an A-Plus Report, allowing entries to be created in the reports. The components are used and configured in the same way as for Shift Log.
In Shift Log terms, when an operator makes an entry, they are filling in part of the story. Another user in Case Management (for example) may pick up that entry and add further information to it, building upon the foundation until the full picture emerges.
All entries created using case and general entry forms are seen in all workbooks which contain the specific form. Log entries are only seen in the workbook they were created in, unless they are shared to another workbook.
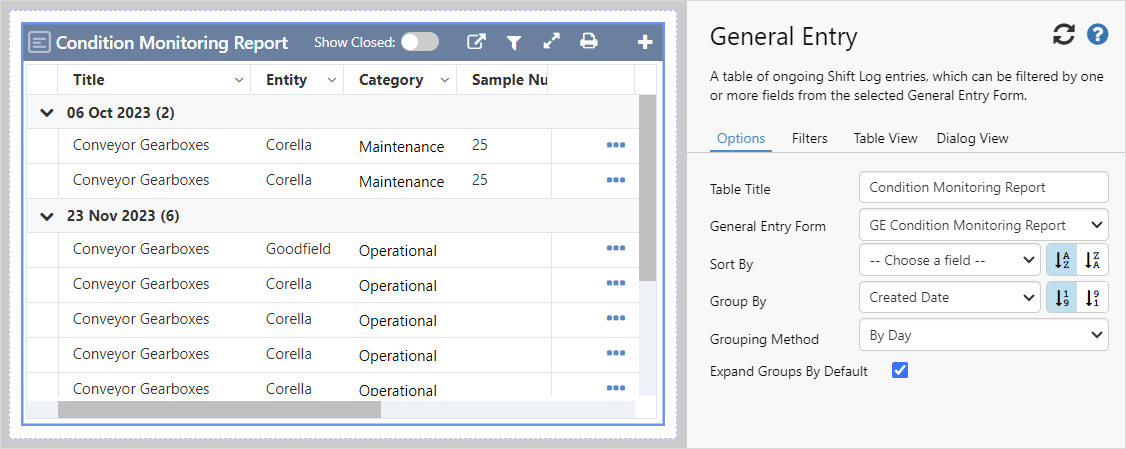
The following diagram shows a General Entry configuration:
The Log Entry, Case Entry, and General Entry components all have the following configuration tabs.
| Options | Determines the form used and how entries are sorted and grouped. Sharing of log entries is also configured here. |
| Filters | Filters the data shown in the table according to your criteria. |
| Table View | Table display options including order of the columns, and which ones will be displayed and how. |
| Dialog View | Dialog display options including default values and instructions. |
What Type of Entry Should I Configure?
The three different types of entries are designed for different things - they are similar, but different. They are designed for different purposes, and have different default fields. However all entry types can have any number of fields in addition to the default fields.
Here's a quick guide to help you understand the difference:
| Log Entry | General Entry | Case Entry | |
| Purpose |
Designed to be contained within a shift. The Event Time determines which shift these entries will appear in. A maximum of 200 entries can be displayed in a log table. |
These entries will appear in a workbook until they are closed. They are not tied to a shift. | These are similar to general entries in that they will appear in a workbook until they are closed. However they will also appear in Case Management. |
| Sharing To | Log entries in the same form are only shared to other workbooks if configured to do so. | All entries belonging to the same case or general entry form, are shared to all workbooks that contain the form. Filtering can be applied in the configuration to restrict the number of entries displayed to only those entries that meet specified criteria. | |
| Getting From | Through the Workbooks field in the configuration Options, log entries can be brought in to a workbook from the same form in a different workbook. | ||
| Default Fields |
|
|
|
In addition to the above default fields, all entries also contain the following system fields:
- Created By
- Created Date
- ID
- Last Modified By
- Last Modified Date
Forms
When configuring a Log Entry, Case Entry, or General Entry, you need to specify a Log Entry Form, Case Entry Form, or General Entry Form. The form determines:
- The fields that apply to the entry.
- The schema the entry is saved to.
Forms can be used in more than one component, which means that the forms are shared - and the entries stored against the form can also be shared among workbooks. You can apply filters to shared forms to restrict the entries to a certain type.
For example, you could have a single form for HSE issues, and use that form in workbooks for Area 1, Area 2, and Area 3. You can then filter the form to only show entries for the relevant area, while retaining a master list in yet another workbook for the HSE manager who overseas all of the those issues. You can filter the form on any field that the form contains, and you can add multiple filters if desired.
Configuration
The entry components can be customized to suit your application.
The tabs, Options, Filters, Table View and Dialog View each contain different configuration options.
![]()
Options
The entry components have the following configuration options, some of which are only available under select conditions.
| Table Title |
The Table Title allows you to specify the heading for the table. |
||||||||
|
Case Entry Form General Entry Form Log Entry Form |
The name of this field is dependent on the entry type and may be either General Entry Form, Case Entry Form or Log Entry Form. It is the Form against which entries are being saved, and contains the fields than will be displayed in the table. |
||||||||
| Sort By |
By default, the entries are shown according to the created date (or event time for log entries). You can change this to sort by another field or in reverse order. |
||||||||
| Group By |
By default, entries are shown in a flat list, or ungrouped. When a Group By field is selected, the entries will be grouped by the values in the field. If the field is not filled in, the entry will appear under "Ungrouped Entries". |
||||||||
| Grouping Method |
A second grouping method can be applied to datetime, list and user data types.
|
||||||||
| Workbooks | Log entries created in the same form but in different workbooks, can be added to the table. These entries "come from" the other workbooks. This is done by selecting the relevant workbooks in the Workbooks field. Multiple workbooks can be selected. |
||||||||
| Expand Groups by Default | When Group By is active, the groups can be expanded to display the entries within the groups by default. |
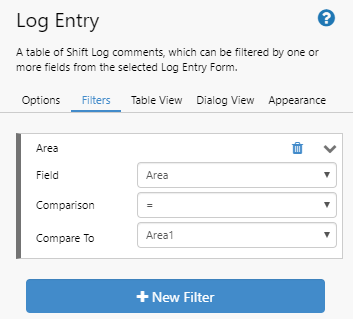
Filters
Multiple filters can be applied to the data in the table by adding a new filter ![]() .
.
| Field | All fields in the form can be used except for multi-line text fields. |
| Comparison | The available operators depend on the type of field that is selected. |
| Compare To | The options available for the field are configured in Server Management. |
Table View
| TABLE | Configuration which applies to the table as a whole. | ||||||||
| Fill Mode | Table columns can adjust to the size of the content.
|
||||||||
| Max Row Height | Row height can be fixed, or dynamic '*'. | ||||||||
| Fit Table Height to Content | Used when Grid Layout row has dynamic height enabled. Allows the table to expand to display all of the content. | ||||||||
| Enable Quick Filter | Adds the quick filters to the table. | ||||||||
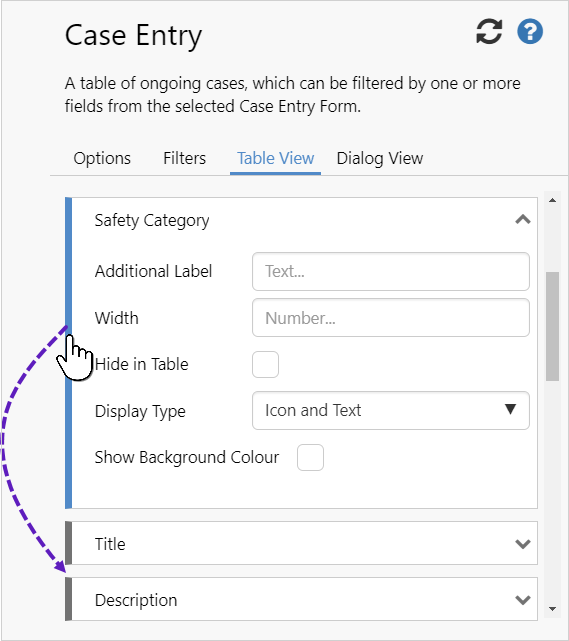
| FIELDS | Each field is a separate column in the table, and an expandable card in the configuration. Changing the card order will change the order of the columns in the table. | ||||||||
| Additional Label | A second label can be used to provide extra information. It will be displayed in brackets beside the field name. | ||||||||
| Width | The width is how wide the table column will be when the page loads. | ||||||||
| Hide in Table | Columns can be hidden in the table. | ||||||||
| Display Type | The icon and/or text can be displayed for list fields | ||||||||
| Show Background Colour | The background colour can be displayed list fields. |
To remove the scroll bars from a table, set the Max Row Height to dynamic and enable Fit Table Height to Content.
Dialog View
Although the field properties have a default configuration when they are added to the form, you can also adjust how the fields appear in the dialog for a specific workbook.
Different field data types may have additional configuration options.
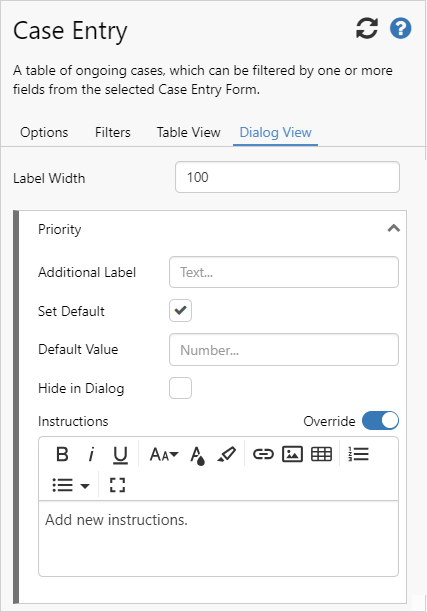
| DIALOG | Configuration which applies to the dialog as a whole. | ||||||
| Label Width | This is the maximum width allocated to the field labels. Note, this does not apply to the Description field label. | ||||||
| FIELDS | Each field is a separate row in the dialog, and an expandable card in the configuration. Changing the card order will change the order of the fields in the dialog. | ||||||
| Additional Label | A second label can be used to provide extra information. It will be displayed in italics under the field name. | ||||||
| Restrict Roles | User data type fields. | ||||||
| Set Default | Use the default value for the field | ||||||
| Default Value | Default value for the field. | ||||||
| Default to Now | Datetime data type fields. | ||||||
| Hide in Dialog | Select the check box if you don't want the field to appear in the dialog. | ||||||
| Override Hierarchy Filter |
A different hierarchy can be configured for entity fields.
|
||||||
| Override | This allows existing instructions to be replaced. | ||||||
| Instructions | Instructions, or information about the field. |
Tutorial: Setting up an HSE Log for Area 1
If you're unfamiliar with the process of building pages, read the article Building an Explorer Page.
The Case Entry component allows operators to enter issues that will also appear in Case Management, which enables them to be tracked and managed. In this tutorial, we’ll show you how to configure the Case Entry component in a workbook to display HSE issues for a specific part of the plant. At the end of the tutorial, your workbook should look something like this:
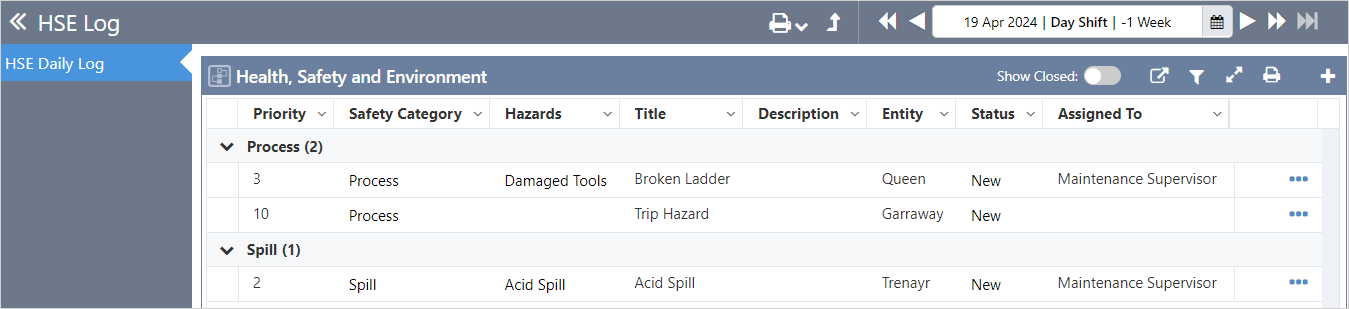
Let’s go through this process, step-by-step.
Step 1. Create a new Workbook

Click the New Workbook button on the Home tab of the ribbon, and then click Add New Page.
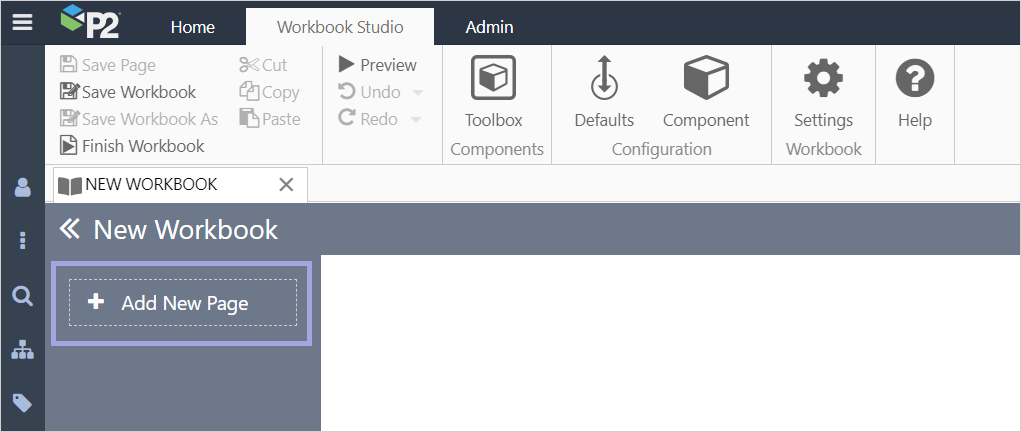
A Grid layout is added automatically with a row and column spacing of 10.
- For this exercise, we'll remove one of the rows so we only have one row and one column.
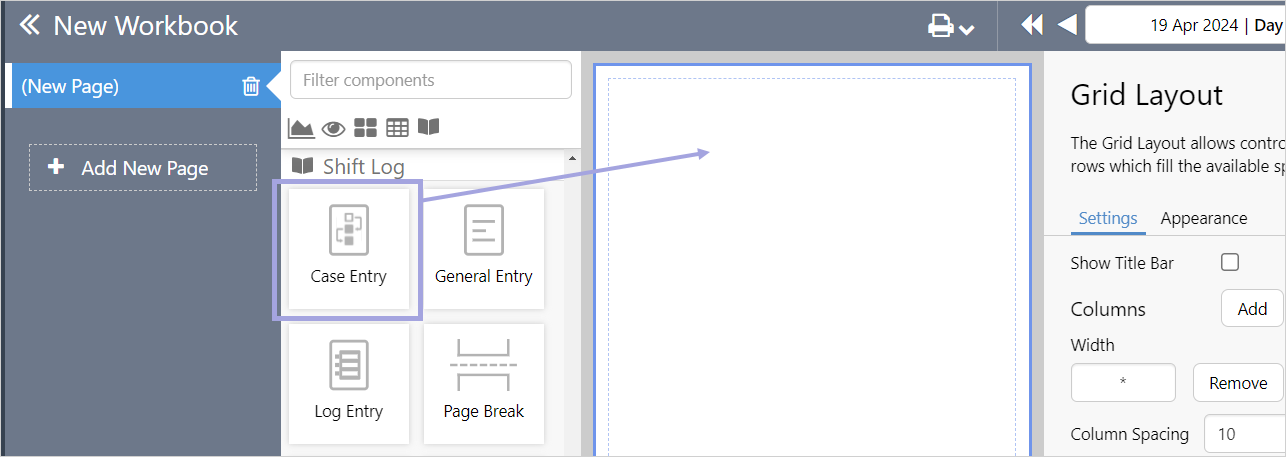
Step 2. Add the Case Entry Component
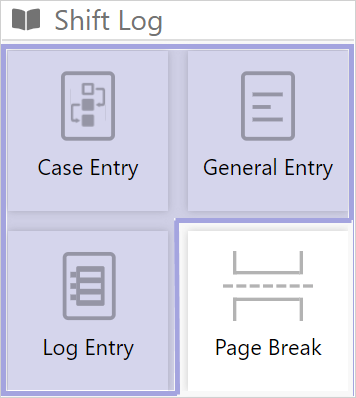
Drag and drop the Case Entry component onto a grid cell. The entry components are in the Shift Log ![]() group.
group.
Step 3. Configure the Case Entry
In this example, we want the Case Entry to only show entries for Area 1.
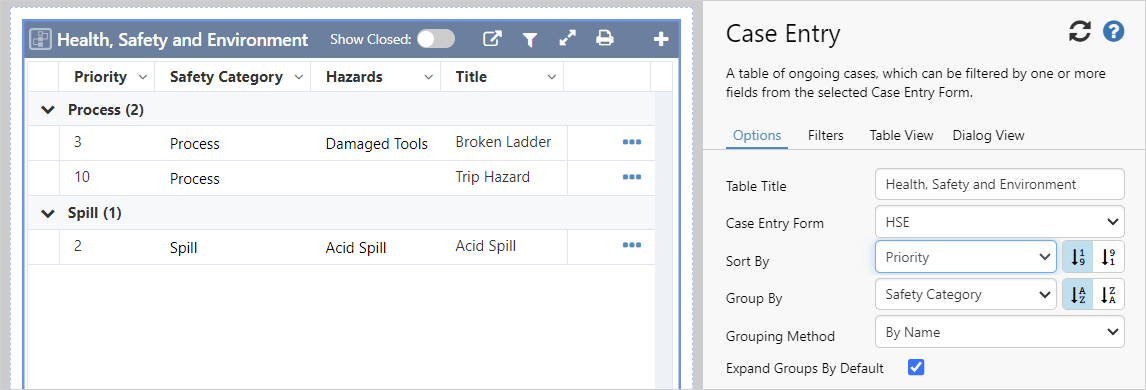
Options
Configure the Options:
- In the Options tab in the editor, fill in the fields as follows:
| Field | Enter this | Notes |
| Table Title | Health, Safety and Environment |
The preview will update on the fly as you type this in. |
| Case Entry Form | HSE |
Select this from the drop-down list. Note that if this form is already being used elsewhere, those entries will be appear in the preview. |
| Sort By | Priority |
Select this from the drop-down list. By default, sort order is from lowest to highest or Z-A. Click the buttons to the right to toggle the sort order. |
| Group By | Safety Category |
Select this from the drop-down list. If there are no entries, or if in this example an entry does not have a Safety Category filled in, then the entry will appear under "Ungrouped Entries". |
Filters
Configure the Filters:
- Click the Filters tab.
- Click the + New Filter button.
- Fill in the fields as follows (note that the preview updates on the fly):
| Field | Enter this | Notes |
| Field | Area | Select this from the drop-down list. All fields included in the form are listed here. Note that you cannot filter on multi-line text fields. |
| Comparison | = | The available operators depend on the type of field that is selected. |
| Compare To | Area 1 | Select this from the drop-down list. The options available for the field are configured in Server Management. |
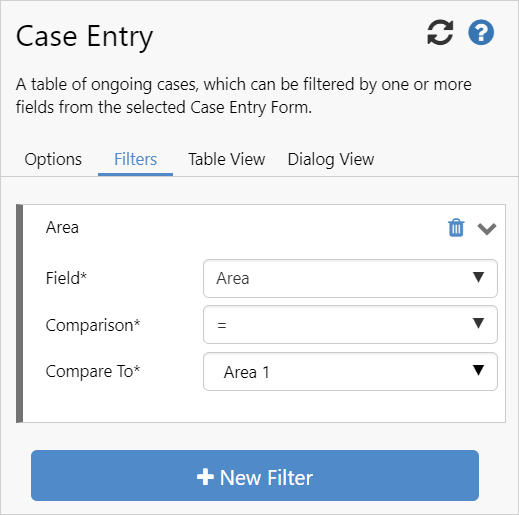
Table View
Configure Table View:
Although the field properties have a default configuration when they are added to the form, you can also tweak how the fields appear in the table for this specific workbook. Note that changes will appear in the preview on the fly.
- Fill Mode: Table columns can adjust to the size of the content. Fill mode options are:
- None: Uses the width for each column as specified in the Form in Server Management, with a minimum width of 50px.
- Equal Width: Distributes the columns across the table so that they are all the same width. This may mean that some columns will shrink if their content width is greater than the table width.
- Fit to content: The columns expand to the minimum width necessary to display all their content and fill the table. Any extra space is added to the last column.
- Stretch to fit: The columns will expand to the minimum width necessary to fill the table. Any extra space is distributed to columns proportional to the size of their content.
- Max Row Height: Row height can be fixed, or dynamic '*'.
- Fit Table Height to Content: Used when Grid Layout row has dynamic height enabled. Allows the table to expand to display all of the content.
- Enable Quick Filter: Adds the quick filters to the table.
- Drag and drop a card to change the order of the columns in the table.
- Click the top of the card to expand or collapse it, so you can make other changes.
- Additional Label: Add a second label. It will be displayed in brackets beside the field name.
- Width: Change how wide the table column should be when the page loads.
- Hide in Table: Select the check box if you don't want the column to appear in the table.
- Display Type: Option to select icon and/or text for list fields.
- Show Background Colour: Optional for list field type.
To remove the scroll bars from a table, set the Max Row Height to dynamic and enable Fit Table Height to Content.
Dialog View
Configure Dialog View:
Although the field properties have a default configuration when they are added to the form, you can also tweak how the fields appear in the dialog for this specific workbook. Note that changes will appear in the preview on the fly.
- Label Width: The width of the field label. Note this does not apply to the Description field label.
- Drag and drop a card to change the order of the columns in the table.
- Click the top of the card to expand or collapse it, so you can make other changes.
- Additional Label: Add a second label. It will be displayed in italics under the field name.
- Set Default: Use the default value for the field.
- Default Value: Default value for the field.
- Hide in Dialog: Select the check box if you don't want the field to appear in the dialog.
- Override: This allows new instructions to be added, overriding instructions set in Server Management.
- Instructions: Instructions, or information, about the field.
Step 5. Save the Workbook
When you save the workbook, you will also be saving the page along with it. The workbook, and associated pages, are saved to a workspace and inherit that workspace's permissions.

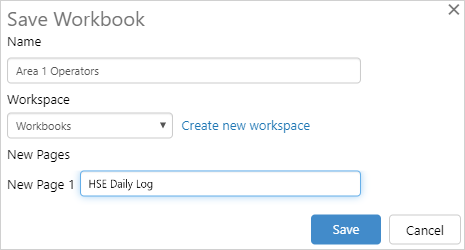
In the Workbook Studio ribbon, click Save Workbook.
- As you do when saving a page, specify the Name of the workbook and the Workspace it should belong to.
- If you have an unsaved page in the workbook, you will also be asked to name the page. Note that the name cannot be the same as an existing page in the workspace (so you cannot have 2 pages called HSE in 2 different workbooks in the same workspace).
Step 6. Workbook Settings
Workbook settings allow you to specify which shift or swing pattern to use and who has access to the workbook.

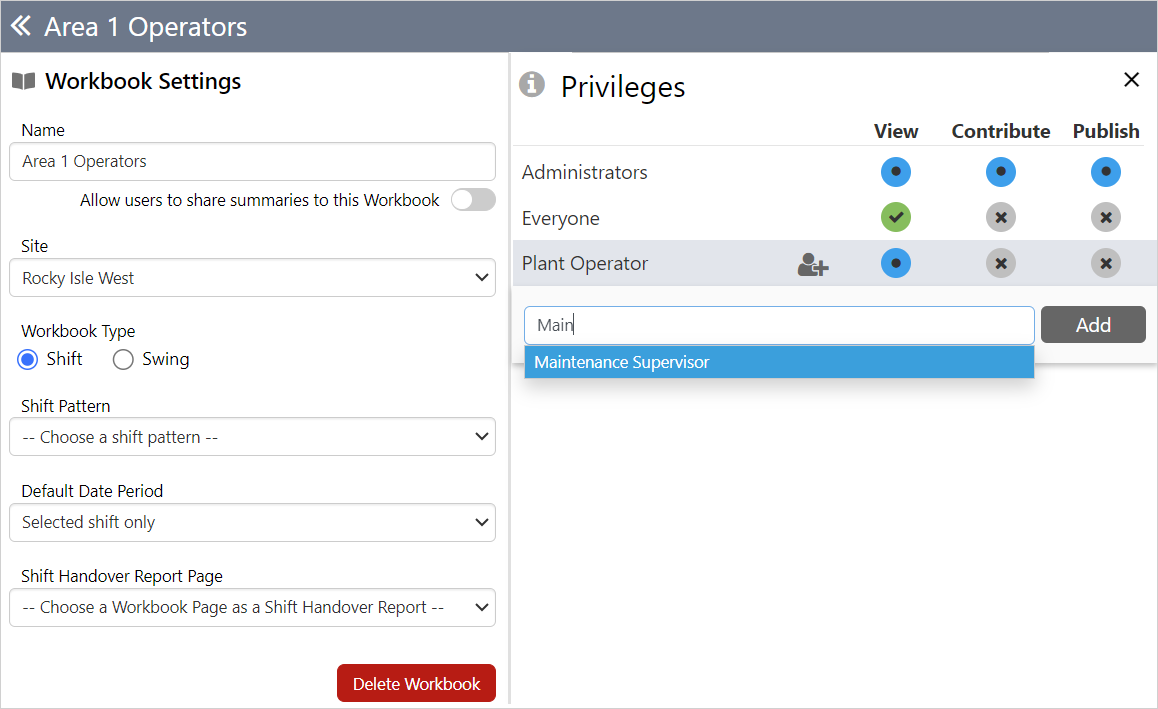
In the Workbook Studio ribbon, click Settings.
- Name: The name of the workbook - you can change this if you need to rename the workbook.
- Site: The name of the site this workbook applies to. The selection list is configured in Server Management. You need to select a site and shift or swing pattern for the shift picker to understand what shift or swing periods to show.
- Workbook Type: Can be a Swing or Shift workbook.
- Shift Pattern: The Shift Pattern from the selected site that you want the Shift Picker to show.
- Swing Pattern: The Swing Pattern from the selected site that you want the Shift Picker to show.
- Default Date Period: Date period Shift Picker defaults to.
- Handover Report Page: The page in the workbook that has been configured to be the shift or swing handover report. This must have a Report - Grid component configured on it.
- Privileges: A workbook inherits its permissions from the workspace it was saved in. If required, you can override the privileges here, and you can also add a new user to a role directly from this screen (if you have Security Admin privileges).
When you have finished, click Finish Workbook in the Workbook Studio ribbon.
Step 7. All done!
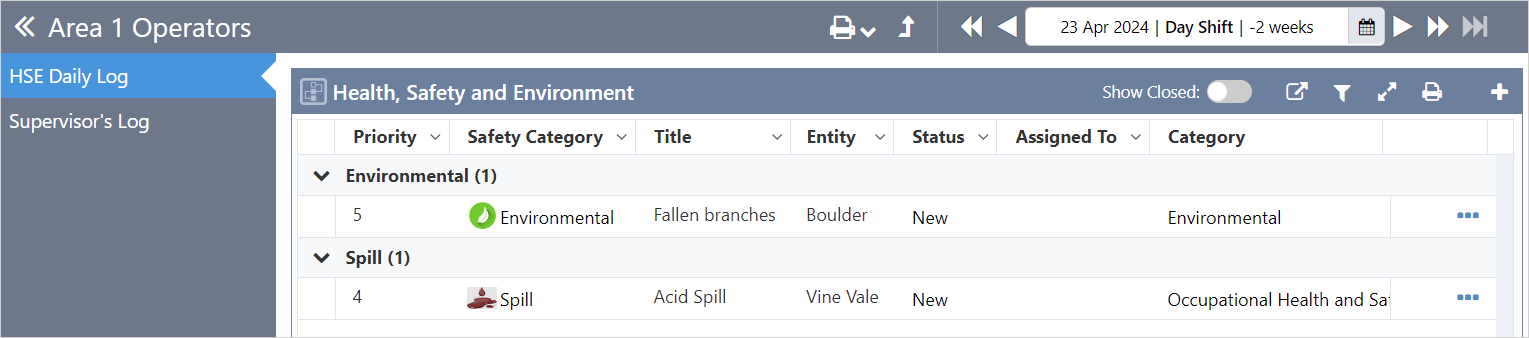
Congratulations! You now have a workbook with an HSE Daily Log that will only show you HSE issues for Area 1.
- Click the Shift Picker to see the configured shifts.
- Click the + button in the top right of the entry component to add a new entry.
- Click the
 filter button to apply further filters to the entry component.
Release History
- Entry Components 4.15 (this release)
- A-Plus report
- Swings
- Report - Grid as handover report
- Entry Components 4.8.0