ON THIS PAGE:
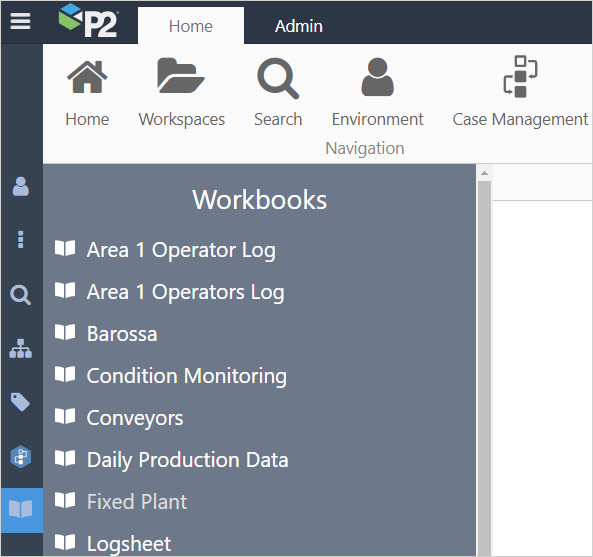
Workbooks are the heart and soul of Shift Log. They are usually organised around a set of activities for a role, and can be structured to have as many pages as required to record activities for the role.
Step 1. Workbook Planning
It's important to plan out how you want your workbooks to appear, as this will inform the choices you make when configuring lists, fields, and forms; as well as which entries to display on which pages in which workbooks.
Workbook Structure
Before you start configuring Shift Log, you need to understand how you want your workbooks to be structured. Workbooks can be structured according to functional area, site, department, etc. Choose the structure that works best for your organisation.
| Workbooks menu: | Pages within a workbook: |
 |
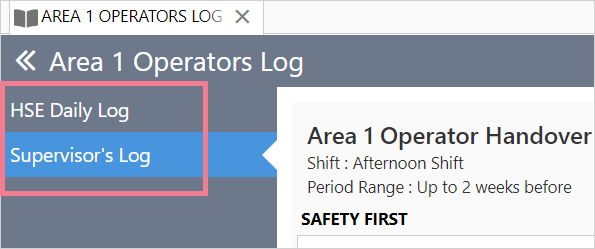 |
Workbooks pages are similar to pages in Explorer. They can contain a number of different components, with those in the Shift Log component group being the most used in workbooks.
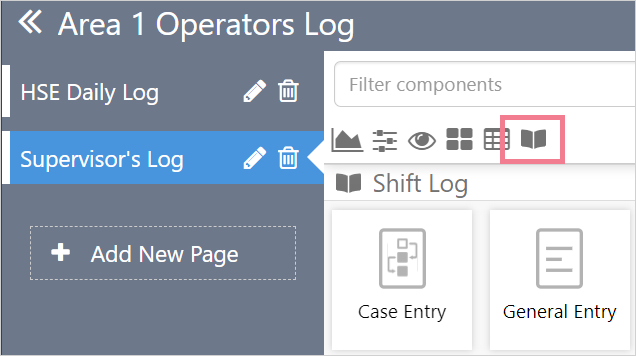
The entry type components, Case Entry, Log Entry, or General Entry are the foundation of Shift Log.
Entry Types
Workbooks can contain 3 types of entries, which are used for different purposes. You need to understand the types of entries you need when creating the workbooks, so you know what type of forms you will need (see step 5). These entry types are:
- Case Entry: An ongoing issue that also appears in Case Management. These entries remain visible in Shift Log until they are closed.
- General Entry: An ongoing issue that only appears in Shift Log. Similar to Case entries, they will remain visible in Shift Log until they are closed.
- Log Entry: An entry (“comment” in previous Shift Log versions) that only appears in a particular shift. These are also locked when a workbook is published.
Security Considerations and Workspaces
Workbooks are secured by roles within a workspace, so all users who have access to a workspace will also have access to the workbooks and pages within that workspace.
It is likely that you will need multiple workspaces/workbooks with differing levels of security.
If you only need a single level of security, you may still want to consider using multiple workspaces, as workbooks must be uniquely named within a workspace.
Workbooks in the same workspace must have unique names:

Workbooks can be secured through object security.
Step 2. Configure Sites, Shifts and Swings
You will need at least one site and one shift or swing pattern in order for workbooks to recognise shift boundaries and display a shift picker.
A shift pattern is a 24-hour period divided into equal portions of time, with the start time being the time the first shift starts. Shifts can be 6, 8, 12, or 24 hours long.
A swing pattern has a number of days on and off, a start date and a linked shift.
Shift Log allows you to define multiple shifts and swings on a per-site basis. For each site, you specify one or more shift patterns.
- If you have multiple sites, you will need to specify a default site.
- If a site has multiple shift patterns, you will need to specify a default shift pattern.
You may use and rename the Default Site and Default Shift Pattern that is automatically created upon installation.
If you disable a shift, it will not appear in the shift picker for workbooks that use that shift, and users will not be able to navigate it. This is useful if you have a shift where no-one is rostered, for example you may only have a morning and afternoon shift, but no night shift.
Step 3. Configure Named Lists
Named Lists are how you create the drop-down list Fields (e.g. Severity) use in Forms. When a Form is added to a workbook (see Step 6), you can group the entries by one of the Named List Fields on the Form.
So if, for example, you want to mimic the Topics concept from older Shift Log versions, you can create a Named List for each Topic you want to group by.
You can specify the sort order of the items in the list to be either manual or automatic (which is alphabetical).
Step 4. Configure Fields
Fields are the properties that appear in an entry: in the workbook's entry table and in the entry dialog.
Fields must be assigned to a Form in order for them to appear in Shift Log. As the same Field (such as Category) can be assigned to many Forms, fields are created independently of the forms.
Fields cannot be changed or deleted after they have been created.
Fields can have one of a range of data types.
Some fields come configured by default and are reserved for system use.
You can configure defaults and other properties on a Field (e.g. mandatory or hidden), when you configure a Form that uses that Field.
Step 5. Configure Forms
A Form defines both the type of entries that will be created, and the fields that the entries will contain. As mentioned in Step 1, Form types can be:
- Case Entry: An ongoing issue that also appears in Case Management. These entries remain visible in Shift Log until they are closed.
- General Entry: An ongoing issue that only appears in Shift Log. Similar to Case entries, they will remain visible in Shift Log until they are closed.
- Log Entry: An entry (“comment” in previous Shift Log versions) that only appears in a particular shift. These are locked when a workbook is published.
When a workbook is configured to contain a Case Entry, for example, you need to specify the Case Entry Form that will determine the fields.
Case, General, and Log entries all have a different set of default system fields associated with them. In addition to these, an administrator can add further fields as required.
The Fields on a Form can optionally have default values, be made mandatory or hidden, and be made editable or read-only. There is also the option to hide or show a field based on the value of a different field, see Conditional Fields.
Note, most of these options can be overridden when a workbook is being configured, but initially configuring sensible defaults can save time when configuring many workbooks.
In the Defaults section, you can also choose various options for how the field is to appear in Shift Log: both in the entries table view and in the entry dialog view.
- To set a field to populate with a particular value each time, set a Default Value and disable editing, in General Defaults.
- For the Table View, you can choose to show or hide a field, and how wide the table column should be for that field. Depending on the type of field, there may be additional configuration options.
The order in which the Fields appear here is the order in which they will appear in the workbook entries tables. You can drag and drop each field to change the order in which it appears. - For the Dialog View, you can also choose whether to show or hide the field. Depending on the type of field, there may be additional configuration options.
The order in which the Fields appear here is the order in which they will appear in the entry dialog. You can drag and drop to change the order.
Step 6. Create and Configure a Workbook
With the previous steps done, you can now create and configure a workbook.
If you have forgotten one of the previous steps, and need to go back to add a new field, for example, you will then need to refresh your workbook for it to become available.
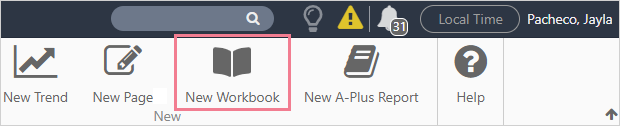
To create a workbook, simply click the New Workbook button in the Home tab of the ribbon.
Workbooks are configured in a similar way to pages in Explorer. First, you choose the layout of the workbook pages by setting the number of rows and columns in the Grid Layout component. Then, you add a Shift Log component corresponding to the type of entry you want to create (Case Entry, Log Entry, or General Entry - see step 5 above).
The components use Forms to know what fields to show in the table and dialog.
There are 3 main parts to configuring a component:
- Specify the Form you want to use, and optionally apply a sort order. You can also choose a Named List Field by which you want to group your entries.
- If desired, you can filter the entries by one or more Fields. This is useful if you are using the same Form for different roles, and want to show different Fields for those roles. You can also drag and drop the filters to change the order in which they apply.
- In the Table View and Dialog View, you can override some default values, and you can also drag and drop the Fields to change the order in which they appear in the table and entry dialogs, respectively.
After configuring the first page, click 'Add New Page' to add more pages and components.
When saving a workbook, you need to name each page separately, in addition to the workbook. The pages will be saved in the same workspace as the workbook. You cannot have duplicate page names inside a workspace.
Filtering
Filtering is a key feature of entry components. This is because Forms can be used in more than one component, which means that the forms are shared - and the entries stored against the form can also be shared among workbooks. You can apply filters to shared forms to restrict the entries to a certain type.
For example, you could have a single form for HSE issues, and use that form in workbooks for Area 1, Area 2, and Area 3. You can then filter the form to only show entries for the relevant area, while retaining a master list in yet another workbook for the HSE manager who overseas all of the those issues. You can filter the form on any field that the form contains, and add multiple filters if desired.
Handover
A handover report can be created by using the Report-Grid component.
You need to use a Report-Grid component in your workbook if you want to be able to publish the workbook. This is usually on a separate page to the other components.
When constructing a handover report, you will usually want to include information from a number of forms from the same workbook, so you would add multiple Report-Grid components to a page in order to construct your report. Each Report-Grid component is configured to display entries stored against a form you are interested in. For multiple forms, you need multiple components.
We recommend including the Report Header only on the first Report-Grid component on the page – this will display the report title and shift details, which are usually only displayed once per report.
Although you could add a Report-Grid component to any page in a workbook, only one page can be nominated as the Handover Report for that workbook (this is done in Workbooks Settings).
There are 2 important details for the Shift Handover page.
- Set the rows in your grid to have Dynamic height – this will ensure the report displays all entries and will print nicely.
- In the workbook settings, you need to specify which page of the workbook is the handover report.
When printing out a handover report, background colours should be enabled in the browser's print function before printing.
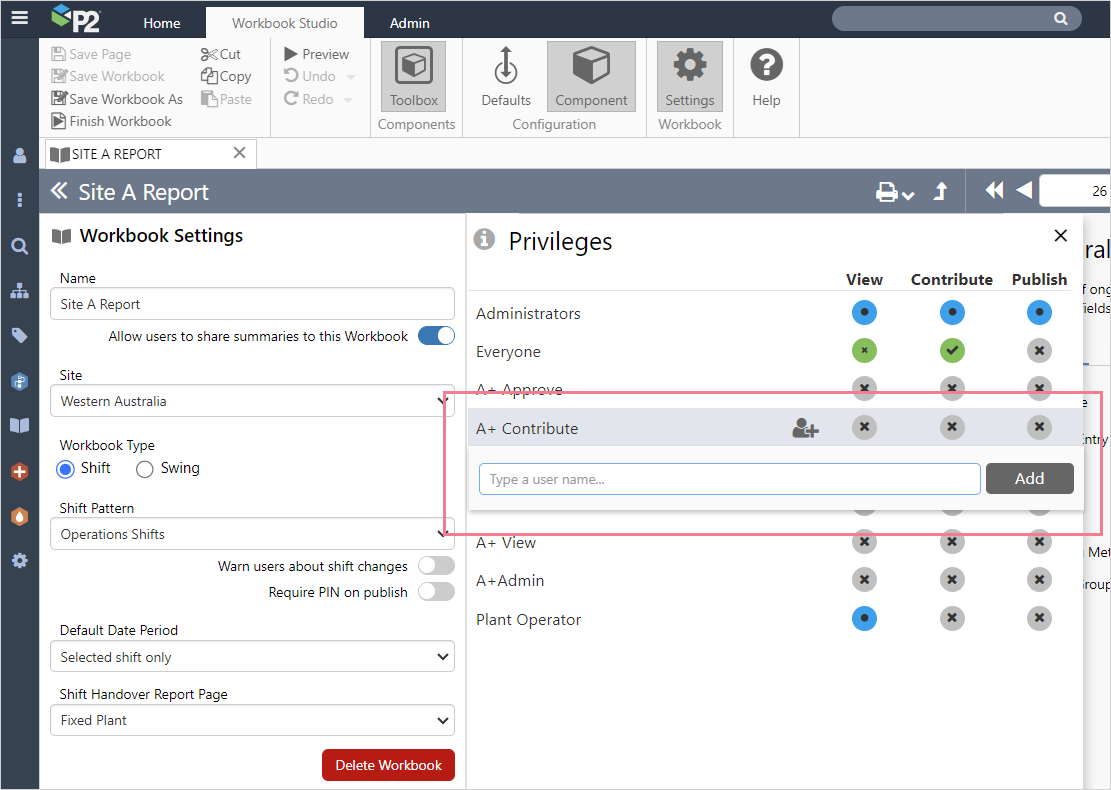
Settings
Finish off your workbook by ensuring the following Workbook Settings are correctly configured:
- Site and Shift or Swing Pattern: This is required in order for the Shift Picker to be displayed.
- Handover Report Page: This is required in order for the Print button to be displayed.
- Privileges: In addition to workspace privileges, you can further refine the security levels for a workbook. Note that you must have Explorer Admin privileges to do this. A handy shortcut to adding new users has also been added to this section, so you can add users as needed without having to go into Server Management.
Release History
- How to configure Shift Log (this release, 4.17)
- Handover Report component renamed Report - Grid
- Swings for sites and shift picker
- Extended component list for Shift Log
Love the Cheat sheet.. :) Well Done!!
Thanks Buddi, glad it helps!