ON THIS PAGE:
Overview
Breadcrumbs are a useful navigation tool for pages that allow users to drill down into a hierarchy to discover further information about a selected entity.
The following diagram shows a breadcrumb configured to display the entities in a hierarchy:
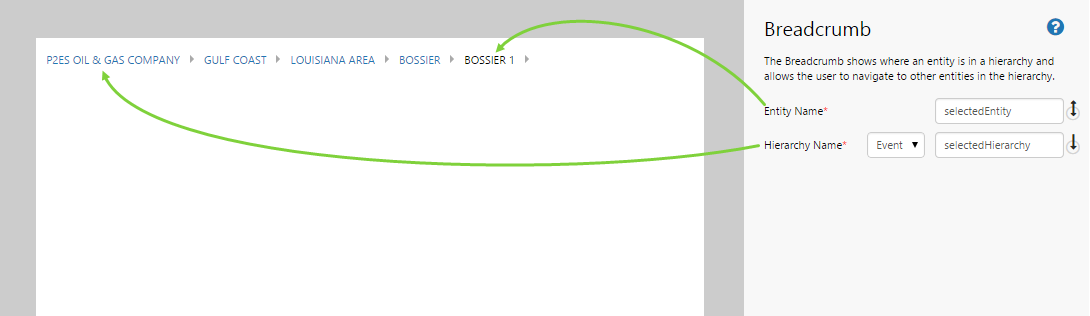
| Entity Name: | The name of the entity to display in the breadcrumb. It is always an event that can both publish and subscribe. The entered value is the name of the event that is published when an entity is selected from the breadcrumb. It is also the name of the event that the Breadcrumb listens to in order to determine the entity names to display. |
| Hierarchy Name: | The name of the hierarchy that the breadcrumb uses to get the entities from. This setting can either be a text value or an event. When set to an event, it is the name of the event that the Breadcrumb listens to in order to determine the hierarchy to display. |
Tutorial
In this tutorial, we'll look at adding a Breadcrumb to a page. This Breadcrumb will display the hierarchy path of the entity chosen in an Entity Selector. We'll also add a Target Bar to show how clicking within the breadcrumb can affect another component on the page.
Let's go through this process, step-by-step.
Step by Step: Creating a Breadcrumb That Shows the Hierarchy of a Selected Entity
Before you start, open a new tab in Explorer and click the “Create a New Page in Studio Mode” thumbnail. Choose the grid layout - you can adjust the rows and columns if you like but it's not important for this exercise.
If you have access to the training environment, you can follow the steps exactly as outlined here. Otherwise, you will need to adjust the configuration to suit your data.
Step 1. Add the Breadcrumb to the page
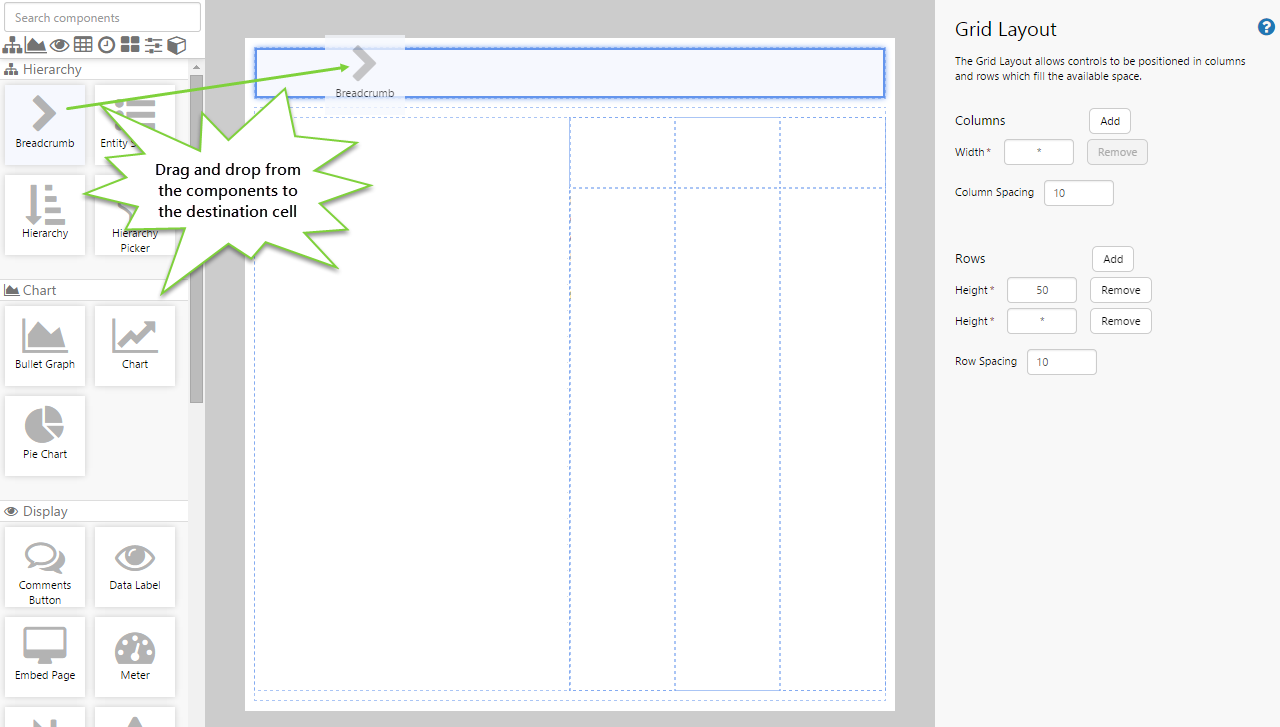
Drag and drop the Breadcrumb component onto a grid cell.
Step 2. Configure the Breadcrumb
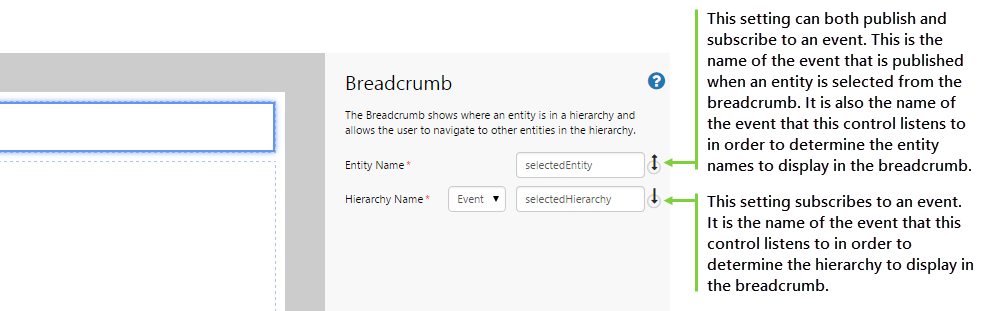
In this step, we want to populate the hierarchy name from an event that the breadcrumb is listening to. You'll notice that the events are already filled in with default event names. You can choose to change this name if you want, but often there's no real need to. Specify the following events:
- Entity Name: selectedEntity
- Hierarchy Name: (Event) selectedHierarchy
Entity Name is always an event, so that the breadcrumb will dynamically update when another component on the page publishes the entity that the user has selected.
- This is often used to link components such as charts and tables.
- It also means that other components on the page can listen to the event that is published when a user clicks on an item in the breadcrumb, which in turn will dynamically update the components on the page.
Step 3. Add and configure an Entity Selector
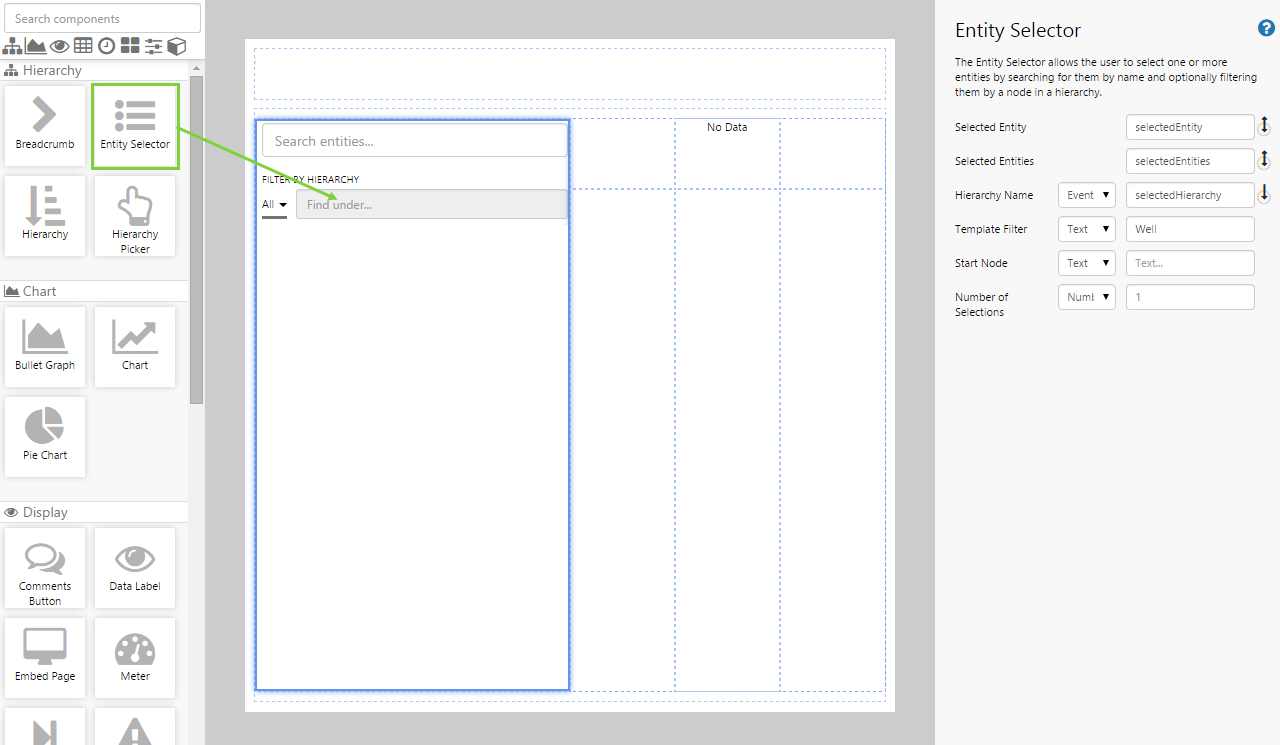
Drag and drop the Entity Selector onto a grid cell, and configure it as follows:
- Selected Entity: selectedEntity
- Selected Entities: selectedEntities
- Hierarchy Name: (Event) selectedHierarchy
- Template Filter: (Text) Well
- Start Node: (leave this blank)
- Number of Selections: (Number) 1
You will notice that the first 3 items already have some default names configured. You can change this if you like, but you will need to remember your changes and substitute appropriately for the next step.
Step 4. Set the event defaults
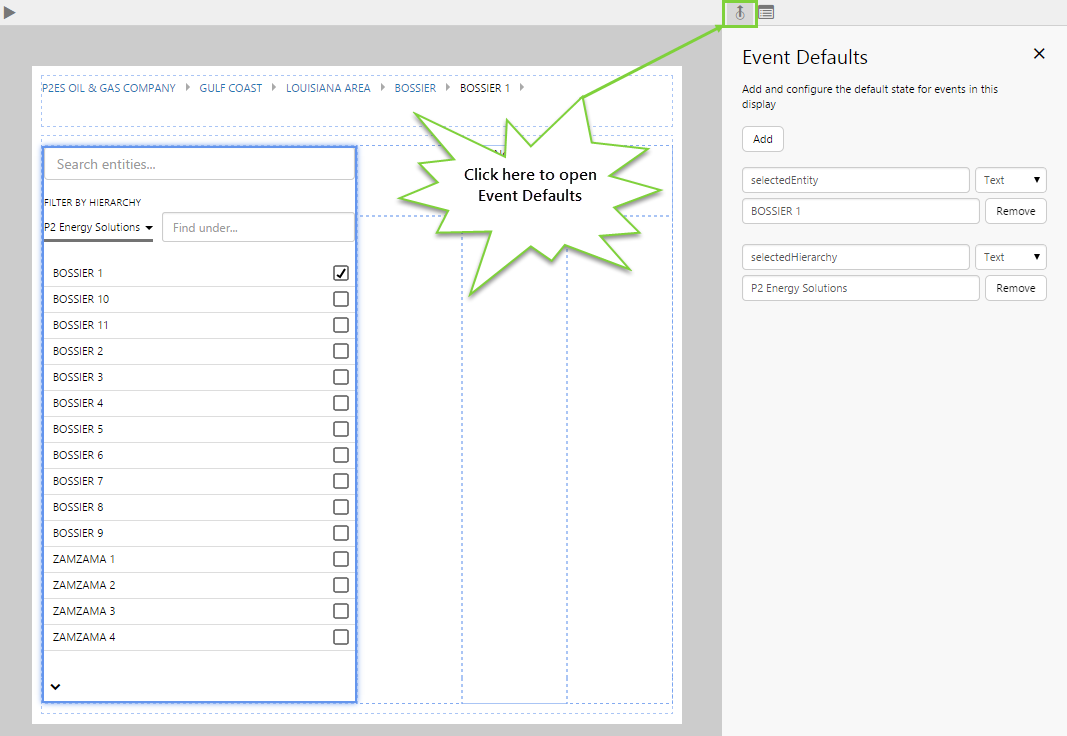
At the moment, the page shows nothing because the user hasn't selected anything. Let's change that and get some default data to display. We do this by creating defaults for the events specified in the components in the previous steps.
- Click the Event Defaults button on the Studio toolbar.
- Add an event called "selectedEntity" with the text BOSSIER 1.
- Add an event called "selectedHierarchy" with the text P2 Energy Solutions.
You should now see the Breadcrumb and Entity Selector populated with entities. Note that you can set the event defaults at any time.
Click the preview ![]() button on the Studio toolbar to see what your page will look like in run-time. You will now be able to select entities from the Entity Selector and observe the change in the Breadcrumb.
button on the Studio toolbar to see what your page will look like in run-time. You will now be able to select entities from the Entity Selector and observe the change in the Breadcrumb.
Step 5. Add some data
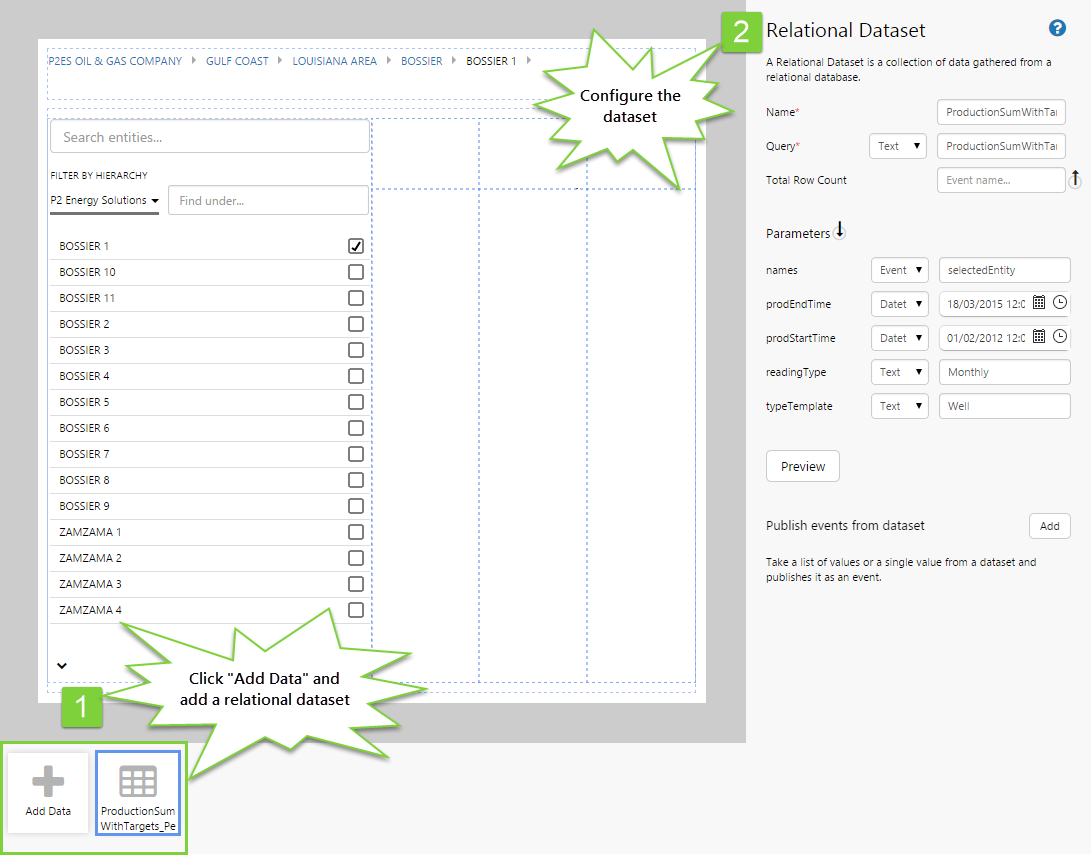
Click the preview ![]() button again to switch back to edit mode, and do a couple of more things. We're going to add some data and another component to demonstrate further interaction with the Breadcrumb.
button again to switch back to edit mode, and do a couple of more things. We're going to add some data and another component to demonstrate further interaction with the Breadcrumb.
- Below the canvas, click the button labelled “Add Data”.
- Choose the source data you are going to use. For this tutorial, we are using a dataset called “ProductionSumWithTargets_Perth.”
- In the configuration options, specify the following:
- Name: ProductionSumWithTargets_Perth1 (this is automatically added)
- Query: ProductionSumWithTargets_Perth (this is the query in P2 Server that is being used to return the data)
- Parameters – names: (Event) selectedEntity
- Parameters – prodEndTime: (Datetime) 18/03/2015 12:00:00 AM
- Parameters – prodStartTime: (Datetime) 01/02/2012 12:00:00 AM
- Parameters – readingType: (Text) Monthly
- Parameters – typeTemplate: (Text) Well
Step 6. Add a Target Bar
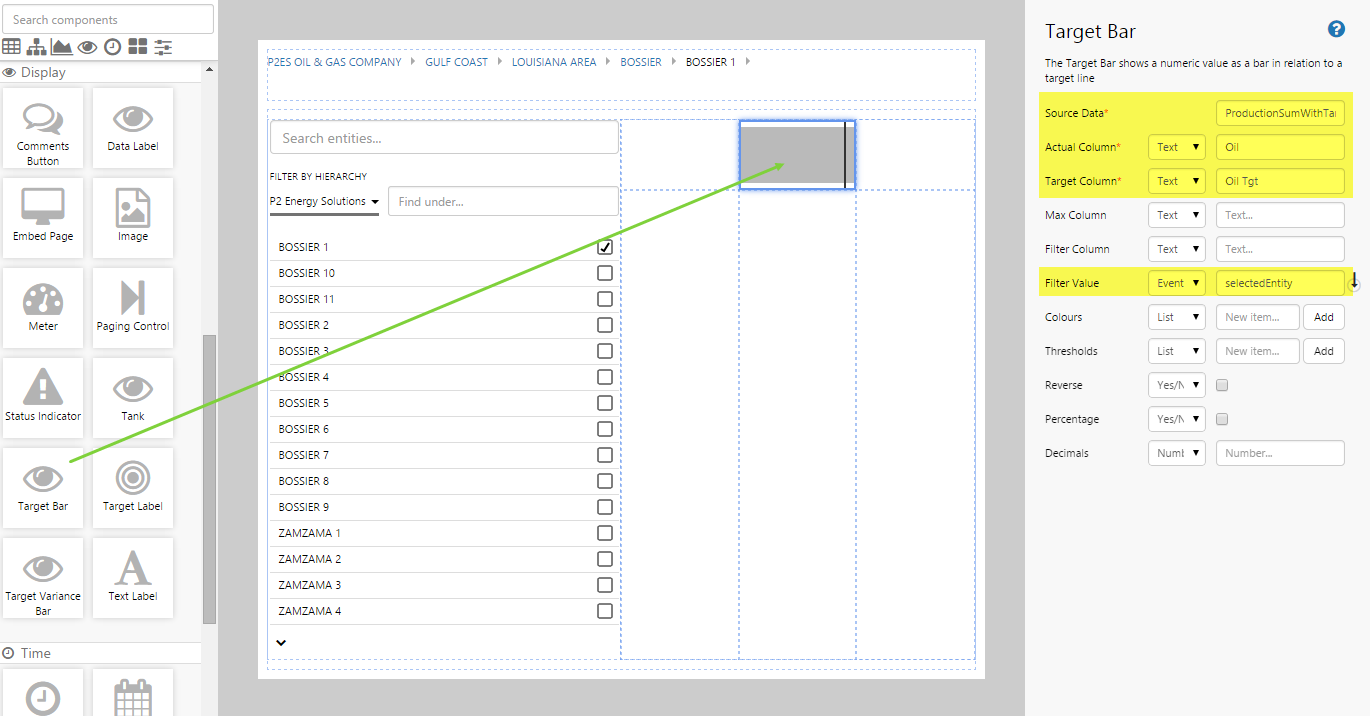
As a last step, let's add a Target Bar that will make use of that data.
- Drag and drop a Target Bar onto another cell on the page.
- Configure the settings as follows:
- Source Data: ProductionSumWithTargets_Perth1
- Actual Column: (Text) Oil
- Target Column: (Text) Oil Tgt
- Filter Value: (Event) selectedEntity
Step 7. All done!
Congratulations! You now have a fully functioning breadcrumb that changes depending on the entity you select.
- Click the preview
 button on the Studio toolbar to see what your page will look like in run-time.
 - Watch the Target Bar change as you choose different entities.
- When you select an entity from the breadcrumb, the components on the page are also affected.
![]() Don't forget to save your page!
Don't forget to save your page!