Overview
The Entity Selector allows the user to select one or more entities from a list. The user can either use a search bar to search for entities by name, or use a filter to find the entities in a hierarchy.
The following diagram shows an Entity Selector that starts at a specific point in the hierarchy:
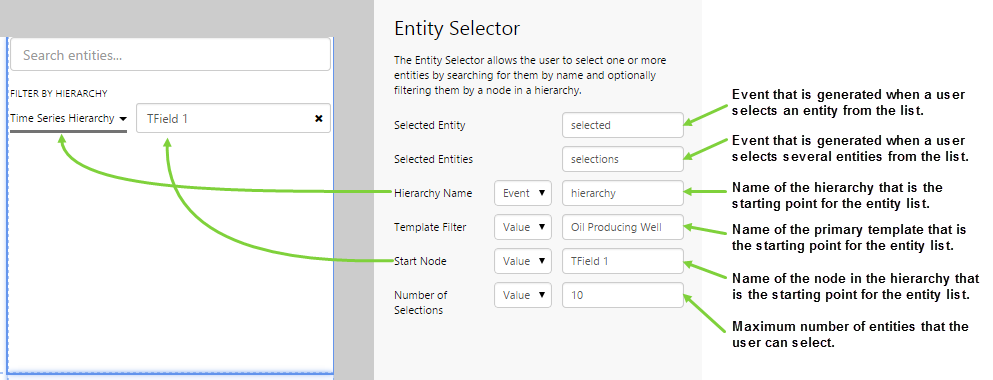
| Selected Entity: | The event that is generated when a user selects a single entity from the list. You should not use this if you want the user to select multiple entities. |
| Selected Entities: | The event that is generated when a user selects multiple entities from the list. You should not use this if you want the user to select a single entity. |
| Hierarchy Name: | The name of the hierarchy that is the starting point for the list of entities that is initially displayed in the control. The entities are displayed in a flat list. |
| Template Filter: | The name of the primary template that is the starting point for the list of entities that is initially displayed in the control. This requires some knowledge of how the hierarchy is constructed in P2 Server. Only entities that have this template will be displayed. |
| Start Node: | The name of the node in the hierarchy that is the starting point for the list of entities that is initially displayed in the control. Only the children of this node will be displayed. |
| Number of Selections: | The maximum number of entities that a user is able to select from the available list of entities. If you want the user to only select a single entity, you should not specify more than 1, otherwise you may get unexpected behaviours. |
Tutorial
The Entity Selector can be used as an alternative to the Hierarchy control when:
- You want to limit the number of selections a user can make. For example, you may want the user to only be able to select a single entity.
- You want the user to be able to search the hierarchy to find entities they are interested in.
- You want to filter the hierarchy to only show certain entities.
You should not use the Hierarchy control and Entity Selector on the same page. Doing so may result in unexpected behaviours.
In this tutorial, we'll look at adding an Entity Selector to a page, which will allow the user to select up to 3 entities. We'll also add a Bar Chart to show how using the Entity Selector can affect another component on the page.

Now, let's look at how we're actually going to do this, step-by-step.
Step by Step: Adding an Entity Selector that Controls a Bar Chart
Before you start, open a new tab in Explorer and click the “Create a New Page in Studio Mode” thumbnail. Choose the grid layout - you can adjust the rows and columns if you like but it's not important for this exercise.
If you have access to the training environment, you can follow the steps exactly as outlined here. Otherwise, you will need to adjust the configuration to suit your data.
Step 1. Add the Entity Selector to the page
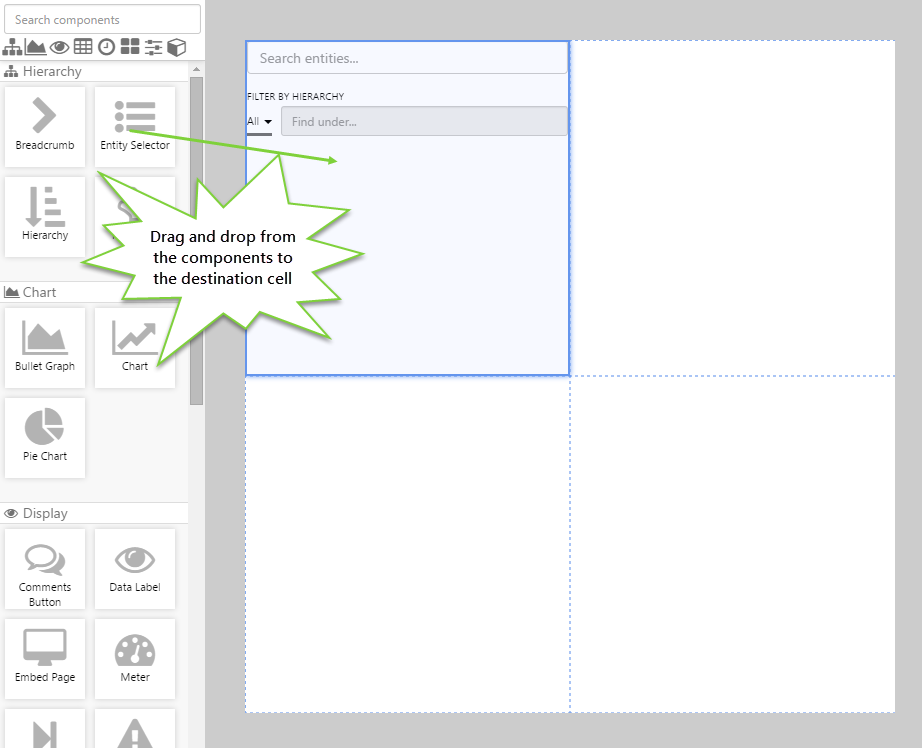
Drag and drop the Entity Selector component onto a grid cell.
Step 2. Configure the Entity Selector
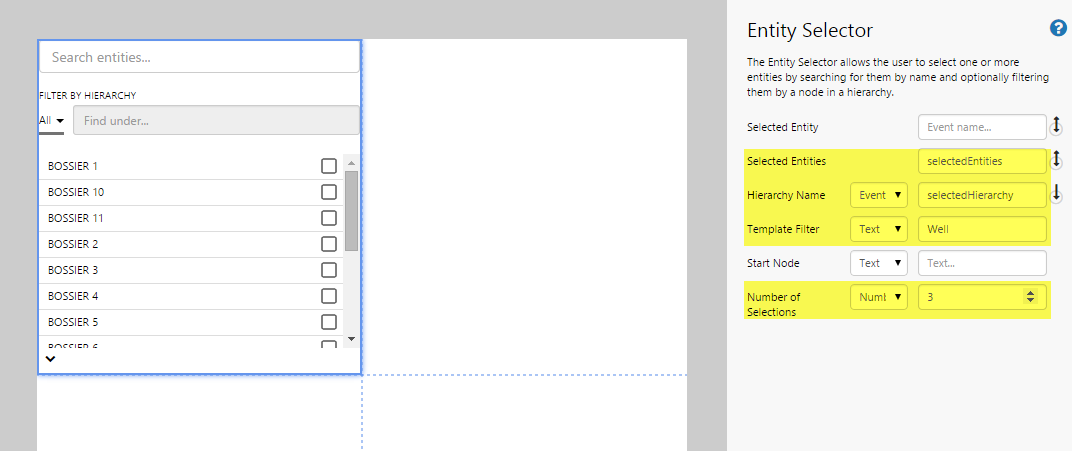
In this step, we want to create an Entity Selector that will allow the user to select up to 3 wells. As we are concerned with multiple entity selections, we can ignore the Selected Entity setting. Configure the fields as follows:
- Selected Entity: (leave this blank)
- Selected Entities: selectedEntities
- Hierarchy Name: (Event) selected Hierarchy
- Template Filter: (Text) Well
- Start Node: (leave this blank)
- Number of Selections: (Number) 3
Note: If you specify an event for both Selected Entity and Selected Entities, the Entity Selector may behave strangely.
Step 3. Set the event defaults
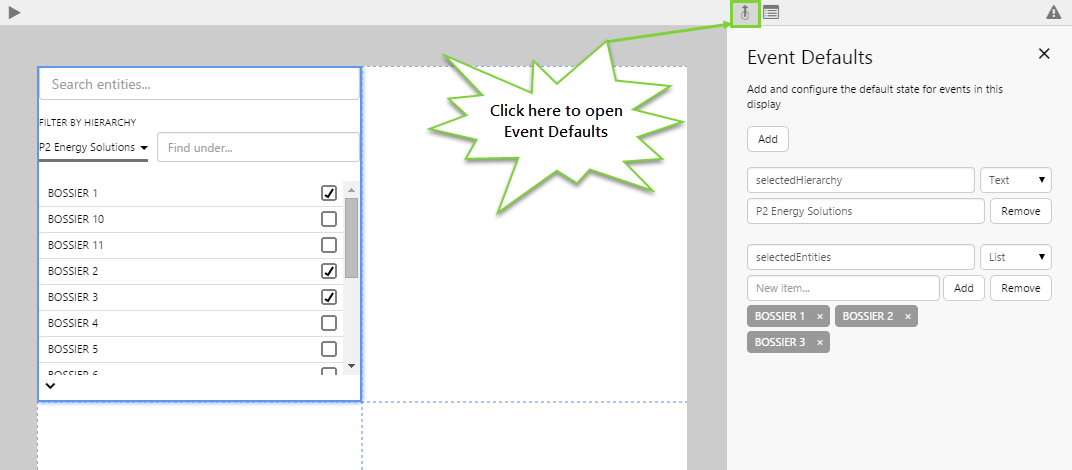
If you don't set any event defaults, the Entity Selector will allow the user to select entities from any hierarchy. But let's say we want to present a particular hierarchy when the page is first loaded. We can do this here. We can also specify the 3 entities that will always be selected by default when the page is loaded.
- Click the Event Defaults button on the Studio toolbar.
- Add an event called "selectedHierarchy" with the text P2 Energy Solutions.
- Add an event called "selectedEntities" with a list containing BOSSIER 1, BOSSIER 2, BOSSIER 3.
You should now see the Entity Selector filter change to the default hierarchy, and the check boxes selected for the default entities. Note that you can set the event defaults at any time.
Click the preview ![]() button on the Studio toolbar to see what your page will look like in run-time. You should see that you will be able to select other entities from the Entity Selector, but you will never be able to select more than 3.
button on the Studio toolbar to see what your page will look like in run-time. You should see that you will be able to select other entities from the Entity Selector, but you will never be able to select more than 3.
Step 4. Add some data
Click the preview ![]() button again to switch back to edit mode. Let's do a couple more things. We're going to add some data and another component to demonstrate further interaction with the Entity Selector.
button again to switch back to edit mode. Let's do a couple more things. We're going to add some data and another component to demonstrate further interaction with the Entity Selector.
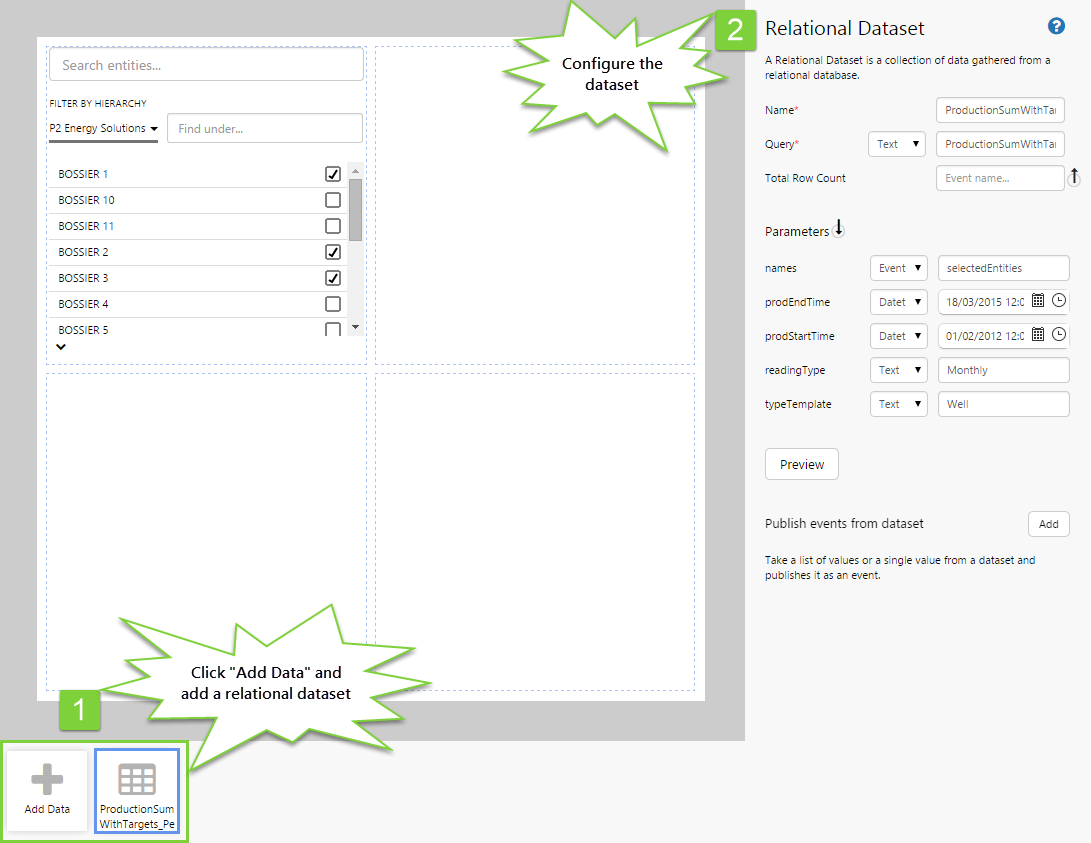
- Below the canvas, click the button labelled “Add Data”.
- Choose the source data you are going to use. For this tutorial, we are using a dataset called “ProductionSumWithTargets_Perth.”
- In the configuration options, specify the following:
- Name: ProductionSumWithTargets_Perth1 (this is automatically added)
- Query: ProductionSumWithTargets_Perth (this is the query in P2 Server that is being used to return the data)
- Parameters – names: (Event) selectedEntities
- Parameters – prodEndTime: (Datetime) 18/03/2015 12:00:00 AM
- Parameters – prodStartTime: (Datetime) 01/02/2012 12:00:00 AM
- Parameters – readingType: (Text) Monthly
- Parameters – typeTemplate: (Text) Well
Step 5. Add and configure a chart
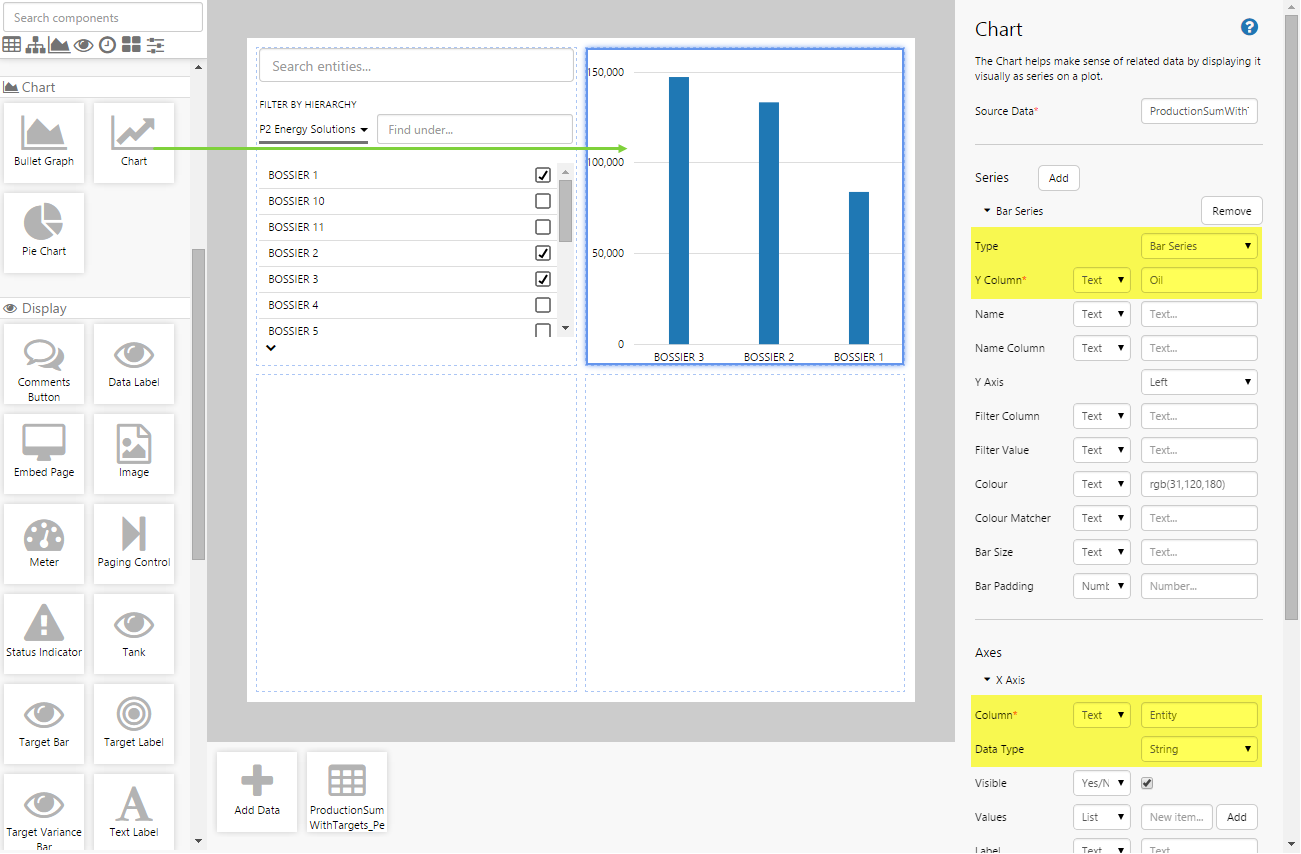
Let's add a chart that will make use of the data. Drag and drop a Chart component onto another cell on the page. Configure a bar chart as follows:
- Source Data: ProductionSumWithTargets_Perth1
- For the chart series:
- Type: Bar Series
- Y Column: (Text) OIL
- For the X Axis:
- Column: (Text) Entity
- Data Type: String
Step 6. All done!
Congratulations! You now have a fully functioning Entity Selector that updates a bar chart when you select different entities.
- Click the preview
 button on the Studio toolbar to see what your page will look like in run-time.
 - Choose different entities and see the bar chart change.
![]() Don't forget to save your page!
Don't forget to save your page!