The Triggers panel in Studio mode is where you can set up controls for updating or manuipluating variables; these controls are not visible on the Explorer page.
This topic covers the Hierarchy Query control, and how to use it.
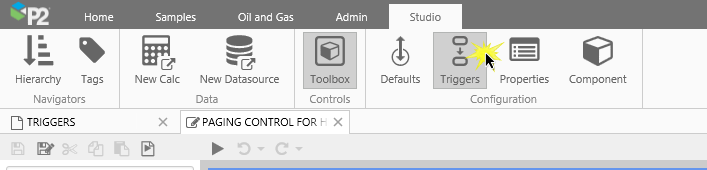
To open the Triggers panel, click the Triggers button in the Configuration group on the Studio ribbon tab.
Hierarchy Query Overview
A Hierarchy Query is used to generate a list of child entities from a defined hierarchy, for a selected entity. It also exposes the primary template name for the selected hierarchy. Using a hierarchy query, you could display the children of a selected entity with some of their attributes, in a chart or a table layout. For example, show the oil and water production figures (attribute values) for all oil producing wells (child entities) of a particular region (selected entity).
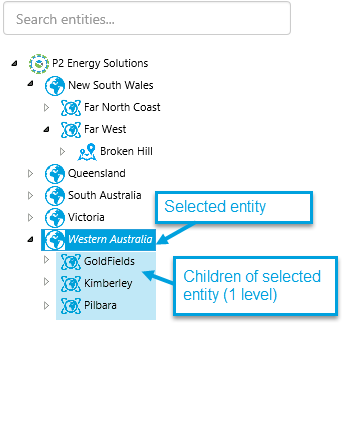
Here are examples of how a selected entity's children are returned by a hierarchy query. The child entities are assigned to a variable, and can then be used elsewhere on the page, or sent to another page or to a trend using a hyperlink. The configuration of the hierarchy query determines how many levels of child entities are assigned to the variable, as well as whether to filter on one or more defined templates.
 |
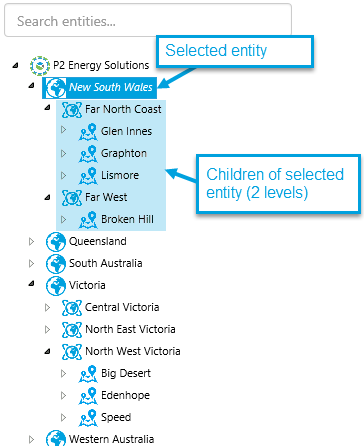 |
| Child entities of selected entity going down one level | Child entities of selected entity going down two levels |
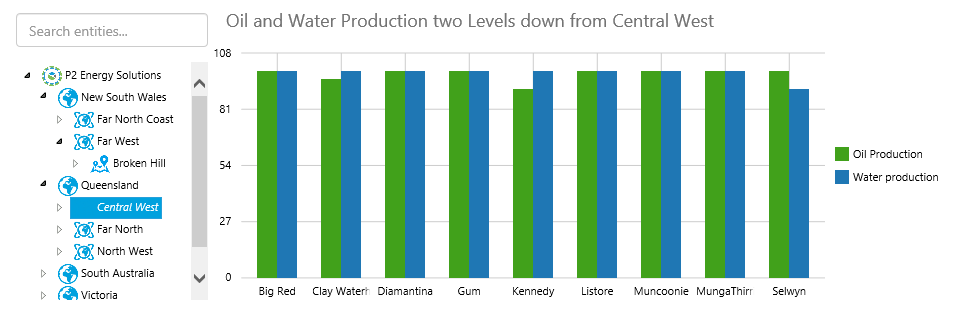
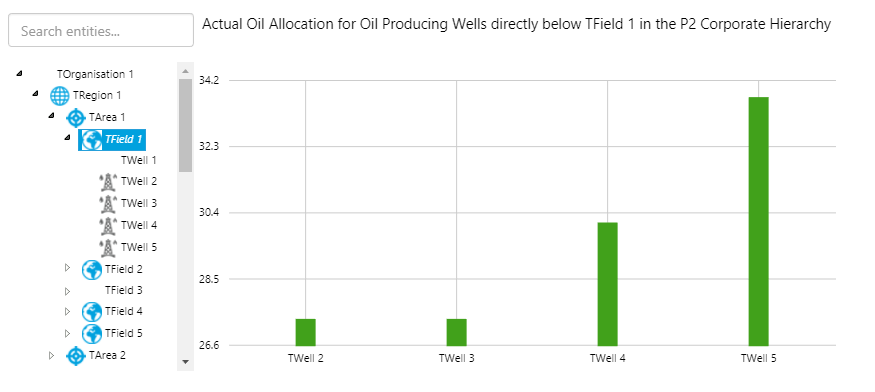
Below is an example of the child entities from the level below the selected entity, appearing on a page in a chart. The query has been configured so that only entities whose primary template is an Oil Producing Well template are included in the set of child entities.
 |
You can configure a hierarchy query to select a set of child entities as follows:
|
A hierarchy is an organised structure of entities, which models an organisation's assets. Read more about the Hierarchy Navigator, the Hierarchy page component, and setting up a hierarchy in Server Management.
Tutorial
In this tutorial, we'll add and configure a hierarchy query, a hierarchy component to control it, a selection list to display its child entities and a text label to describe the child entities.
Later in the tutorial we'll show how to change the hierarchy query by changing the Levels and adding Template Filters, as well as selecting the Filter By Primary Only check box.
Finally, we'll work with the paging properties of the hierarchy query.
At the end of the tutorial, we'll have something that looks like this:
Setting up a Page with a Basic Hierarchy Query
There are four steps in the first part of the tutorial:
- Step 1. Prepare the new tutorial page.
- Step 2. Update the selectedEntity default value.
- Step 3. Add and configure hierarchy, text label and selection list.
- Step 4.. Add a hierarchy query.
If you're unfamiliar with the process of building pages, read the article Building an Explorer Page.
Step 1. Prepare the Tutorial Page
Note: Before you start the tutorial, prepare a precision layout page in Studio and save it with a suitable name, such as Hierarchy Query Tutorial.
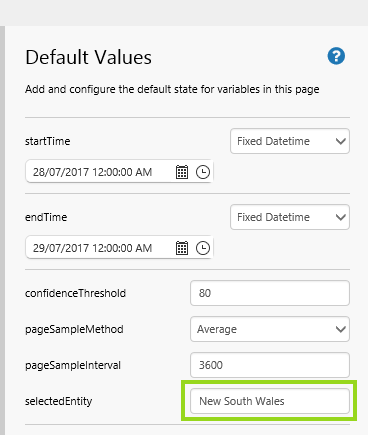
Step 2. Update the selectedEntity Default Value
1. Open the Default Values panel.
2. Type New South Wales in the selectedEntity value edit box.
This is an entity from the P2 Corporate hierarchy which we will be using for this tutorial.
Step 3. Add and Configure a Hierarchy, a Text Label and a Selection list
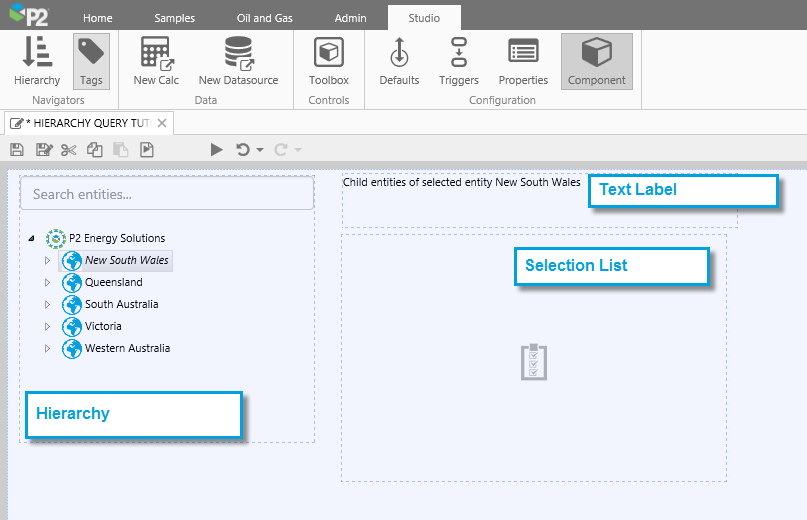
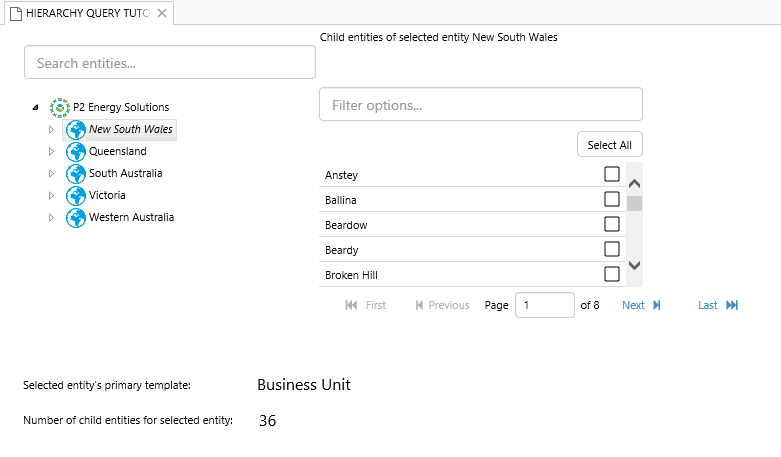
The hierarchy is for selecting the entity (selectedEntity), the selection list is for displaying the selected entity's child entities, and the text label provides a description of the child entities.
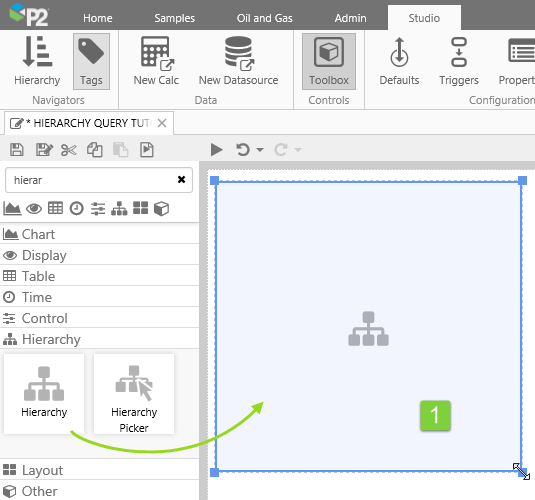
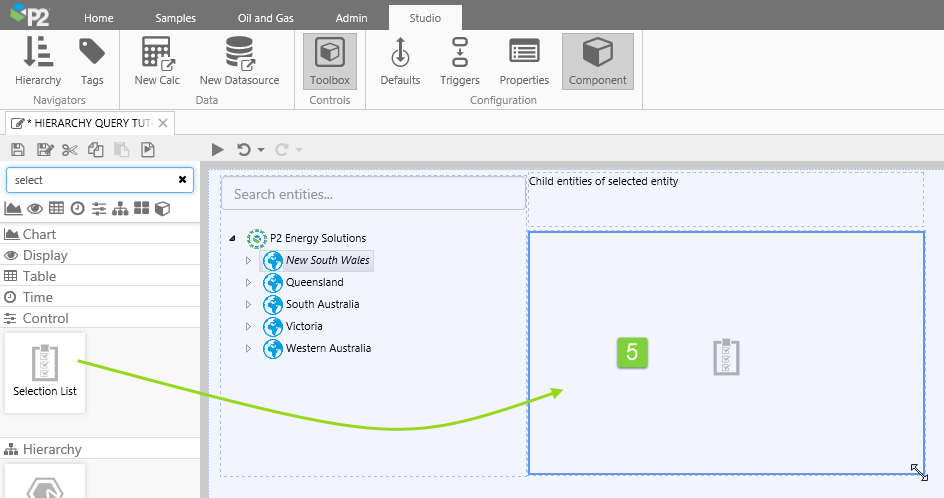
1. Drag a Hierarchy onto the page. Resize it to fit in the top left area of the page, as shown.
2. In the Hierarchy component's property panel, select P2 Corporate from the drop-down list of available hierarchies for the Hierarchy Name.
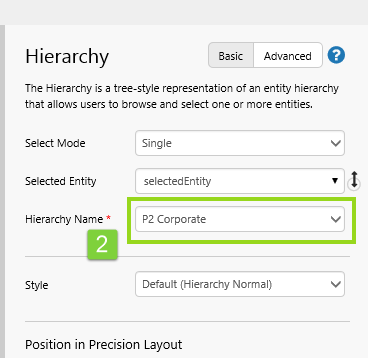
Note how the default value for Selected Entity is selectedEntity. This control will be used for updating the selectedEntity variable.
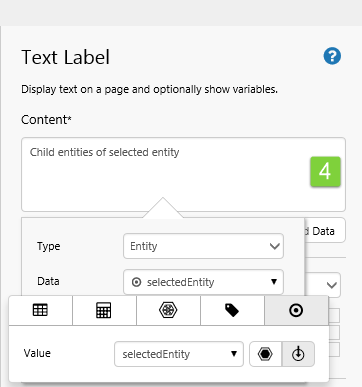
3. Drag a Text Label onto the page, to the right of the hierarchy. Widen the label slightly, as shown.
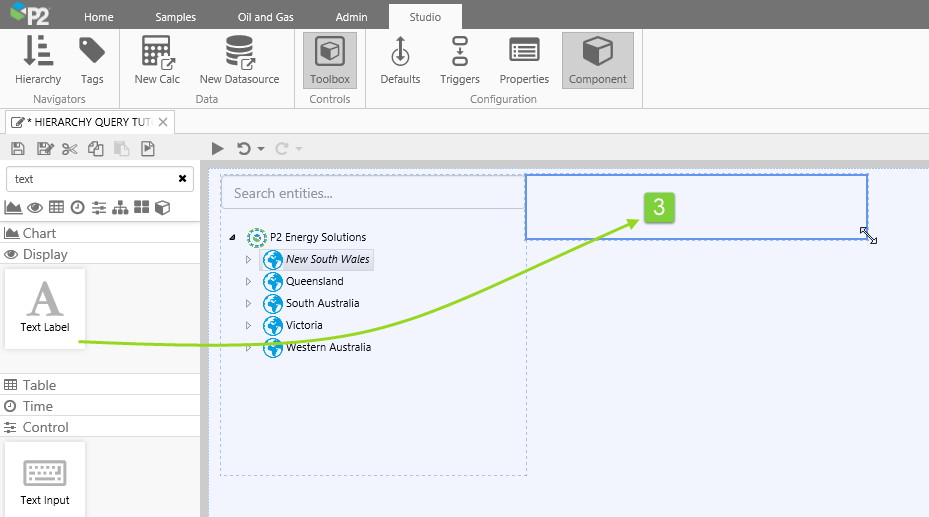
4. In the Text Label content, type "Child entities of selected entity " then click Add Data, select Entity as the Type, and add the selectedEntity variable.
5. Drag a Selection list onto the page, below the Text Label, and resize to line up to the Hierarchy and the Text Label, as shown.
6. In the Option Values of the Selection list component, type a variable name, childEntities, as a variable value.
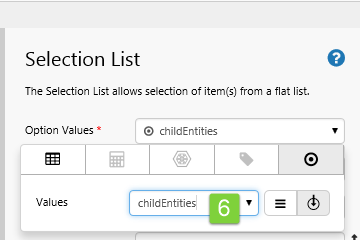
The childEntities variable will contain the child entities from the hierarchy query.
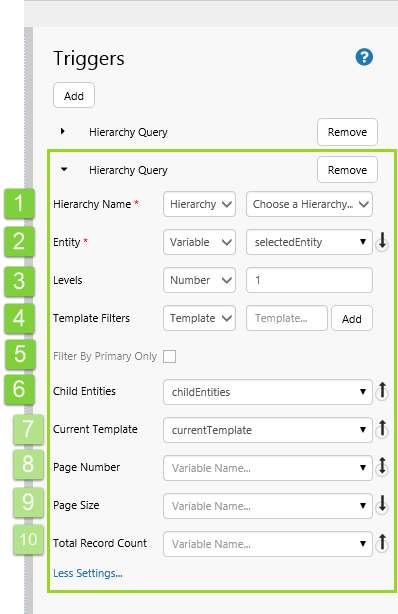
Step 4. Add and Configure a Hierarchy Query
In this step, we'll add a hierarchy query that gets child entities from the P2 Corporate Hierarchy, for the selected entity.
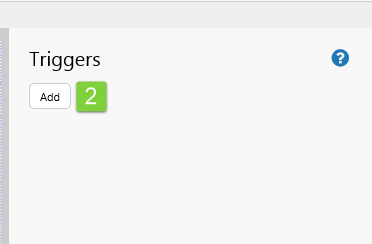
1. Click the Triggers button in the Configuration group on the Studio ribbon tab.
The Triggers panel opens so that you can add, edit or view the page's hierarchy queries.
2. Click Add to add a new hierarchy query.
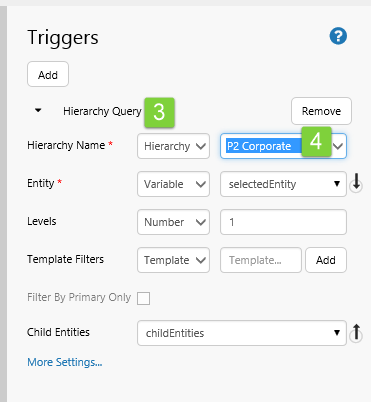
3. Click Hierarchy Query to expand the hierarchy query.
4. Select P2 Corporate Hierarchy from the Hierarchy Name drop-down list.
This matches the hierarchy used in the Hierarchy component.
Note that by default the Entity property uses the selectedEntity variable, and the Child Entities property uses the childEntities variable. These names describe the functionailty of the hierarchy query, which is that child entities (childEntities) are generated by the query when a user selects an entity (selectedEntity).
You now have a functioning hierarchy query, whose Entity is updated by the users's selection on the Hierarchy component, and whose Child Entities are displayed in the Selection List.
To try out the new functionality:
- Click the Preview
 button on the Studio toolbar to see what your page will look like in display mode.
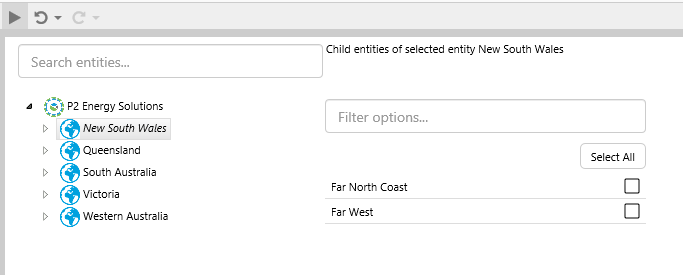
 - Note how the child entities of the default selectedEntity, New South Wales appear in the selection list.
- Select a different entity from the hierarchy, to see how its child entities are displayed in the selection list.
- Note that child entities match the child entities in the hierarchy component.
Configuring the Levels and Template Filters in the Hierarchy Query
Now we're going to change the hierarchy query to go down more than one level. We're also going to add template filters. Both of these changes will modify the query results (the child entities that are generated by the hierarchy query).
Changing the Levels
First click the Preview ![]() button again, to go back into Design mode.
button again, to go back into Design mode.
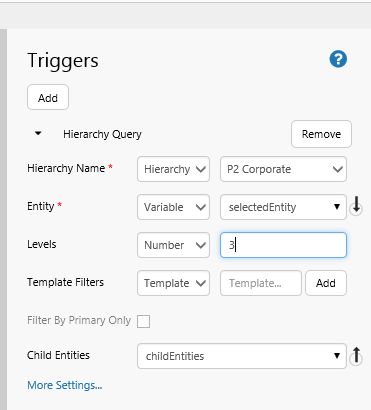
1. Open the Hierarchy Query in the Triggers panel, and update the Levels value to 3.
To try out the changed levels:
2. Click the Preview ![]() button on the Studio toolbar.
button on the Studio toolbar.
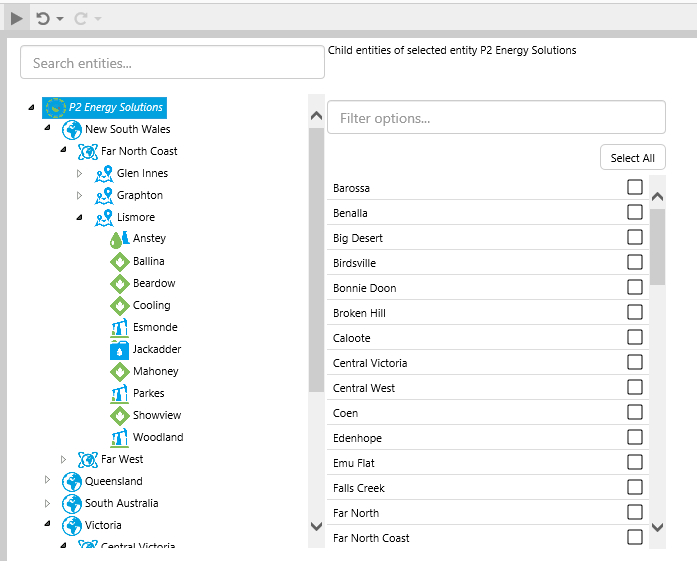
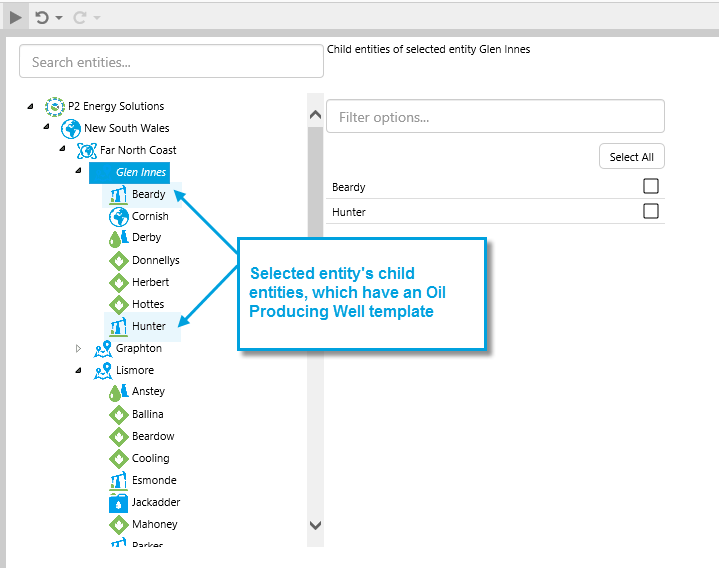
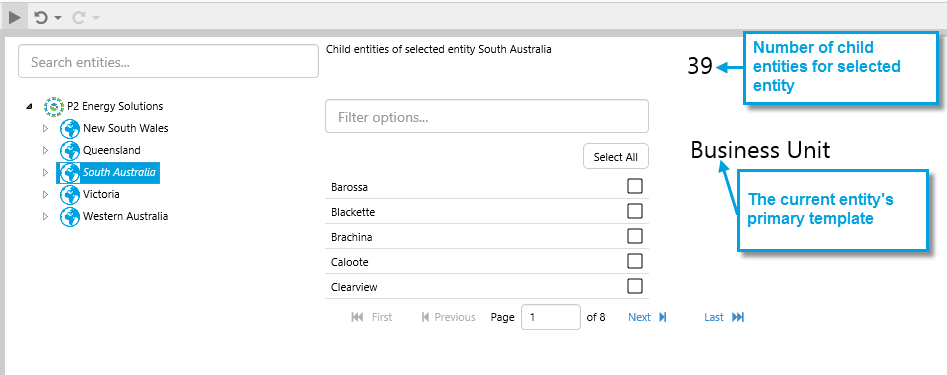
3. Click the top node of the hierarchy, P2 Energy Solutions.
Note how the child entities (displayed in the selection list) include child entities from three levels below the selected entity.
Adding Template Filters
A template defines the characteristics (attributes) of an entity.
For a hierarchy query, the list of child entities is restricted to those that have a template that is included in the list of template filters. (If there are no template filters, this restriction does not apply.)
First click the Preview ![]() button again, to go back into Design mode.
button again, to go back into Design mode.
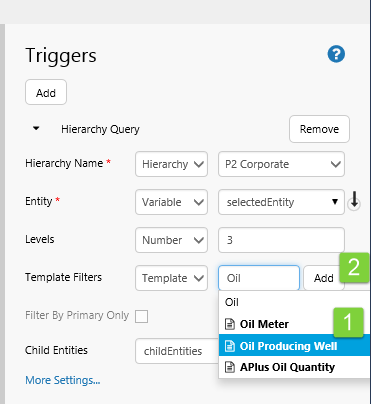
1. Open the Hierarchy Query in the Triggers panel, start typing a template name (type "Oil"), then select a template filter (select Oil Producing Well) from the auto-complete drop-down list.
2. Click Add next to the Template Filters, to add the new Template Filter for the Hierarchy Query.
To try out the new template filter:
2. Click the Preview ![]() button on the Studio toolbar.
button on the Studio toolbar.
3. Click the top node of the hierarchy, P2 Energy Solutions.
Note how not all of the child entities are selected; only those that have Oil Producing Well as a template.
Paging the Results of the Hierarchy Query
If you're expecting large sets of child entities from a hierarchy query, you can configure the hierarchy query so that a user can page through the resulting child entities. This is only where the control supports paging: for example, a Data Table control. You need a Paging Control in order to do this.
First click the Preview ![]() button again, to go back into Design mode.
button again, to go back into Design mode.
1. Drag a Paging Control onto the page, and position it below the Selection List.

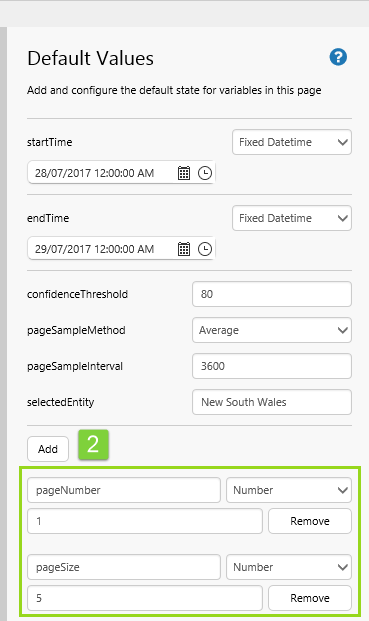
2. Add two new variables names to the Default Values: pageNumber and pageSize, both of type Number and assign the values 1 and 5, respectively.
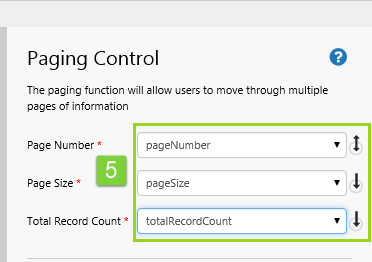
3. Open the Hierarchy Query in the Triggers panel, and click More Settings.
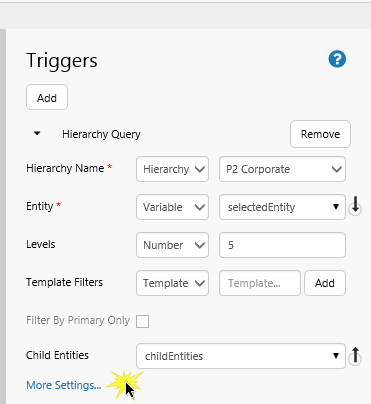
4. Update the paging properties as follows:
- Page Number: Select the pageNumber variable from the drop-down list.
- Page Size: Select the pageSize variable from the drop-down list.
- Total Record Count: Type totalRecordCount into the list.

5. Now click on the Paging Control component and configure its properties as follows:
- Page Number: Select the pageNumber variable from the drop-down list.
- Page Size: Select the pageSize variable from the drop-down list.
- Total Record Count: Select the totalRecordCount variable from the drop-down list.
To try out the new paging functionality:
- Click the Preview button on the Studio toolbar to see what your page will look like in display mode.
- Click New South Wales, near the top of the hierarchy.
- Click the Next button on the Paging Control to see the next five child entities appear in the selection list.

Displaying the Current Template Name and the Number of Child Entities
Also found in the More Settings section are the properties for the selected entity's primary template and its number of child entities (which we also used for the paging). We're going to display these variables on the page.
First click the Preview ![]() button again, to go back into Design mode.
button again, to go back into Design mode.
1. Drag two Data Labels onto the page, and widen each of these.
2. For the first, assign the variable totalRecordCount to the Value, and assign zero (0) to the Decimals.
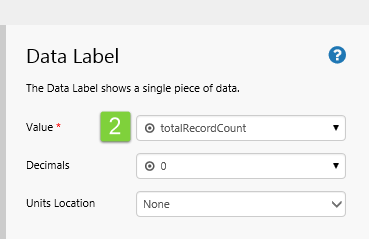
3. For the second, type a variable name currentTemplate into the Value property.

Click the Preview ![]() button to view the values in the new labels.
button to view the values in the new labels.
Note how these values change as you select different entities in the hierarchy.
Tips and Best Practices
Here are some tips to consider when using hierarchy queries.
Use a Single Hierarchy Query per Page
We strongly recommend that you only use a single hierarchy query in any P2 Explorer page.
FAQs
Some of the questions relating to hierarchy queries on an Explorer page:
Can I have a hierarchy query that is updated from an Explorer ribbon link?
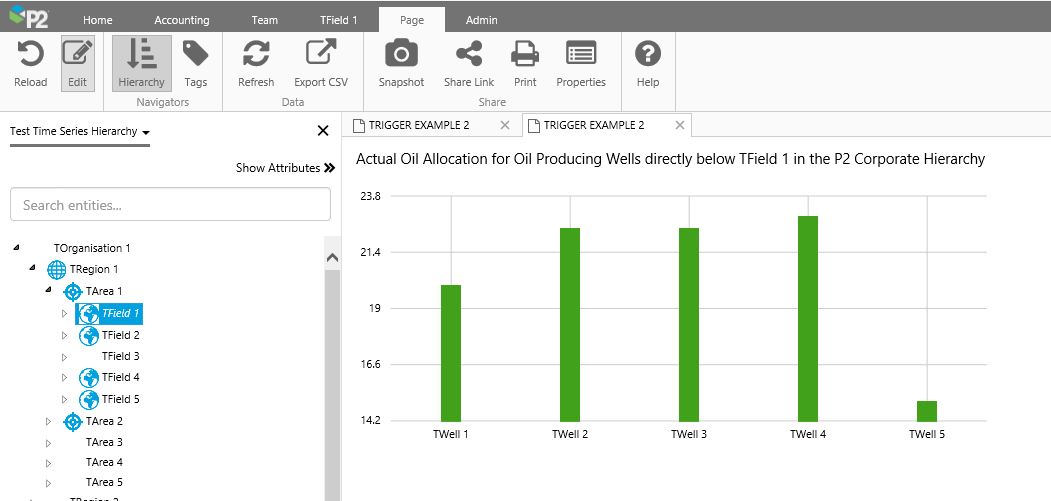
Yes, the user can update the selected entity by opening the page from the Table of Contents ribbon for an entity selected in the hierarchy navigator.
In the example below, the user selects an entity, TField 1, in the hierarchy navigator (1 in screenshot), then clicks the link in the entity's table of contents (2 in screenshot).
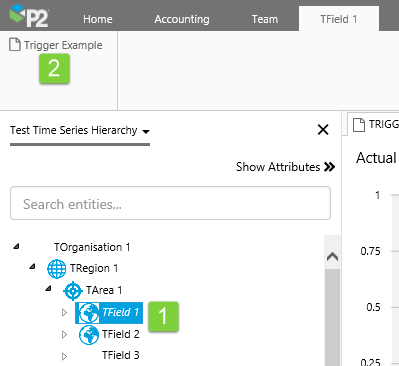
This opens a page which has a chart for the child entities of the selected entity, TField 1.
To add a link to a template's table of contents on the Explorer Ribbon, you need access and permissions in P2 Server.
Can I pass child entities to another page or a trend?
Yes, you can pass the child entities variable to a page or trend, using variable mapping in a hyperlink or other linking control.