ON THIS PAGE:
What the Hierarchy Query Does
A hierarchy is an organised structure of entities, which models an organisation's assets. The Hierarchy Query trigger is designed to generate a list of child entities from a hierarchy, for a selected entity. The list of child entities is stored in a variable, which can be used in the same way as any other entity variable, including passing it to a page or trend.
The list of child entities is limited by:
- Searching a defined number of levels deep in the hierarchy (e.g. return only the direct children of an entity by limiting the search to 1 level).
- Finding all descendants of a particular type (e.g. find all children of type ‘Well’).
- A combination of the above.
A common way of setting up a Hierarchy Query trigger is to specify a hierarchy and starting entity, along with a list of templates and the number of levels down the hierarchy to traverse. This configuration will search for all child entities with one of the specified templates, and the returned list of entities is subsequently used in other components on the page.
The Hierarchy Query also exposes the primary template name for the starting entity. This can also be used to drive the data displayed on a page and is usually reserved for more powerful drill-down analyses.
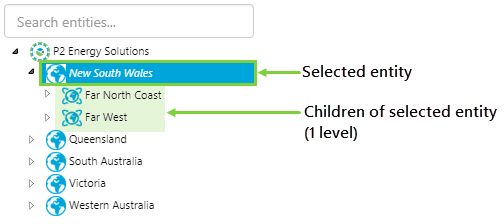
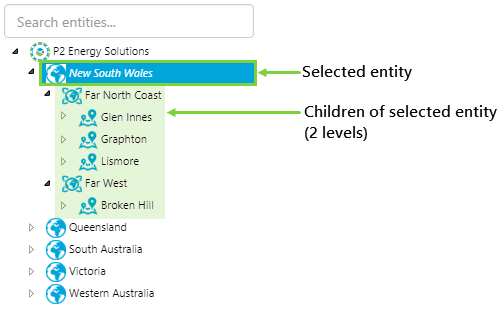
Here are some examples of how a selected entity's children are returned by a hierarchy query. The child entities are assigned to a variable, and can then be used elsewhere on the page, or sent to another page or to a trend using a hyperlink. The configuration of the hierarchy query determines how many levels of child entities are assigned to the variable, as well as whether to filter on one or more defined templates.
| Child entities of selected entity going down one level: | Child entities of selected entity going down two levels: |
 |
 |
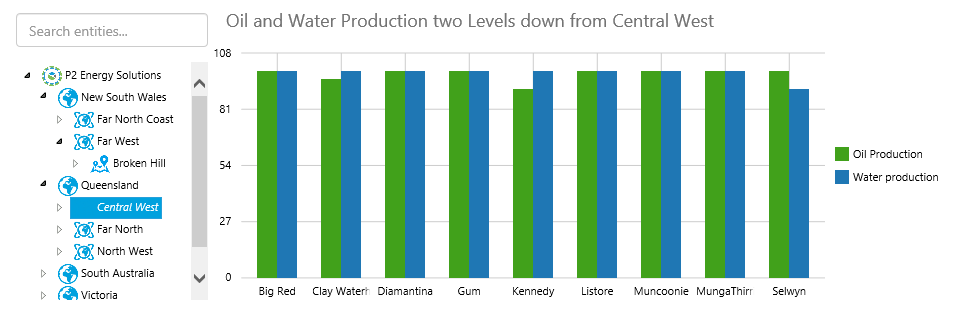
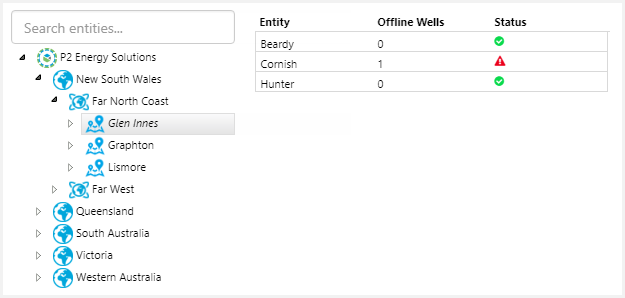
Using a hierarchy query, you could display the children of a selected entity, along with some of their attributes, in a chart or a table layout. The example below shows the oil production and water production (attribute values) for all oil producing wells (child entities) of a particular region (selected entity).
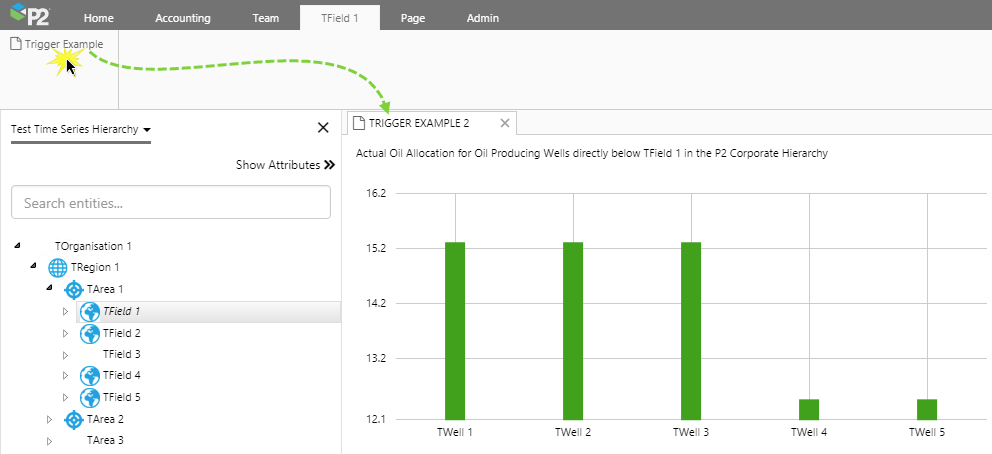
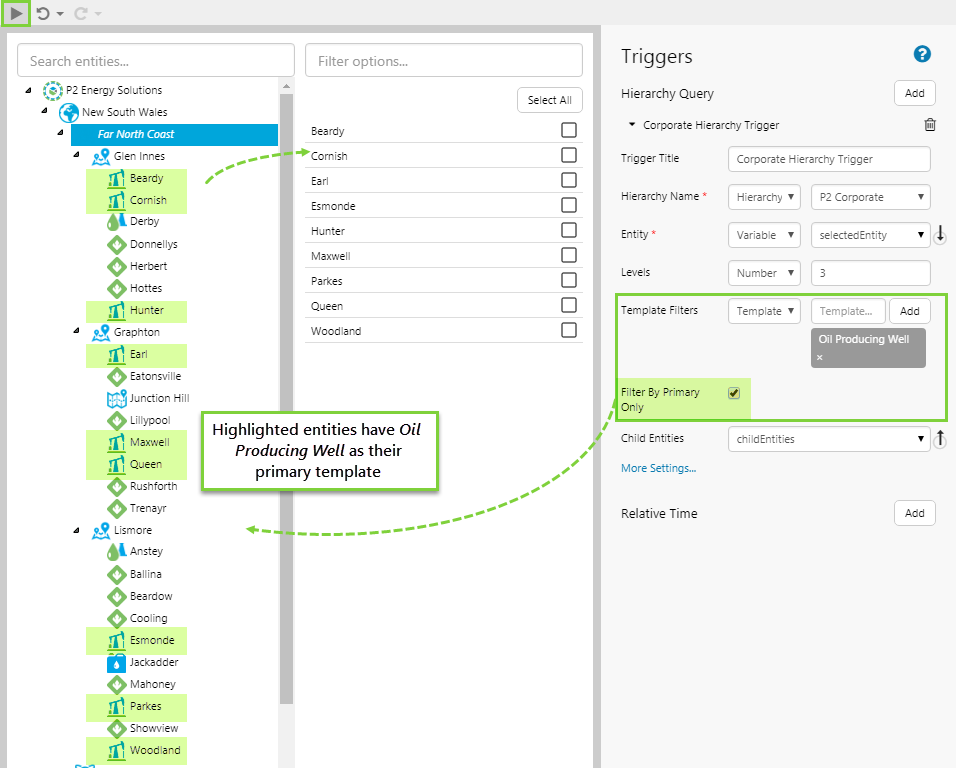
The example below shows the child entities of the selected entity, appearing on a page in a chart. The query has been configured to only include child entities whose primary template is an Oil Producing Well. TWell 1 is not included in the chart because it does not have Oil Producing Well as a primary template - you can see this in the hierarchy because the icon reflects the entity's primary template.
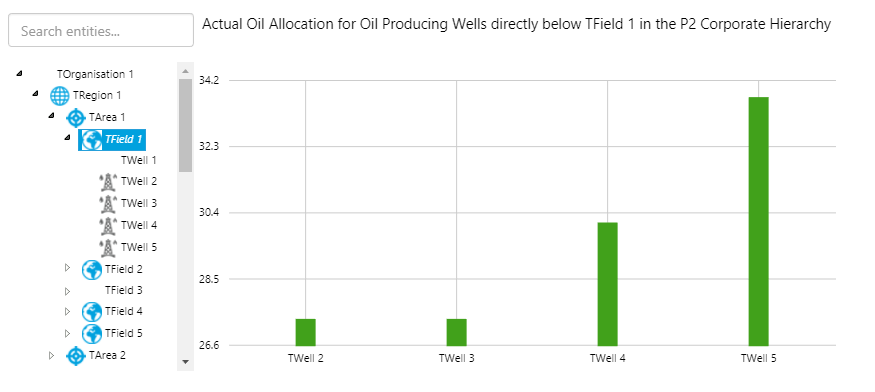
The trigger on a page is also activated when a user opens the page from the Table of Contents. When a user clicks an entity in the Hierarchy Navigator, the Table of Contents for that entity opens in the ribbon. If the Table of Contents has a page containing a trigger, then the clicked entity will be passed to that page as the Selected Entity. In the example below, the user selects an entity, TField 1, in the hierarchy navigator, and then clicks the link in the entity's Table of Contents. This opens a page which has a chart for the child entities of the selected entity, TField 1.
Configuration Overview
The following image shows how to use the configuration options of a hierarchy query:
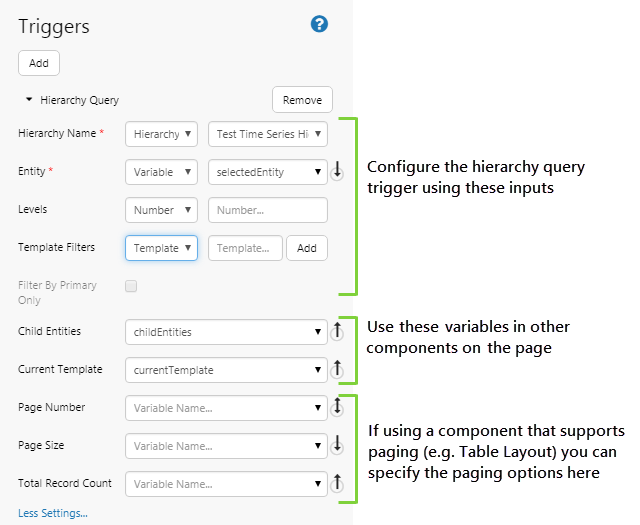
The main configuration options are:
| Trigger Title | The name used to identify the hierarchy query. |
| Hierarchy Name | Select a hierarchy to query from. Either select a variable, or select a hierarchy from the drop-down list of hierarchies that exist in IFS OI Server. |
| Entity | Assign a fixed entity name, or more commonly a variable entity that the user will update from another page control. This is the entity whose children the hierarchy query returns. |
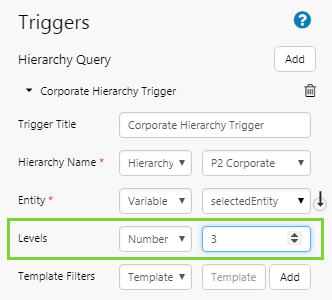
| Levels | Specify how many levels to fetch from, below the selected entity (1 for one level down, 2 for two levels, and so on). The default is one level (1). |
| Template Filters | Optionally add one or more template filters, to restrict what type of entity to fetch. This is covered in the tutorial in more detail, under Adding Template Filters. |
| Filter By Primary Only | You can further restrict to child entities where their primary template is one of the listed template filters. |
| Child Entities | The child entities returned by the query are assigned to an entity list variable (the default variable is called childEntities). |
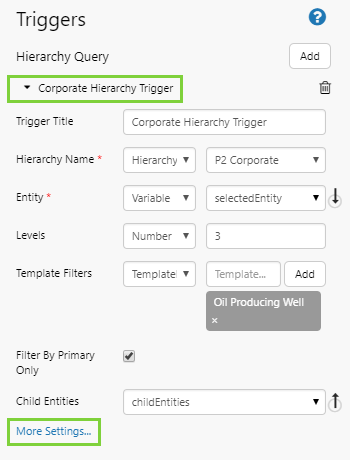
More Settings
Click More Settings to show additional configuration options, and Less Settings to hide the extra options.
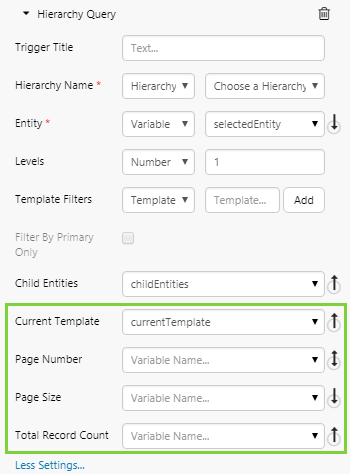
| Current Template | Use this property to assign the name of the selected entity's current primary template to a variable (called currentTemplate by default). |
| Page Number | The number of the page that is being displayed. You can use the Page Number, Page Size, and Total Record Count in conjunction with a Paging Control, to allow paging of the child entities. You should create this variable as a default value, however you may leave the value blank. A blank value will display the first table page when the Explorer page is loaded. |
| Page Size | The number of rows of data to display on each page of the table. You should also create a default value for this variable, and assign it a value. E.g. A page size of 5 means that 5 rows of data will be displayed on each page of the table. |
| Total Record Count | The total number of records in the set of data, rounded up. This is used by the paging control to determine the size of data. You should create this variable as a default value, however you may leave the value blank as this will be determined by the size of the set of data. Setting a value here will restrict the number of total records shown in the table. |
Tutorials
In this series of tutorials, we'll add and configure a hierarchy query, along with a hierarchy component to control it, a selection list to display its child entities, and a text label to describe the child entities.
Later we'll change the hierarchy query by changing the levels and adding template filters, as well as filtering by primary templates. Finally, we'll work with the paging properties of the hierarchy query.
At the end of the tutorials, your page should look like this:
Tutorial 1: Simple Hierarchy Query
If you're unfamiliar with the process of building pages, read the article Building an Explorer Page.
Step 1. Prepare a Studio Page

Before you start, click the New Page button on the Home tab of the ribbon. Choose the Grid layout.
- Add another row
- Configure the 2nd and 3rd rows to have a height of 50
- Assign a Column Spacing and Row Spacing of 10.
Step 2. Update Default Values
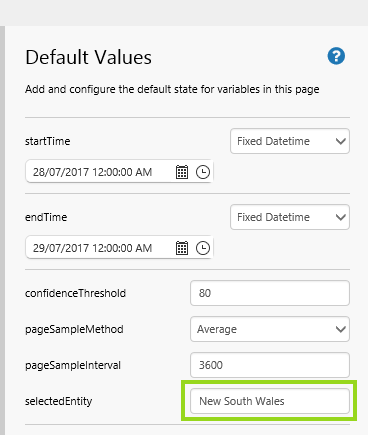
1. Open the Default Values panel.
2. In the selectedEntity box, type New South Wales.
This is an entity from the P2 Corporate hierarchy which we will be using for this tutorial, and New South Wales will be selected by default when the page loads.
Step 3. Add a Hierarchy Query Trigger
In this step, we'll add a hierarchy query that gets child entities from the P2 Corporate hierarchy, for the selected entity.
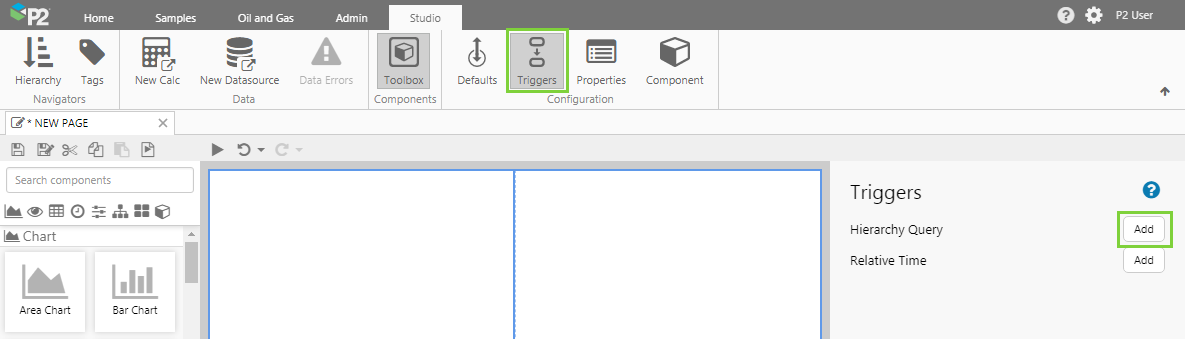
1. Click the Triggers ![]() button in the Configuration group on the Studio ribbon tab.
button in the Configuration group on the Studio ribbon tab.
The Triggers panel opens so that you can add, edit or view the page's hierarchy queries.
2. Click the Add button next to Hierarchy Query.
Step 4. Configure the Hierarchy Query
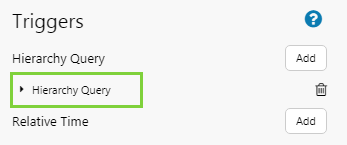
- Click Hierarchy Query to expand the trigger.

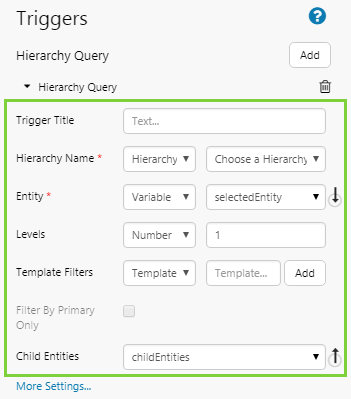
We are interested in two settings: the Trigger Title and the Hierarchy Name.
| Trigger Title | Corporate Hierarchy Trigger | Allows us to easily identify the trigger if we add multiple triggers to a page. |
| Hierarchy Name | P2 Corporate | Specifies the hierarchy that we are interested in. Choose this from the drop-down list. You could also set a variable to allow the user to select the hierarchy. |
For the rest of the settings, we will make use of the default values:
- Entity: Use the selectedEntity variable here. This is the variable that identifies the entity that the user selects when clicking on a page component. When the page opens, New South Wales will be shown initially, because we specified that in the Default Values panel.
- Levels: The default level of 1 means that the returned child entities will be the immediate children of the selected entity.
- Child Entities: This variable stores the child entities generated by the hierarchy query trigger, and is to be used in page components.
Step 5. Add and Configure a Hierarchy
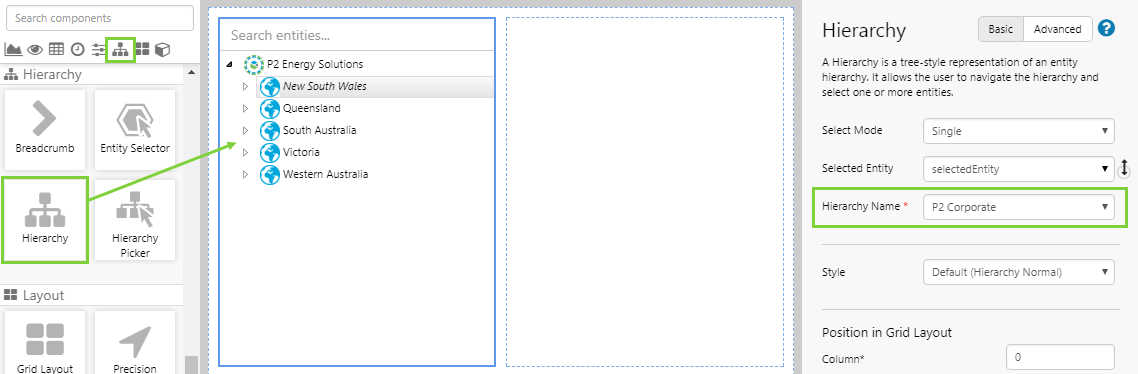
In this step we'll add a hierarchy so that the user has a way of selecting the entity (selectedEntity). Drag and drop a Hierarchy onto the page, and configure it as follows:
Hierarchy Name: Select P2 Corporate from the drop-down list.
Notice how the default value for Selected Entity is selectedEntity. This is used for updating the selectedEntity variable.
Step 6. Add and Configure a Selection List
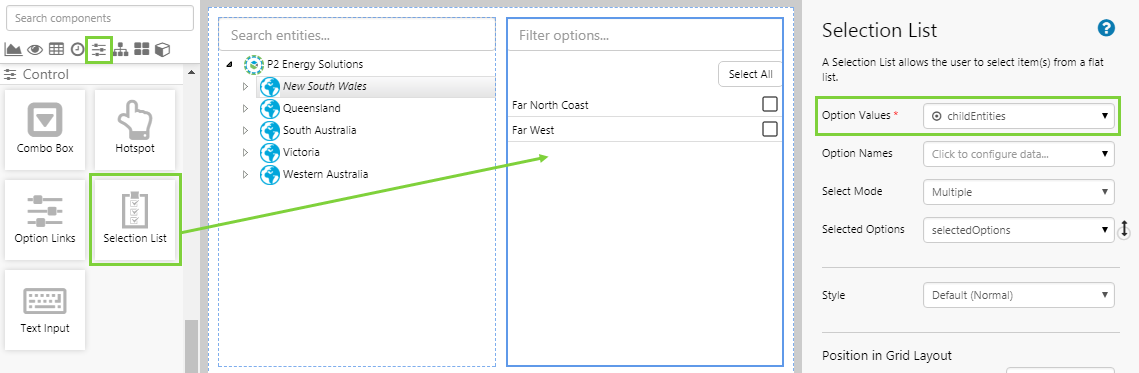
Drag and drop a Selection list onto the page. The selection list is for displaying the selected entity's children (childEntities).
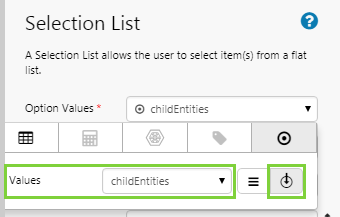
In the Option Values data selector, click the variable ![]() icon and type childEntities as the value. The childEntities variable contains the child entities from the hierarchy query.
icon and type childEntities as the value. The childEntities variable contains the child entities from the hierarchy query.
Step 7. Preview the Page
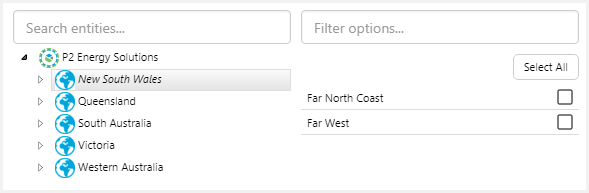
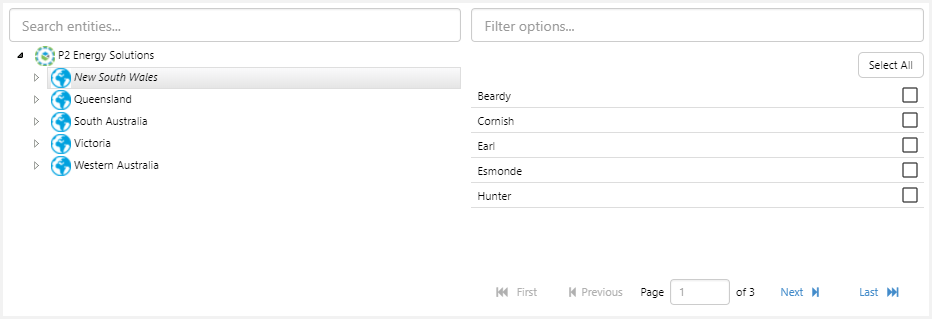
You now have a functioning hierarchy query, whose Entity is updated by the user's selection on the Hierarchy component, and whose Child Entities are displayed in the Selection List.
To try out the new functionality:
- Click the Preview
 button on the Studio toolbar to see what your page will look like in display mode.
 - Notice how the child entities of the default selectedEntity, New South Wales appear in the selection list.
- Select a different entity from the hierarchy, to see how its child entities are displayed in the selection list.
- Notice that child entities match the child entities in the hierarchy component.
Tutorial 2: Levels and Templates
Now we're going to change the hierarchy query to go down more than one level, and add template filters. Both of these changes will modify the query results (the child entities that are generated by the hierarchy query).
Step 1. Change the Levels
Click the Preview ![]() button again, to go back into Design mode.
button again, to go back into Design mode.
Open the Hierarchy Query in the Triggers ![]() panel, and update the Levels value to 3.
panel, and update the Levels value to 3.
To try out the changed levels:
- Click the Preview button on the Studio toolbar.
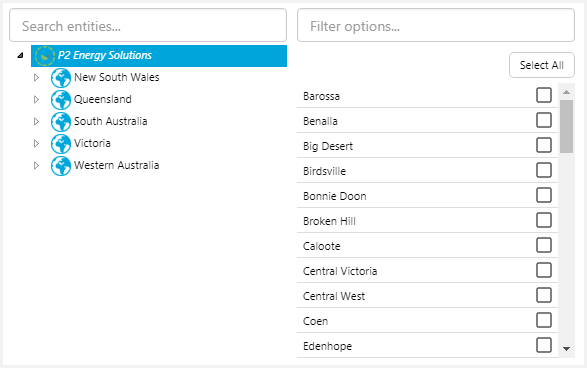
- Click the top node of the hierarchy, P2 Energy Solutions.
- Notice how the child entities (displayed in the selection list) include child entities from three levels below the selected entity.
Step 2. Add Template Filters
A template defines the attributes of an entity. For a hierarchy query, the list of child entities is restricted to those that have a primary or secondary template that is included in the list of template filters. If there are no template filters, this restriction does not apply.
- Click the Preview button again, to go back into Design mode.
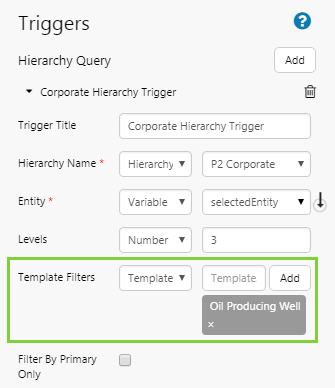
- Open the Hierarchy Query in the Triggers panel, start typing a template name (type "Oil"), and then select a template (Oil Producing Well) from the drop-down list.
The drop-down list shows the matching templates in IFS OI Server. Clicking one of these automatically adds it to the list of template filters.
To try out the new template filter:
- Click the Preview button on the Studio toolbar.
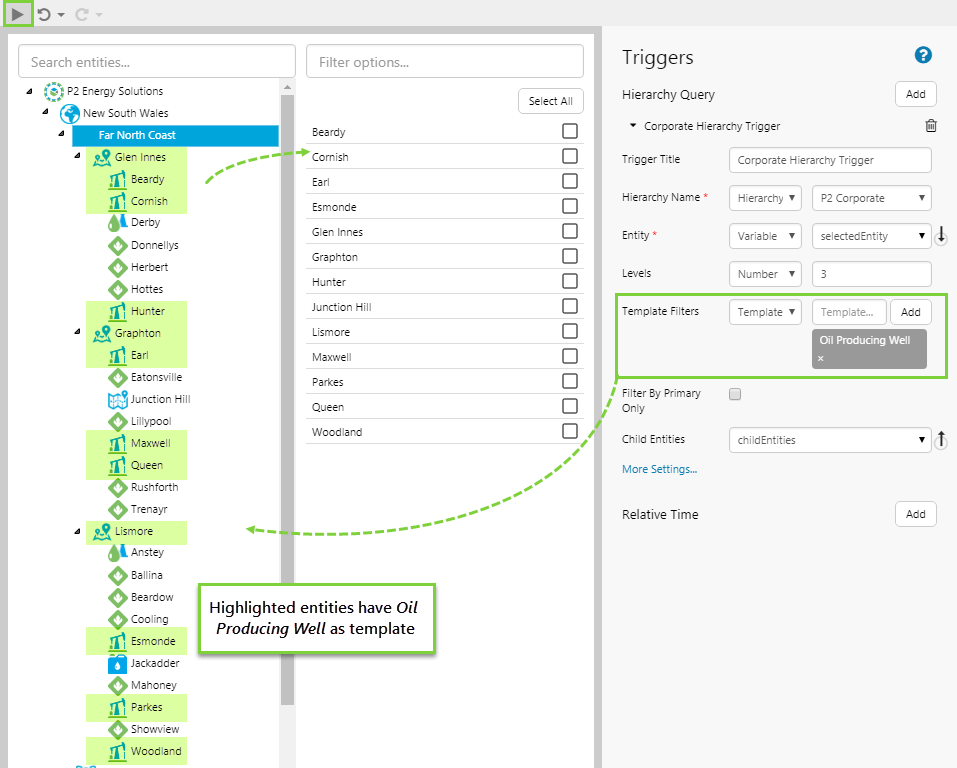
- Click the Far North Coast node of the hierarchy.
- Notice how not all of the child entities are selected; only those that have Oil Producing Well as a template (the template could be the entity's primary template or a secondary template).
Step 3. Filter By Primary Template
A primary template defines the type of an entity. In a hierarchy, the entity's icon indicates the entity type (or primary template). Sometimes, you may only want to show the entities of a certain type. This is where you use the Filter By Primary Only option in the trigger. It further restricts the child entities to only show those that have the specified template as their primary template.
- You can update the Triggers panel while still in Preview mode.
- In the Triggers panel, select the Filter By Primary Only option.
- Notice that the selection list automatically updates to show only the entities with a primary Oil Producing Well template.
In the Hierarchy, the icon next to the entity indicates what that entity's primary template is. In the example above, this icon ![]() indicates a primary Oil Producing Well template.
indicates a primary Oil Producing Well template.
Tutorial 3: Paging the Results
If you're expecting large sets of child entities from a hierarchy query, you can configure the hierarchy query so that a user can page through the resulting child entities. This is only available where the child entities are displayed in a component that supports paging, such as a Data Table or Table Layout. To do this, you need a Paging Control.
The Paging Control works by using 3 variables: Page Number, Page Size, and Total Record Count. These need to be defined in the page Default Values before they can be used on the page.
Step 1. Add Default Values for Paging
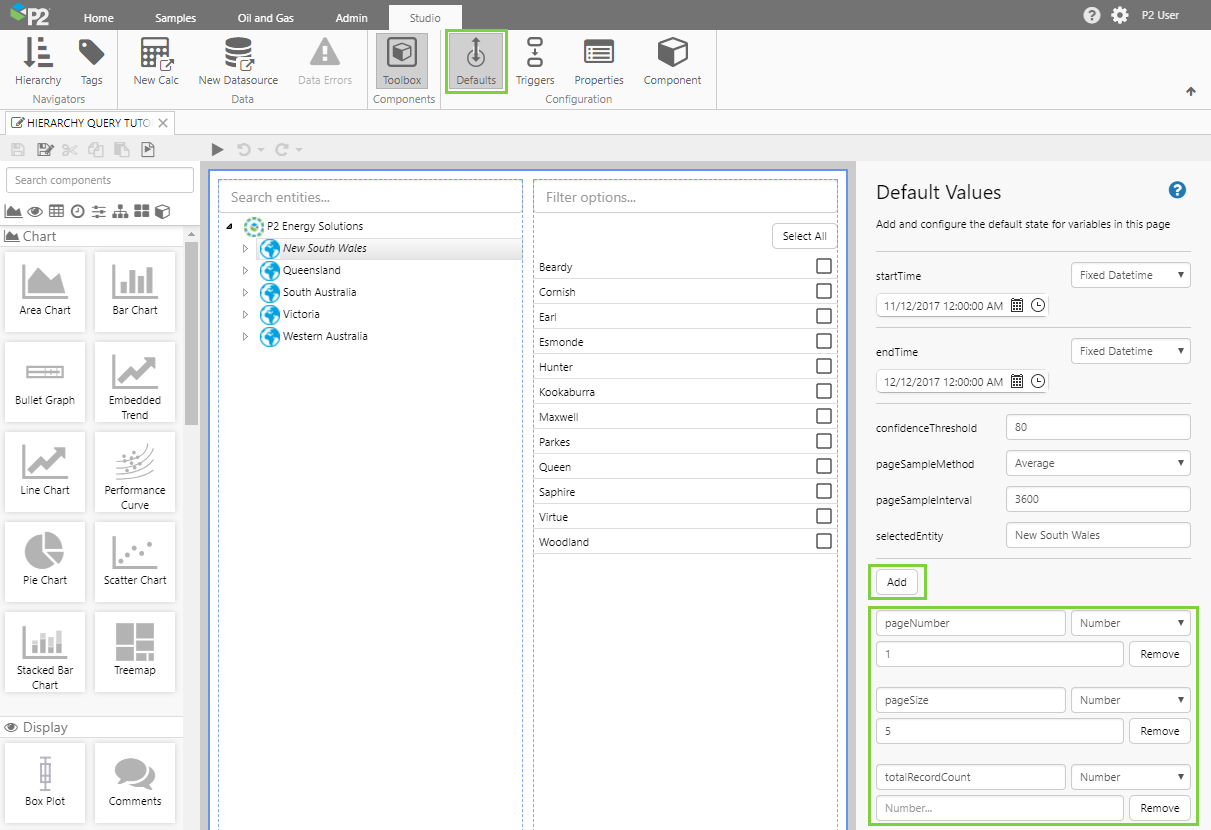
Click the Default Values button in the Studio ribbon tab, and add the following default values:
| pageNumber | Number | 1 | This represents the page of data to display when the Explorer page is loaded. |
| pageSize | Number | 5 | This is the number of items to display on each data page. |
| totalRecordCount | Number | Do not enter a value here, this is calculated automatically by the set of data and represents the number of child entities. |
Step 2. Configure the Hierarchy Query for Paging
- Open the Triggers
 panel again, expand the Corporate Hierarchy Trigger, and click More Settings.
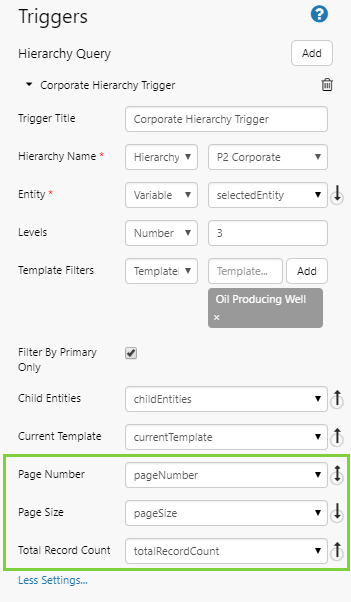
Update the paging properties as follows:
- Page Number: Select the pageNumber variable from the drop-down list.
- Page Size: Select the pageSize variable from the drop-down list.
- Total Record Count: Select the totalRecordCount variable from the drop-down list.
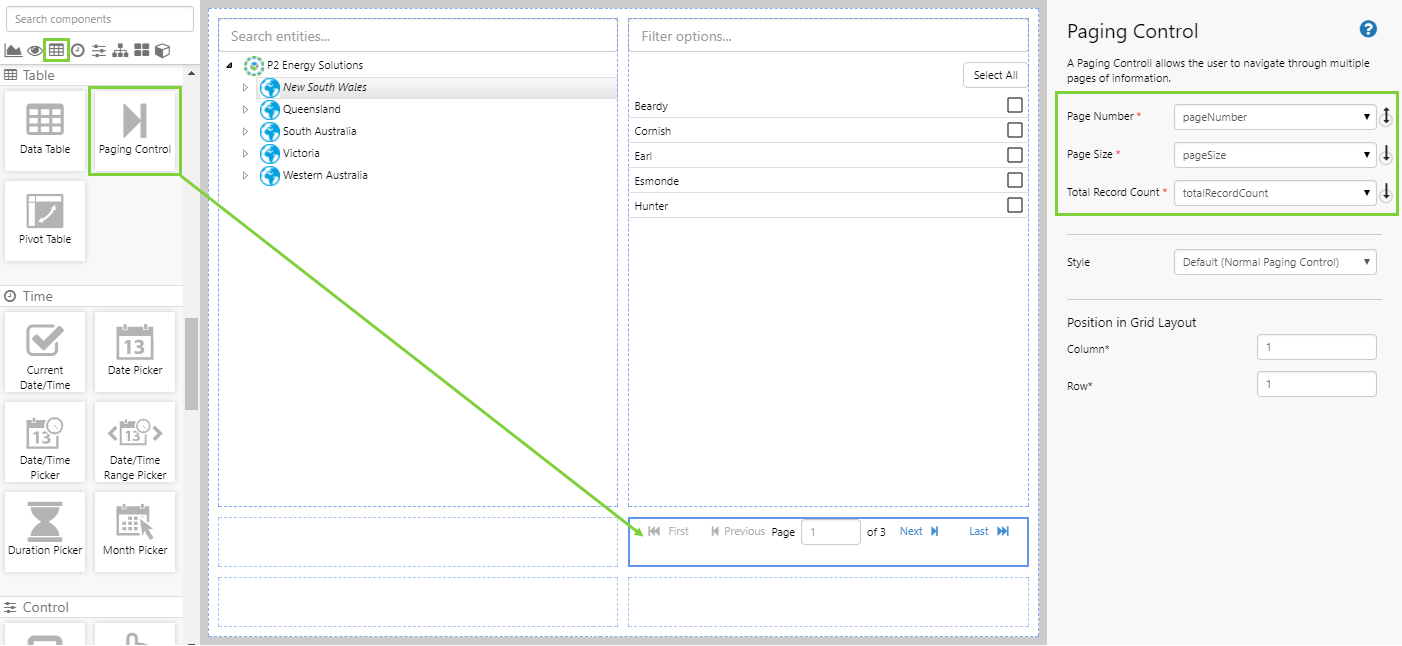
Step 3. Add and Configure the Paging Control
Click the Preview ![]() button again, to go back into Design mode.
button again, to go back into Design mode.
Drag and drop a Paging Control component onto the page (in the Table ![]() group), position it below the Selection List, and configure it as follows.
group), position it below the Selection List, and configure it as follows.
- Page Number: Select the pageNumber variable from the drop-down list.
- Page Size: Select the pageSize variable from the drop-down list.
- Total Record Count: Select the totalRecordCount variable from the drop-down list.
To try out the new paging functionality:
- Click the Preview button on the Studio toolbar to see what your page will look like in display mode.
- Click New South Wales, near the top of the hierarchy.
- Click the Next button on the Paging Control to see the next five child entities appear in the selection list.

Tutorial 4: Template Name
The More Settings section also contains the property for the selected entity's primary template . We're going to display this variable on the page.
First click the Preview ![]() button again, to go back into Design mode.
button again, to go back into Design mode.
1. Drag a Data Label onto the page.
2. Type the variable name currentTemplate into the Value property.

Click the Preview ![]() button to view the value in the new label.
button to view the value in the new label.
Notice how this value changes as you select different entities in the hierarchy.
Tutorial 5. Attributes in Table Layout
A common way of using the full power of a Hierarchy Query is in conjunction with a Table Layout. This allows users to dynamically update a table from a hierarchy that uses time series data. This scenario takes full advantage of an asset model setup, and enables you to construct powerful tables that allow you to drill down and determine the cause of a problem.
Release History
- Hierarchy Query 4.5.4 (this release)
- New configuration option Trigger Title allows you to name the hierarchy query for easier identification in the list of triggers.
- Hierarchy Query 4.5.2
- Initial release