This article applies to versions 4.6.1 and later of P2 Explorer.
Overview
There are four ways to open a Case in the Explore panel:
- Selecting a row in the Case Management tab's table
- Opening a case notification from the Notifications panel
- Updating a case variable on a page configured to open the Explore panel for a case
- Selecting a row in the Related Cases section in the Case Detail tab
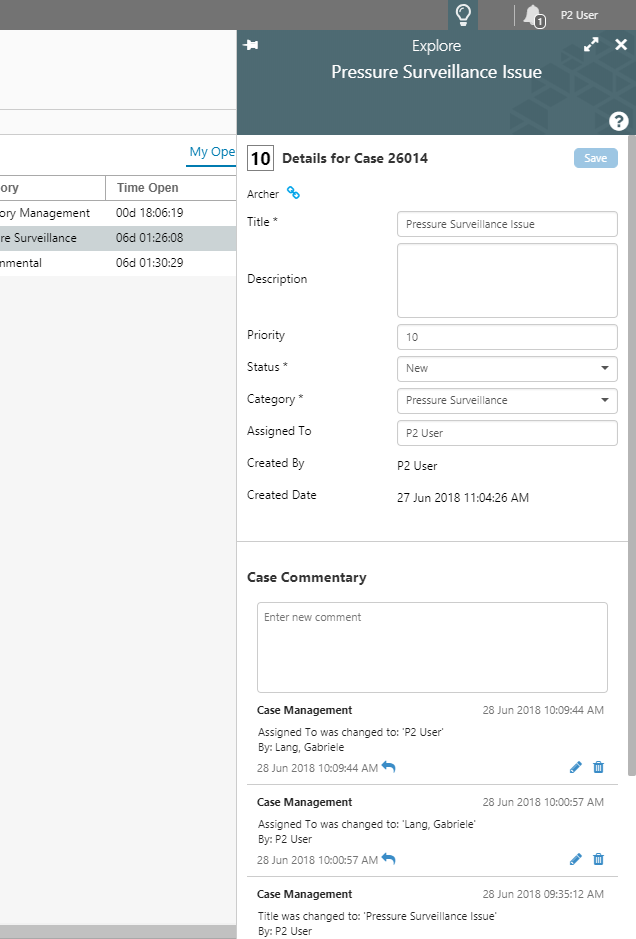
| Explore Case Details for Case 26014, opened from the Case Management tab |
From the Case Management Tab
From the Case Management tab, click on a row in the table to open the Case details in the Explore panel.
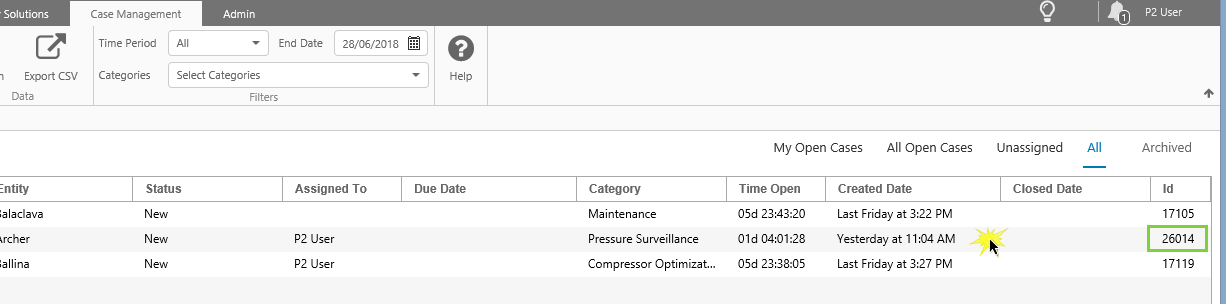
The Explore panel opens to show the case details and case commentary for the row's case id.

As you scroll through the list of cases in the case management table, using the up and down arrow keys, the case details in the Explore panel refresh to show the currently selected case in the table.
Read more: Case Overview
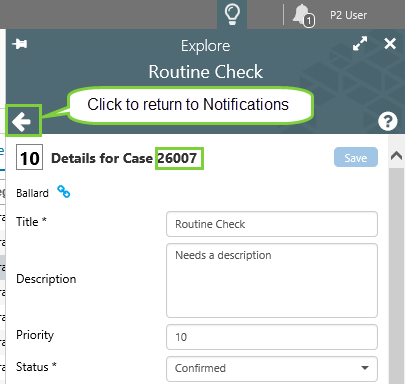
From the Notifications Panel
From the Notifications panel, click on a notification to open the Case details in the Explore panel.

The Explore panel opens to show the case details and case commentary for the case in the notification.
Note the return arrow: when you click this, you return to the Notifications panel.
Read more: Notifications
From a Specially Configured Page
When you change the Case Id variable, for example from a Text Input control, the Explore Panel opens for the case.
Note: This is not a standard feature of Explorer pages, and a page designer needs to specially configure this in Studio mode.
In this example, type a case id into a Text Input control to update a case id variable which sets a trigger to open the Explore panel.
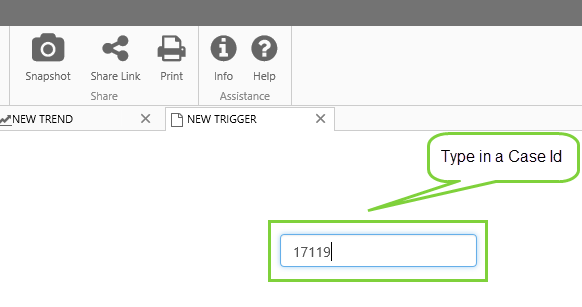
The Explore panel opens to show the case details and case commentary for the case ID.

Read more: Triggers, Explore Panel Trigger
From the Case Details Tab
From the Case Details tab, click on a row in the Related Cases section, to open the Case details in the Explore panel.
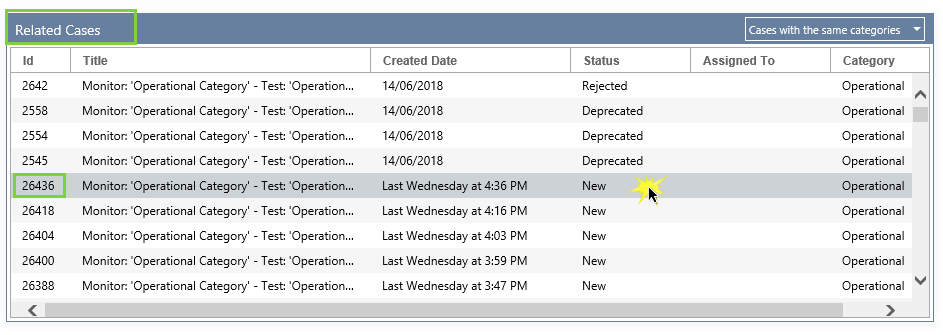
The Explore panel opens to show the case details and case commentary for the row's case ID.
Read more: Case Details
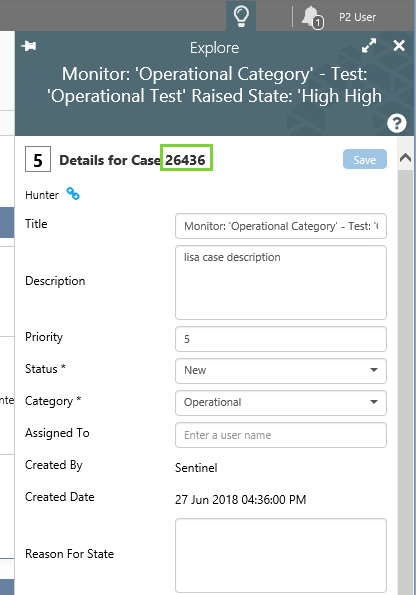
Case Details in Explore Panel
From the Case Details in the Explore panel, you can:
- View the case details and commentary
- Update the case details and commentary
- Open the case entity's Table of Contents
- Open the case in a new Case tab in Explorer
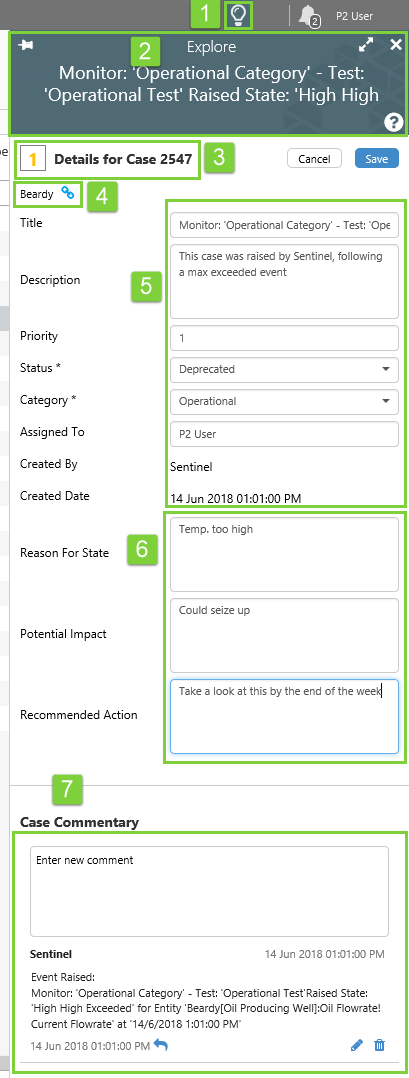 |
| 1. |
Explore icon: This icon appears when the Explore panel is open (in this case, for the selected Case). |
| |
Click the icon to open/close the Explore Panel. |
| 2. |
Case header: The header is 'Explore', with a sub-header showing the case Title. |
| |
Click the pin  to keep the panel open, otherwise it will close if you click elsewhere in Explorer (for example on a display, or on the ribbon). Click again to keep the panel open, otherwise it will close if you click elsewhere in Explorer (for example on a display, or on the ribbon). Click again  to unpin. to unpin. |
| |
Click the Expand  button to open the Case Details in a new Explorer tab. button to open the Case Details in a new Explorer tab. |
| |
Click the Close  button to close the Explore panel for this case. button to close the Explore panel for this case. |
| |
Click the Help button  to open contextual help. to open contextual help. |
| 3. |
Priority and Case ID: The case priority can have a colour, if configured in the auto-prioritisation spreadsheet. See more about this here: Managing Prioritisation of Cases. |
| 4. |
Case entity and link: Click the link  icon to open the entity's Table of Contents tab in the Explorer ribbon. icon to open the entity's Table of Contents tab in the Explorer ribbon. |
| 5. |
Case details: Most of the details here are in the Case Table, and described here: Case Table (see under Case Columns). |
| |
Addition details are Description: A description of the case that is defined in Sentinel, or typed in when a new case is created, and Created By: The user name (for manually created cases) or the Sentinel super user name (for Sentinel-raised cases). |
| |
All of the fields, (except Created By and Created Date) can be updated here. |
| 6. |
Additional details for Sentinel-raised cases |
| |
For Sentinel-raised cases, there are additional text boxes for capturing or editing the following fields: |
| |
Reason for State: A statement of the most likely reason for this state being reached. |
| |
Potential Impact:
The potential impact of this state being reached. |
| |
Recommended Action:
The recommended action for this state being reached. |
| |
In Sentinel, these fields can be captured in the State Configuration section for a state, for a particular test for a monitor. If that state is reached, these fields are included with the case that gets raised. |
| 7. |
Case Commentary |
| |
The comments here are those captured against the case, as well as system-generated auditing comments, which track updates to the case. |
| |
Examples of auditing comments: Case Raised: (details), Assigned to was changed to: (details), Category was changed to: (details). |
| |
Each comment has the user name of the person who made the comment (or 'Case Management' for audit comments, or the Sentinel super user display name for cases raised by Sentinel), the comment date and time, and the comment text. |
| |
To add a new comment, type in the comment edit box, then press Enter. Any user can reply to a comment. If you have Commentary privileges, you can edit or delete comments. |
|
Updating Case Details in the Explore Panel
Note: From version 4.6.4, you can format the text in the Description field and in comments.
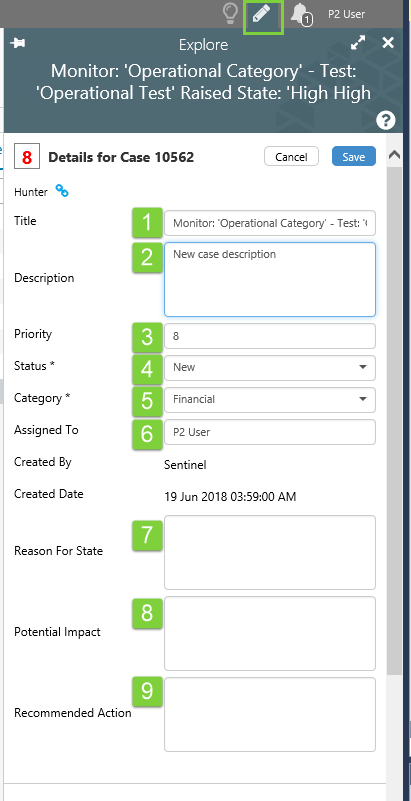
You can edit any of the following Case Detail fields in the Explore Panel:
 |
| 1. |
Title:
The case title should describe what the case is about. Sentinel-raised cases have titles configured in Sentinel, that can contain Sentinel tokens, such as the event time, the monitor name, and so on. |
| 2. |
Description:
A description of the case that is either defined in Sentinel per monitor test state (for Sentinel-raised cases), or typed in when a new case is created manually. |
| 3. |
Priority:
The case priority can be manually edited from 1 (highest priority) to 10 (lowest priority). The priority's colour cannot be manually updated. |
| |
Note that the priority might be automatically updated again, if it is eligible for auto-prioritisation. Read more about Managing Prioritisation of Cases. |
| 4. |
Status:
The status should be updated as the case progresses. For example: 'New' -> 'Investigating' -> 'Closed'. Read more about Case Statuses. |
| 5. |
Category:
Select a category from the drop-down list. Read more about Case Categories. |
| 6. |
Assigned To:
Type in a user name. Only valid user names that match your text are returned. Select from one of these. |
| |
A notification is raised for a user, when you assign a case to them. Read more about Notifications. |
| 7. |
Reason For State:
For Sentinel-raised cases only, this is statement of the most likely reason for this state being reached. |
| 8. |
Potential Impact:
For Sentinel-raised cases only, this describes the potential impact of this Sentinel state being reached. |
| 9. |
Recommended Action:
For Sentinel-raised cases only, this describes the recommended action to take. |
|
Unsaved Changes
If you are editing a case, and then open the Explore panel for another item (for example, you open a different Case in the Explore panel), you can still manage your unsaved changes. This feature is useful if you want to check on some background or get further information, before saving your changes.
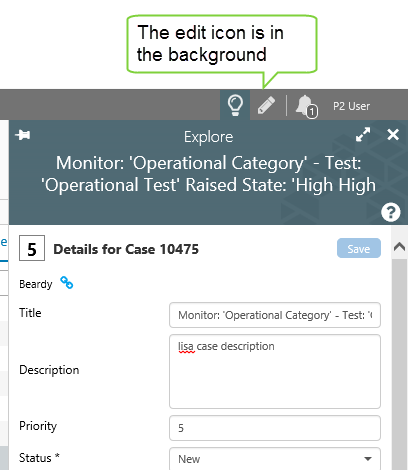 |
| The Explore panel for the currently selected Case is shown in the focused tab |
You can click on the Edit tab, to show the unsaved changes.
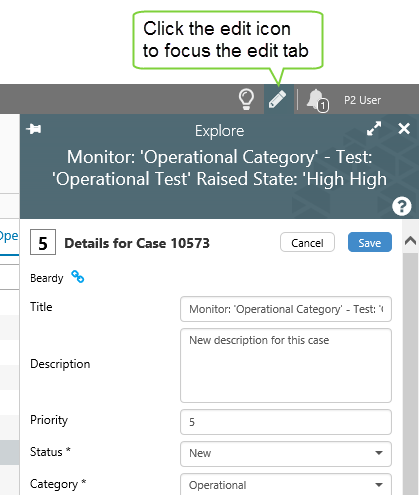 |
| The Explore panel for the currently selected Case is in the background tab, while the unsaved changes for the first case is shown in the focussed edit tab |
Click on the Explore icon to the currently selected case.
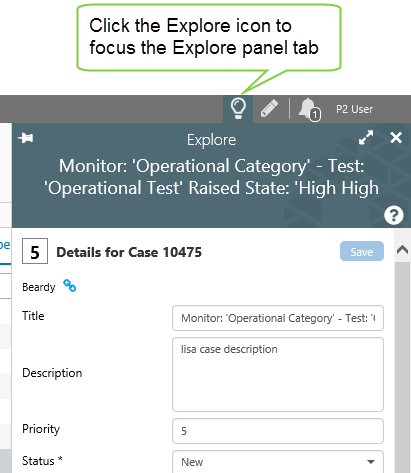 |
| Here the Explore panel for the currently selected Case is in the focussed tab, while the unsaved changes for the other Case is shown in the background edit tab |
If you click Edit while there are unsaved changes in the background, the Edit tab gets focus, and you are able to see the unsaved changes.
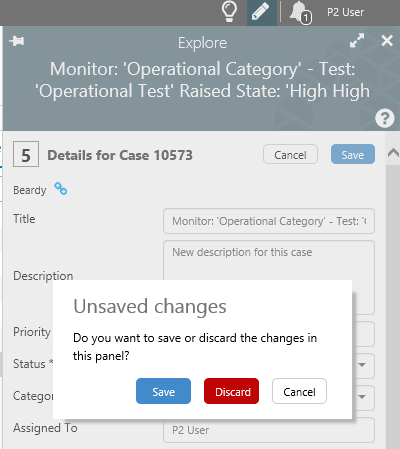
An Unsaved changes dialog box appears, and you have the following choices:
- Save
Save the unsaved changes, and the Edit tab disappears. You can now click Edit again to edit the current Case fields.
- Discard
Discard the unsaved changes, and the Edit tab disappears. You can now click Edit again to edit the current Case fields.
- Cancel
The Edit tab gets focus, with the unsaved changes.
Saving Changes
Remember that Cases are shared between users. When you save changes, this overwrites anything previously saved by another user.
Auditing
Changes are audited by the system, and displayed in the Case Commentary section of the Explore panel.
To add a new comment, type in the comment edit box, then press Enter. Any user can reply to a comment. If you have Commentary privileges, you can edit or delete comments.