ON THIS PAGE:
The P2 Explorer Ribbon is the main way to access the functionality of P2 Explorer.
The ribbon contains two main tabs (Home and Admin), along with 5 other context-sensitive tabs appearing as needed (Studio, Trend, Page, Trend Preview, and Page Preview).
Additional custom-built tabs may appear if they have been configured for an organisation. There is also a Table of Contents tab, that appears when an entity is clicked in the hierarchy navigator; this tab is named for the selected entity.
The ribbon has the following structure:

| 1. Ribbon buttons | The buttons on the ribbon provide access to P2 Explorer functionality. If a function is unavailable, its button is greyed out. |
| 2. Active tab | The highlighted tab is the one that is currently selected. |
| 3. Ribbon tabs | Functionality is grouped into different tabs on the ribbon. See the following sections for detailed information on each tab. |
| 4. Button groups | Buttons are arranged in functional groups. |
| 5. Collapse button | Clicking the small arrow collapses the ribbon so that only the display tabs are visible. To expand the ribbon again, click one of the tabs. |
Home Tab
The Home tab provides access to the high-level functions in P2 Explorer.
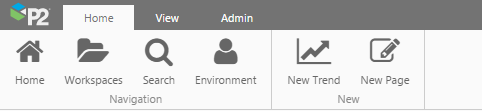
| Home | Opens the home page in a tab inside P2 Explorer. A designated page can be configured as the Home page for a user group, by an administrator. | |
| Workspaces | Opens the list of workspaces and a pop-out panel of the Pages (and Trends, in a separate tab) to which you have access. | |
| Search | Opens a Search Page in a new display tab, where you can search for pages, trends, and tags. | |
| Environment | Opens the My Environment page, where you can see all your private pages and trends, as well as pages and trends pending approval, and snapshots. | |
| New Trend | Opens a new, blank trend. From here, you can add tags or attributes, and change the default sampling. Read more: Trend Interactive Tour, Creating a Trend |
|
| New Page | Opens a new page inside Explorer Studio. From here, you can start building a new page. |
Admin Tab
The Admin tab is only available to users with administrator roles, and contains various administrative functions.
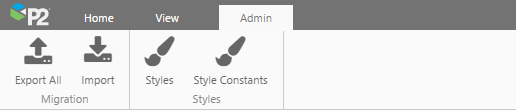
| Export All | Opens the Export all Pages and Trends dialog, from which you can Export all pages and trends from P2 Explorer into a .zip file for download. Requires the Explorer Administrator role. | |
| Import | Opens the Import Pages and Trends dialog, from which you can Import a .zip file containing pages, trends and workspaces, into P2 Explorer. Requires the Explorer Administrator role. | |
| Styles | Opens the Style Settings page, which allows you to configure styles for each component. Requires the Explorer Style Administrator role. | |
| Style Constants | Opens the Style Constants page, which allows you to set a common style property for use across multiple components. Requires the Explorer Style Administrator role. |
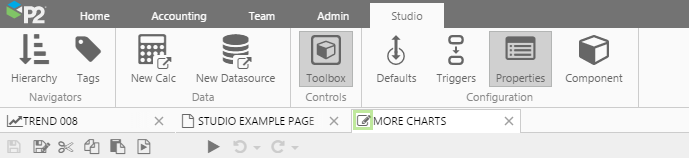
Studio Tab
The Studio ribbon tab is activated when the currently selected tab in the display area is a Page in Design Mode. ![]()
|
|
Hierarchy | Toggle button to open/close the Hierarchy Navigator. Use this to navigate to entities, whose attributes you can drag onto a Studio page or into a component's properties. You can also open an entity's Point Detail page from here. |
|
|
Tags | Toggle button to open/close the Tags Navigator. Use this to search or navigate to tags that you can drag onto a Studio page or into a component's properties. You can also open a tag's Point Detail page from here. |
|
|
New Calc | Open Server Management to create calculations. If you require access to Server Management, but don't have the relevant permissions, contact your administrator. |
|
|
New Datasource | Open Server Management to create datasources. If you require access to Server Management, but don't have the relevant permissions, contact your administrator. |
|
|
Toolbox | Open the component toolbox. You can choose a component here, to drag and drop onto your page. |
|
|
Defaults | Toggle button to open/close the Default Values panel. This is where can configure the page's startTime and endTime, or assign a default value to any variable on an Explorer page. You can also add new page variables here. |
|
|
Triggers | Toggle button to open/close the Triggers panel. |
|
|
Properties | Toggle button to open/close the Page Properties panel. This displays page details including a description, page dimensions, print options, and thumbnail image. |
|
|
Component | Toggle button to open/close the component editor panel. The component editor allows you to configure a component. |
To Save a page, click the save ![]() button on the Studio toolbar. Read more about Saving your Page.
button on the Studio toolbar. Read more about Saving your Page.

Trend Tab
The Trend ribbon tab is activated when the currently selected tab in the display area is a Trend. ![]()

| Reload | Reload the trend to what is was since the last Save (or to a blank trend, if you’ve just started a new trend). E.g. If you add two new tags to the trend and then click ‘Reload’, these disappear. | |
| Save | Save the trend to a workspace. | |
| Submit | Submit an unpublished trend for approval. (Available for trends in My Workspace.) | |
| Hierarchy | Open the Hierarchy Navigator. Use this to navigate to entities, whose attributes you can drag onto the trend. You can also open an entity's Point Detail page from here. | |
| Tags | Open the Tags Navigator. Use this to navigate to tags, which you can drag onto the trend. You can also open a tag's Point Detail page from here. | |
| Controls | Toggle the trend controls (date selectors, sampling, hairlines, and scaling) on and off. | |
| Range Selector | Toggle the range selector on and off. | |
| Trace Table | Toggle the trace table on and off. | |
| New Calc | Open P2 Server Management to create a new calculation. Requires permissions for P2 Server Management. | |
| Refresh | Refresh the data on the trend. (Note: To refresh current data at a steady rate, select ‘Now’ and choose a duration and a refresh rate.) | |
| Export CSV | Export the trend's data to a .csv file for downloading. | |
| Snapshot | Save the current selections of the trend as a snapshot, and allow it to be retrieved at a later date. The snapshot can be opened from the page's preview in its workspace, or from My Environment. | |
| Share Link | Share the link to the current trend through P2 Explorer. | |
| Print the currently open trend. | ||
| Properties | Open the Trend Properties panel for a summary of trend details. | |
| Help | Open the Trends landing page on the P2 Explorer Help Center. |
Trend Preview Tab
The Trend Preview ribbon tab is activated when an approver clicks the Preview ![]() button for a trend that's pending approval, from their My Environment page.
button for a trend that's pending approval, from their My Environment page.
This opens the trend in Preview mode, so that the approver can view it before approving or rejecting it.
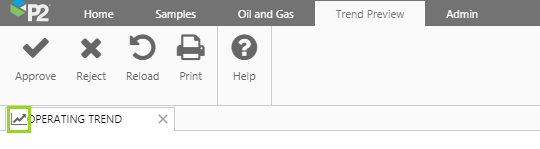
| Approve | Click to approve a trend. See Publishing. | |
| Reject | Click to reject a trend. See Publishing. | |
| Reload | Reload the trend to its state when you first opened it (with the same selections). | |
| Print the trend. | ||
| Help | Open the P2 Explorer Help Center on the Using the Page Controls landing page, in a new Explorer tab. |
Page Tab
The Page ribbon tab is activated when the currently selected tab in the display area is a Page in Display Mode. ![]()

| Reload | Reload the page to its state when you first opened it (with the same selections). | |
| Edit | Switch to Explorer Studio, so that you can edit the page. Note that you need editor permissions for this. | |
| Submit | Submit an unpublished page for approval. (Available for pages in My Workspace.) | |
| Hierarchy | Open the Hierarchy Navigator. Use this to navigate to entities, whose attributes you can drag onto an embedded trend on the page. You can also open an attribute's Point Detail page from here. | |
| Tags | Open the Tags Navigator. Use this to navigate to tags, which you can drag onto an embedded trend on the page. You can also open a tag's Point detail page from here. | |
| Refresh | Refresh the data on the page. | |
| Export CSV | Export the page's data to a .csv file for downloading. | |
| Snapshot | Save the current selections of the page as a snapshot. The snapshot can be opened from the page's preview in its workspace, or from My Environment. | |
| Share Link | Click to get the link to this page. You can copy the URL and send this to another user. | |
| Print the page. | ||
| Properties | Open the Page Properties panel for a summary of page details. | |
| Help | Open the P2 Explorer Help Center on the Using the Page Controls landing page. |
Page Preview Tab
The Page Preview ribbon tab is activated when an approver clicks the Preview ![]() button for a page that's pending approval, from their My Environment page.
button for a page that's pending approval, from their My Environment page.
This opens the page in Preview mode, so that the approver can view it before approving or rejecting it.
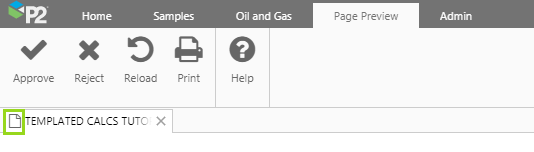
| Approve | Click to approve a page. See Publishing. | |
| Reject | Click to reject a page. See Publishing. | |
| Reload | Reload the page to its state when you first opened it (with the same selections). | |
| Print the page. | ||
| Help | Open the P2 Explorer Help Center on the Using the Page Controls landing page, in a new Explorer tab. |
Table of Contents Tab
The Table of Contents ribbon tab is activated when an entity is clicked in the Hierarchy Navigator.
If any of the entity's templates has links assigned, then these appear in its table of contents tab.

| Primary Link | This opens the page, trend or URI assigned to the primary template's primary link. | |
| Page Links | The templates' Page links | |
| Trend links | The templates' Trend links | |
| URI Links | The templates' URI links |
Release History
- Explorer Ribbon 4.5 (this release)
- Changes to the Page ribbon tab
- The View ribbon tab has been removed
- Explorer Ribbon (4.4.5)
- Changes to the Trend and Page ribbons
- Explorer Ribbon (4.4.1)